
A lot of nonprofits I talk to are doing everything by hand. Typing the same thank you email over and over. Copying a donor’s name from one spreadsheet into another.
It doesn’t have to be that way, and you don’t need a big budget or a tech background to fix it.
I’ve spent 15+ years working with nonprofits, including co-founding one myself. This guide is simple on purpose. I’ll walk you through what to automate, what to leave alone, and why, in plain English, no jargon.
Just here to save you time and make life easier so you can set mundane tasks on auto-pilot and use the free time for other things.
By the end, you’ll know exactly what to set up first, whether you’re using Charitable or something else.
Table of Contents
- Why Nonprofits Can’t Skip Automation in 2026
- The Tool I’ll Point You To (and Why)
- Donor Communications & Stewardship Automation
- Donation Processing & Receipt Automation
- Data Entry & Donor Record Automation
- Marketing & Outreach Automation
- Volunteer Management Automation
- Grant Management & Compliance Automation
- Reporting & Impact Automation
- Choosing the Right Automation Tools for Your Nonprofit
- Quick Start: Your First 3 Automations
- FAQs on Nonprofit Task Automation
Why Nonprofits Can’t Skip Automation in 2026
As part of my work, I’ve networked with and talked to well over 100 nonprofits.
Here’s what I hear most often when the subject of automating tasks comes up:
- “That’s not for us.”
- “We don’t have the resources for that.”
- “We don’t have the time.”
- “We’re stretched thin. No one can set that up or manage it.”
- “We don’t know how to do that.”
- “We don’t use a website or much tech in our work. We’re old school. We rely on notebooks and registers, and we prefer it that way.”
And then there’s the other half of the nonprofits I talk to. Some have embraced automation and had a genuinely good experience with it, handing off tasks that used to eat their whole week. Others tried and still haven’t been able to cross that barrier.
If you’re the one saying any of the above, and you haven’t crossed that barrier yet, this guide is for you.
You can run a nonprofit without a website, without much tech, without automating a single task. People have done it for decades, and plenty still do it well. But here’s what you’re leaving on the table if you don’t.
⏳ What Doing It All By Hand Really Costs You
Studies on nonprofit work say something that matches what I hear on the ground: about 1 out of every 5 hours your team spends goes to tasks that repeat themselves. Typing the same donor info into 2 different places. Digging through old spreadsheets to find the right version.
That’s close to 1 full day a week, spent doing the exact same steps every time. A computer can do those same steps just as well. It won’t get tired, and it won’t make a typo at 4pm on a Friday.
That time doesn’t come back on its own. Someone has to decide to take it back, one task at a time.
🤝 What to Automate, and What to Leave to a Person
Not everything on your plate should be automated. I’ve seen nonprofits get this wrong, and it ends with donors feeling like they’re talking to a robot at exactly the wrong moment.
Here’s a simple way to think about it. If the task touches trust, emotion, or a relationship, let a computer handle the setup, but keep a person for the last step. If it’s just moving data around or sending a reminder on a schedule, hand the whole thing over.
A thank you email after a $25 gift can go out on its own. A handwritten note after a $10,000 gift should not.
With that in mind, here’s how I’m going to help you actually get this done.
The Tool I’ll Point You To (and Why)
I’m not going to just tell you what to automate and leave you to figure out the rest. For most of what’s in this guide, I’m going to name the tool and show you how to set it up.
For most of it, that tool is going to be Charitable. Not because it’s the only option out there, but because it covers almost everything on this list in one place: online fundraising, donation records, donor management, a donor portal, recurring donations, anonymous donations, email receipts, and auto-generated reports. That’s one plugin and one dashboard, instead of stitching together 5 different tools to do the same job.
It’s built to be affordable, and you don’t need a tech background or any code. Install it, and you can set most of this up yourself. We keep adding new features and making it easier to use, so what you set up today keeps getting better without you having to redo it.
You can start with start with Charitable Lite, which is free and covers the basics: taking donations, sending receipts, and basic reports. When you’re ready for the deeper automation in this guide, recurring donations, Fee Relief, and the full automation suite (Smart Workflows, Zapier, Webhooks, Zoho Flow, and Automate.io), that’s what the Pro plans are for.
Every paid plan comes with a 14-day money-back guarantee, no questions asked, so there’s no real risk in trying the tier that fits where you’re at. You can browse everything it does on the features page before you decide.
Charitable is going to come up a lot in what’s below. I’ll also point out other tools along the way, especially free ones, for the pieces Charitable doesn’t cover, like volunteers and grants.
From here, I’ll go task by task: what the task is, why it’s worth automating, and exactly how to set it up, including which Charitable feature does it, or which outside tool to use instead.
- ✅ 14-day money-back guarantee
- ✅ Transparent pricing
- ✅ Code-free setup
Would you rather watch video tutorials than read?
Head over to our YouTube playlist on automation:
Donor Communications & Stewardship Automation
This is where automation helps the most, and the fastest. A gift comes in. A donor hits their 1 year mark. A name shows up on a list because they haven’t given in a while. Set it up once, and the right message goes out every time, without anyone thinking about it again.
💌 Welcome & First-Gift Thank-You Sequences
The first message a new donor gets matters a lot. It shouldn’t depend on who happens to be checking email that day.
If you use Charitable, every gift already sends an automatic receipt the moment it comes in. That’s on by default, but it’s worth checking your setup.
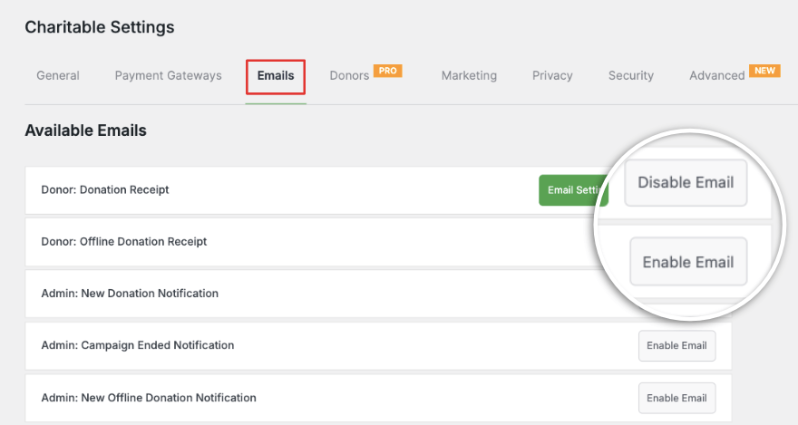
- Go to Charitable » Settings » Emails. “Donation Receipt” is enabled by default. Click on the Email Settings button to customize the subject line and headline.
- Go to Charitable » Settings » Advanced » PDF Receipts if you want the receipt attached as a PDF, add your logo, or adjust which donor details show up on it.
- To layer a welcome series on top, install Newsletter Connect and go to Charitable » Settings » Extensions to connect Mailchimp or another email tool. New donors can drop straight into a short welcome sequence there.
Here’s the full walkthrough on setting up automated receipts, and the documentation on PDF receipts covers every setting in detail.
🎉 Recurring & Anniversary Donor Recognition
Monthly donors usually only get a receipt, and that’s a missed chance. Set up one email that goes out on their giving anniversary, something as simple as “thank you for a year of support.” It takes a few minutes to set up, and it runs for as long as they keep giving.
This works alongside recurring donations, I’ll walk through exactly how to turn that on in the next section. Once it’s running, add the anniversary email through your email tool the same way you set up the welcome series above. If you’re not sure recurring giving is worth setting up yet, this breakdown can help you decide.
📬 Lapsed Donor Win-Back Sequences
A donor who hasn’t given in a year or so isn’t gone. But they need a different message than someone giving for the first time. Here’s how to find them and set up the email:
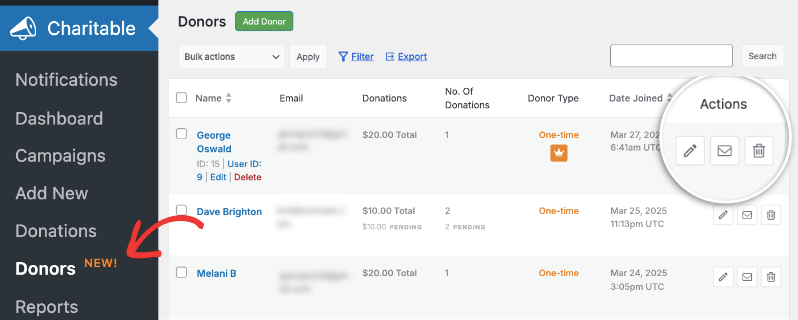
- Go to Charitable Pro » Donors. Every donor here shows their total giving, how often they give, and their last gift date.
- Click Filter and set a date range that excludes anyone who’s given recently, so you’re left with donors who haven’t given in, say, 12 months.
- Select those donors and click Export to pull them into a CSV, or add them to a specific list in your connected email tool.
- Write one re-engagement email in your email tool and send it to that list. Repeat the same filter every month or quarter to catch newly lapsed donors.
This documentation covers every filter and field available on the Donors screen.
🧾 Automated Tax Receipts & Acknowledgment Letters
Tax receipts are the easiest thing on this whole list to automate. The format barely changes, everyone expects one right away, and there’s nothing personal lost by handing it off.
Charitable sends the receipt for every single gift on its own, that’s the setup covered above.
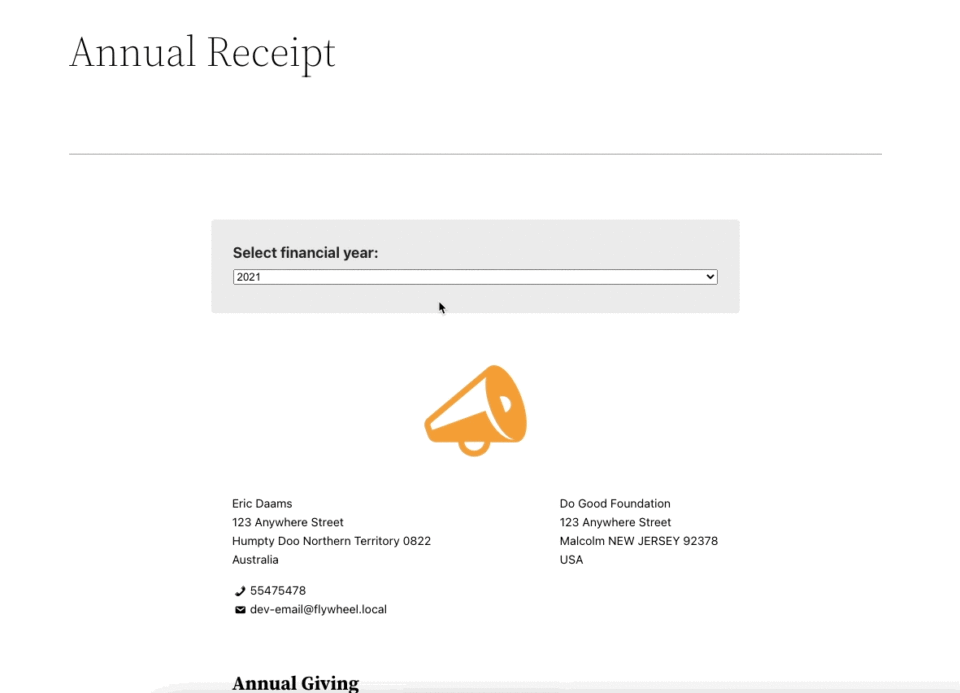
For the year-end statement, here’s how to set up Annual Receipts:
- Go to Pages » Add New and insert the Annual Receipt block from the Charitable block category. Customize your logo, contact details, and header and footer text, then publish it.
- Go to Charitable » Settings » General and select that page under “Annual Receipt Page.”
- Go to Charitable » Settings » Extensions, find the Annual Receipts section, and set the day and month that match your organization’s financial year end.
Once that’s set, you can send the giving statement to every donor at once instead of building them one by one in December. If you want something more specific than the default template, Custom Receipts lets you pick a receipt mode (Default, Redirect, or Custom) per campaign in the campaign builder’s Settings » Receipt tab, then design it in the block editor. No code involved either way.
Here’s the full Annual Receipts setup guide, and here’s the Custom Receipts guide if you want to design your own.
That receipt email matters more than most teams think. It’s usually the email a donor opens more than any other you send them, so it’s worth taking a few minutes to get it right.
That covers what your donors see. Now let’s look at what happens behind the scenes, once the gift actually comes in.
Donation Processing & Receipt Automation
Once someone submits a gift, there used to be a list of things a staff member had to check by hand. Did it go through? Did the fee get covered? Did it show up in the right report? Most of that now runs on its own.
🔁 Recurring Donation Management
Monthly gifts are about as close to steady income as a nonprofit gets. But that’s only true if the billing, the retries, and the receipts all run without anyone stepping in.
Here’s how to turn on recurring donations for a campaign:
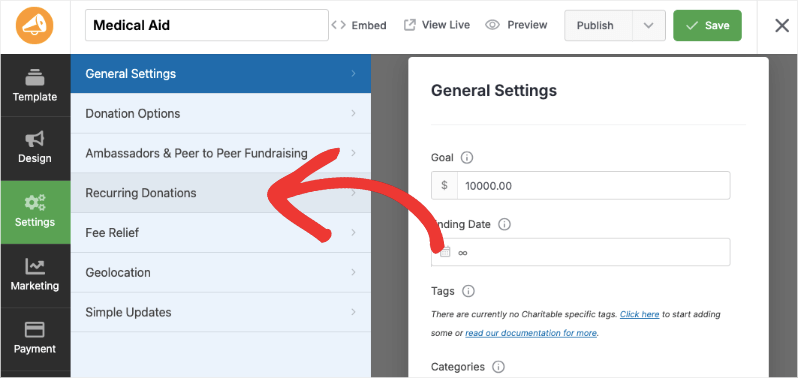
- In your WordPress admin, go to Charitable » Campaigns and open the campaign you want to edit, or start a new one.
- In the campaign builder, go to Settings » Recurring Donations and click Install and Activate if you haven’t added the addon yet, then save and reload the campaign.
- Go back to Settings » Donation Options, scroll to the Recurring Donations section, and toggle it on.
- Choose Simple mode for a single “make this recurring” checkbox, or Advanced mode to set your own suggested amounts, donation periods, and which frequencies donors can pick from.
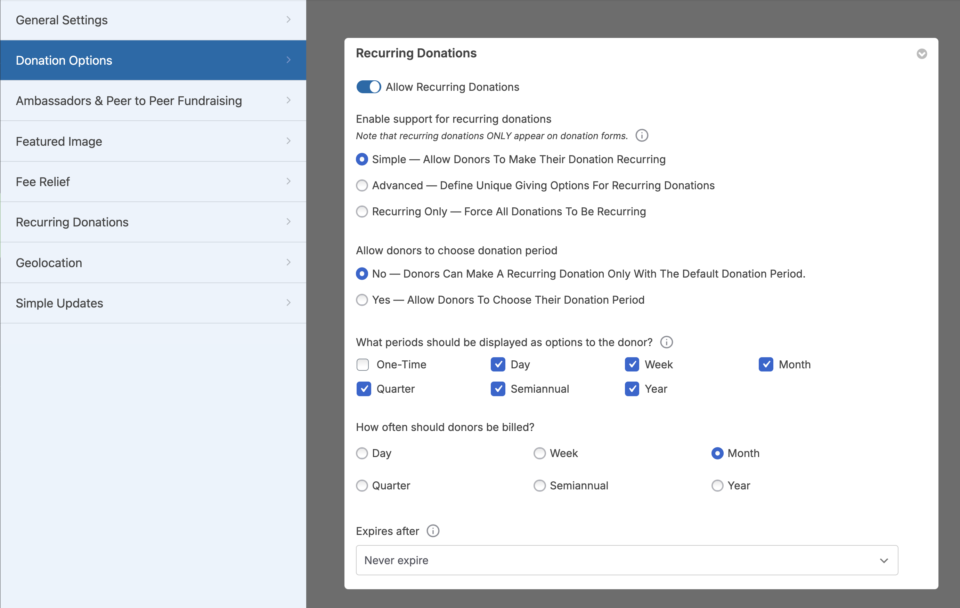
You can turn this on for specific campaigns only, or set a campaign to accept recurring donations exclusively. Once it’s on, the billing, retries, and receipts all run without you touching anything. If a donor wants to change their amount or how often they give, they can do that themselves from their own dashboard.
Here’s the full setup guide if you want to see every option in detail.
🧮 Fee Tracking & Reconciliation
Payment fees quietly take a bite out of every gift. Most teams don’t realize how much until they add it all up at the end of the year.
Here’s how to turn on Fee Relief, which lets donors choose to cover that fee themselves at checkout:
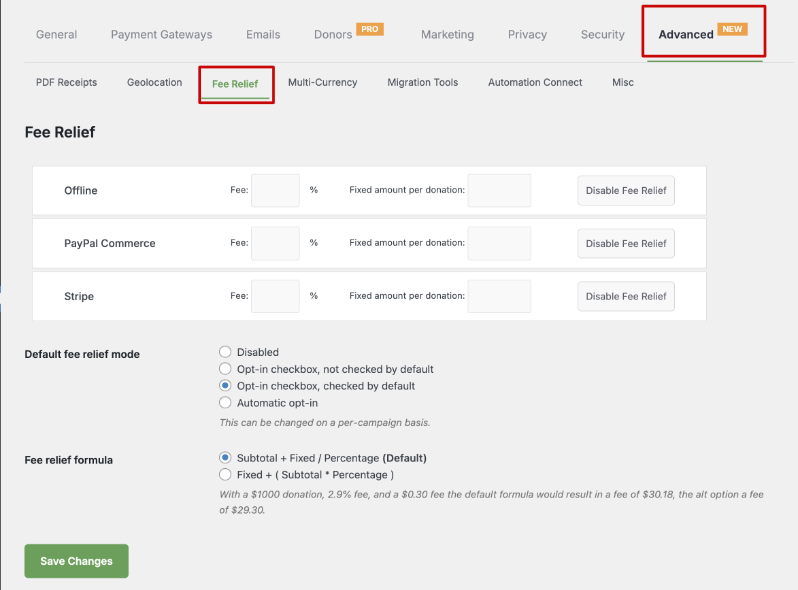
- Install the Fee Relief addon from Charitable » Addons, or upload it from your account’s Downloads tab through Plugins » Add New » Upload Plugin.
- Go to Charitable » Settings » Advanced » Fee Relief and enter the fee percentage and fixed amount for each payment gateway you use.
- Choose a Fee Relief Mode: an opt-in checkbox that’s unchecked by default, one that’s checked by default, or automatic opt-in for every donor.
You can also set this per campaign, in that campaign’s builder under Settings » Fee Relief. Once it’s on, gateway fee tracking keeps a record of exactly what each gift cost to process, so instead of rebuilding a spreadsheet every month, you just pull a report.
Here’s the full Fee Relief setup guide.
🛒 Abandoned Donation Recovery
If someone starts filling out a donation form and leaves before hitting submit, that’s not a lost gift. That’s a follow-up waiting to happen.
Here’s how to turn on Donation Recovery:
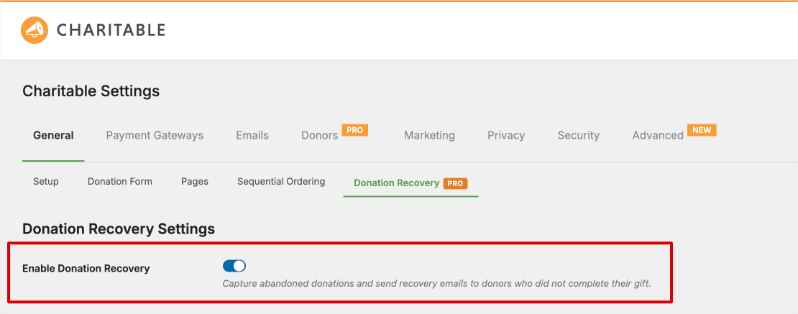
- Go to Charitable » Settings » General » Donation Recovery.
- Check the box for Enable Donation Recovery.
- Under Campaign Recovery Scope, pick which campaigns should track abandoned forms. None are included by default, so you do need to select them.
- Save your settings. You can also adjust how long before a session counts as abandoned, and how long records stick around, in the same screen.
Once it’s on, Donation Recovery notices when this happens on its own and can send a gentle follow-up email. Without it, that gift just disappears the second someone closes the tab. Just make sure WP-Cron is enabled on your site, the recovery emails depend on it.
Here’s the full Donation Recovery setup guide.
🏦 Syncing Donations to Your Accounting Software
Typing every gift into QuickBooks or Xero by hand is one of the most boring jobs on a bookkeeper’s plate. It’s also one of the easiest to get rid of.
Here’s how to connect Charitable to your accounting software through Zapier:
- In your WordPress admin, go to Charitable » Automation » API Keys, name the key something like “Zapier,” and click Generate Key. Copy it right away, you can’t see it again once you leave the page.
- In Zapier, search for the Charitable app and connect it using your site’s URL and the API key you just copied.
- Choose a trigger, like “New Donation” or “Donation Completed,” and optionally limit it to a specific campaign.
- For the action step, pick QuickBooks or Xero and map the donor and donation fields to the right place.
- Make a test donation on your site to confirm it comes through, then publish the Zap.
Once it’s connected, every new gift shows up in your books on its own. Nobody has to type it in. Here’s the full Zapier setup guide.
Data Entry & Donor Record Automation
Data entry is work nobody notices, until a report comes back wrong. Then everyone notices.
Nobody plans for “fix the numbers before the board meeting.” But it happens every single quarter at organizations still moving donor data by hand.
🔄 CRM & Spreadsheet Syncing
If your donor data lives in more than one place, and for most nonprofits it does, someone on your team is keeping those places in sync by hand. That job goes away once you connect them.
Here’s how to set up Automation Connect, Charitable’s own no-code way to send data anywhere:
- Install the Automation Connect extension from your account’s Downloads tab, through Plugins » Add New » Upload Plugin.
- Go to Charitable » Settings » Advanced and click Add Webhook Subscription.
- Give it a name, paste in the delivery URL from your CRM or spreadsheet tool (most tools that accept webhooks give you one), and choose the triggering event.
- Save it. New donation and donor data now pushes to that tool automatically, without you ever leaving WordPress.
Here’s the full Automation Connect setup guide, including how to connect it through Zapier instead if you’d rather use that.
🏷️ Donor Segmentation Rules
Sorting donors by hand, by how often they give, how much, or which campaign they care about, works fine for a few dozen names. It stops working somewhere around a few hundred.
Go to Charitable Pro » Donors and click Filter. You can narrow the list by date range, campaign, giving frequency, or search term, then check the donors you want and click Export to pull that exact segment into a CSV.

The list updates on its own as new gifts come in, so you’re not re-sorting everything by hand before every campaign, you’re just re-running the same filter. Here’s the full guide to the Donors screen.
📇 Offline Donation Entry
Checks, cash at events, bank transfers. These still make up a real share of giving for most nonprofits, and they shouldn’t live in a separate system from everything else.
Here’s how to set up offline donations:
Go to Charitable » Settings » Payment Gateways and enable Offline Donations.
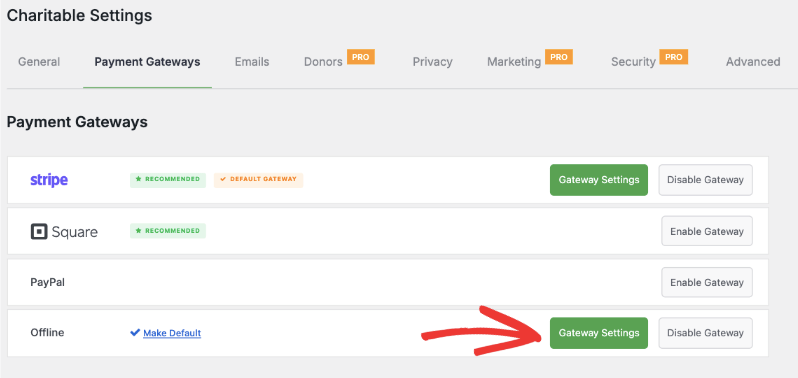
Click Gateway Settings for Offline Donations and add your own instructions, who checks should be made payable to, your mailing address, or your bank transfer details.
When a check or cash gift comes in, go to Charitable » Donations » Add Donation, select the campaign and amount, and attach it to a new or existing donor. You can send a receipt from the same screen.

That gift gets logged into the same donor record as online gifts, so your reports never have to pull from 2 separate places.
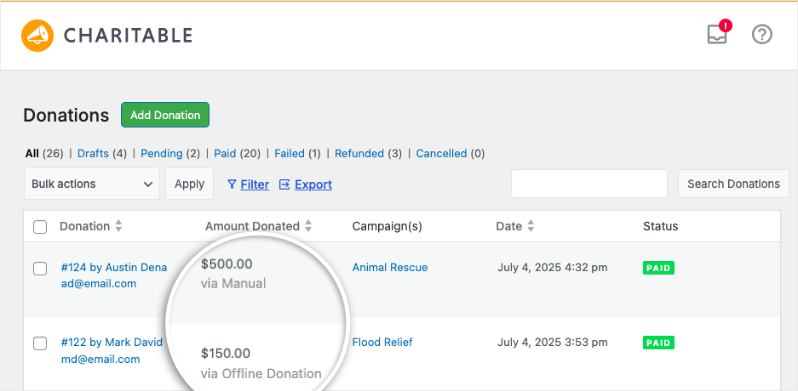
This walkthrough and the full documentation cover every setting.
🧹 Data Hygiene & Duplicate Cleanup
Duplicate donor records happen when the same person gives through 2 different forms, or when you move over from an old system and nobody merges the matching names.
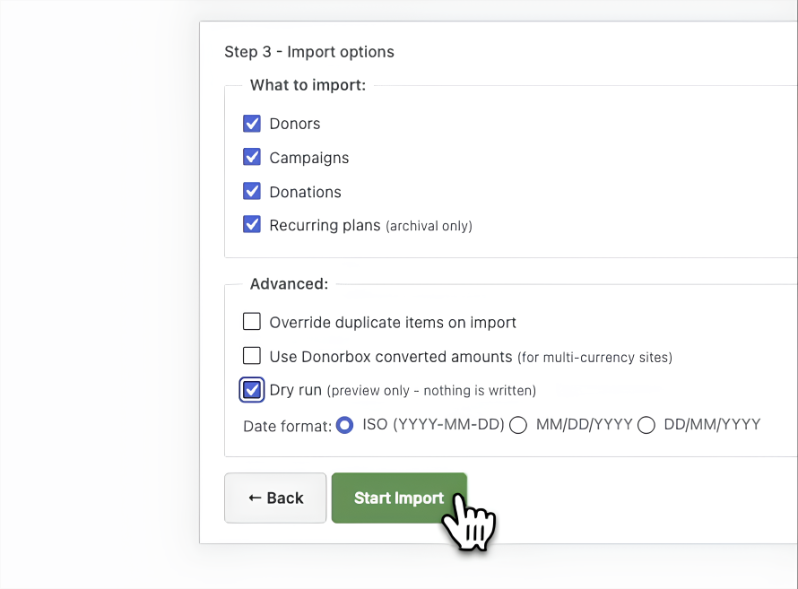
When you import a donor list from your spreadsheet or from another platform, Charitable’s CSV import tool automatically spots duplicates and merges them.
Marketing & Outreach Automation
This is where I see the biggest gap. Marketing automation can do a lot, but most small nonprofit teams aren’t using much of it yet.
It’s not about money. The tools below are already cheap or free at the level a small nonprofit needs. What’s usually missing is just the hour it takes to set them up.
📱 Social Media Scheduling
When you publish a new campaign or blog post, you shouldn’t need someone to remember to also post it on Facebook and Instagram.
This one doesn’t run through Charitable itself, it’s your WordPress site talking to Zapier. In Zapier, search for the WordPress app and choose “New Post” as your trigger, then add Facebook Pages and Instagram for Business as actions and connect your accounts. Every campaign page or blog post you publish then posts itself to social the moment it goes live. That’s one less thing to remember on launch day.
You can also use an app like Buffer to schedule posts ahead of time so that your social media schedule is taken care of in advance.
📨 Email Drip Campaigns
One newsletter blast treats every subscriber the same, whether they gave last week or 3 years ago. A drip sequence doesn’t do that.
Here’s how to connect to a email marketing platform like Mailchimp through the Newsletter Connect extension:
- Install and activate Newsletter Connect, then go to Charitable » Settings » Extensions and click Configure next to Mailchimp.
- Paste in your API key, which you’ll find in Mailchimp under Extras » API keys.
- Set your default list, whether the opt-in checkbox is checked or unchecked by default, and the checkbox label donors see.
- Click Sync Lists to pull in any lists you’ve created since connecting.
The same Extensions tab connects ActiveCampaign and HubSpot too. See all integrations available »
Once it’s connected, a new donor drops right into a welcome sequence, and nobody has to export a list to make it happen.
Here’s the full Newsletter Connect guide, and this walkthrough covers building the actual welcome sequence step by step.
🔔 Push Notifications & SMS Alerts
Not everyone checks email every day. A push notification sent at the right time can reach people email can’t. It appears in their browser like so:
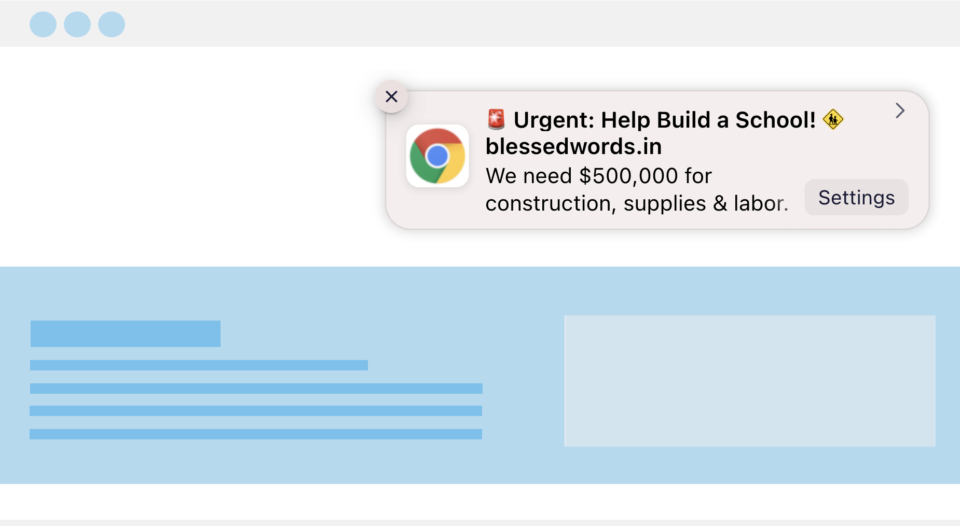
Here’s how to set up PushEngage:
- Open a campaign in the campaign builder and go to the Marketing tab, then select PushEngage and follow the prompts to install the plugin and connect your account. You can also install it directly from your account’s Downloads tab.
- Back in the campaign builder, go to Marketing » PushEngage for that specific campaign.
- Turn on the alerts you want: Donation Thank You, Goal Milestone, Campaign Launch, or Ending Soon. Each one has an editable title and message, and a Send Test button so you can see it before it goes out.
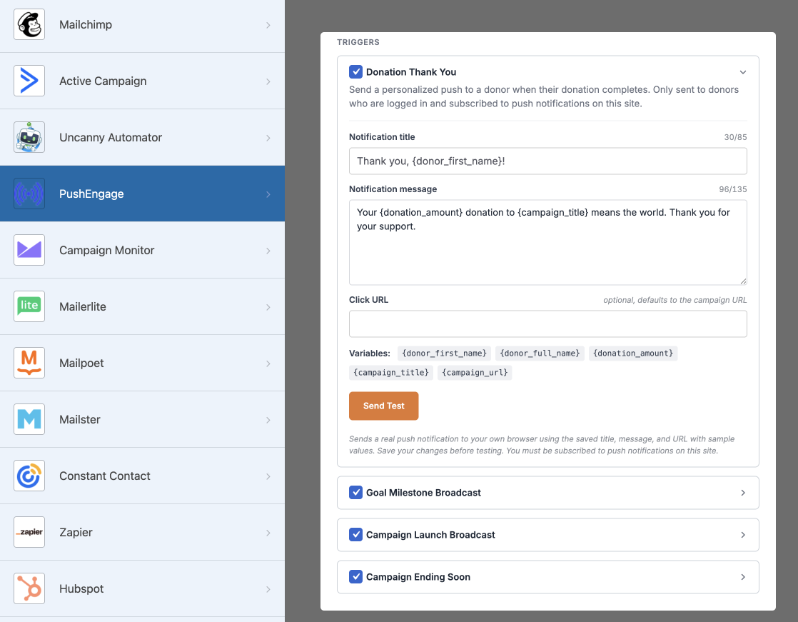
Once it’s set up, these alerts go out on their own. This template list is a quick way to see what’s worth setting up first.
🤖 AI-Assisted Content Drafting
Using AI to write a first draft of a fundraising email or a social post is one of the safest places to try it. A person still reads it before it goes anywhere near a donor.
If you’re still not sure where AI even fits into your work, start with this piece and the Ultimate Guide to AI for Nonprofits before you use it on anything donor-facing.
So far, this has all been about donors and money. But 2 of the biggest time drains I hear about from nonprofit staff have nothing to do with either one: volunteers and grant paperwork. The same idea applies to both.
Here are 10 Best AI Tools For Non-Profits To Make Fundraising Faster and Easier »
Volunteer Management Automation
Volunteer work follows the same pattern as donor communication. A shift gets filled. A reminder needs to go out. Hours need to get logged. It’s just as easy to automate, even though it usually runs through a different tool than your donation platform.
Most nonprofits use a separate tool built just for volunteers, instead of trying to force it into a fundraising platform that was never built for scheduling. The idea carries over the same, even if the software doesn’t.
🗓️ Shift Scheduling & Sign-Ups
A shift calendar where a coordinator has to manually assign every single slot only works for a small handful of volunteers.
A volunteer platform lets people claim their own open shifts from a calendar. Your coordinator is no longer the bottleneck for every sign-up. SignUpGenius is a free, simple option a lot of nonprofits already use for this. If you want more built-in tracking and reporting alongside it, VolunteerHub is worth a look.
It also fixes double-booking, which happens all the time with a shared spreadsheet. The calendar closes a slot the second someone takes it.
If you’d rather use a simple form with a powerful backend, then check out WPForms. There are premade templates for volunteer signups. It comes with conditional logic which means you can ask follow up questions based on a user’s answer. You’ll get a record of your signups, automated emails, and integrations with other tools.
⏰ Automated Reminders
A volunteer who forgets their shift usually isn’t being careless. They just didn’t get a reminder close enough to the date.
Set a reminder to go out 48 and 24 hours before, by email or text, and nobody has to remember to send it. No-shows drop, and drop a lot. Most volunteer scheduling tools handle this automatically once a shift is booked, SignUpGenius included.
That same reminder can carry the small stuff too, like where to park, where to check in, what to wear. That way your coordinator isn’t answering the same 3 texts the morning of the event.
⏱️ Hour Logging & Reporting
Volunteer hours matter for grant reports, and a paper sign-in sheet is about the slowest way there is to track them.
A digital check-in logs the hours on its own. What used to be a task someone did at the end of every month is now a report that’s just sitting there, ready, whenever you need it. Golden is built around this, with automatic hour tracking and reminders in one place.
The hours get recorded the same day, instead of someone trying to remember them 3 weeks later when a grant report is due.
🙌 Volunteer-to-Donor Conversion Nudges
Someone who volunteers for you already believes in what you do. That makes them a good candidate to also give, or to raise money on your behalf, if you just ask.
Here’s how to turn that on with Ambassadors, Charitable’s peer-to-peer fundraising tool:
- Go to Charitable » Ambassadors » General » Setup Actions » Open Setup. The wizard also opens automatically the first time you activate the addon.
- Walk through the wizard: pick individual, team, or team member fundraisers, choose whether campaigns need approval before going live, and pick which social networks supporters can share to.
- Let it create your submit-campaign and my-campaigns pages automatically, then optionally set up a starter campaign to test the flow yourself before inviting anyone.
They’ll get their own fundraiser page like this which they can share with their peers and in their network and raise funds for your cause.
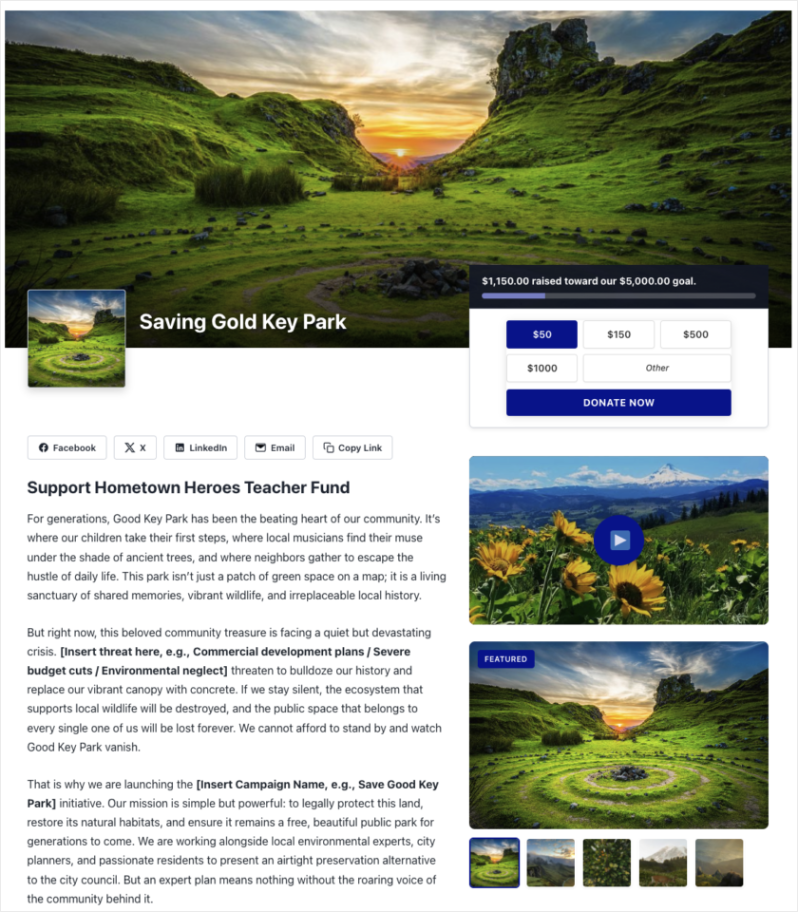
Once it’s live, a volunteer who signs up to fundraise on your behalf moves from volunteer to advocate on their own. You don’t need a separate outreach plan for it. Here’s the full setup wizard guide, and this beginner’s guide covers the strategy side.
Grant Management & Compliance Automation
Grants come with their own repeat work: deadlines, drafts, and reports that look almost the same for every funder. This is one of the fastest-growing areas in nonprofit automation right now. Worth keeping an eye on, even if it’s not where you start.
None of this runs through Charitable. Grants are their own thing. But the same rule from earlier still applies: automate the setup, keep a person on the parts that need judgment.
📅 Deadline Tracking
A missed grant deadline is one of the most avoidable losses a nonprofit can have. It usually happens because the date only lived in one person’s head, not in a shared system.
Put it on a shared calendar with reminders at 60, 30, and 7 days out, and it stops depending on any one person remembering. Instrumentl is built specifically for this, tracking every deadline for the grants you’re pursuing in one place.
✍️ Proposal Drafting Assistance
AI grant writing tools have actually gotten useful for first drafts. They pull from your past proposals and program info to give you a starting point instead of a blank page.
That draft still needs a person to go through it before it reaches a funder. Think of AI as a fast intern who’s good at research, not the person who signs off at the end. Grantable is built for exactly this, pulling from your past proposals to speed up the next one.
📂 Post-Award Compliance Tracking
Winning the grant is just the start. Every award comes with its own reporting schedule, spending rules, and paperwork.
Tools built for this read the award letter for you and turn it into a checklist with dates on it. Nobody has to reread the same PDF every time a question comes up. Submittable covers this end to end, from the application through the post-award reporting.
🏛️ Board & 990 Reporting Reminders
Annual filings and board reports have the same problem as grant deadlines. Everyone knows the date is coming, and it still sneaks up on people.
Set one reminder tied to your fiscal year, and you won’t have the “did we already miss this” panic every single year.
Pair that with the same Charitable Reports filter you re-run every quarter, more on that shortly, and most of the board packet is ready before anyone even sits down to write the memo.
Reporting & Impact Automation
Reporting is usually the last thing anyone thinks to automate, and the first thing everyone wishes they’d done once board season rolls around.
📊 Automated Donor & Fundraising Reports
Building a fundraising report by hand every month is the kind of task that quietly eats a whole afternoon.
Go to Charitable » Reports to see this by default, no setup required. It pulls straight from your live donation data, and breaks it down by payment method, campaign, and date range.
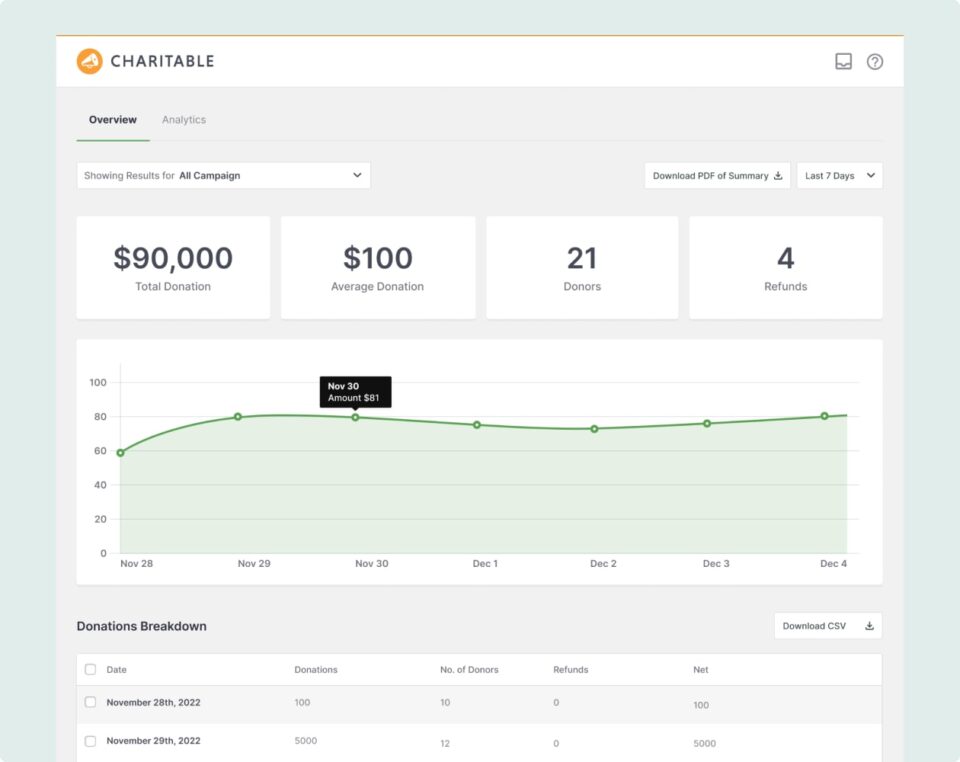
This breakdown of the reports every nonprofit needs is a good checklist if you’re not sure what to track. Donor-level reports cover the rest.
📈 Real-Time Dashboards
If you wait until the end of the month to see how a campaign did, you find out too late to change anything.
Here’s how to connect Google Analytics, which tracks donations live, including from gateways like PayPal that happen off your site:
- In Google Analytics, go to Admin » Data Streams, select your web stream, and copy the measurement ID (it starts with “G-“).
- In WordPress, go to Charitable » Settings » Advanced and paste that ID into the Google Analytics field. Save your changes.
- To also catch donations from off-site gateways like PayPal, go back to Google Analytics, create a Measurement Protocol API secret under the same Data Streams screen, and paste that into the GA4 Measurement Protocol API Secret field back in Charitable.
- Click Send Test Event to GA4 on the same settings screen to confirm it’s working.
Once it’s connected, you get a live view of what’s working, so you can shift your attention mid-campaign instead of finding out after it’s over. Here’s the full setup guide.
💬 Impact Update Emails
If donors only ever hear from you when you’re asking for money, they eventually stop opening your emails.
Set up one quarterly update through the same email tool you’re already using. It keeps the relationship from feeling like it’s only ever about money.
🗳️ Board Meeting Report Prep
Board members want a clear snapshot, not a raw data export. Putting that snapshot together by hand every quarter is exactly the kind of task worth automating.
Go to Charitable » Reports, filter by the date range and campaign your board cares about, and export it. Bookmark that filtered view, or note the settings, so you’re re-running the same report each quarter instead of rebuilding it. Pair it with the donor dashboard for the donor-level detail, and board prep turns into a 10-minute task instead of eating half a day.
That’s the last of the 8 task areas. Between Charitable and the few outside tools I named along the way, you’ve got a way to automate almost everything on this list. The last question is just which specific tool to reach for when more than one option can do the job.
Choosing the Right Automation Tools for Your Nonprofit
Once you know what you want to automate, the next question is which tool actually does it. Here’s how the main options compare, in plain terms.
🧩 No-Code Platforms
Zapier connects to more apps than anything else on this list, and it’s the easiest place to start if you’re just connecting 2 things together. It gets pricier as you use it more, so keep an eye on that as you grow.
Make is worth a look once you need something more than a single trigger and action, like a few steps with different paths depending on what happens. It connects to fewer apps than Zapier, but costs less for that kind of multi-step setup.
Uncanny Automator keeps everything inside WordPress. That’s the right choice if most of what you’re connecting already lives on your own site.
Cost matters more than most feature comparisons let on. If you’re only running 2 or 3 simple automations a month, you can probably stay on a free plan for a long time. It’s only once you’re connecting several tools together on a regular schedule that paying starts to make sense. Don’t upgrade before you actually need to.
✅ A Simple Decision Checklist
Ask yourself these before you pick one:
- If you’re just connecting 2 things once and leaving it alone, start with Automation Connect or Zapier’s free plan.
- If you need a few steps with different paths, look at Make.
- If everything you use already lives inside WordPress, Uncanny Automator keeps it all in one place.
- If you’re already on a Pro plan, check whether Webhooks, Zoho Flow, or Automate.io already does what you need, before you pay for another tool.
Quick Start: Your First 3 Automations
If all of this feels like too much at once, just start with these 3.
- Check that automatic donation receipts are turned on, so every gift gets a quick, correct thank you.
- Connect one email tool and set up a simple lapsed donor email, even just a basic 2-email sequence.
- Automate one task your team does by hand, like syncing event attendees to Google Calendar through Zapier, so nobody’s tracking RSVPs on a spreadsheet anymore.
Get those 3 running before you add anything else. Automation builds on itself, but only once the first few pieces are actually working.
FAQs on Nonprofit Task Automation
What should a nonprofit automate first?
Start with donation receipts, and anything else that happens the exact same way every time. Those save you the most time with the least risk of feeling cold to a donor.
Is automation too expensive for a small nonprofit?
Not anymore. The free versions of Zapier and Charitable Lite cover a lot of ground before you’d need to pay for anything.
Will automation make donor communication feel impersonal?
Only if you automate the wrong things. Automate the setup and the routine steps, and keep a real person for the moments that actually need one, like calling a donor after a big gift.
Do I need a developer to set up nonprofit automation?
No. Every tool in this guide, including Charitable’s own Automation Connect, is built so you can set it up yourself. No code needed.
What’s the difference between Zapier and Charitable’s Automation Connect?
Automation Connect works right inside WordPress for the common stuff. Zapier connects to a lot more outside apps, but it’s a separate tool, and it costs money once you go past its free plan.
How much staff time can automation actually save?
Nonprofits that automate their thank yous, reports, and data entry usually get several hours back a week, per person. The exact number depends on how much you’re still doing by hand right now.
Should volunteer coordinators automate too, or is this just for fundraising?
Yes, just as much. Shift reminders and hour logging follow the exact same pattern as donor communication.
How do I know if an automation is actually working?
Check it the same way you’d check anything else. Pull a report after 30 days and see if the numbers match what you’d expect. Most tools, including Charitable’s Reports, keep a log of every automated action, so you’re not just guessing.
Want more of this delivered straight to you? Download The Ultimate Fundraising Kit Now »
Charitable Has 1.2+ Million Downloads!
Trusted by millions to power successful fundraising campaigns. Try Charitable risk-free today.
✅ 14-day money-back
✅ Transparent pricing
✅ Code-free setup
Stay Connected for More Nonprofit Resources
For more tutorials and videos tailored to nonprofits, subscribe to our YouTube channel. We regularly publish expert tips, step-by-step guides on online donations, fundraising strategies, and practical resources to help your organization succeed.
🗞️ Get weekly tips and exclusive guides in your inbox
Join our newsletter →
🎥 Watch step-by-step tutorials and success stories
Subscribe to our YouTube channel →
👩🏽💻 Connect with our community and get daily nonprofit insights
Follow us on LinkedIn →
🥳 Fun reels and non-profit insights
Follow us on Instagram →
👀 Insightful & fun videos to help you grow your cause
Follow us on TikTok→
🌎 Subscribe and follow for general fundraiser tips
Get Fundraiser Tips on TikTok →
Powerful Fundraising Resources
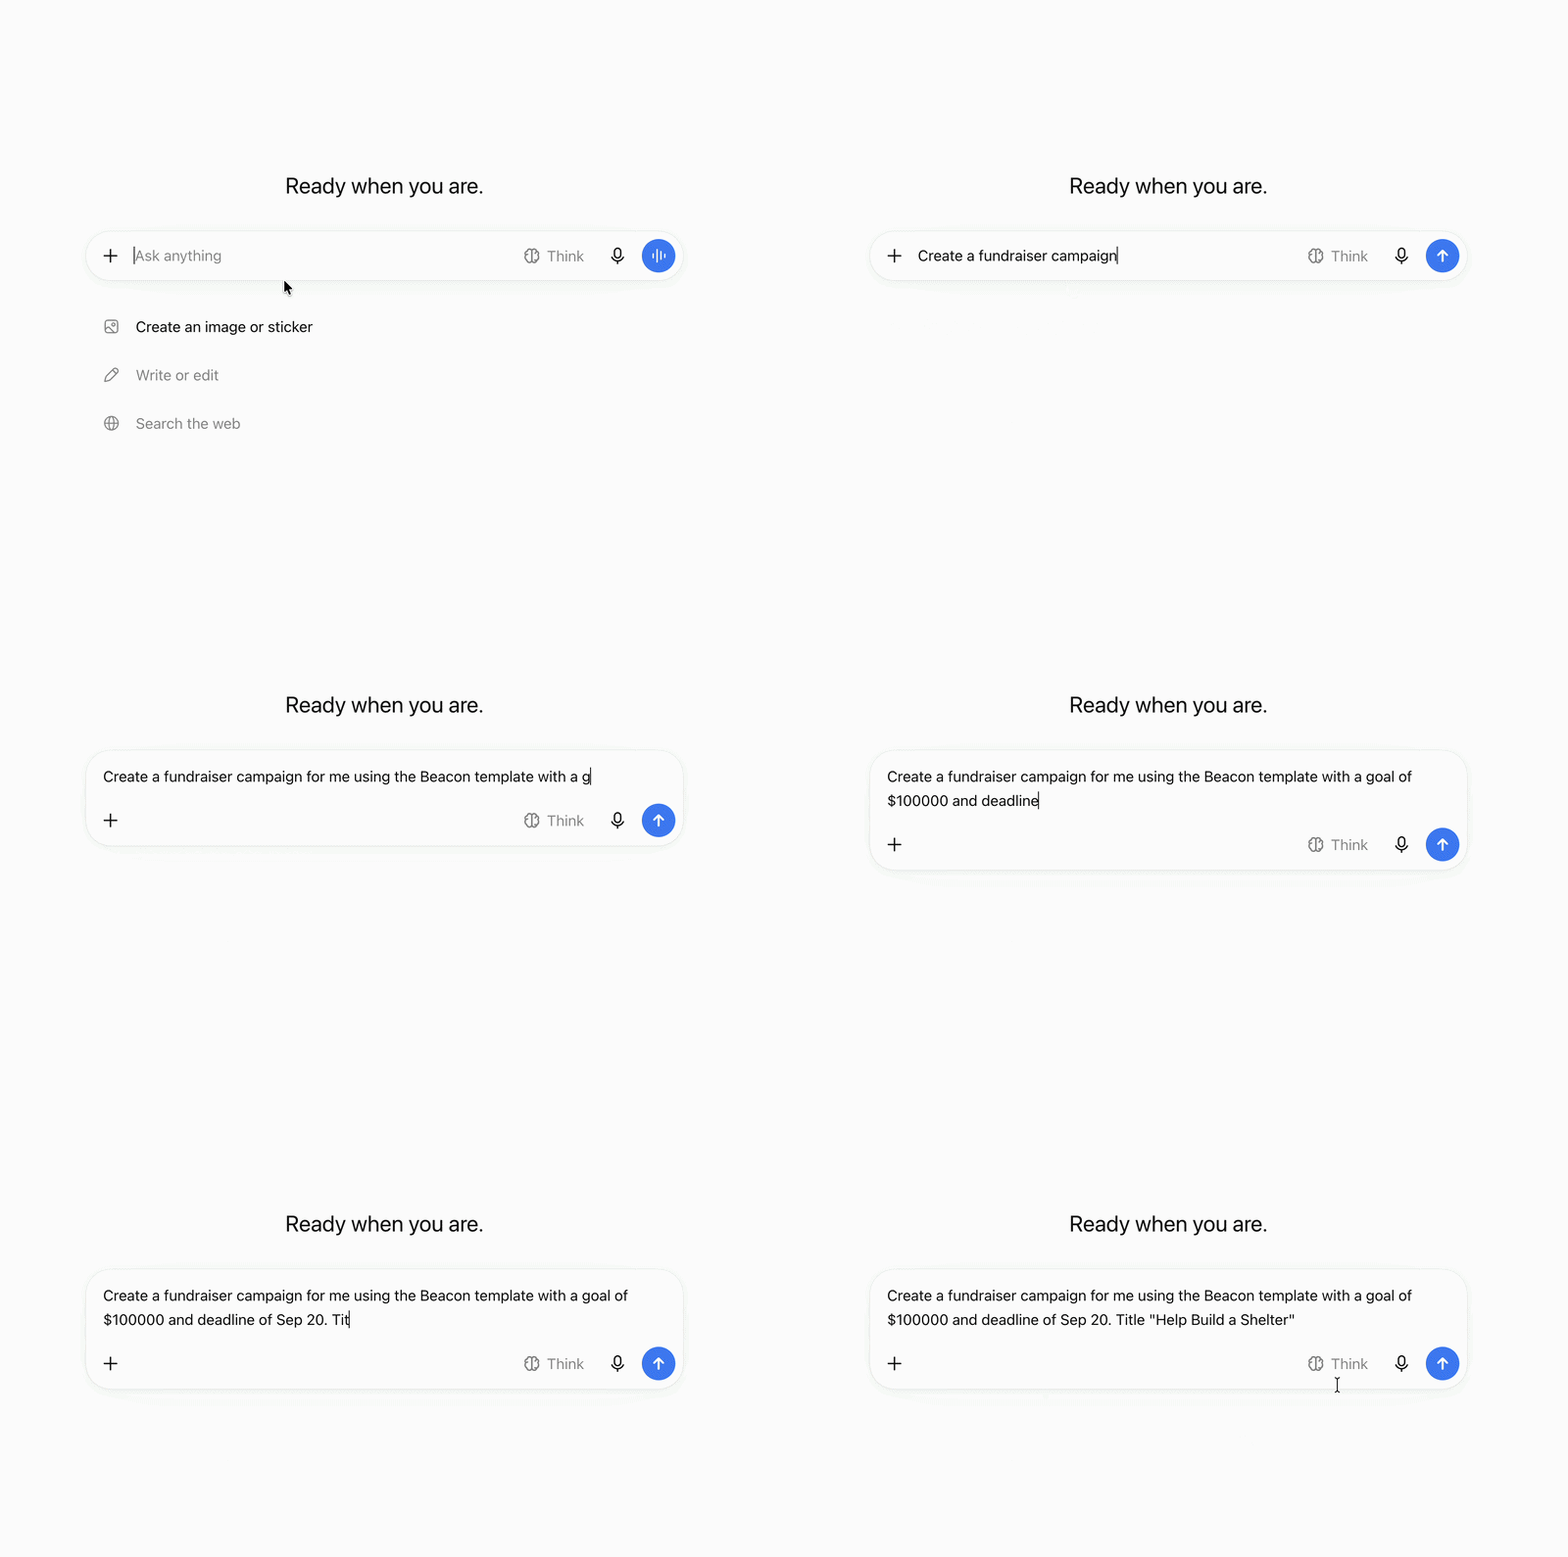
🤖 Use Charitable with Your AI Assistant
⬇️ Download proven strategies, campaign ideas, and expert tools
Get the Fundraising Kit →
💸 Get Free Fundraising Resources
Head to the Charitable Fundraising Hub →
🤔 Got questions about Charitable?
Charitable FAQs →
🏎️ Take Charitable for a spin
Create your Charitable Demo →
Understand non-profit terms and jargon
Non-Profit Glossary →
% Looking for non-profit deals and discounts?
Best Non-Profit Deals and Discounts →





Leave a Reply