
Donation form building should be easy and simple. I’ve struggled with backend builders where you create forms and then wonder what they’ll actually look like on the front end to real donors. We don’t need to do that anymore.
With Charitable’s visual Donation Form Builder, you design your form exactly as donors will see it. All you have to do is drag and drop fields and click to edit them – no more guessing. This gives you complete control to optimize the user experience while making your own process smooth and fast.
This 10-minute tutorial shows you how build a donation form easily. You’ll learn how to use the form builder, add fields like suggested amounts and donor details, customize everything visually, and publish a form ready for Stripe or PayPal payments. Let’s build one together.
Choosing the Right Form Builder
There are lots of online form builders out there, but most nonprofits need more than just a contact form that happens to accept payments online. You need a tool built for fundraising, one that handles recurring gifts, donor details, campaign goals, and privacy compliance without extra plugins or fees.
That’s why Charitable stands out. It gives you two visual builders working together:
- The Campaign Visual Builder for complete fundraising pages (progress bars, donor walls, impact stories)
- The Donation Form Visual Builder for customizing exactly how donors fill in their payment details and give
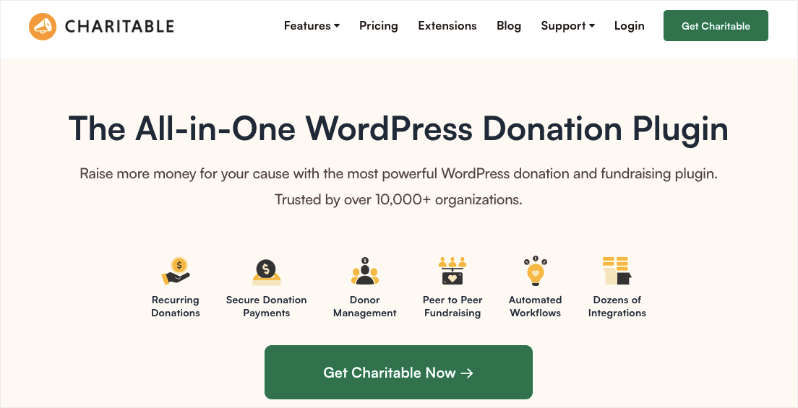
Charitable is the perfect choice for this tutorial because it combines everything nonprofits need in one reliable plugin – no addon chaos or hidden fees.
- Visual builders for everything: Campaign pages and online donation forms both get drag-and-drop interfaces with live previews, so you control the full experience without code.
- Built for nonprofits: Recurring donations, donor management, progress goals, and peer-to-peer campaigns are all built in to the plugin. You won’t need to juggle multiple tools.
- No transaction fees: Keep 100% of Stripe/PayPal donations (Charitable Pro removes any Lite fee).
- Proven in real campaigns: I’ve tested it across dozens of sites where it outperformed other plugins and brought in real results.
- Free to start: Core version is free and gives you all the essential fundraising features. Charitable Pro (starts at $69+/yr) unlocks advanced features without breaking the bank.
Other plugins work for simple needs, but Charitable scales from your first $100 drive to $100K Giving Tuesday campaigns. Let’s build with the tool that won’t let you down.
For this tutorial, we’ll use Charitable because it lets you build professional donation experiences in minutes that actually convert, whether you’re launching your first appeal or running a $50K matching campaign.
Charitable’s Visual Builders
Charitable gives you two powerful drag-and-drop tools that work together perfectly:
Campaign Visual Campaign Builder
The campaign builder lets you choose templates or layouts to design complete fundraising pages. This is where you tell your story, show impact, set a goal with a progress bar, display donor walls or donor comments, add videos, and embed the actual donation form.
Here’s a campaign I created with Charitable:
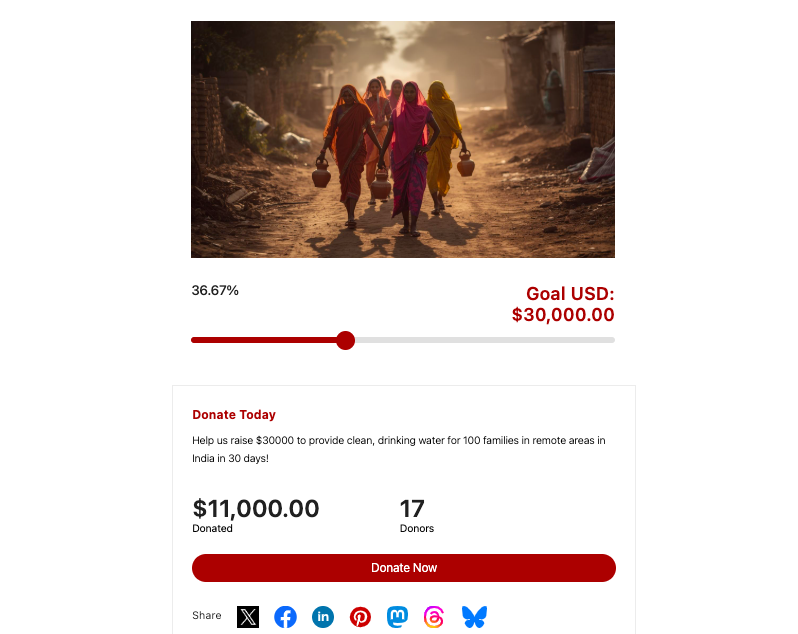
Every campaign has:
- Campaign content: Description, images, videos, updates to inspire giving.
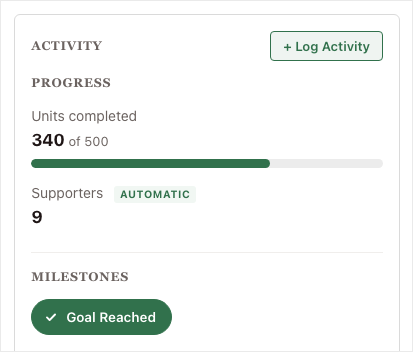
- Goal tracking: Visual thermometer showing raised/total, closes automatically when hit.
- Donor engagement: Public comments, leaderboards, or anonymized totals.
- Built-in donation form: Powered by the Visual Form Builder we’ll use next.
You can create unlimited campaigns for just about any fundraiser you need, including emergencies, annual funds, events, or peer-to-peer fundraisers.
Donation Form Visual Builder
When a donor clicks on the “Donate Now” button in the campaign, they’ll be shown a donation form.
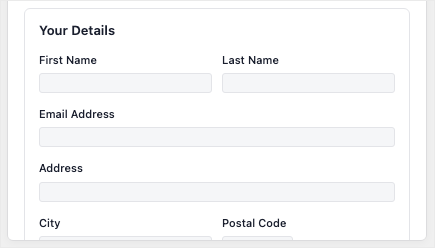
This is where donors enter their name, choose an amount, select payment method, and hit “Donate.” Together, the campaign page and donation form come together as a conversion engine: the campaign page tells the story and builds excitement, but the form seals the deal.
Here’s a non-profit donation form from Charitable:
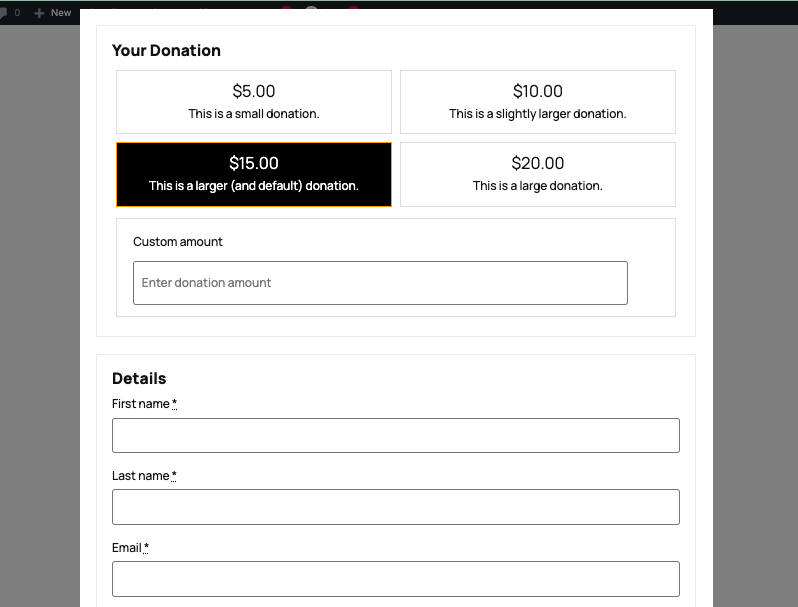
You can customize the actual giving experience inside any campaign. Add fields, rearrange layouts, set suggested amounts, and preview exactly how donors will see and interact with your form.
Both builders let you work visually with real-time previews, so what you see matches what donors experience.
In this guide, I’ll show you how to create a campaign, open the form builder, add fields like suggested amounts and donor details, customize visually, and publish a form ready for Stripe or PayPal payments. Let’s build one together.
How To Create a Donation Form
Step 1: Install and Activate Charitable
To get started, log into your WordPress dashboard and go to Plugins » Add New.
Search for “Charitable” in the search box. Look for the official one (over 10,000 active installs, 5-star rating).
Click “Install Now” then “Activate”. This gives you the free core version immediately – no credit card needed.
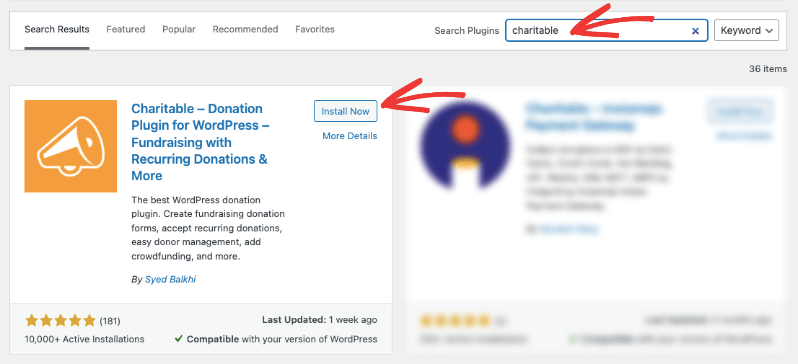
This gets you Charitable Lite with all the essential features you need to get started. For the Pro plugin, go to the official website, choose your plan, and sign up for an account.
What Pro gets you (starting at $69/year):
- Recurring donations (monthly/annual checkboxes)
- Full donor management with profiles and self-service dashboards
- Peer-to-peer fundraising and crowdfunding
- Fee recovery (donors cover Stripe fees), Gift Aid (UK)
- More payment gateways and anonymous donations
- Donor leaderboards, comments, and social proof
- Advanced reporting, PDF/annual receipts, email integrations
- Priority support and premium features like automation
- …and much more.
With Charitable installed and activated, let’s create your first campaign.
Step 2: Create Your First Campaign
Creating a campaign is so easy and just needs a few clicks. Open Charitable » Add New in your WordPress left menu.
Name it something specific like “Emergency Relief Fund” or “Holiday Matching Drive.”
Next, you can choose a template or a layout to get started.
Once you do that, the campaign builder will open, where you can customize the content.
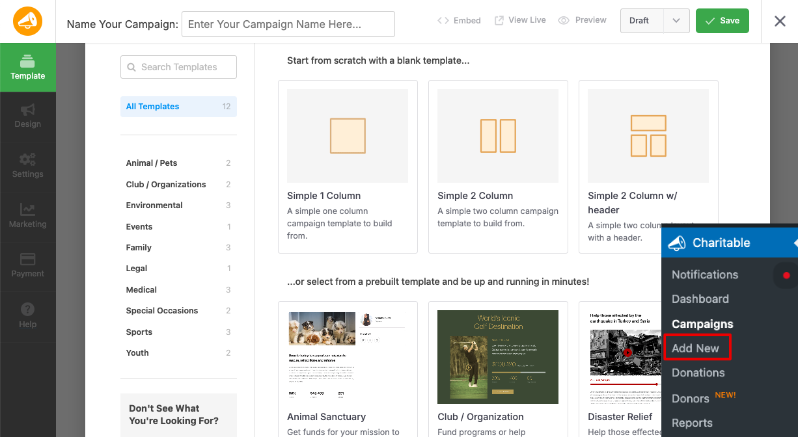
When you create or open a campaign in Charitable, you’ll see a live visual preview of your campaign page. This is the Campaign Visual Builder.
You can drag and drop blocks, add new sections, and rearrange elements like your headline, description, image, and goal/progress bar to match your story and layout preferences. It feels like editing a landing page, not a backend form.
When you click on any block or field in this preview, its settings open in the left-hand panel. Here you can edit the text, change images, adjust alignment, tweak borders, spacing, and colors, and control display options. Once you’re happy with how the campaign looks, click Save so your design changes are stored.
Step 3: Customize the Donation Form
Now it’s time to customize the actual donation form. In the same campaign editor, look to the far left menu and click the Form tab. This opens the Donation Form Visual Builder, where you’ll design the fields donors fill out when they give.
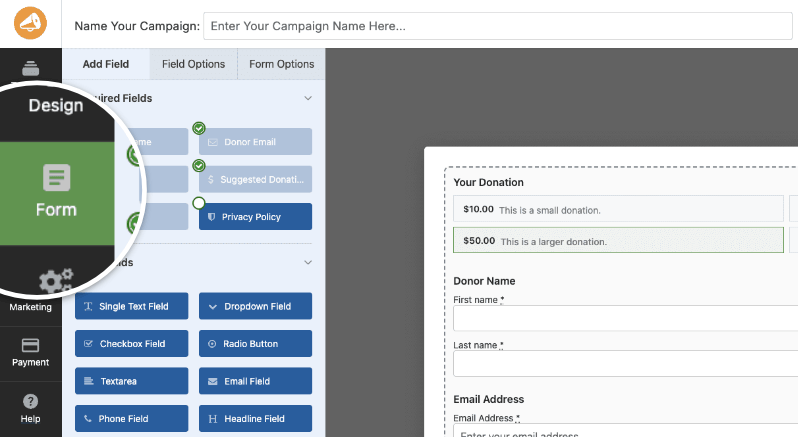
- On the left, you have all your available fields: required fields (like donor name, email, payment), standard fields (like text, dropdowns, checkboxes), and Pro fields (like donor comments and referral codes).
- On the right, you see exactly how the form will appear to your donors on the front end.
To customize your form, follow these simple steps.
Add fields: Drag any field from the left panel right into your form preview. For example, add a Headline field at the top that says “Complete Your Donation.” Or drag in a Donor Comment field so people can leave a message. You could also add a Dropdown field asking “How did you hear about us?”
Rearrange fields: Grab the drag handles on any field and move it up or down. Keep the flow simple and natural, like this order: Donor Name, Donor Email, Suggested Donation Amounts, Payment, and Donor Comment (if you want it).
Edit field settings: Click on any field in the preview. The settings will open on the left side. Here you can change the label. For example, switch “Donation Amount” to “Choose Your Gift Amount.” Then you can also adjust alignment, spacing, or add custom CSS if needed.
To design your form so that it’s helpful to your donors, you can add placeholder text like “Enter your full name” or help text below it to guide donors. You can also decide if it’s required or optional.
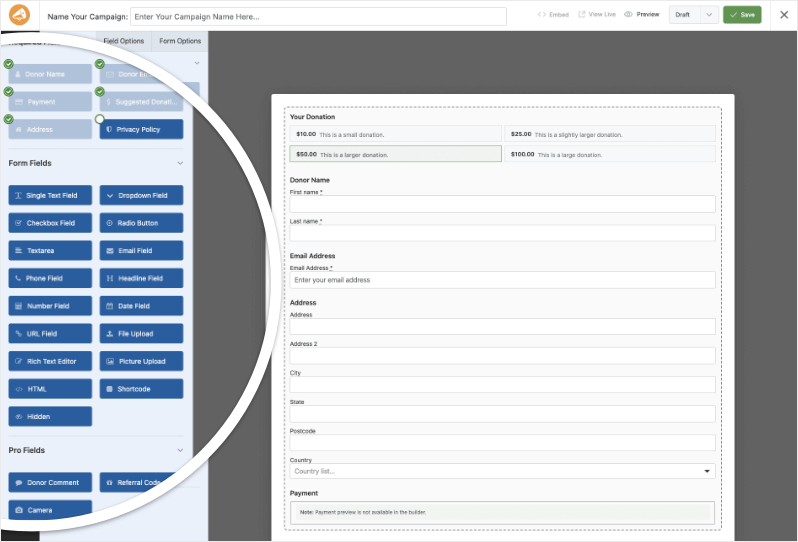
As you make these changes, the form updates live in the preview, so you always see exactly what donors will experience.
When it looks clean and simple, click Save. Now your campaign has a customized page and a perfect donation form ready for testing.
Step 4: Connect Your Payment Gateway
Now you’ll need to connect Stripe or PayPal so your form processes payments securely. Charitable makes this simple and fast.
Go to Charitable » Settings » Payment Gateways in your WordPress menu. Depending on your plan, you’ll see the gateways available to you here:
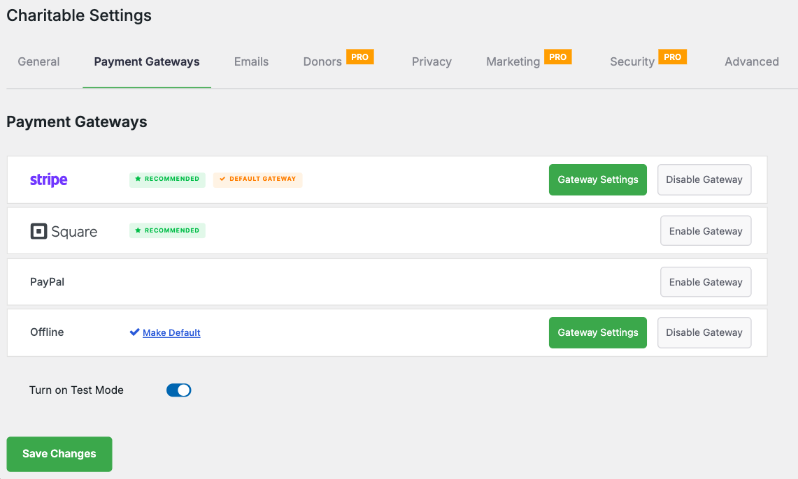
First, I recommend turning on test mode while you set up and test your gateway.
You can enable and disable gateways with just a click. When enabled, you’ll see a green button appear that says “Gateway Settings”. This will take you to the settings page where you can add your API keys or log in to your payment gateway account to make the connection.
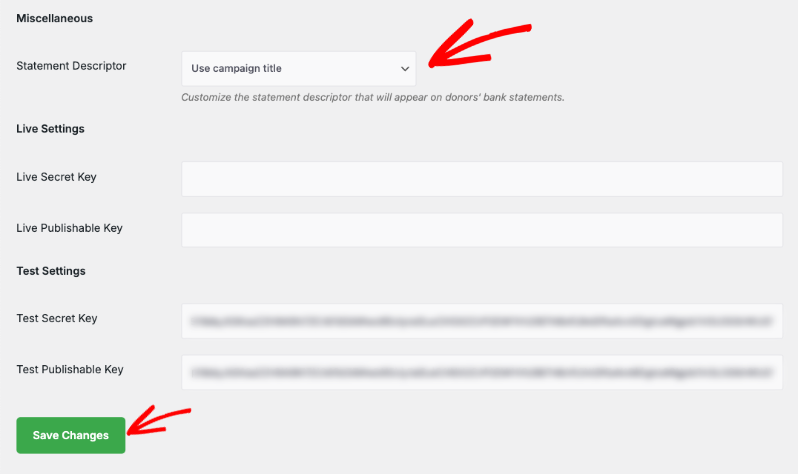
Make sure to save your changes.
Follow this guide for more details on how to connect your gateway »
Step 5: Optimize Your Campaign
Here are some tips and features you can use to optimize your donor’s experience. A smooth experience ensures donors complete their contribution, share your cause, and also come back to donate again.
Setting a clear fundraising goal and deadline
Setting a clear fundraising goal and deadline helps motivate donors and adds a healthy sense of urgency. Choose a target that feels realistic but still inspiring for your campaign, so supporters know exactly what they’re helping you work toward and you have a simple way to measure success.
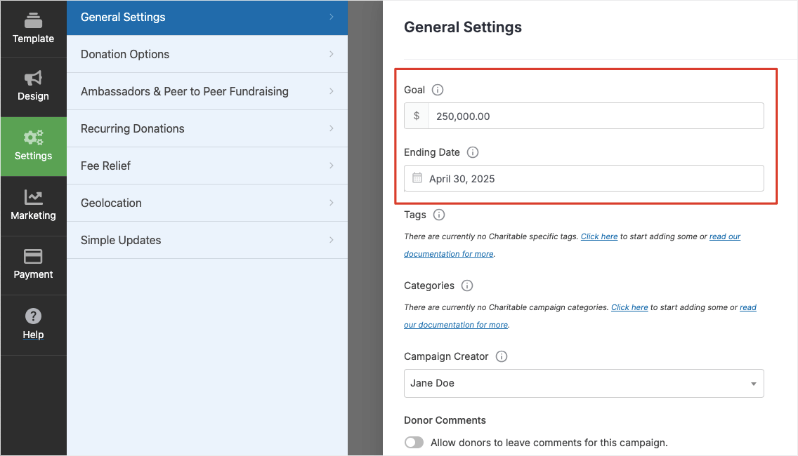
In your Charitable campaign, open the Settings tab in the left-hand menu. Under General Settings, enter the total amount you want to raise, such as $30,000.
Just below that, use the Ending Date option to set when the campaign should finish, including the exact date and time. For a Black Friday push, you might start a day or two before and end a day or two after to capture both early and late donors.
Once your goal and deadline are in place, your campaign page will automatically show donors how close you are to the target and how much time is left. Next, there are a few more options you can use to optimize your campaign and streamline your workflow.
Using Suggested Amounts
Charitable helps you make the most of every fundraising moment with features built just for nonprofits. These tools guide donors toward bigger gifts and keep them engaged long-term.
Start with suggested amounts. In the Settings » Donation Options tab, set figures that feel right for your campaign – like $25, $50, $100, or $500. These buttons make it easy for donors to pick quickly without typing.
Boosting Donations with Powerful Features
Charitable also offers powerful extras to boost results:
- Recurring Donations: Add a checkbox so donors turn one-time gifts into monthly support.
- Peer-to-Peer Fundraising: Let supporters create their own campaigns to reach their networks.
- Simple Updates: Post live progress notes right on the campaign page to build excitement.
- Geolocation: Show campaigns on a map to connect with local donors.
- Fee Relief: Let donors cover Stripe/PayPal fees so every penny goes to your cause.
Connect to Email Marketing
In the Marketing tab, connect to email tools like Mailchimp or Constant Contact. This lets you send targeted appeals and instant thank-yous without extra work.
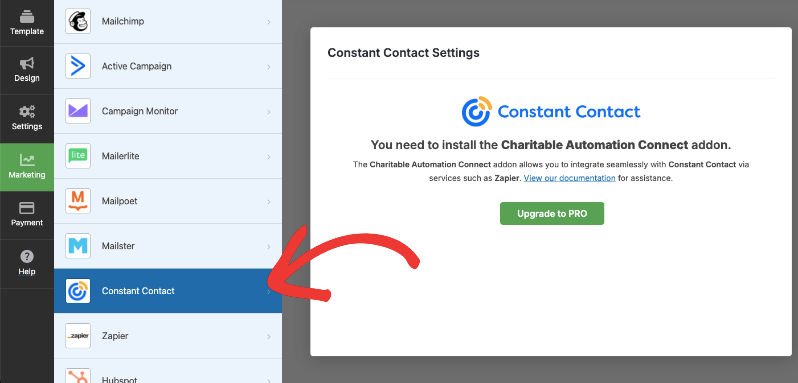
The process is easy. All you have to do is follow the instructions onscreen.
You may want to read Best WordPress Plugins for Better Donor Communications
Step 6: Publish Your Donation Form
When you’re happy with your campaign and form, it’s time to make it live for donors.
Look at the top-right corner of the builder. Click Save first to store all your changes. Then use the dropdown next to it and select Publish.
Your campaign is live.
You can add your campaign to any page or post using the readymade blocks available in the Gutenberg or block editor. You can also use campaign shortcodes to embed the campaign anywhere you need.
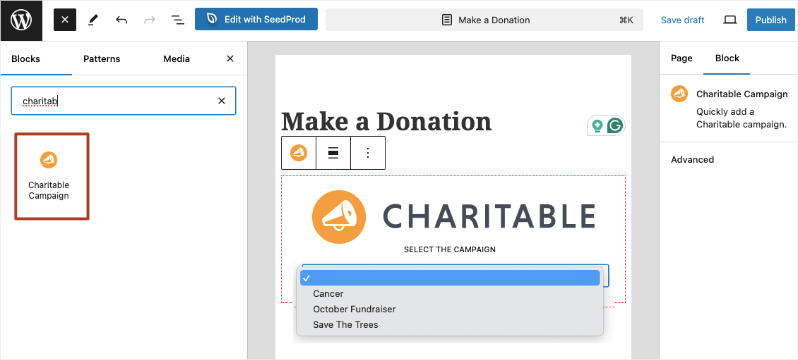
Donors can visit this campaign page, see your story and progress bar, and give through the custom form you built.
I recommend testing one more time on mobile and desktop. You’re now accepting real donations in under 10 minutes total!
Tracking the Success of Your Donation Form
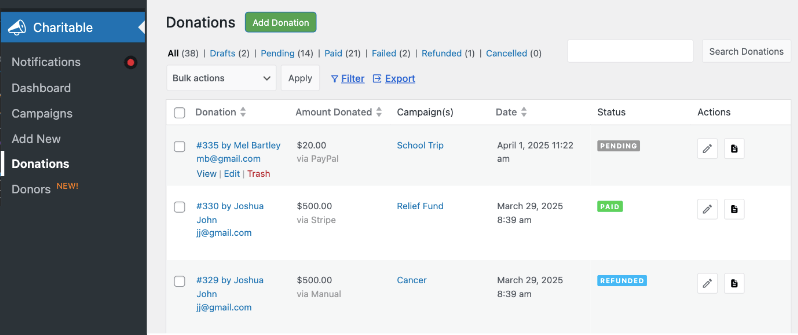
To understand how well your fundraising efforts are performing, track your campaign’s progress and analyze the results. You can view all your donation records under Charitable » Donations.
You can also see readymade reports and analytics under Charitable » Reports.
Top Donors: Identify your most generous supporters so you can recognize and engage them personally to build loyalty.
Recurring Donors: Track who contributes regularly, which helps create a steady income over time.
Average Donation Amount: See the typical gift size to adjust your suggested amounts and appeals for better results.
Total Donations: Monitor how much you’ve raised so far and stay on target with your goals.
Refunds: Keep an eye on any refunded donations to maintain accurate records.
Donations Breakdown: Get insights by campaign, date, or donor type to understand what’s working.
Payment Methods: Review which gateways donors prefer so you can optimize your checkout options.
Real-Time Activity: Follow donations as they come in, so you can share live updates and build excitement.
LYBUNT and SYBUNT Reports: Use “Last Year But Unfortunately Not This” (LYBUNT) and “Some Year But Unfortunately Not This” (SYBUNT) reports to re-engage donors who gave before but haven’t recently.
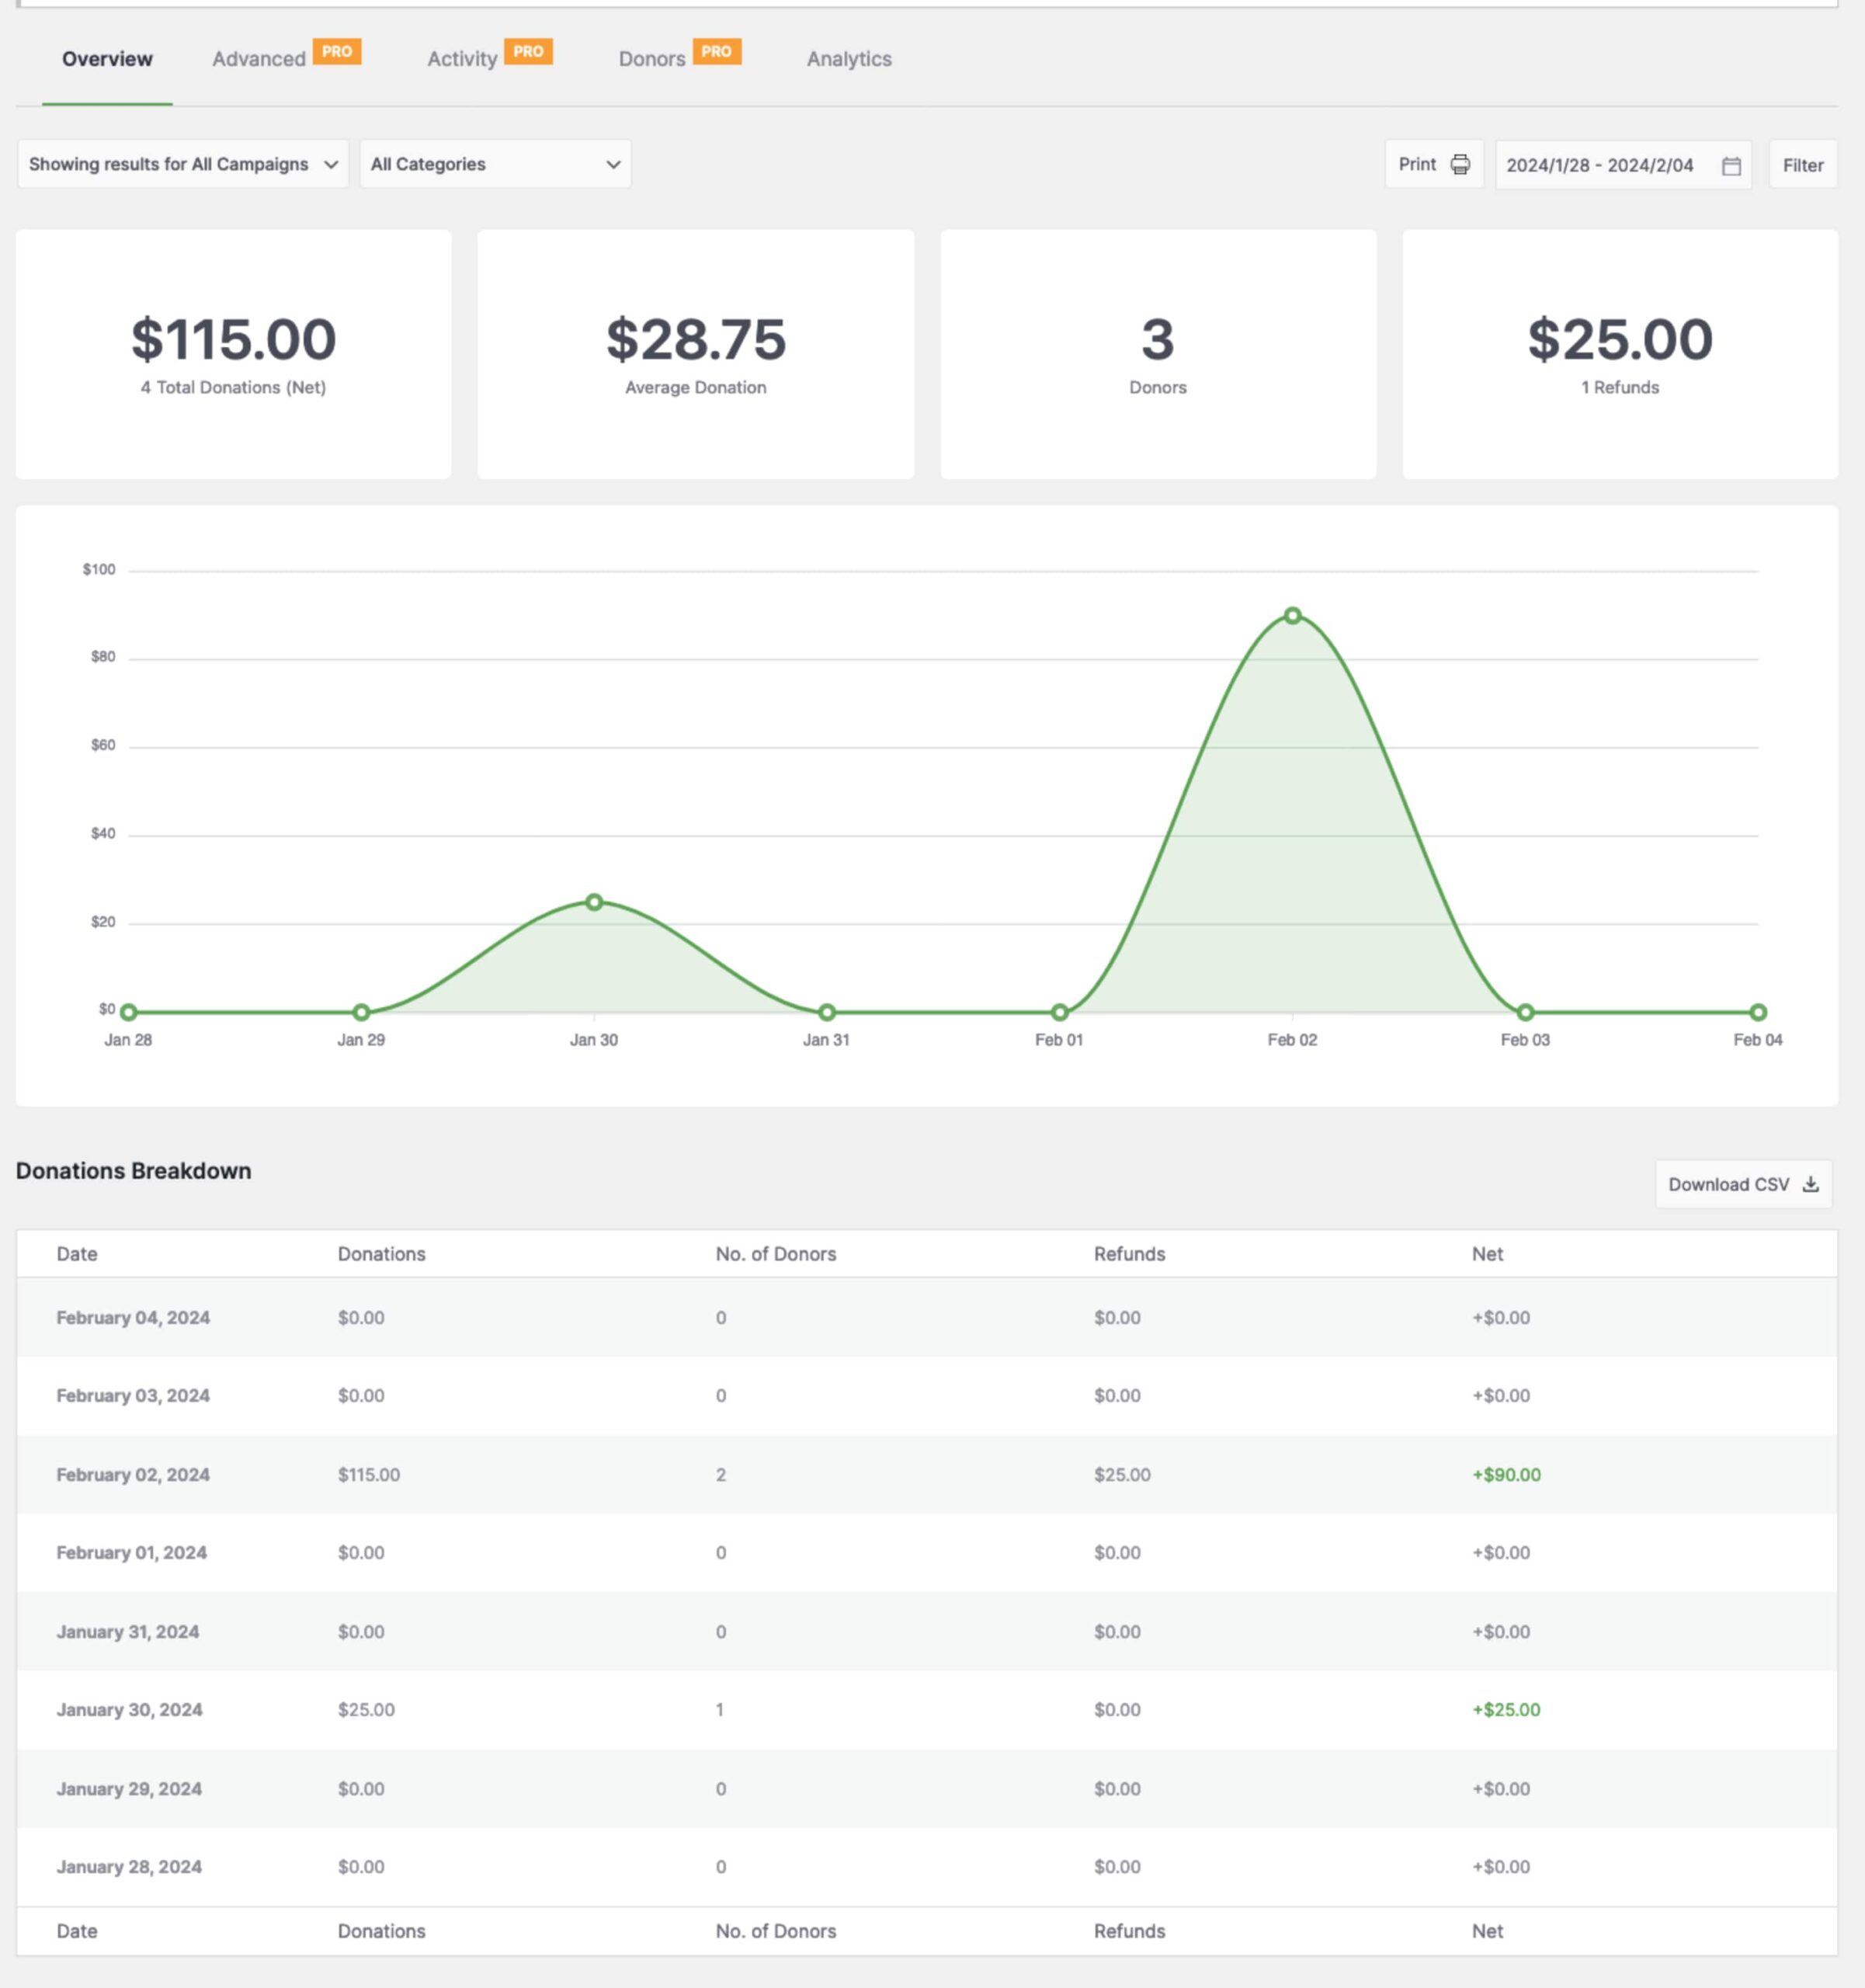
While Charitable covers these core insights, connect it to Google Analytics or email platforms for deeper data like traffic sources. Use these reports to celebrate wins, encourage repeat gifts, and plan even stronger campaigns ahead.
See why data driven fundraisers beat guesswork every time »
Next Steps
You’ve now built a complete, professional donation form using Charitable’s visual builders in under 10 minutes. From installing the plugin to customizing fields, connecting payments, and publishing your campaign, everything works together to create a smooth experience for donors and your team.
Start sharing your campaign link everywhere—email lists, social media, your homepage sidebar. Remember to always test a few donations in live mode.
When you’re ready to scale, upgrade to Pro for recurring gifts, donor dashboards, and peer-to-peer fundraising.
You can sign up risk-free today with a 14-day money back guarantee.
That’s it. You may also want to read our other guides:
- The Ultimate Giving Tuesday Toolkit
- The Ultimate Nonprofit Playbook to Maximize Year-End Fundraising
FAQs on Building a Donation Form
Do I need coding skills to use the Campaign Visual Builder?
No, the visual builder is designed for all users – whether you’re a beginner or an advanced user. You can drag, drop, and configure fields visually without writing any code. Optional custom CSS classes are available if you want to add your own styles.
Will my existing campaigns and forms work with the new builder?
Yes, all existing campaigns and donation forms will continue to work as before. You can open them in the Visual Builder to customize or enhance the form visually if you choose.
Can I use the builder to create multiple campaigns?
Absolutely. There’s no limit to how many campaigns you can create, each with its own unique form design and settings through the builder.
How to create a donation page for free?
Charitable lets you create donation pages and forms for free on your website. You can use Google Forms if you don’t have a website.
How to create a donation form for school?
You can use Charitable’s donation form builder or WPForms to create a form for school and any projects or events.
Are Pro fields available in the Visual Builder?
Yes. If you have Charitable Pro, you can add advanced fields like Donor Comments and Referral Codes, unlocking powerful engagement features.
How do I add the campaign form to my website pages?
After building and saving your form, use the embed wizard or shortcode provided in the campaign editor to place the form on posts, pages, or widgets seamlessly.
Can I preview the donation form before publishing?
Yes, the builder shows a live preview of your form, updating instantly as you make changes, so you always know exactly how it will look to donors.
What’s the difference between Charitable Lite and Pro?
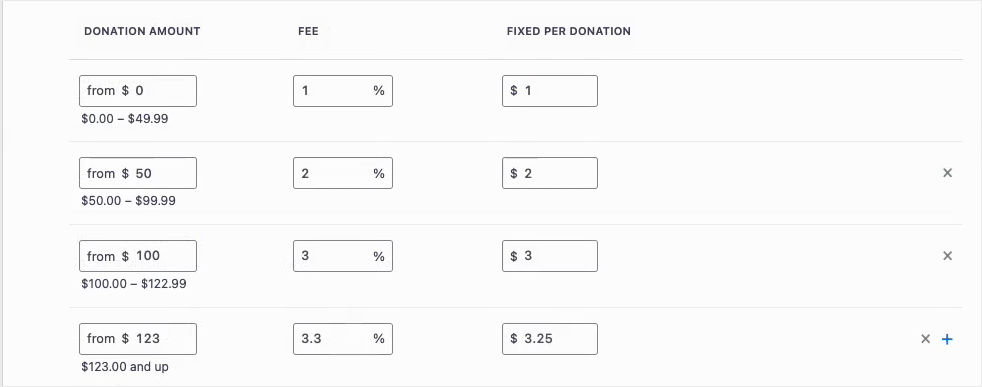
Charitable Lite is free but includes a 3% transaction fee. Pro plans eliminate this fee and include advanced features like recurring donations, donor management, peer-to-peer fundraising, and more payment gateways.
Where can I get support if I have issues?
- Free users: Use the WordPress.org support forums
- Pro users: Contact support directly for priority assistance
- Documentation: Check the comprehensive documentation library
- Community: Join the newsletter and follow social channels for tips and updates
Are there video tutorials available?
Yes! Subscribe to the Charitable YouTube channel for step-by-step tutorials and success stories.
Want more fundraising tips and nonprofit advice?
We regularly share practical guides, proven strategies, and insider tips to help you raise more funds and build stronger donor relationships. Join thousands of nonprofits who get our best content delivered straight to them:
- Join our newsletter – Get weekly tips and exclusive guides in your inbox
- Subscribe to our YouTube channel – Watch step-by-step tutorials and success stories
- Follow us on LinkedIn – Connect with our community and get daily nonprofit insights
- Follow us on TikTok – Insightful & fun videos to help you grow your cause
- Follow us on Instagram – Fun reels and non-profit tips
No fluff, just actionable advice from people who understand the challenges you face every day.


Leave a Reply