Do you want your donation forms to automatically update your CRM, post a Slack notification, or add every new donor to your email list?
The Uncanny Automator integration for the Pro plugin connects Charitable to 210+ apps, letting you build no-code automations that run the moment someone gives.
In this guide, we’ll walk through connecting Uncanny Automator to Charitable and building your first automated recipe.
Read about the full feature here »
What’s In This Guide?
- Requirements
- Activating the Uncanny Automator Integration
- Building Your First Recipe
- Managing Your Recipes
- FAQs on Uncanny Automator
- More Documentation
Requirements
Before you get started, make sure you have:
- Charitable’s Pro plugin, updated to version 1.8.12 or later. You can grab the latest version from the Downloads tab in your Charitable account.
- The Uncanny Automator plugin installed and activated on your site. The free version covers the Charitable trigger and most everyday actions.
You do not need to activate any extension from Charitable. The Uncanny Automator integration is built in (available in the premium plugin – Pro plan)
Note: Uncanny Automator also sells its own paid tier, Automator Pro, which is separate from Charitable’s Pro plugin. A handful of triggers and advanced tools (like filters, delays, and loops) require Automator Pro. We’ll call those out as we go.
Activating the Uncanny Automator Integration
Open a campaign in the campaign builder, either a new one or an existing one. Go to the Marketing tab in the left panel, then click Uncanny Automator from the list of marketing integrations.
You’ll see a green “Activate Uncanny Automator” button. Click it.
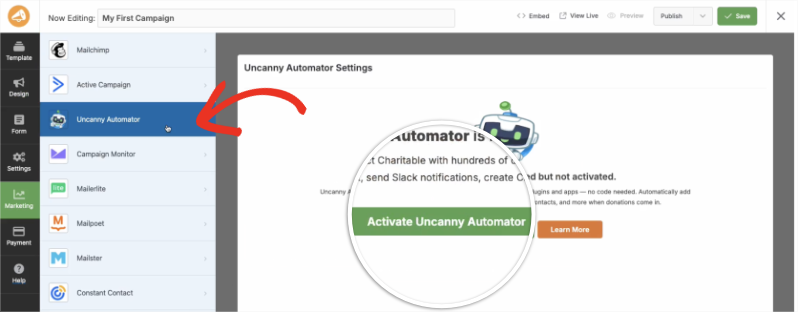
The integration activates automatically. There’s nothing else to configure on the Charitable side.
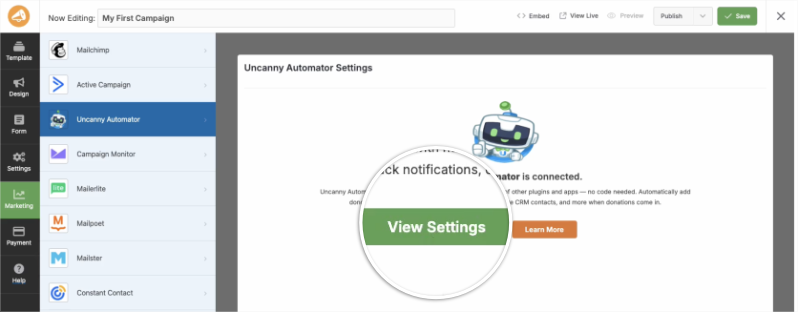
Once it’s done, the button changes to a green “View Settings” button. Click it to jump straight into Uncanny Automator, where you’ll build your first automation.
Building Your First Recipe
In Uncanny Automator, every automation is called a recipe. A recipe has a trigger (the event that starts it, like a donation) and one or more actions (what happens next, like sending an email or updating an app).
Choosing a Recipe Type
Go to Automator » Add New Recipe. You’ll be asked to choose a recipe type:
- Logged-in users – The recipe only runs for donors who are logged into a WordPress account.
- Everyone – The recipe runs for logged-in users and logged-out guests. Choose this if you accept guest donations.
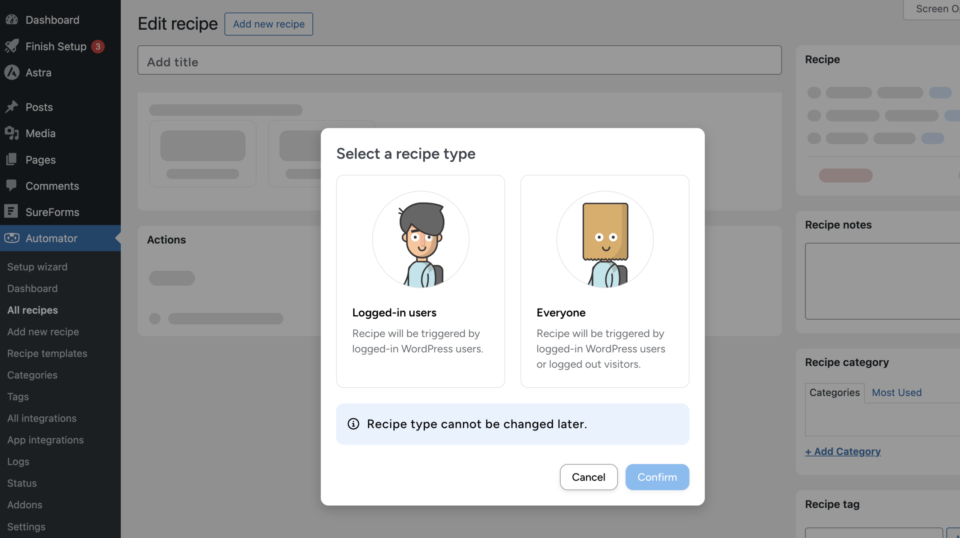
Important: The recipe type cannot be changed later. If you’re not sure whether all your donors will be logged in, choose Everyone.
Setting the Trigger
In the Trigger box, click “Add trigger” and select the Charitable integration. Search for a trigger, then select it.
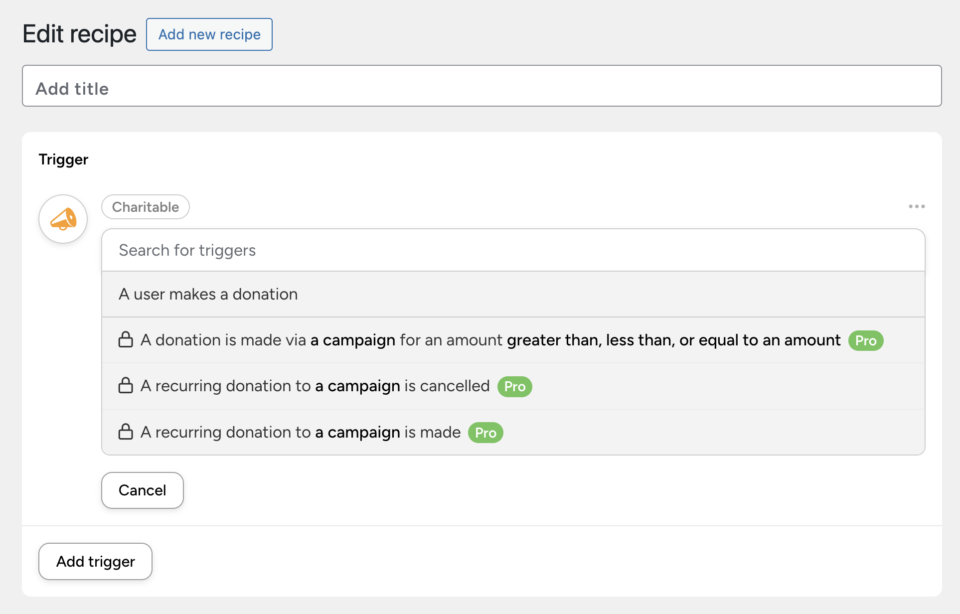
“A user makes a donation” is available in the free version of Uncanny Automator and fires every time someone completes a donation. The following triggers require Automator Pro:
- A donation is made via a campaign for an amount greater than, less than, or equal to an amount
- A recurring donation to a campaign is made
- A recurring donation to a campaign is cancelled
Pro tip: Want to send a special email only to donors who give over $100, or trigger a different action for a specific campaign? These amount and campaign-based triggers make that possible, without any custom code.
Adding an Action
In the Actions box, click “Add action” to choose what happens when the trigger fires. Automator lists every app it can connect to, including Airtable, Google Sheets, Slack, Mailchimp, ActiveCampaign, Zapier, Make, Webhooks, and WordPress itself.
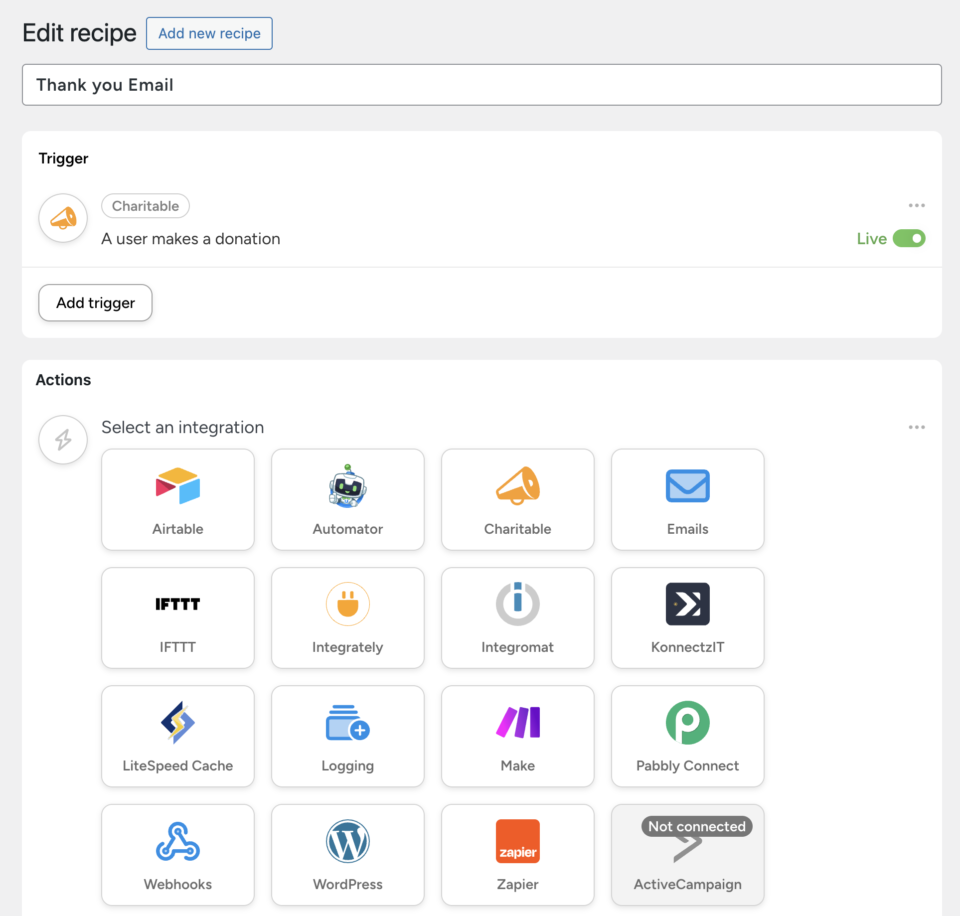
As an example, let’s build a simple recipe that sends a personal thank you email whenever a donation comes in.
- Select the “Emails” app, then choose “Send an email.”
- Fill in the From, From Name, and To fields. Click the lightning icon next to any field to insert a dynamic token instead of typing it manually, like the donor’s email address or first name.
- Write your subject line and email body. You can personalize the message with tokens pulled from the donation, like the campaign name or donation amount.
- Click “Send test email” to preview it before you go live, then click “Save.”
Note: Automator makes over 9,000 dynamic tokens available across its triggers, pulling data straight from your donors, campaigns, and form submissions. You’re not limited to email actions either. Add multiple actions to a single recipe to, say, send a thank you email and add the donor to a spreadsheet at the same time.
Reviewing and Publishing Your Recipe
Give your recipe a title at the top of the page, like “Thank You Email.” In the Recipe panel on the right, you’ll see a summary of how the recipe is configured.
Each trigger and action has its own Live/Draft toggle. Switch each one to Live once you’ve finished configuring it. Then, in the Recipe panel, switch the recipe itself from Draft to Live. A recipe that’s still in Draft won’t run, even if every trigger and action inside it is set to Live.
That’s it. Your recipe is now active, and it’ll run automatically every time its trigger fires.
Managing Your Recipes
Go to Automator » All Recipes to see every recipe on your site, along with its status and how many times it’s run.
Open any recipe to adjust its settings in the Recipe panel:
- Throttle – Limit how often the recipe can run in a given time period.
- Times per user – Limit how many times the recipe can run for the same donor.
- Total times – Cap how many times the recipe can run overall.
- Completed runs – Click “View logs” to see every time the recipe ran, useful for confirming an automation is working or troubleshooting one that isn’t.
You can also add recipes to categories and tags, which makes it easier to find the right one once you have several automations running.
The Uncanny Automator integration is available in Charitable’s Pro plugin.
Not yet on Charitable Pro?
You can get up to 50% off when you sign up for or upgrade to Charitable Pro. We want to ensure that you can try the advanced fundraising features like Recurring Donations, Donation Recovery, and more at a significantly reduced cost.
Join over a million satisfied Charitable Pro users today. Every purchase comes with a 14-day money-back guarantee, ensuring you’re supported every step of the way.
If you have any questions or need assistance, our support team is ready to help you make the most of these new features.
FAQs on Uncanny Automator
Do I have to pay for Uncanny Automator to use this integration?
No. The free version of Uncanny Automator includes the Charitable donation trigger and most common actions, like sending emails or connecting to Zapier and Make. Automator Pro, a separate purchase from Uncanny Automator, unlocks additional triggers, filters, delays, and loops.
Can I trigger an automation for recurring donations?
Yes, but the recurring-specific triggers (“A recurring donation to a campaign is made” and “…is cancelled”) require Automator Pro.
My recipe isn’t running. What should I check?
First, check that the recipe itself is set to Live in the Recipe panel, not just the individual trigger and action. Then confirm the recipe’s user type (Logged-in users or Everyone) matches how your donors actually give. If you accept guest donations, the recipe needs to be set to Everyone.
Can guest donors trigger an automation?
Yes, as long as you chose Everyone as the recipe type when you first created the recipe. This can’t be changed after the recipe is created, so choose carefully.
How many apps can I connect Charitable to?
Uncanny Automator connects Charitable to over 210 apps and plugins, including Google Sheets, Slack, Mailchimp, WooCommerce, and virtually every popular WordPress plugin.
More Documentation
- Installing Charitable Extensions
- How to Use the Donor Management System
- How to Use the Donor Dashboard
- Setting Up Payment Gateways
Helpful Links
🤝 Get help when you need it
Connect with Customer Support →
📑 Find the guide you need
Browse the Documentation Hub →
⬇️ Download proven strategies, campaign ideas, and expert tools
🔗 Let your AI Assistant do the fundraising work for you.
Connect Charitable to your AI assistant →
💸 Get Free Fundraising Resources
Head to the Charitable Fundraising Hub →
🤔 Got questions about Charitable?
Charitable FAQs →
Need help understanding non-profit terms and jargon?
See our Non-Profit Glossary →