
Do you know how to get every donor record out of the tool you use today, and into the next one, without losing anyone?
Most nonprofits only ask that question when they’re already leaving. A price goes up, a feature disappears, or a board member asks for a full donor list and nobody knows where to find it. That’s a stressful moment to learn what your platform will and won’t let you take with you.
I’ve co-founded a nonprofit and worked with fundraising teams for over 15 years, and I’ve seen a lot of donor lists stuck inside a tool that someone else controls. So in this guide, I’ll cover what owning your donor data really means, what a complete export should include, and how to plan a donor data migration you can trust.
Then I’ll show you, step by step, how to export your donors and donations from Charitable, and how to bring them in from GiveWP, Donorbox, Givebutter or any spreadsheet.
What’s In This Guide
- Who Owns Your Donor Data?
- What a Complete Donor Export Should Include
- How to Plan a Donor Data Migration
- Charitable: The Donor Data Solution You Control
- How to Export Your Donor Data From Charitable
- How to Import Donors Into Charitable From Other Platforms
- Keep Your Donor Data Working After the Move
- FAQs on Donor Data Migration
Who Owns Your Donor Data?
Your donors gave to your cause, so their names, emails and giving history should belong to you. In practice, it depends on where those records live.
On a hosted fundraising platform, your donor list sits on the platform’s servers. You can see it through their dashboard, and most of them let you download some of it. But the platform decides which fields go in the file, how often you can get it, and sometimes whether you need to ask their support team first.
On your own WordPress website, the records sit in your own database. You can open them, export them and back them up whenever you like, and nobody has to approve it.
This matters most on the day you want to change something. For example, if a small food bank had 4 years of donors on one platform and the price doubled, they would need every donor, every gift and every monthly plan to come with them. If the export only had names and emails, they would lose the giving history they use to thank people and ask for the next gift.
So it pays to know what you can take with you long before you ever need to leave.
Questions to Ask Any Donation Tool Before You Commit
Whether you’re choosing a tool for the first time or reviewing the one you have, these questions tell you how much control you really have.
- Can I export everything myself? You should be able to download donors and donations from the dashboard, without a support ticket.
- Which fields are in the file? Ask for a sample. A list of emails is not the same as full giving history.
- Is there a cost to export? Some tools charge for exports or limit them to higher plans.
- What happens to monthly donors if I leave? Find out whether recurring plans can move, or whether donors will need to sign up again.
- Can I bring data in, too? A tool that imports from other platforms makes it easy to keep everything in one place.
If the answers are vague, treat that as your answer. The next question is what a good export actually looks like.
What a Complete Donor Export Should Include
A useful export has enough detail to rebuild your fundraising somewhere else. A donor list with no gifts attached can’t tell you who your most loyal supporters are.
Here’s what I look for in a complete set of files.
- Donor records. First and last name, email, phone, mailing address, company and any tags or notes you’ve added.
- Donation history. Every gift with its amount, currency, date, status, payment method and the campaign it went to.
- Recurring plans. Who gives monthly, how much, how often and when the next payment is due.
- Campaigns. Names, goals and totals, so your past results still make sense.
- Tax and consent records. Gift Aid declarations for UK charities, anonymous giving choices and email opt-ins.
- Fundraiser data. If you run peer-to-peer campaigns, the supporters who fundraised for you and what they raised.
The format matters as well. CSV is the safest choice, because Excel, Google Sheets, Numbers and almost every donation tool can open it. A PDF is better for a board pack or a funder report, but you can’t import a PDF anywhere.
Once you know what you need, you can plan the move itself.
How to Plan a Donor Data Migration
Donor data migration means moving your donor records, giving history and campaigns from one tool to another. It sounds technical, but most of the work is planning, and a good plan keeps you from losing anyone along the way.
Start with a full backup of everything, before you change a single setting. Then clean the data while it’s still in one place. Merge duplicate donors, fix obvious typos in emails and remove test donations.
Next, decide what moves and what stays behind. Ten-year-old one-off gifts from a single event may be fine as an archived spreadsheet. Active donors, recurring plans and the last few years of history should come across in full.
Finally, test before you commit. Import a small batch first, check that names, amounts and dates look right, and only then run the full import.
What Happens to Recurring Donations When You Switch
Monthly donors are the part of a migration that needs the most care. The record of a recurring plan is easy to copy. The permission to charge the donor’s card is not.
That permission is stored as a payment token with the payment gateway account the old tool used. If the old tool’s tokens can’t be moved, the plan can come across as history, but the next payment won’t happen until the donor sets it up again.
So before you switch, list your active monthly donors and decide how you’ll reach them. A short, warm email explaining the move and linking to your new donation form works well. Cancel the old plans before the new ones start, so nobody is charged twice.
I’ll point out exactly how each importer below handles recurring plans, so you know what to expect.
Your Donor Data Migration Checklist
Copy this checklist into your own notes and tick each item off as you go. It works for any move, whichever tools you’re moving between.
- Export a full backup of donors, donations, recurring plans and campaigns from your current tool, and save it somewhere safe.
- Back up your WordPress website as well, before you import anything.
- Merge duplicate donors and remove test donations in the old tool.
- List your active monthly donors and write the email you’ll send them.
- In the new tool, create your campaigns first, so imported gifts have somewhere to go.
- Import a small test batch and check names, amounts, dates and campaigns.
- Run the full import, then compare donor counts and totals with the old tool.
- Turn on test mode for your payment gateway and make a test donation.
- Send the email to monthly donors and cancel their old plans.
- Keep the old export files for at least a year, in case you need to look something up.
If you want a step-by-step guide to the backup part, I’ve written one on how to back up your nonprofit website. Now let’s look at a tool that makes the rest of this list easy.
Charitable: The Donor Data Solution You Control
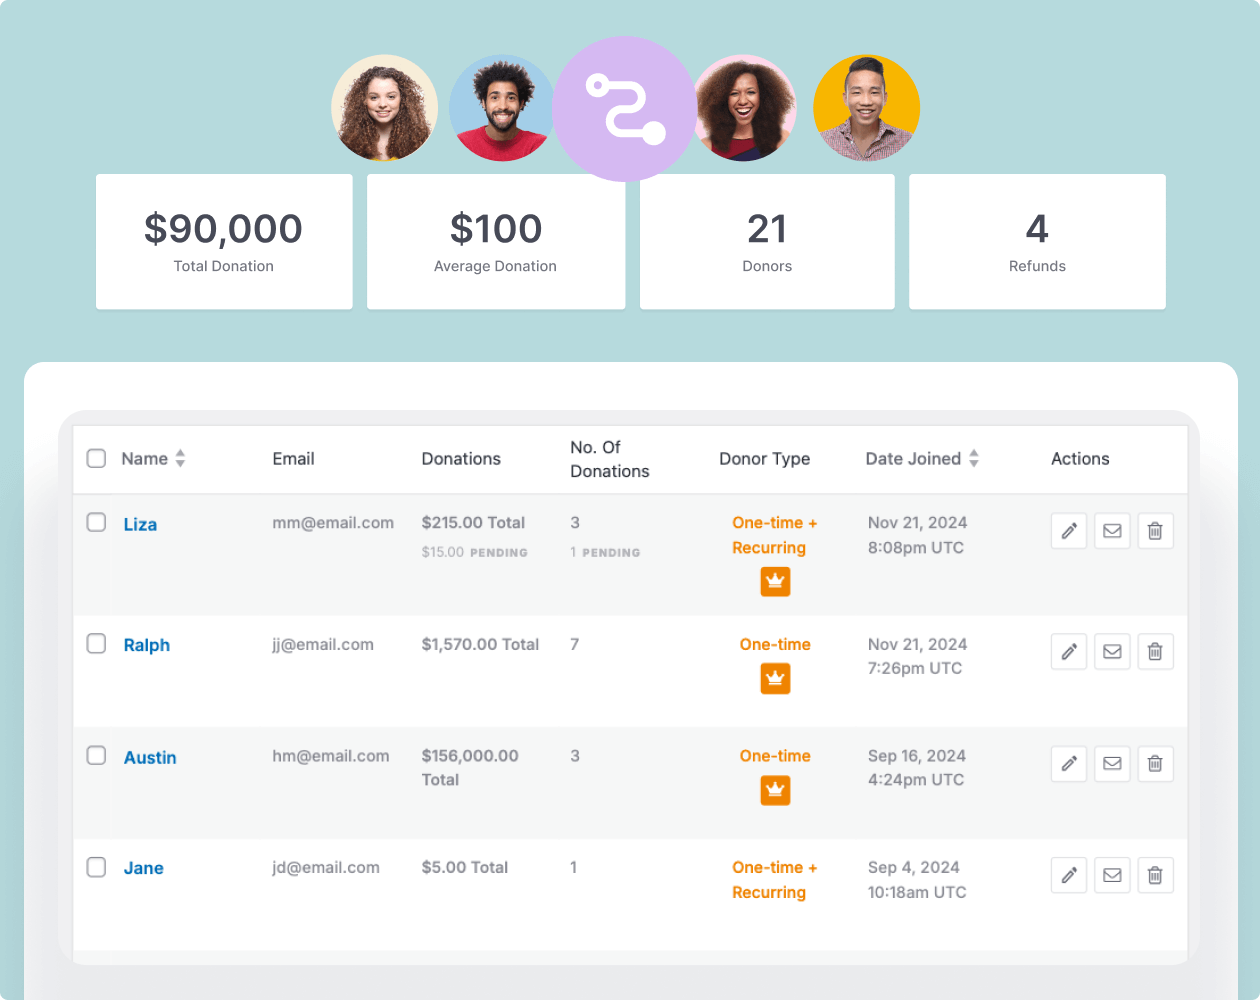
Charitable is a WordPress donation and fundraising plugin, trusted by over 10,000 nonprofits. Because it runs on your own website, every campaign, donation and donor record lives in your own WordPress database.
That means you control your data. You can export it, take it with you, move any time you want and use it anywhere. And because Charitable also imports from other platforms, it’s easy to bring everything into one place and use your website as your main donor database.
Here’s what that looks like day to day.
- Export donations any time. Download your donations as a CSV file from the Donations screen, even on the free version.
- Move to a new website. Export your campaigns, donations and donors, then import them into Charitable on your new site.
- Share reports with your board. Download your fundraising reports as a PDF with the chart included, or as a CSV for your own analysis.
- Bring donors in from anywhere. The CSV Donor Import tool brings in donor profiles from any spreadsheet.
- Switch from another plugin or platform. Built-in importers move your data from GiveWP, Donorbox and Givebutter.
- Keep UK tax records ready. Export Gift Aid declarations in the columns HMRC asks for.
- See every donor in one place. Donor management gives each donor a profile with their full giving history.
- Decide who can see donor details. Choose which roles can let an AI assistant see or export donor data.
- Get paid directly. Donations go straight from Stripe, PayPal or your other gateway to your account. Charitable never holds the money.
You can start with Charitable Lite, which is free and includes unlimited campaigns, unlimited donations and CSV export of your donations. When you need the importers, report exports and donor management, the paid plans start at $69 a year, and every plan comes with a 14-day money-back guarantee.
Getting started is simple.
- Install Charitable on your WordPress website.
- Create your first campaign.
- Customize your donation form.
- Connect your payment gateway and import your donors.
- Launch your campaign.
Get Charitable today → Every paid plan is risk-free with a 14-day money-back guarantee.
How to Export Your Donor Data From Charitable
Charitable gives you several exports, depending on what you need the file for. You don’t need all of them. Pick the steps that match your situation, and each one takes about a minute.
Step 1. Export Your Donations as a CSV File
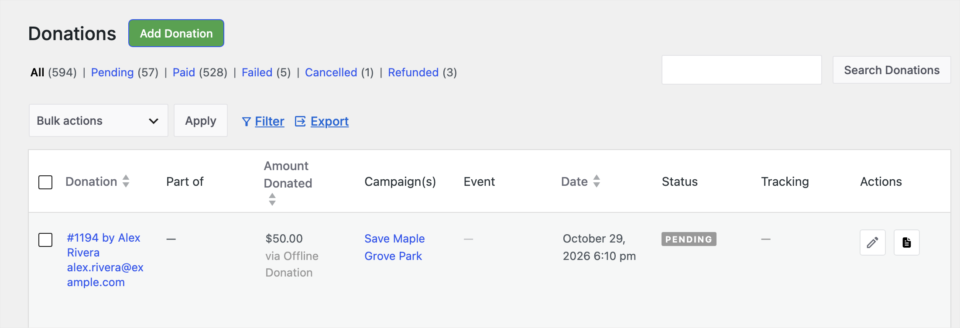
This is the export to use for a backup or a move, and it’s included in the free version. To get started, head over to Charitable » Donations and click the Export button at the top of the list.
The Export Donations window will open. You can filter by date, status and campaign, and choose all donations, one-time donations or the ones that are part of a recurring donation. Leave everything on All to get a full backup.
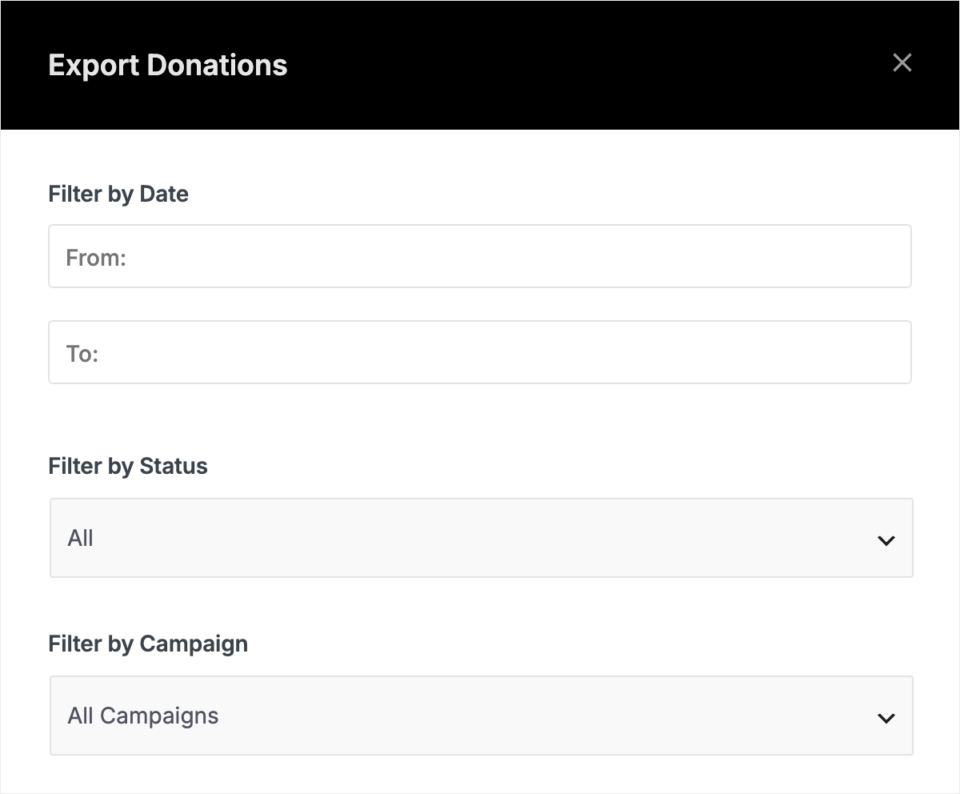
Click Export and the CSV file downloads, ready to open in Excel or Google Sheets.
Step 2. Export Your Donor List
Your donor list has its own export. To find it, head over to Charitable » Donors and click Export next to Filter and Find Duplicates.
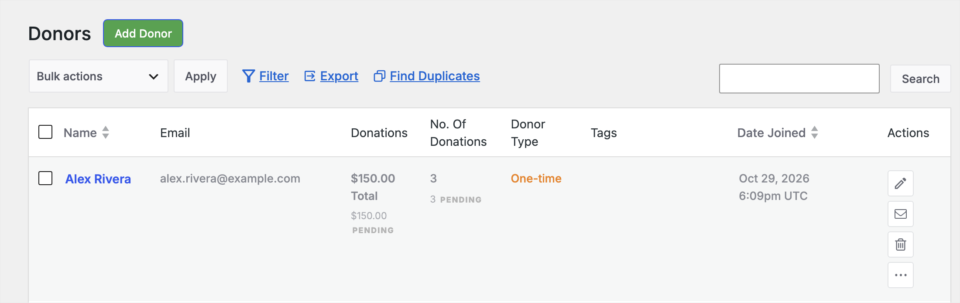
In the Export Donors window, you can filter by the date each donor joined and by campaign. Click Export to download the file.
Step 3. Export Your Fundraising Reports as a PDF or CSV
For a board meeting or a funder update, a report is easier to read than a raw list. In the Charitable Pro plugin, version 1.8.19 and higher, you can head over to Charitable » Reports, set your campaign and date range, and click Download PDF or Export CSV at the top right.
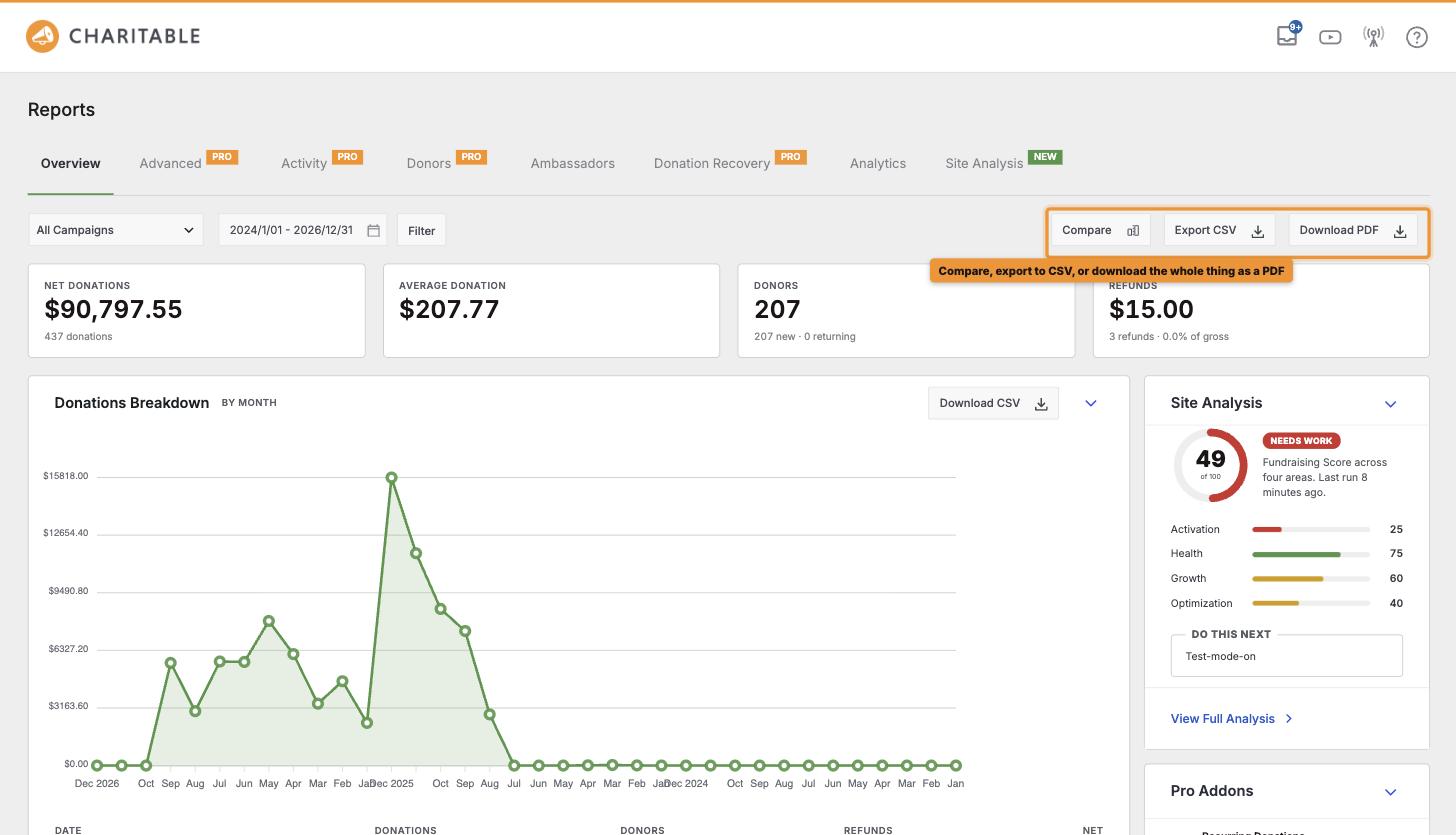
The PDF includes the chart, so it’s ready to share. Some sections, like Donations Breakdown, also have their own Download CSV button when you only need part of the report. Every export uses the filters you’ve picked at the top of the page.
Here’s the full guide on exporting your donation reports as a PDF or CSV.
Step 4. Export Your Gift Aid Declarations
UK charities can collect Gift Aid declarations on the Plus plan and higher. With Gift Aid set up, the Export window on the Donations page adds a Type of Report setting. When it’s time to claim, set it to Gift Aid.
The CSV file comes with the columns you need for a Gift Aid claim to HMRC.
- Donation ID
- Title, first name and last name
- House number and postcode
- Donation date, amount and status
You can read more in the Gift Aid documentation.
Step 5. Export Your Peer-to-Peer Fundraising Data
If supporters fundraise for you with peer-to-peer fundraising, their data is yours to export as well. It’s in the Charitable Pro plugin, Pro plan and higher.
Every Ambassadors screen works the same way. Head over to the section you want under Charitable » Ambassadors, such as Overview, Moderation, Directory or Invitations, and click its Download CSV button. The file downloads right away and follows the date range you’ve picked.
Anonymous donors stay anonymous in these files unless you choose to include their details. The Ambassadors CSV export guide lists every column.
Step 6. Ask Your AI Assistant for an Export
If you’ve connected an AI assistant to your website, you can simply ask it for a donor or donation export. In the Charitable Pro plugin, version 1.8.19 and higher, the assistant replies with a download link and the number of rows in the file.
You stay in charge of who can do this. To set it up, head over to Charitable » Tools » AI MCP and find the AI Access to Donor Data section. Switch on the roles that may let an assistant see donor emails, addresses and exports, then click Save Changes.
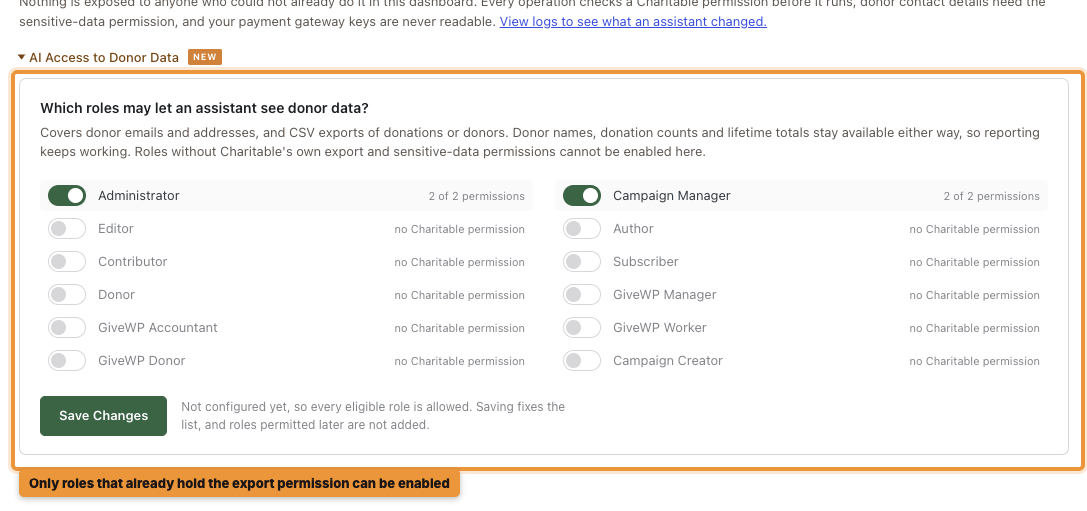
The download link only works for someone signed in to your website with permission to export. Here’s how to control what your AI assistant can see and export.
That covers getting data out. Now let’s bring it in.
How to Import Donors Into Charitable From Other Platforms
Every importer lives on the same screen. To find it, head over to Charitable » Tools and click the Import tab. You’ll see a tab for each source, and you only need the one that matches where your data is today.
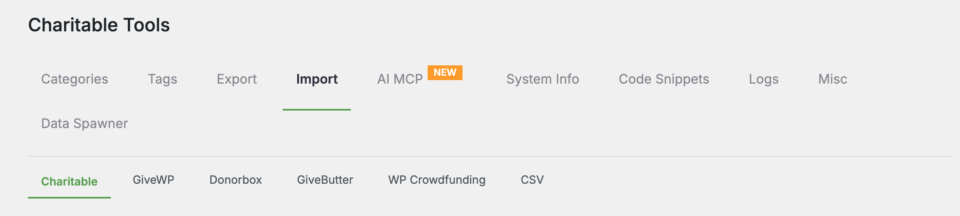
Before you start any of them, back up your website and create the campaigns you want your donations to go to.
Import Donors From Any Spreadsheet With a CSV File
If your donors are in a spreadsheet, an email tool or a platform without its own importer, the CSV Donor Import tool brings them in. It’s in the Charitable Pro plugin, version 1.8.8.8 and higher.
First, save your list as a CSV file. It needs first_name, last_name and email columns, and it can also include phone numbers, company names, mailing addresses and tags.
Then open the CSV tab on the Import screen. Click Upload File, choose your file and click Import CSV Donors.
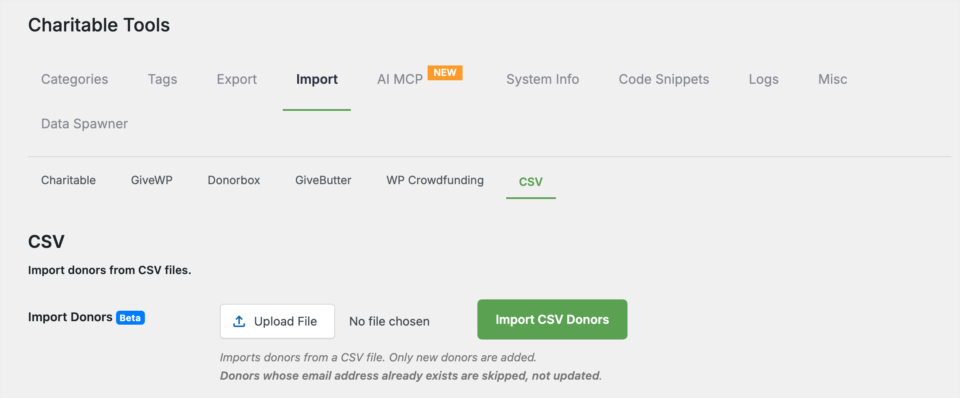
Your supporters will appear on the Donors screen, ready to use. If your file has extra columns, you can map them to custom fields on the same tab.
This importer brings in donor profiles only, without donation history. It only adds new donors, so anyone whose email address is already in Charitable is skipped, not updated.
Move From GiveWP to Charitable
GiveWP lets you export donations and donors as CSV files, and Charitable has a GiveWP importer ready for them. To get started in GiveWP, head over to Donations » Tools » Exports.

Use Export Donation History and Export Donors, clicking Generate CSV for each. Keep both files as .csv, not .xls or .xlsx. You don’t need to rename any columns.
Next, open the GiveWP tab on the Charitable Import screen. Choose the campaign for your donations, click Upload File and then Import GiveWP Donations. Do the same for donors with Import GiveWP Donors.
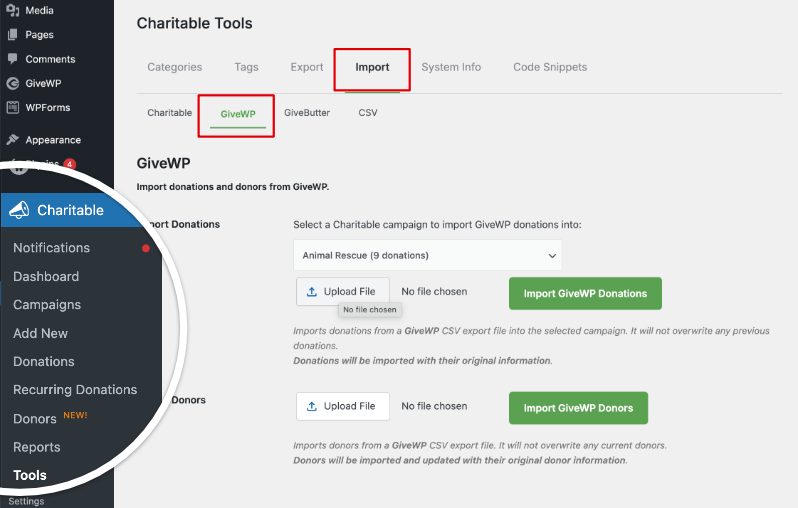
Charitable won’t overwrite any donations you already have, and a message tells you how many records came across. Our full guide on how to switch from GiveWP to Charitable covers testing the move.
If you have monthly donors on GiveWP or would rather not do this yourself, our White Glove Migration Service moves your donors, donation history and active recurring plans for you, with your existing gateway. A paid license is needed to start.
Move From Donorbox to Charitable
Charitable’s Donorbox importer is in the Charitable Pro plugin, version 1.8.14 and higher, on every paid plan. It brings across donors, campaigns, donations and a record of your recurring plans.
In Donorbox, export your donations with the All Columns option. Supporters and recurring plans are optional extra files, and I’d include both for the fullest history.
Then open the Donorbox importer on the Charitable Import screen and upload your files. Charitable counts what it found before it writes anything, so you can check the numbers first.
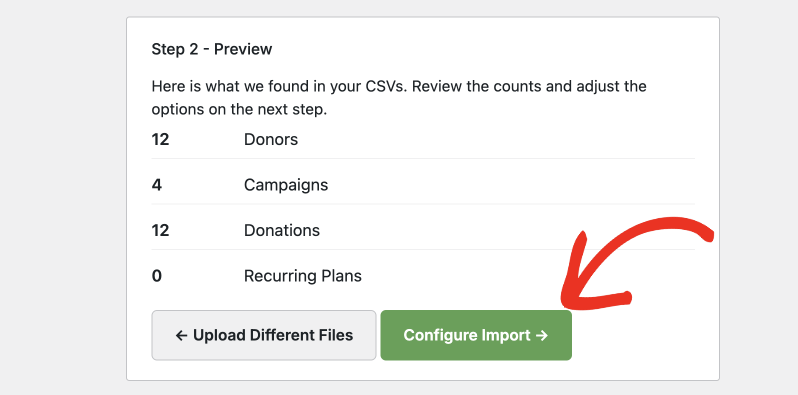
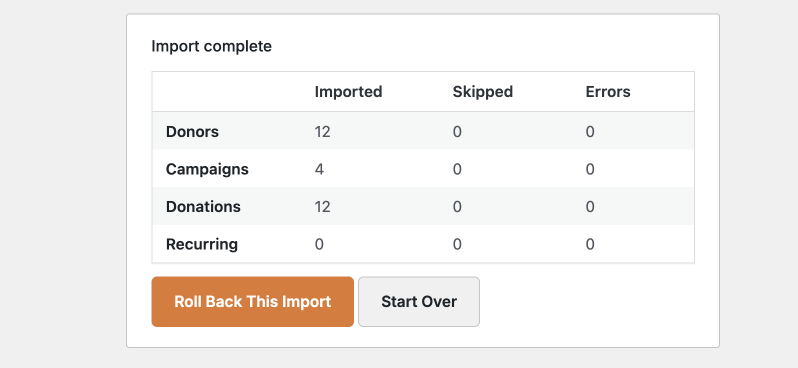
Choose what to import and your date format, and run a dry run if you’d like one more check. After the import, a results screen shows what came in, what was skipped and any errors.
If something looks wrong, the Rollback button removes everything from that import so you can try again.
One thing to plan for is monthly donors. Donorbox payment tokens can’t be moved, so recurring plans arrive as a record with a cancelled status. You’ll need to ask those donors to set up their monthly gift again on your new form.
The Donorbox importer guide has every field and option.
Move From Givebutter to Charitable
To get started, create your campaigns in Charitable, because every imported Givebutter donation needs a campaign to go to. Then, in Givebutter, export your donations from the Transactions section and your donors from the Contacts section.
Back in WordPress, open the Givebutter tab on the Charitable Import screen. Pick a campaign, click Upload File and then the button to import your Givebutter donations.
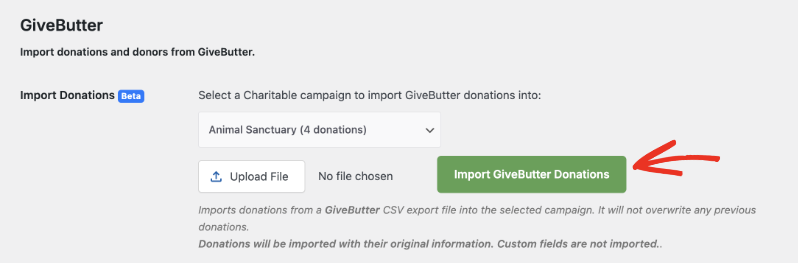
If your export covers more than one campaign, repeat this for each one. Then upload your contacts file in the donors section. Here’s the full guide on how to switch from Givebutter to Charitable.
Move Charitable to a New Website
Your data can move with you even when Charitable stays the same. If you’re moving to a new website or a new domain, Charitable exports your campaigns, donations and donors in files your new site can import.
On your old site, head over to Charitable » Tools and click the Export tab. Pick a campaign and click Export Campaign, then do the same with Export Donations and Export Donors.
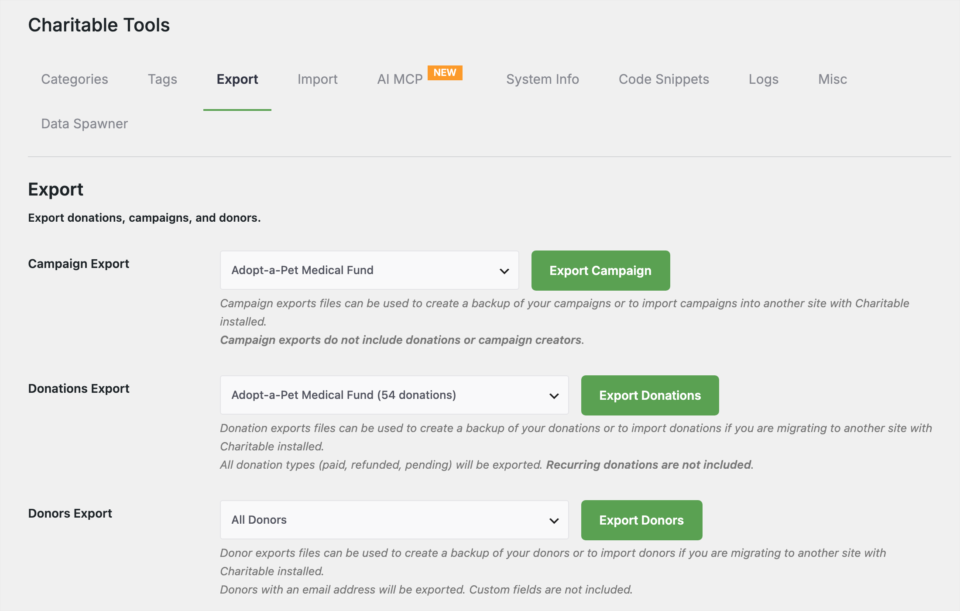
Keep in mind what each file leaves out. Campaign files don’t include donations, donation files don’t include recurring donations, and donor files only include donors with an email address, without custom fields.
On your new site, open the Charitable tab on the Import screen. Upload each file with Import Campaign, Import Donations and Import Donors, starting with your campaigns.
Keep Your Donor Data Working After the Move
Moving your data is only the start. Once your donors are in Charitable, you can do a lot more with them than store them.
Each donor gets a donor profile with their contact details and giving history. You can add tags and notes, and filter your list by campaign or date to find the right people for your next appeal.
Donors can also log in to the donor dashboard to see their own gifts, download receipts and manage their recurring donations. That’s a good place to send the monthly donors who need to set up their gift again.
On the Plus plan and higher, new donors can go straight to your email list in Mailchimp, ActiveCampaign, MailerLite, Campaign Monitor, MailPoet or Mailster. So you won’t need to export and import a list every month.
And keep exporting. A monthly CSV export of your donations, saved somewhere outside your website, means you always have a copy of your donor data, wherever you decide to use it next.
If you’re still comparing your options, these guides can help.
- GiveWP vs Charitable, compared side by side
- Charitable vs Donorbox for WordPress nonprofits
- The best donor database software for nonprofits
FAQs on Donor Data Migration
Who owns donor data on a hosted fundraising platform?
Your donors gave to you, but on a hosted platform the records sit on that company’s servers, and its terms decide what you can export. With Charitable, the records sit in your own WordPress database, so you can export them whenever you like.
Can I export my donor data from the free version of Charitable?
Yes. The free version lets you export your donations to a CSV file from the Donations screen. Report exports and the importers are in the Charitable Pro plugin.
Will my donation history come across when I import donors from a CSV file?
No, the CSV Donor Import tool brings in donor profiles only. To bring giving history across, use the GiveWP, Donorbox or Givebutter importer if your data comes from one of those.
Will my monthly donors keep giving after I switch?
It depends on where you’re coming from. Donorbox recurring plans arrive cancelled, so those donors need to set up their gift again. For GiveWP, the White Glove Migration Service moves active recurring plans for you.
What if I make a mistake during a Donorbox import?
On the results screen, click Rollback and Charitable removes everything from that import. Then fix your files and run it again.
Will importing create duplicate donors?
The GiveWP importer skips donors whose email is already in Charitable, and the Donorbox importer skips records it has already imported. The CSV Donor Import tool also skips any donor whose email address is already in Charitable.
How often should I export a backup of my donor data?
Once a month is a good habit, and always before a big change such as a plugin update or a move. Save the file somewhere outside your website.
Can someone move my GiveWP data for me?
Yes. Our White Glove Migration Service moves donor records, donation history and recurring plans from GiveWP and installs the Charitable Pro plugin for you.
Your donors trusted you with their support. Keeping their records in your own hands is how you keep that trust, wherever your fundraising goes next. Get Charitable now → and take control of your donor data, risk-free with a 14-day money-back guarantee.
Charitable Has 1.2+ Million Downloads!
Trusted by millions to power successful fundraising campaigns. Try Charitable risk-free today.
✅ 14-day money-back guarantee
✅ Transparent pricing
✅ Code-free setup
Stay Connected for More Nonprofit Resources
For more tutorials and videos tailored to nonprofits, subscribe to our YouTube channel. We regularly publish expert tips, step-by-step guides on online donations, fundraising strategies, and practical resources to help your organization succeed.
🗞️ Get weekly tips and exclusive guides in your inbox
Join our newsletter →
🎥 Watch step-by-step tutorials and success stories
Subscribe to our YouTube channel →
👩🏽💻 Connect with our community and get daily nonprofit insights
Follow us on LinkedIn →
🥳 Fun reels and non-profit insights
Follow us on Instagram →
👀 Insightful & fun videos to help you grow your cause
Follow us on TikTok→
🌎 Subscribe and follow for general fundraiser tips
Get Fundraiser Tips on TikTok →
Powerful Fundraising Resources
🤖 Use Charitable with Your AI Assistant
⬇️ Download proven strategies, campaign ideas, and expert tools
Get the Fundraising Kit →
💸 Get Free Fundraising Resources
Head to the Charitable Fundraising Hub →
🤔 Got questions about Charitable?
Charitable FAQs →
🏎️ Take Charitable for a spin
Create your Charitable Demo →
Understand non-profit terms and jargon
Non-Profit Glossary →
% Looking for non-profit deals and discounts?
Best Non-Profit Deals and Discounts →





Leave a Reply