
Migrating from GiveButter to Charitable is a simple process that helps you move your donors and donations without losing any important data.
If you’re switching to Charitable, you can easily bring over your records using the built-in import tool.
In this tutorial, we’ll walk you through each step, from exporting your data from GiveButter to importing it into Charitable.
You don’t need any special technical skills to follow along, just a few minutes and access to your WordPress dashboard and your GiveButter account.
Not sure whether to switch to Charitable yet? See GiveButter vs Charitable »
- Before you start
- Step 1: Export Your Data from GiveButter
- Step 2: Prepare your CSV files
- Step 3: Go to the GiveButter Import tab in Charitable
- Step 4: Import your donations
- Step 5: Import your donors
- Step 6: Clean up and test
- Next Steps in Charitable
- GiveButter vs Charitable – Frequently Asked Questions
- More Information
Before you start
Before migrating from GiveButter, it’s a good idea to make sure everything is backed up and ready to go. You’ll need access to your WordPress dashboard with Charitable installed, as well as your GiveButter account.
Here’s what to check before you begin:
- Back up your site. Always keep a recent backup of your WordPress site and database. This ensures you can restore your data if something goes wrong. Need a free backup solution? Try Duplicator.
- Confirm your data. Make sure your GiveButter transactions and contact records are complete and up to date before exporting.
- Log in as an admin. You’ll need admin access in both GiveButter and your WordPress dashboard.
- Install and activate Charitable. If you haven’t already, install Charitable and make sure it’s active. See How to Install the Charitable Plugin »
- Create your campaigns first. Before importing donations, create the corresponding campaigns in Charitable. You’ll need to assign imported donations to an existing campaign during the import step.
Once you’ve checked these points, you’re ready to migrate from GiveButter to Charitable.
Step 1: Export Your Data from GiveButter
In this step, you will export your donations and donor records from GiveButter as CSV files. GiveButter includes built-in export tools in your account dashboard.
Log in to your GiveButter account and navigate to your organization’s dashboard.
Export your donations
Go to the Transactions section of your GiveButter dashboard. Look for an Export or Download option.
You can filter by date range or specific campaign before exporting. Apply any filters you need, then download the CSV file to your computer.
Export your donors
Go to the Contacts section of your GiveButter dashboard. Look for the Export or Download option there as well.
Select the fields you want to include, such as name, email, address, and donation history, then download the CSV file.
We recommend storing both files in a dedicated folder on your computer so they’re easy to find when you’re ready to import.
Step 2: Prepare your CSV files
Before importing into Charitable, take a moment to open and review the CSV files you exported from GiveButter. This helps avoid errors during import and makes it easier to map your data into Charitable correctly.
- Open each CSV file in a spreadsheet tool like Excel, Google Sheets, or Numbers so the data is easy to scan.
- Check that the column headers are clear and that each row of data sits in the right column, with no shifted cells or strange characters.
Next, make sure your file is saved correctly and ready for upload.
- Confirm the file format is .csv and not another format like .xls or .xlsx.
- If you make any edits, save the file again as CSV to keep it compatible with Charitable’s import tool.
You do not have to rename every column to match Charitable exactly, because you will map each column to the right field during the import step.
Step 3: Go to the GiveButter Import tab in Charitable
Log in to your WordPress dashboard as an administrator.
Go to Charitable » Tools » Import.
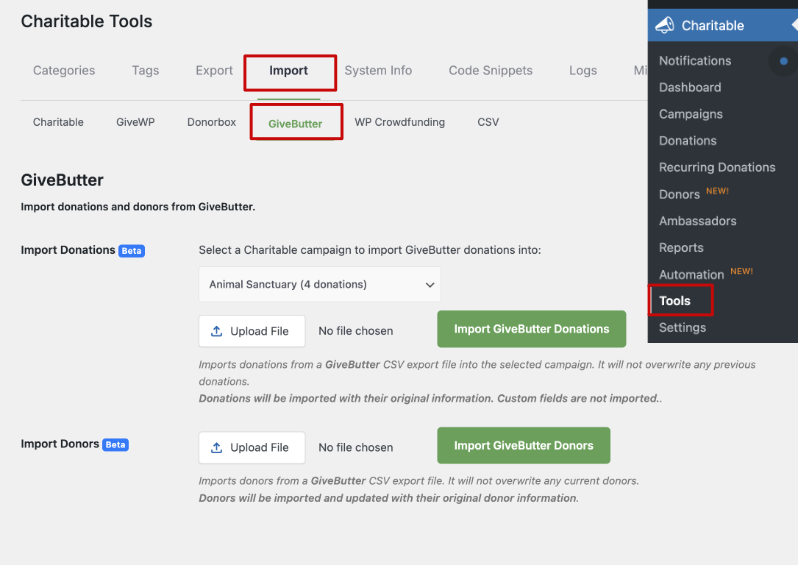
On this screen, you’ll see a menu with options that include Charitable, GiveWP, GiveButter, and CSV. Open the GiveButter tab.
You will see two import sections: Import Donations and Import Donors.
Step 4: Import your donations
Under Import Donations, you’ll see a dropdown menu to select a Charitable campaign. Choose the campaign you want to import the donations into.
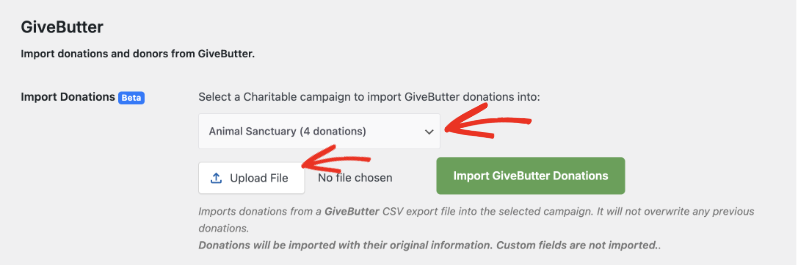
Next, click the Upload File button and select the donations CSV file you exported from GiveButter.
Click the Import GiveButter Donations button. Charitable will process the file and bring in your donation records with their original information. It will not overwrite any previous donations.
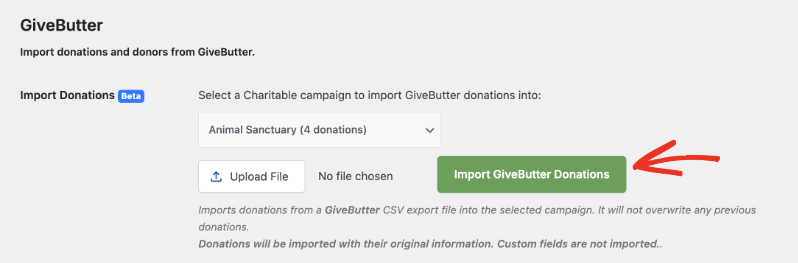
Repeat this step for each campaign if your GiveButter export covers multiple campaigns.
Step 5: Import your donors
Under Import Donors, click the Upload File button and select the donors CSV file you exported from GiveButter.
Click the Import GiveButter Donors button and Charitable will do the rest.

Once the import is complete, you will see a confirmation message telling you how many records were imported successfully.
After the import finishes, it is important to check that everything looks right in Charitable.
- Go to Charitable » Donations to review your imported donations and confirm that amounts, dates, and campaigns look correct.
- Go to Charitable » Donors to check that donor names and emails appear as expected.
If something looks off, such as missing donors or incorrect amounts, compare a few records in Charitable with your original GiveButter CSV file to see if a column may have been mapped to the wrong field during import.
Step 6: Clean up and test
Once you are happy with your migrated data, you can do a quick cleanup and final test.
- Make a small test donation on your site to confirm that Charitable is recording new donations correctly.
- When you are confident everything is working and your data is safely in Charitable, you can stop routing donations through GiveButter.
Next Steps in Charitable
Once your data is safely in Charitable, you are ready to start using your new donation tools to grow your fundraising. Charitable gives you flexible campaigns, easy donor management, and powerful options for collecting and tracking donations in your WordPress dashboard.
Here’s a quick guide to Get started with Charitable as well as to Create Your First Campaign »
Here are a few helpful things to do next:
- Create or tweak your campaigns under Charitable » Campaigns so they match your current appeals and goals.
- Add your donation forms to key pages on your site so visitors can give quickly and easily.
- Explore features like donor dashboards, recurring donations, and email receipts to give supporters a smooth giving experience.
With your GiveButter data migrated and Charitable set up, you can focus on what matters most: growing support for your mission.
GiveButter vs Charitable – Frequently Asked Questions
Do you have a question about Charitable vs GiveButter? See the list below for our most frequently asked questions. If your question is not listed here, please contact us.
What makes Charitable different from GiveButter?
Charitable is built specifically for WordPress and gives nonprofits full ownership of their data and donor relationships, with no platform fees on donations. Here are the main differences:
- Affordable Pricing – Charitable charges a flat annual fee starting at just $69 per year, with no platform fees taken from your donations.
- No Platform Fees – GiveButter charges a platform fee on every donation on top of payment processing fees. With Charitable, 100% of what donors give goes to your cause.
- Your Data, Your Site – All donor data lives in your WordPress database, not a third-party platform.
- All-Inclusive Plans – No expensive add-ons needed; features come standard.
Are there any limits on the number of campaigns or donation forms with Charitable?
No. Charitable lets you create unlimited donation campaigns and forms from day one. No paid upgrades or restrictions.
Can I manage recurring donations with Charitable?
Yes! Charitable includes robust recurring donation features so your supporters can contribute weekly, monthly, or on a custom schedule, helping you achieve a reliable, steady income. You need a Plus plan that costs just $99 per year.
What’s the price difference between Charitable and GiveButter?
GiveButter charges platform fees on every donation on top of payment processing fees, which adds up quickly as your fundraising grows. Charitable charges a flat annual fee with no per-transaction platform fees.
Charitable starts at just $69 per year for essential features like unlimited donation forms, full donation management, reports, PDF receipts, and emails.
Does Charitable integrate with my favorite tools and services?
Charitable works seamlessly with many popular platforms, including MailChimp, ActiveCampaign, Constant Contact, HubSpot, MailPoet, Zapier, and more.
Is Charitable easy to set up and use?
Yes. Charitable is designed to be easy for anyone to use – no coding and beginner-friendly. We’ve included a setup wizard that guides you through the process so you can set up and launch your first campaign in minutes, not hours, not days!
What kind of support does Charitable offer?
Lite users can post questions in the WordPress support forum. Charitable Pro plugin customers can reach out to us through the support channel. You’ll receive friendly, responsive support from a team experienced in helping charities succeed. We’re here to answer questions and resolve any issues quickly.
Will Charitable continue to get new features and updates?
Yes. At Charitable, we are always listening to and actively seeking your feedback to make our platform even better. We are constantly innovating – adding new features, enhancing existing tools, and regularly updating our plugin to ensure compatibility with WordPress updates. Every improvement and security enhancement is driven by real feedback from nonprofits like yours.
More Information
Here are some of the more popular “how to” guides and help articles for new users:
- Setting up Payment Gateways
- Create and Edit Donations in the WordPress Dashboard
- How to Use the Donor Management System
- Connect to Google Analytics
- Issues With Donation Emails Not Sending
- Resend Donation Emails from the Dashboard
- Widgets And Shortcodes
Want more fundraising tips and nonprofit advice?
We regularly share practical guides, proven strategies, and insider tips to help you raise more funds and build stronger donor relationships. Join thousands of nonprofits who get our best content delivered straight to them:
- Join our newsletter – Get weekly tips and exclusive guides in your inbox
- Subscribe to our YouTube channel – Watch step-by-step tutorials and success stories
- Follow us on LinkedIn – Connect with our community and get daily nonprofit insights
- Follow us on TikTok – Insightful & fun videos to help you grow your cause
- Follow us on Instagram – Fun reels with non-profit insights and tips
No fluff, just actionable advice from people who understand the challenges you face every day.

