Do you want your AI assistant to pull a donor list or a CSV file for you, while you stay in charge of who can see donor contact details? The Charitable Pro plugin 1.8.19 adds a donor data setting, CSV exports you can ask for in plain English, and a repeat donor summary.
This guide walks you through each one, plus how to check what an assistant did on your site. Your donors trust you with their details, so it helps to know exactly who can reach them.
If you have not connected an assistant yet, start with Getting Started With AI Assistants in Charitable. It covers connecting WPVibe or another client step by step, so this guide does not repeat it.
What’s In This Guide
What You Need
- The Charitable Pro plugin, version 1.8.19 or later. The donor data setting and the export requests arrived in this version.
- WordPress 6.9 or later. Charitable’s AI features are built on the WordPress Abilities API, which arrived in 6.9.
- An assistant connected to your site. You can connect through the free WPVibe plugin or any MCP client. MCP is the standard way AI assistants connect to other tools.
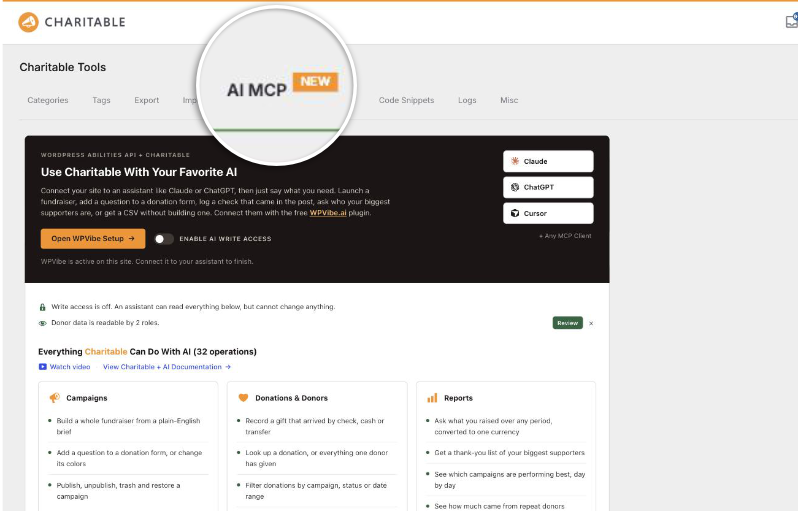
Everything in this guide starts from the AI MCP screen. You’ll find it under Charitable » Tools » AI MCP.
Choose Which Roles Can Share Donor Data With an Assistant
An assistant always acts as the WordPress user it is connected as. The AI Access to Donor Data setting decides which user roles may let an assistant see donor contact details.
The setting covers 2 things.
- Donor email addresses and postal addresses.
- CSV exports of donations or donors.
Donor names, donation counts and lifetime totals stay available either way. That means reports and questions like “Who are our biggest supporters?” keep working.
To change the list, follow these steps.
- In your WordPress dashboard, head over to Charitable » Tools » AI MCP.
- On that screen, click AI Access to Donor Data to open the section. You’ll see the question “Which roles may let an assistant see donor data?” and a switch for each role on your site.
- Next, turn each role on or off.
- When you are happy with the list, click “Save Changes”.
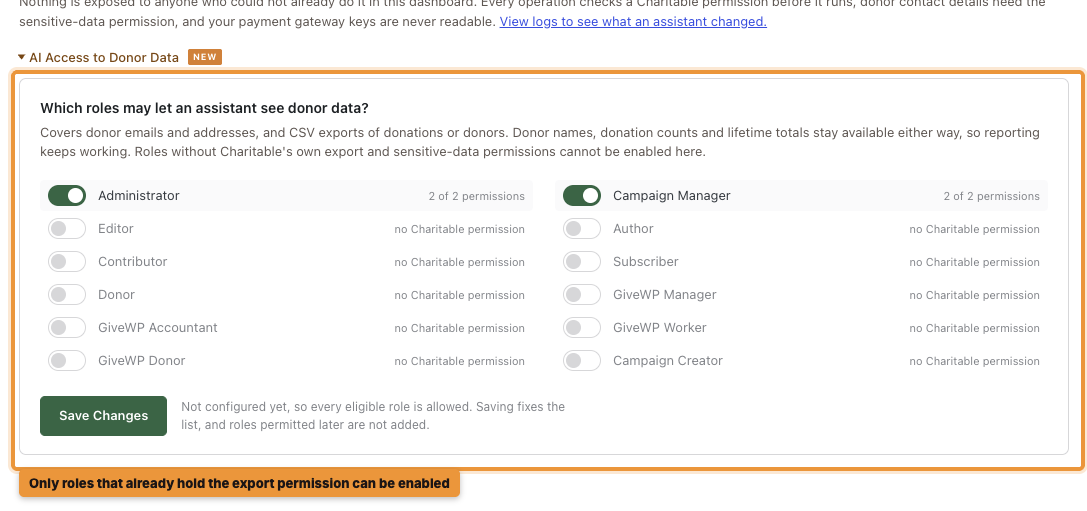
Only roles that already have Charitable’s own export and sensitive-data permissions can be turned on. On most sites, that means Administrator and Campaign Manager. Every other role appears greyed out with “no Charitable permission” beside it.
Important Note: Until you save this section for the first time, it reads “Not configured yet”. In that state, every eligible role is allowed. Once you click “Save Changes”, the list is fixed.
Important: A role that gains Charitable’s export and sensitive-data permissions after you save is not added to the list for you. If you give a role those permissions later and want it to share donor data with an assistant, come back here, turn it on and save again.
The AI MCP screen also shows a short summary line, such as “Donor data is readable by 2 roles.” The “Review” button beside it is a quick way back to this setting.
Export Donations or Donors as a CSV File
You can now ask your assistant for a CSV file instead of building the export yourself. The assistant replies with a download link and the number of rows in the file.
Here are a few requests you can try.
- “Export last month’s donations as a CSV.”
- “Give me a CSV of every completed donation to the Spring Appeal campaign.”
- “Export all donations from Jane Smith this year.”
- “Export a CSV of the donors added to our site this quarter.”
A donation export can be narrowed by campaign, donor, donation status and date range. These are the same filters the assistant uses when it lists donations for you.
Important Note: The date range on a donor export means the date each donor was first added to your site. It does not mean the date they gave. If you want to know who gave last month, ask for a donation export for last month instead.
A donation export includes donor names, email addresses, phone numbers and postal addresses. Because exports hold contact details like these, the user the assistant is connected as needs the sensitive-data permission, and their role has to be on the AI Access to Donor Data list.
Note: The download link only works for someone who is signed in to your WordPress site with permission to export. If the link is shared with anyone else, it will not open the file for them.
Ask How Much Came From Repeat Donors
Your assistant can now split the money from any period between repeat donors and first-time donors. For each group, you get the number of donors and the total they gave.
You can ask it in your own words.
- “How much of this year’s money came from repeat donors?”
- “How many first-time donors did we have last quarter, and what did they give?”
There are 2 ways to count a repeat donor, and the totals can differ a little between them.
- Range counts someone as a repeat donor if they gave before the period you asked about started. This is what most people mean by a repeat donor.
- Lifetime counts someone as a repeat donor if they have made more than 1 donation in total. This matches the First Time filter on the Donors report in Charitable.
Here is an example. If Maria gave for the first time in March and then gave again later in March, a range count for March puts her with first-time donors, because she had not given before March. A lifetime count puts her with repeat donors, because she has made 2 donations.
Pro tip: If you want your numbers to match the Donors report, ask for the lifetime count in your question.
Check Your Write Access Setting
Nothing in this guide needs write access, since seeing and exporting data does not change your site. This is a good moment to check the setting, though.
“Enable AI Write Access” is off by default. While it is off, an assistant can read your Charitable data but cannot change anything. If it is asked to make a change, it refuses and tells you which switch to turn on.
If you turned it on while following the getting-started guide and would like it off again, here is how.
- In your WordPress dashboard, head over to Charitable » Tools » AI MCP.
- Next to the “Open WPVibe Setup” button, turn the “Enable AI Write Access” switch off.
You’ll see the line “Write access is off. An assistant can read everything below, but cannot change anything.” under the header.
See What an Assistant Did
Every change an assistant makes is recorded in Charitable’s logs, along with the times it was asked to do something and refused.
- To get started, head over to Charitable » Tools » Logs.
- In the first drop-down above the table, choose Abilities.
- Then click “Filter”.
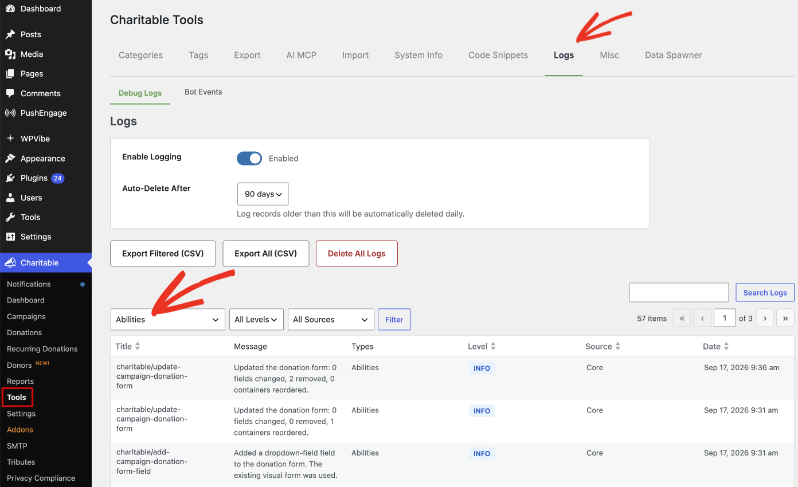
Each entry shows which operation the assistant used, what happened, and when.
Pro tip: Click “Export Filtered (CSV)” on the same screen if you need to share the record with someone else on your team.
Troubleshooting
Start With the Abilities API Section in System Info
For most problems, the first place to look is Charitable » Tools » System Info. Its Abilities API section tells you whether the API is available, whether write access is on, and which MCP clients are active.
It also shows the last operation an assistant ran and the last one that was refused. If you contact support, click “Copy System Information” and paste it into your ticket.
The Assistant Says It Does Not Have Permission
This usually happens when you ask for donor emails, addresses or a CSV export. There are 2 things to check.
- First, find the role of the user the assistant is connected as. You can see it under Users » All Users.
- Then open Charitable » Tools » AI MCP, click AI Access to Donor Data, and make sure that role is switched on. If you made changes, click “Save Changes”.
If the role is greyed out, it does not have Charitable’s export and sensitive-data permissions. In that case, you can connect the assistant as a user with a role that does, such as an Administrator.
The Export Link Will Not Open
The download link only works while you are signed in to your WordPress site as a user who may export. Sign in to your dashboard in the same browser, then open the link again.
Tips Worth Keeping in Mind
A few habits will help you keep donor data safe while you work with an assistant.
- Save the donor data list once, on purpose. Until you save it, every eligible role is allowed, so saving it is how you make the choice yours.
- Connect each person as themselves. When every team member uses their own WordPress user, the logs show who asked for what.
- Ask for a donation export when you mean “who gave”. Donor exports filter by the date a donor was added to your site.
- Treat a CSV file like any other donor list. It holds contact details, so store it somewhere private and delete copies you no longer need.
- Fewer refused edits. If you have write access on, the assistant can now check which form field types and design style values your site accepts before it edits a donation form.
That’s it! You can now choose which roles may share donor data with an assistant, ask for donation and donor CSV files, and see how much of your money came from repeat donors.
You also know where to check your write access setting and how to review everything an assistant did in the logs. If you get stuck, our support team is happy to help.
You May Also Want to Read
These guides cover the rest of Charitable’s AI features and your donor data.
- Getting Started With AI Assistants in Charitable walks you through connecting WPVibe or another client and turning on write access.
- Everything AI Assistants Can Do in Charitable lists what an assistant can do on your site and how permissions map to roles.
- How to Export Your Donations Reports as PDF or CSV shows you how to export reports yourself from the dashboard.
- How to Use the Donor Management System explains how to find, edit and manage donor records in Charitable.