Do you want to sell tickets to your gala, walkathon or workshop without running a separate ticketing tool? Charitable Events lets you sell event tickets through your Charitable donation forms, so every ticket counts toward a campaign goal and lands in your donation reports.
This guide covers creating an event, adding ticket types, asking attendees questions at checkout, choosing how event pages look, showing events on a calendar or any page, and checking guests in at the door.
Keeping tickets and donations in one place means one set of reports, one list of supporters, and receipts that show the right tax-deductible amount for every ticket.
Charitable Events is available in the Charitable Pro plugin, Pro plan and higher.
What’s In This Guide?
- Before You Start
- Where to Find Charitable Events
- Creating an Event
- Adding Ticket Types
- How Fair Market Value Works
- Asking Attendees Questions at Checkout
- What Buyers See on the Event Page
- Choosing a Page Layout
- Turning On Event Page Extras
- Showing Events on Sugar Calendar or The Events Calendar
- Adding Events to Any Page With Blocks
- Tickets and QR Codes on the Receipt
- Checking In Attendees
- Managing Attendees
- Event Tickets on Donation Records
- Virtual and Hybrid Events
- Tips Worth Keeping in Mind
- FAQs on Charitable Events
- Wrapping Up
- You May Also Want to Read
Before You Start
Charitable Events is an addon, so it needs to be installed and activated first. You’ll need the Charitable Pro plugin active with a license on the Pro plan or higher.
- To get started, head over to Charitable » Addons in your WordPress dashboard.
- Find Events in the list and click “Install Addon”.
- Once it’s installed, click “Activate”.
Note: Ticket payments go through the payment gateways you already have set up in Charitable. If you haven’t connected a gateway yet, do that before you start selling tickets.
Where to Find Charitable Events
Once Events is active, you’ll see a new Events item under Charitable in the WordPress menu. Go to Charitable » Events to open it.
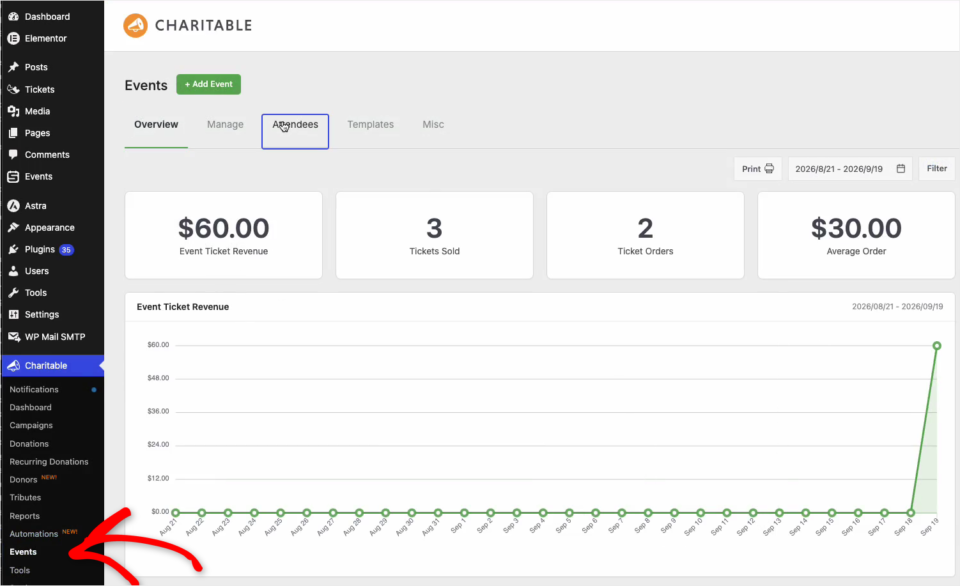
At the top of the page you’ll see 5 tabs.
- Overview shows your event ticket revenue, tickets sold, ticket orders and average order, with a revenue chart, your upcoming events, your top events and your most recent ticket purchases.
- Manage lists every event you’ve created, whether it is published, a draft or pending.
- Attendees lists everyone who holds a ticket.
- Templates sets the default layout for your event pages.
- Misc holds the settings that apply to every event page, such as the countdown, calendar buttons, map and sharing buttons.
The Overview tab also has a Quick Actions box with shortcuts to add a new event, open the check-in scanner, view attendees and manage all events.
Creating an Event
To create your first event, click “+ Add Event” at the top of any Events tab. The Add Event screen opens on the General tab. It works much like writing a WordPress post, with a few event settings added.
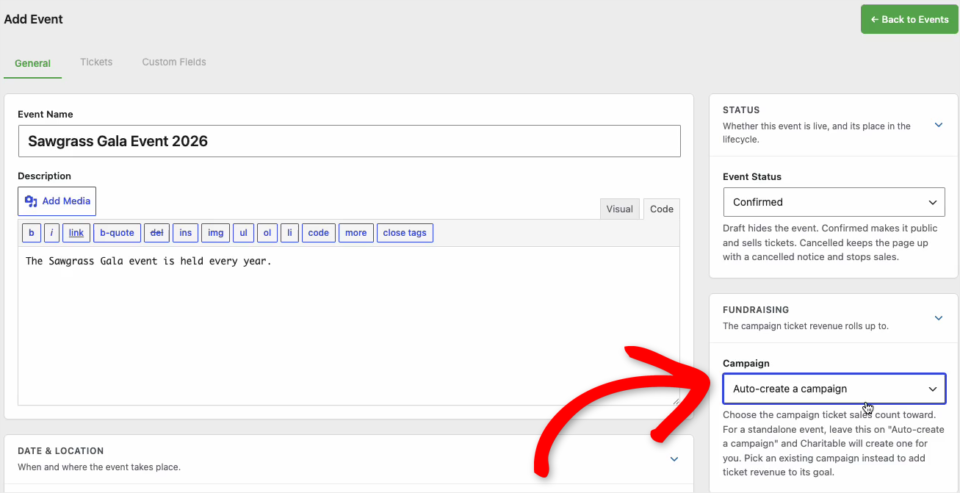
In the main column, fill in the details of the event.
- Event Name is the title of the event and of its page.
- Description is the text shown on the event page. You can add images and links here, the same as in a post.
- Date & Location holds the start and end date and time, the venue name, street address, city, state or region, postal code and country. Once you save, a map of the address appears below these fields.
- Event Photos adds a photo gallery that plays as a slideshow on the event page. You can use it as a preview before the day and add highlights afterward.
On the right side, you’ll see a set of boxes that control how the event works.
- Status sets where the event is in its life. Draft hides the event. Confirmed makes it public and starts selling tickets. Cancelled keeps the page up with a cancelled notice and stops sales.
- Fundraising sets the campaign that ticket sales count toward. For a standalone event, leave it on “Auto-create a campaign” and Charitable will create one for you. To add ticket money to an existing campaign’s goal, pick that campaign instead.
- Virtual Access is for virtual or hybrid events. See Virtual and Hybrid Events below.
- Featured Image is the main image for the event. It appears on the event page and on event cards in lists.
- Display sets the layout for this one event and whether it shows on a calendar. Both are covered later in this guide.
When you’re happy with the details, click “Add Event” at the bottom of the page.
After you save, the screen changes to Edit Event. You’ll see a Permalink field under the event name, where you can change the end of the event page’s URL.
A “View Event” button also appears at the top, and a Check-In Link box appears on the right. The check-in link is covered in Checking In Attendees below.
Important Note: Every donation in Charitable belongs to a campaign, and your reports are built on campaigns. That’s why each event needs one. The campaign page itself can stay hidden if you only want people to buy tickets from the event page.
Adding Ticket Types
Next, open the Tickets tab at the top of the Edit Event screen. This is where you create the ticket options buyers choose from.
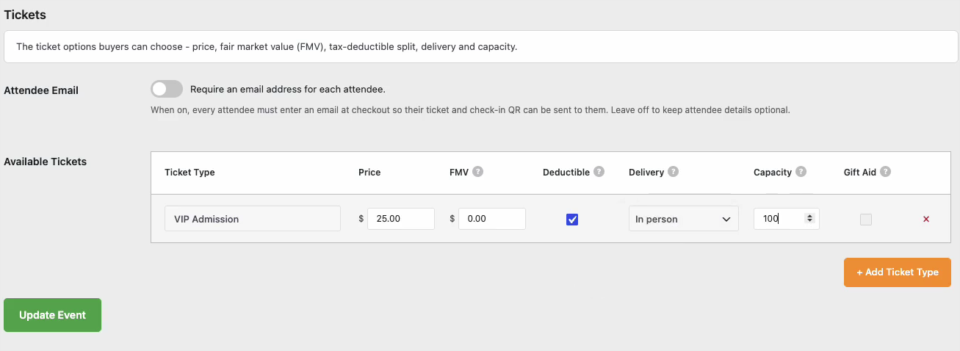
To add a ticket, click “+ Add Ticket Type” and fill in each column of the new row.
- Ticket Type is the name buyers see, such as General Admission, VIP or Early Bird.
- Price is what the ticket costs.
- FMV is the fair market value of what the attendee receives, such as the cost of the meal. See How Fair Market Value Works below.
- Deductible sets whether this ticket produces a tax-deductible donation.
- Delivery sets how attendees take part. In person tickets get a QR code for check-in at the door. Virtual tickets get gated access to the online stream. Hybrid tickets get both.
- Capacity is how many of this ticket type you can sell. When a ticket type sells out, it stops selling.
- Gift Aid is for UK charities that claim Gift Aid.
You can add as many ticket types as the event needs. To remove one, click the red × at the end of its row.
At the top of the tab there is also an Attendee Email switch. When it’s on, every attendee must enter an email address at checkout, so their ticket and check-in QR code can be sent to them. Leave it off to keep attendee details optional.
When your tickets are set up, click “Update Event” to save them.
How Fair Market Value Works
When someone pays for an event ticket, part of that money often pays for something they receive, like a dinner or entertainment. That part is the fair market value, and only the amount above it counts as a tax-deductible gift.
Charitable works this out for every ticket from the Price and FMV you set, and shows both amounts on the donor’s receipt.
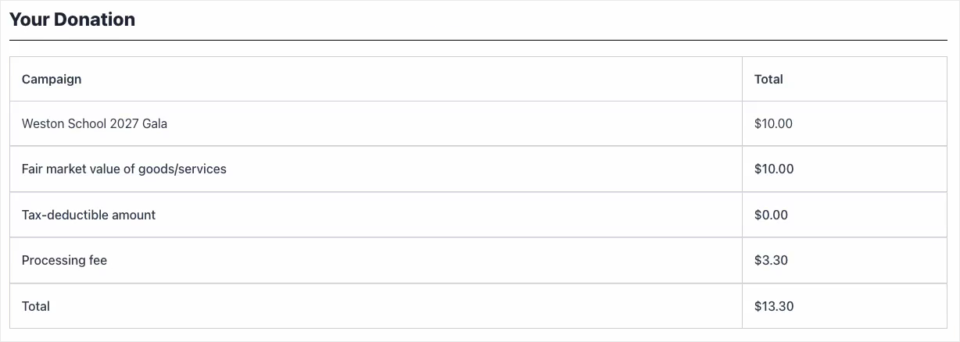
In this example, a $10 ticket has an FMV of $10, so the tax-deductible amount is $0. A $25 ticket with an FMV of $0 would show the full $25 as tax-deductible.
We’re using the US approach as the example here, since that’s the one most readers know. If your organization is somewhere else, your accountant can tell you how your country treats event tickets and what to enter as the fair market value.
Asking Attendees Questions at Checkout
Every ticket creates its own attendee record. The Custom Fields tab lets you add extra questions each attendee answers at checkout, such as a meal choice or a t-shirt size. The answers are saved to the attendee record.
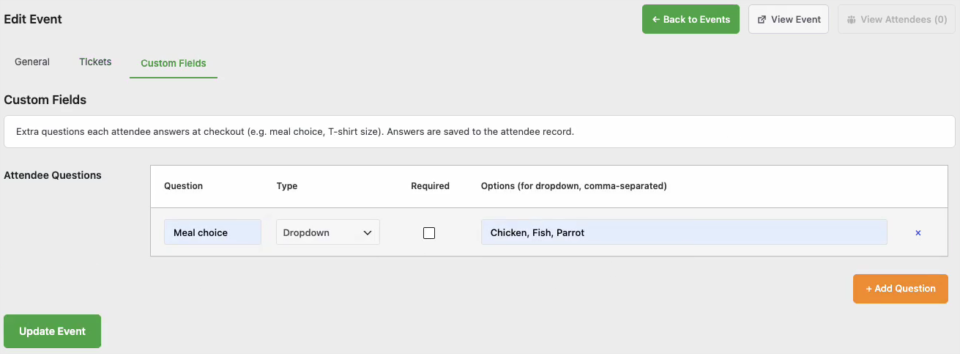
- Click “+ Add Question”.
- Enter the Question, for example Meal choice.
- Pick the Type of answer from the dropdown.
- Tick Required if every attendee has to answer.
- For a dropdown, enter the Options separated by commas, for example Chicken, Fish, Vegetarian.
- Click “Update Event”.
What Buyers See on the Event Page
To see the page, click “View Event” at the top of the Edit Event screen. By default, event pages live at yoursite.com/campaign-events/event-name/.
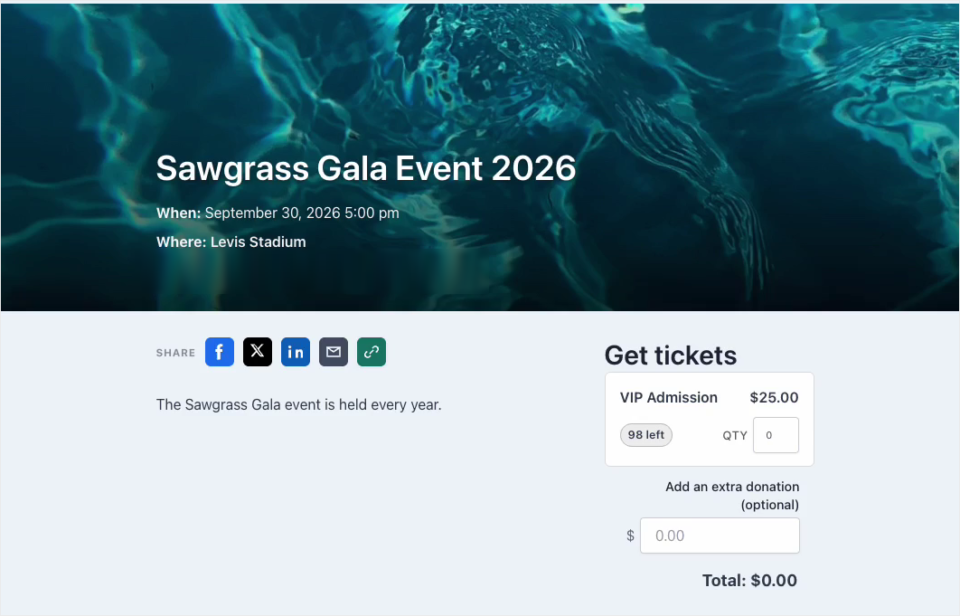
Buyers choose a quantity for each ticket type in the Get tickets box. Each ticket shows how many are left. There’s also an optional field to add an extra donation on top of the tickets.
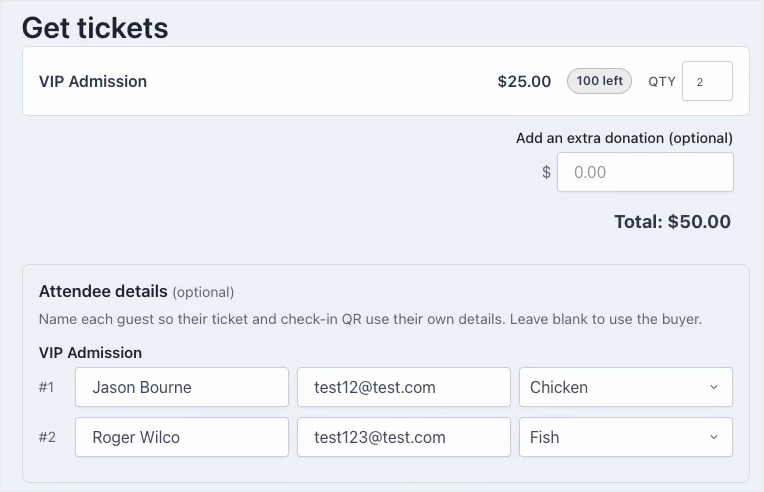
Once they pick a quantity, an Attendee details section appears with a row for each ticket. Buyers can name each guest so every ticket and QR code carries that guest’s own details. If they leave a row blank, that ticket uses the buyer’s details.
Below that, buyers fill in the usual Charitable donation fields and choose a payment method. Any other donation form features you use, such as Fee Relief, appear here too.
Choosing a Page Layout
The Templates tab under Charitable » Events sets the default layout for every event page.
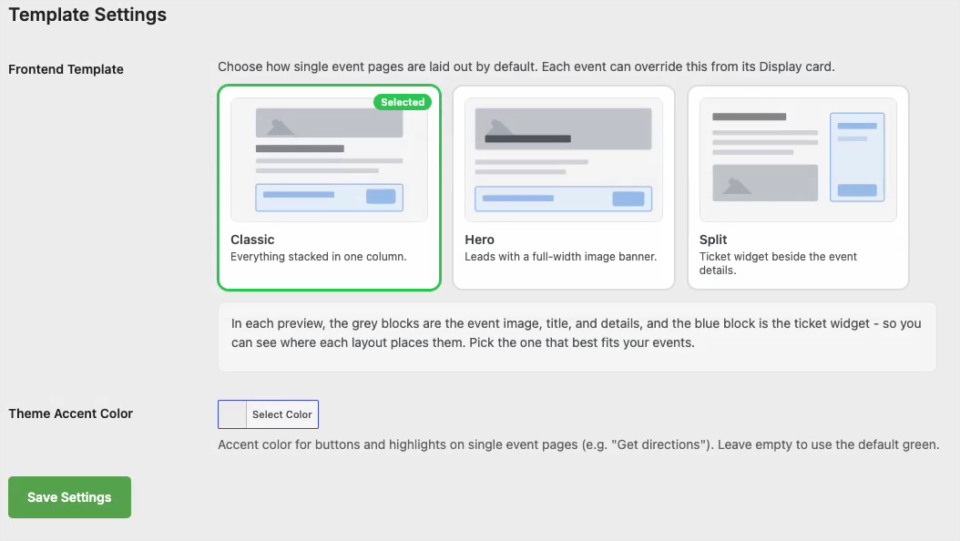
- Classic stacks everything in one column.
- Hero leads with a full-width image banner.
- Split puts the ticket widget beside the event details.
In each preview, the grey blocks are the event image, title and details, and the blue block is the ticket widget. Pick a layout, then click “Save Settings”.
Here’s an event page using the Hero layout.
Theme Accent Color sets the color of buttons and highlights on event pages, such as the Get directions button. Leave it empty to use the default green.
To use a different layout for one event, open that event and change the Layout in its Display box. Leave it on Site Default to follow the setting on the Templates tab.
Pro tip: The Split layout looks best with a longer description, so the ticket widget has text to sit beside. For a short description, Classic or Hero will look tidier.
Turning On Event Page Extras
The Misc tab under Charitable » Events holds settings that apply to every event on the site. Open the Event Settings sub-tab to see them.
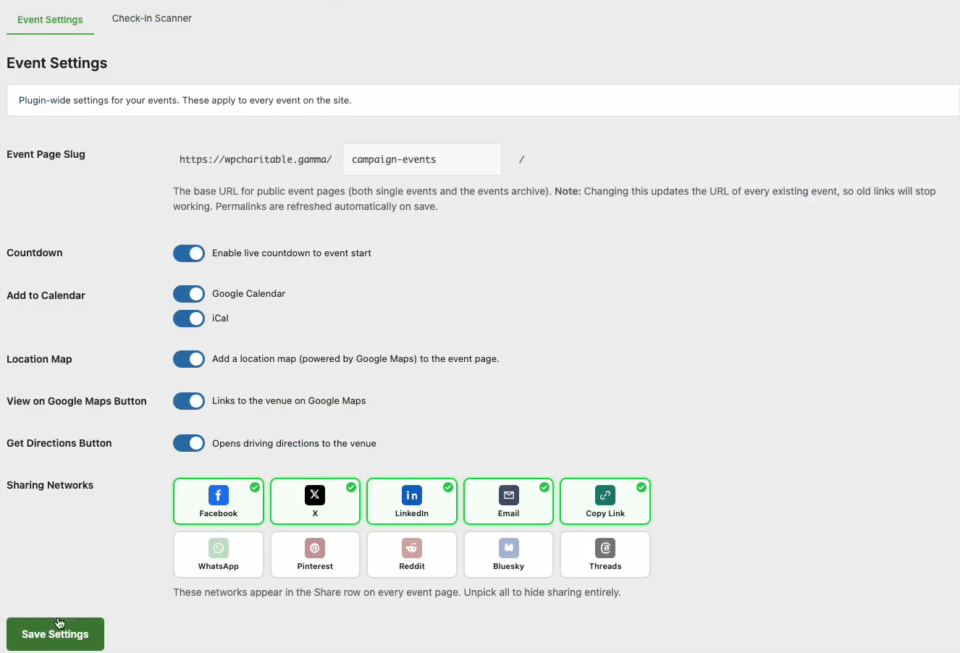
- Event Page Slug is the part of the URL that comes before every event page. The default is
campaign-events. - Countdown adds a live countdown to the start of the event.
- Add to Calendar adds Google Calendar and iCal buttons, each with its own switch.
- Location Map adds a map of the venue, powered by Google Maps.
- View on Google Maps Button links to the venue on Google Maps.
- Get Directions Button opens driving directions to the venue.
- Sharing Networks sets which share buttons appear on every event page. Click a network to add or remove it. Unpick them all to hide sharing completely.
Important: Changing the Event Page Slug changes the URL of every event you already have, so old links to those pages will stop working. Set it before you share any event links.
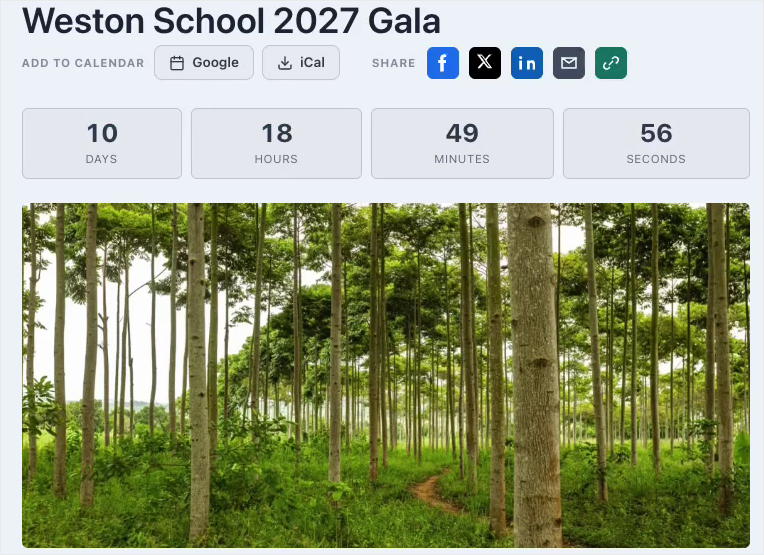
When you’re done, click “Save Settings”. Here’s how the countdown, calendar buttons and share row look at the top of an event page.
Showing Events on Sugar Calendar or The Events Calendar
If you use Sugar Calendar or The Events Calendar on your site, Charitable Events can add your events to it. The calendar shows the event’s date, description, image and location, while the tickets, attendees and receipts stay in Charitable.
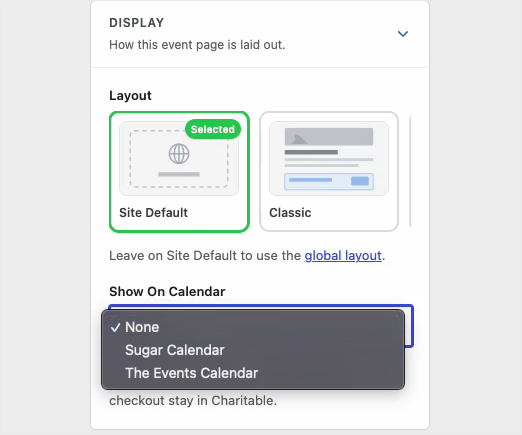
To choose the calendar, open the event and find the Display box on the right. Then pick the calendar from the Show On Calendar dropdown and click “Update Event”.
It works the other way too. An event that already lives in Sugar Calendar or The Events Calendar can be turned into a fundraising event in Charitable, without building it again.
Adding Events to Any Page With Blocks
Charitable Events adds 3 blocks to the WordPress block editor. To find them, open the block inserter and scroll to the Charitable Events group, or search for the block’s name.
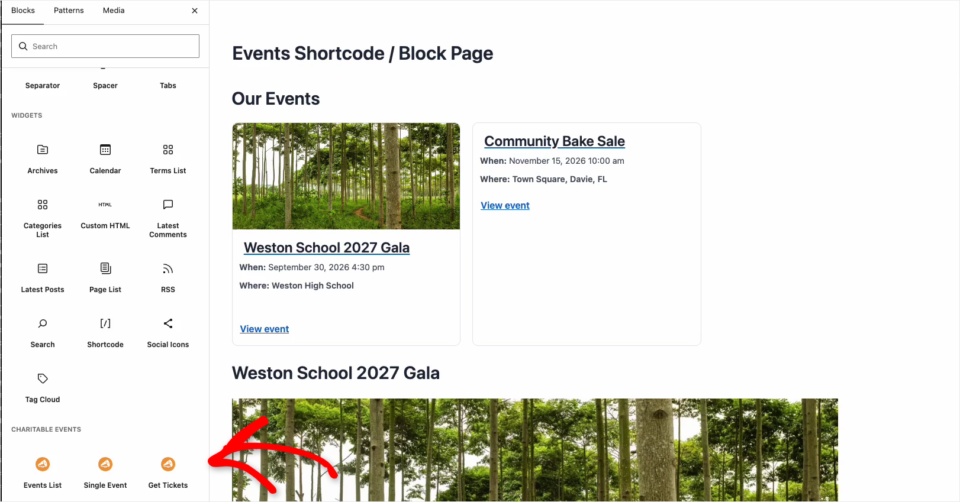
- Events List shows a grid or list of your events, with their featured images, in the same way a campaign list shows campaigns.
- Single Event shows the full details of one event.
- Get Tickets puts the ticket form for one event on any page.
For the Single Event and Get Tickets blocks, choose the event in the block settings on the right side of the editor. The Get Tickets block also lets you change its heading.
Note: In the editor, the Get Tickets block shows a preview of the tickets. The full donation form appears on the published page.
Tickets and QR Codes on the Receipt
After checkout, the donation receipt page shows a My Tickets section. Each attendee gets their own card with their name, ticket type, email, custom field answers, status and a QR code to scan at check-in.
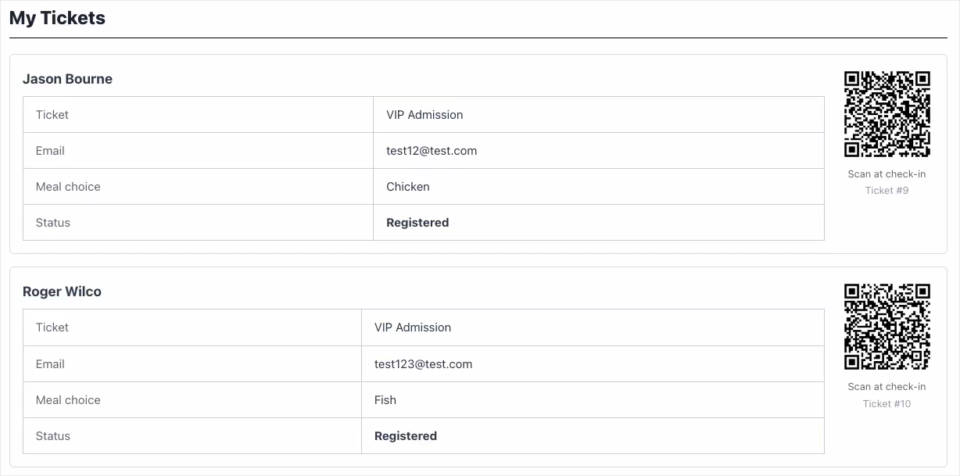
Important Note: Tickets are only issued once the payment is confirmed. If a buyer pays with an offline method such as a check, the donation stays pending and no tickets appear. When the money arrives, open the donation under Charitable » Donations and mark it as paid, and the tickets will then show on the receipt.
Checking In Attendees
There are 2 ways to check people in on the day. You can scan their QR code at the door, or check them in by hand from their attendee record.
Scanning Tickets at the Door
Staff who are logged in can open the check-in scanner from Quick Actions on the Overview tab. The scanner’s settings are on the Check-in Scanner sub-tab under Charitable » Events » Misc.
Door volunteers don’t need a WordPress account. Every event has a Check-In Link box on the right of its Edit Event screen, which you share with the people scanning tickets.
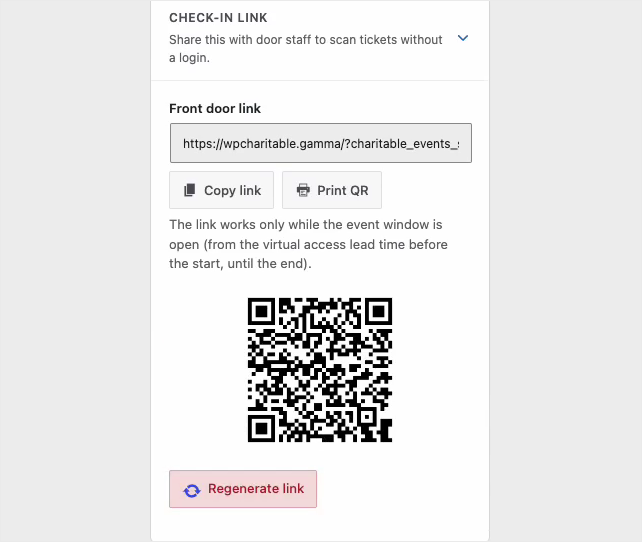
- “Copy link” copies the front door link so you can send it to your volunteers.
- “Print QR” prints a QR code of the link, so volunteers can scan it to open the scanner on their phone.
- “Regenerate link” creates a new link and stops the old one working. Use it if the link has been shared with the wrong people.
The link only works while the event window is open, from the virtual access lead time before the start until the end of the event.
Checking Someone In by Hand
If a guest forgets their QR code, go to Charitable » Events » Attendees, click their name and click “Check In”.
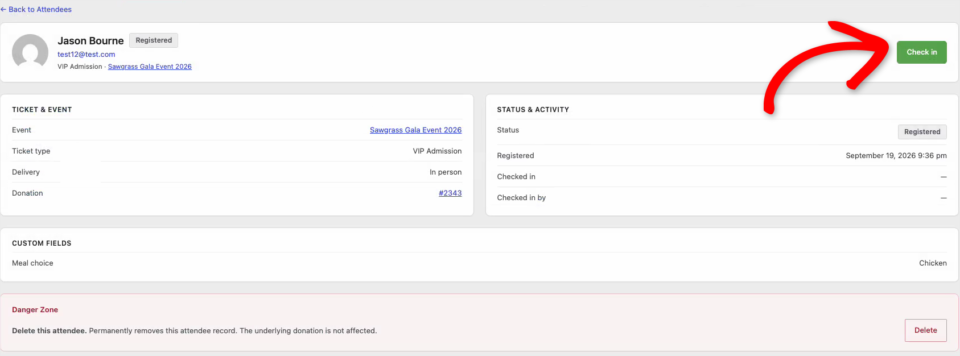
The Status & Activity box then shows when they were checked in and who checked them in.
Managing Attendees
The Attendees tab lists everyone who holds a ticket, across all your events. Each row shows the attendee, their event, ticket type, status, registration date and the donation their ticket belongs to.
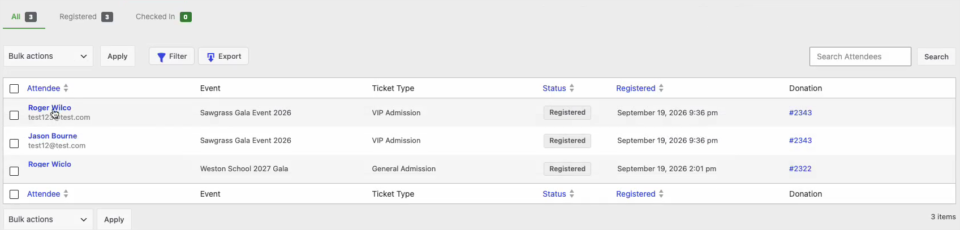
- Use the All, Registered and Checked in links at the top to see each group.
- Use “Filter” to narrow the list, and “Search Attendees” to find someone by name.
- Use “Export” to download the list, for example for a printed door list or a seating plan.
- To open an attendee’s record, click their name. The record shows their ticket, event, delivery type, donation and custom field answers.
To remove an attendee, open their record and click “Delete” in the Danger Zone box. This removes the attendee record permanently, but the donation it belongs to is not affected.
To see the attendees for one event, open the event and click “View Attendees” at the top of the Edit Event screen.
Event Tickets on Donation Records
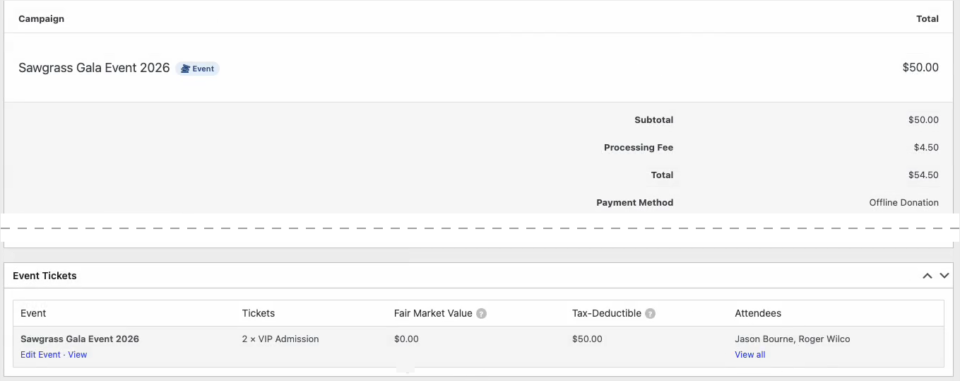
Every ticket purchase is a Charitable donation, so it appears under Charitable » Donations with the rest of your donations. With Charitable Events active, the donations list gets an extra column showing the event each donation belongs to.
When you open a ticket donation, you’ll see the campaign marked with an Event label, and an Event Tickets box listing the tickets, their fair market value, the tax-deductible amount and the attendees.
Virtual and Hybrid Events
For an online or part-online event, set the ticket’s Delivery to Virtual or Hybrid on the Tickets tab. Then open the Virtual Access box on the event’s General tab to add the join details. The join link or stream is only available to people who hold a ticket.
Tips Worth Keeping in Mind
A few habits that make events easier to run on the day.
- Save a new event as a Draft first, check the page with “View Event”, and switch it to Confirmed when you’re ready to sell.
- Turn on test mode and buy a ticket yourself before the event goes live, so you see the checkout, the receipt and the QR code the way your guests will.
- Turn on Attendee Email if every guest needs their own QR code, for example at a gala where couples arrive separately.
- Set your Event Page Slug once, before you share any links, because changing it later breaks the old ones.
- Send volunteers the check-in link a day early, and test it on their phones before the doors open.
- Export the attendee list the night before, so you have a backup if the Wi-Fi at the venue is poor.
FAQs on Charitable Events
Which plan includes Charitable Events?
Charitable Events is in the Charitable Pro plugin, Pro plan and higher.
Do I need to create a campaign before I create an event?
No. Leave the Campaign setting on “Auto-create a campaign” and Charitable creates one when you save the event.
Can I add an event to a campaign I’m already running?
Yes. Pick that campaign in the Fundraising box, and ticket sales will count toward its goal alongside its regular donations.
Why can’t the buyer see their tickets yet?
Tickets appear only once the payment is confirmed. If the buyer chose an offline payment method, mark the donation as paid under Charitable » Donations and the tickets will show on their receipt.
Can supporters give more than the ticket price?
Yes. The Get tickets box has an optional extra donation field, and that amount goes to the same campaign as the tickets.
Does it work with page builders?
Charitable Events comes with 3 blocks for the WordPress block editor. There are no page builder widgets for it yet.
Wrapping Up
You now know how to create an event, add ticket types with a fair market value, ask attendees questions, choose how event pages look, and check guests in at the door.
Your ticket money counts toward your campaign goal, and your event income sits in the same reports as the rest of your fundraising. If you get stuck on any step, our support team is happy to help.
You May Also Want to Read
These guides cover the Charitable features that work alongside your events.
- How to Install and Activate Charitable Extensions. What to do if Events is not showing under Charitable » Addons yet.
- Customizing the Donation Receipt Page. Change the receipt page where your attendees find their tickets and QR codes.
- Charitable Gift Aid. Set up Gift Aid before using the Gift Aid column on your ticket types.
- How to Add the Donation Form Block. Another way to put a Charitable form on any page, for regular donations outside your events.