
Do you want your WordPress site to handle the work that comes after a donation, without you touching any of it? Most fundraising teams collect the gift automatically and then do everything else by hand.
I’ve spent more than 15 years running fundraising campaigns, and I co-founded a nonprofit, so I know exactly which jobs eat the week. It isn’t collecting the money. It’s the tagging, the thank-you notes, the team alerts, and the spreadsheet that someone has to remember to update.
In this tutorial you’ll build a real donation automation in WordPress, step by step, with no code and no developer. By the end you’ll have one that tags the donor, emails your team, and can send the same donation on to any other tool you use.
If you haven’t set up donations on your site yet, get started with Charitable and come back once your first campaign is live.
What’s In This Tutorial
- What Donation Automation Actually Means
- How Charitable Handles Donation Automation
- How to Automate Donations in WordPress (Code-Free)
- Every Event That Can Start a Donation Automation
- How to Automatically Tag Donors After a Donation
- How to Personalize Automated Emails and Notes
- How to Apply an Automation to Donors You Already Have
- How to Test a Donation Automation Before You Trust It
- Donation Automation Workflows to Build First
- When Zapier or Uncanny Automator Is the Better Choice
- Advanced Tips for Donation Automation
- FAQs on Donation Automation in WordPress
What Donation Automation Actually Means
Search for donation automation and almost everything you find is about building a donation form. A form should be built well, and it does one job automatically, which is taking the money.
Everything after that point is usually still manual. Somebody reads the notification email, decides whether this donor is new, decides whether the amount is big enough to mention to the director, and then does 3 or 4 small tasks by hand.
Donation automation is the second half of that job. It’s a rule you set once that says what should happen every time a gift arrives, so nobody has to remember it.
The 3 Parts of Every Donation Automation Workflow
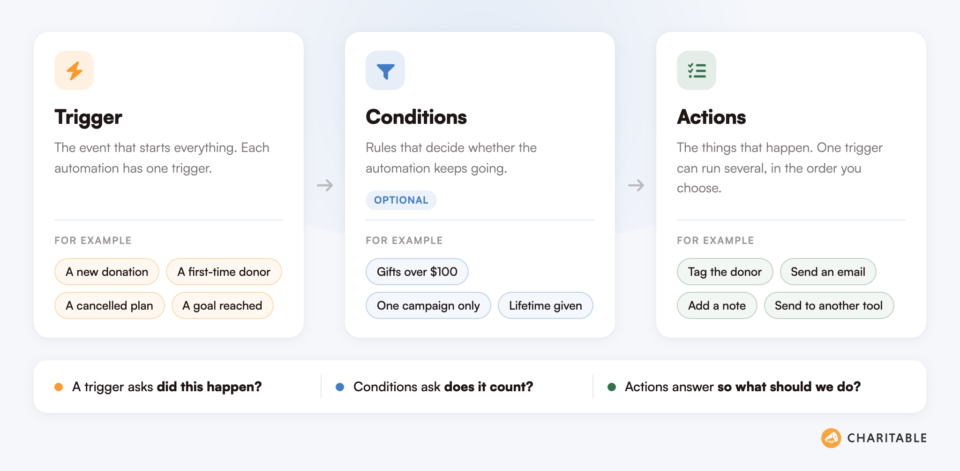
Whatever tool you use, a donation automation workflow is built from the same 3 parts. Once you can name them, the rest of this tutorial will make sense straight away.
- Trigger: the event that starts everything. A new donation, a first-time donor, a cancelled recurring plan, a campaign that reaches its goal. Each automation has one trigger.
- Conditions: optional rules that decide whether the automation keeps going. You might only want it to run on gifts over $100, or only on gifts to one campaign.
- Actions: the things that happen. Tag the donor, send an email, write a note on the donor record, send the data to another tool. One trigger can run several actions in the order you choose.
That’s the whole model. A trigger asks “did this happen?”, conditions ask “does it count?”, and actions answer “so what should we do?”
What to Automate After a Donation
Not every task should be automated. The ones that should share 2 features. They happen every single time, and they follow a rule you could write down in one sentence.
Here are the jobs I’d hand over first, based on the work I see fundraising teams doing by hand most often.
- Grouping donors: marking who is a first-time giver, a monthly giver, or a major giver, so your next email goes to the right people.
- Internal alerts: telling a named person when a large gift arrives, instead of hoping they read every notification.
- Record keeping: writing a dated note on the donor record so the next person to open it knows what already happened.
- Follow-up emails: the message that goes out after the receipt, which is a different job from the receipt itself.
- Failed payment recovery: reaching a monthly donor quickly when their card is declined, while they still intend to give.
- Copying data to other tools: getting the gift into your CRM, your email list, or your board’s spreadsheet without exporting a CSV file.
Notice what isn’t on that list. Anything that needs a judgement call, like deciding what to say to a donor who just gave for the 10th time, stays with a human. Automation should buy back the time for that call, not make it.
How Charitable Handles Donation Automation
Charitable is a WordPress donation and fundraising plugin with more than 1 million downloads, used by over 10,000 nonprofits. It keeps donors on your own site and your donor data in your own database.
It lets you create fundraiser campaigns using templates and a visual builder. There’s no coding at all. Once donations come in, it also handles the backend – creating donation records, sending receipts, compiling reports, and so much more. See all features here »
Let’s talk about the Automation Connect feature which comes with a Visual Automation Builder. This is a full-screen canvas that lays every automation out as a row of connected cards.
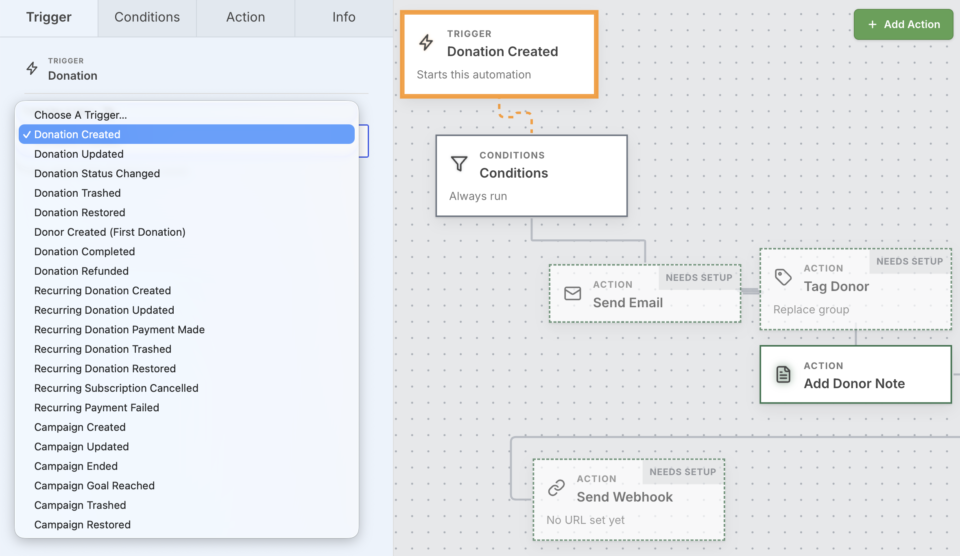
That matters more than it sounds. When an automation is a form, you have to hold the whole flow in your head. When it’s a set of cards on a canvas, you can see what runs, in what order, and under what conditions, before it ever runs for a real donor.
Here’s what you can do with it, without connecting anything outside WordPress.
- Start from 21 different events: donations, first-time donors, recurring plans, failed payments, and campaign milestones all work as triggers.
- Run several actions from 1 trigger: tag the donor, write a note, send an email, and pass the data to another tool, all from the same donation.
- Group your donors as gifts arrive: the Tag Donor action builds giving levels for you, with no outside service involved.
- Email the right person: the donor, your site admin, the campaign creator, or any address you type in.
- Personalize every message: merge tags drop live values like the donor’s first name, the amount, and the campaign name into your text.
- Set rules that keep it sensible: conditions on amount, campaign, country, gateway, lifetime giving, and more decide when the automation should run at all.
- Catch up your existing donors: tags and notes can be applied to the donors already in your database, not only to new ones.
- Send data anywhere else you need it: the Send Webhook action connects your donations to Zapier, Make, n8n, Pabbly Connect, Slack, or your own endpoint.
What You Need Before You Start
Charitable Lite is free on WordPress.org and it will collect donations, run unlimited campaigns, and send receipts. Automation Connect is a paid feature, so there are a few things to check first.
- The Charitable Pro plugin on a Pro plan or higher. Automations are not delivered on the Basic and Plus plans. You can compare what each one includes on the Charitable pricing page.
- Automation Connect 2.3.0 or later. Version 2.3.1 added the “Tidy Up” button and the welcome tour you’ll see in the steps below.
- WordPress 6.2 or later.
- Working scheduled tasks on your site. Emails, webhooks, and the catch-up run all happen in the background, which depends on WordPress being able to run its own scheduled jobs.
If you’re on Lite today, the honest path is to get a campaign live for free first. Pay for automation once donations are actually arriving and the follow-up work has become real.
Getting Started Is Simple
From a standing start, the whole path to a working automation is 5 moves.
- Install Charitable and activate your plan.
- Create a campaign in the visual campaign builder and take your first donation.
- Turn on Automation Connect from the Charitable addons screen.
- Build an automation on the canvas and test it.
- Set it to Active, then add the next one.
Every Charitable plan comes with a 14-day money-back guarantee, no questions asked, so you can build a real automation and see it run before you commit.
How to Automate Donations in WordPress (Code-Free)
In this walkthrough you’ll build an automation that tags a donor and tells your team about the gift. The same steps work for any trigger and any action you pick, so treat this as the pattern rather than the only recipe.
Give it about 10 minutes end to end. No coding, and nothing to install outside WordPress.
Step 1. Turn On Automation Connect
To get started, head over to Charitable » Addons in your WordPress admin and find Automation Connect. Then click Install, and click Activate once it’s ready.
This takes under a minute. If the addon is greyed out, your plan is below Pro, and the pricing page shows what each plan includes.
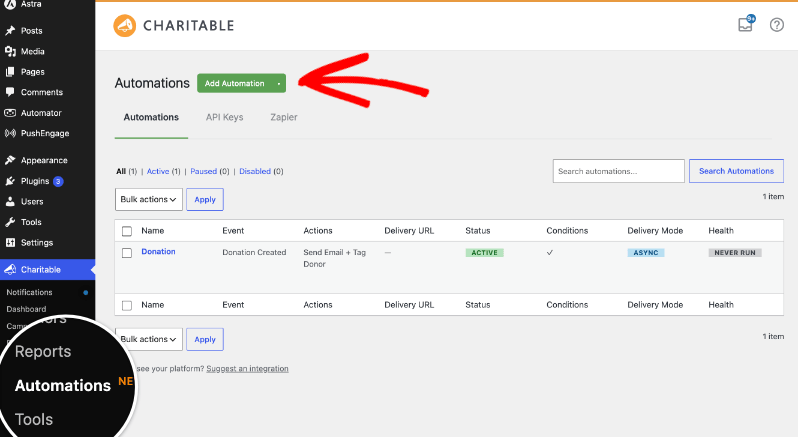
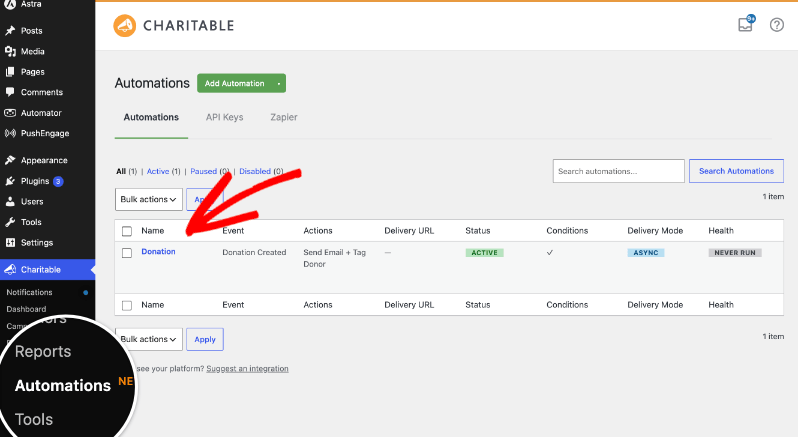
Step 2. Open the Automations Screen
To see everything you’ve built so far, go to Charitable » Automations. Each row shows the automation’s name, its trigger, its status, and how its last run went.
To begin a new one, click Add Automation at the top of the page.
Step 3. Pick a Template or Start From Scratch
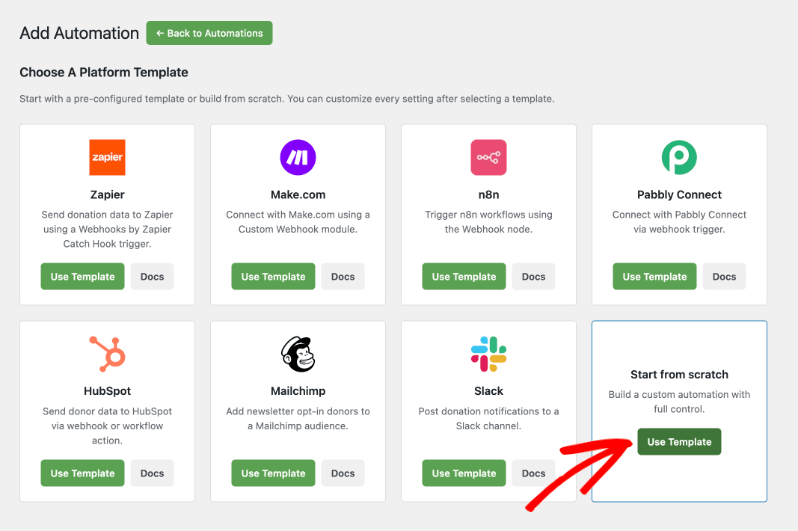
You’ll see templates for the tools people connect most often, including Zapier, Make.com, n8n, Pabbly Connect, HubSpot, Mailchimp, and Slack. A template fills in sensible defaults for that tool, and you can change anything afterwards.
For this walkthrough, choose Start from scratch, because the automation you’re building runs entirely inside Charitable.
Step 4. Take the Tour or Start Building
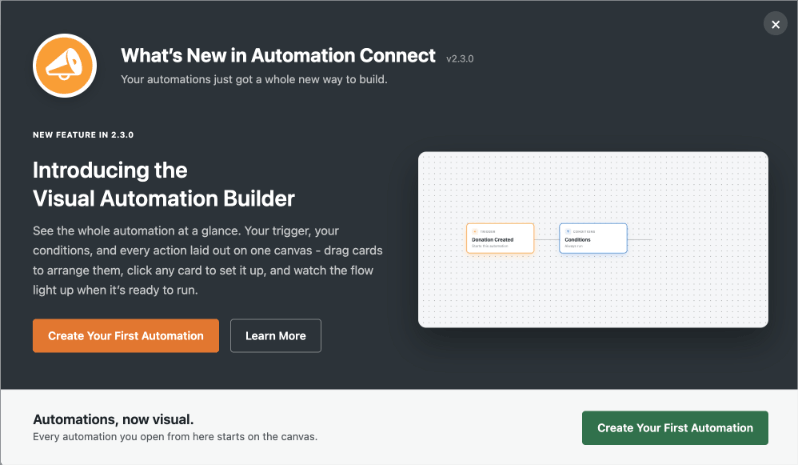
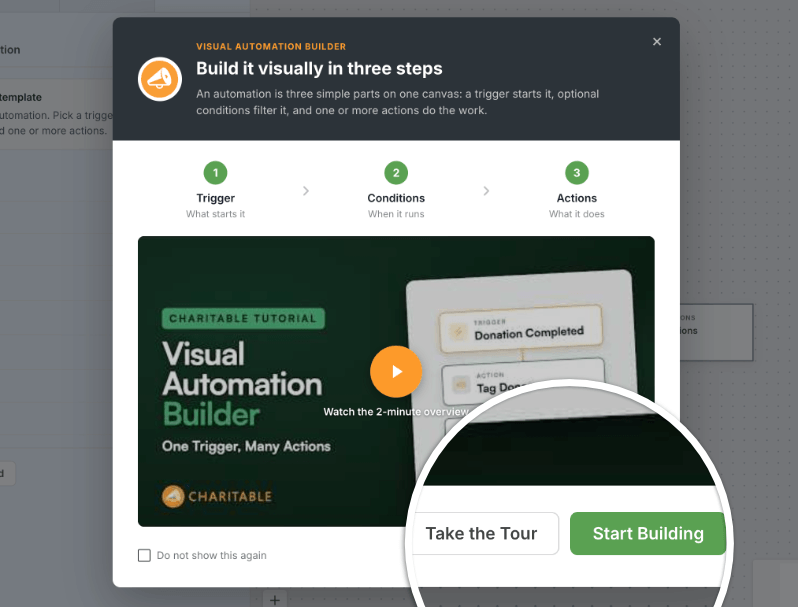
The first time you create an automation, a short welcome screen explains triggers, conditions, and actions. From there you can watch a 2 minute overview video, click Take the Tour for a 7 step walk around the builder, or click Start Building to go straight in.
Once you know your way around, tick “Do not show this again” and you won’t see it next time.
Step 5. Name Your Automation
The name sits in the top bar of the canvas. To rename it, click the name field and type over it, for example “Tag major donors and tell the team”.
A name is generated for you if you leave it blank, but a clear one makes the automations list far easier to read once you have 6 or 7 of them.
Step 6. Choose Your Trigger
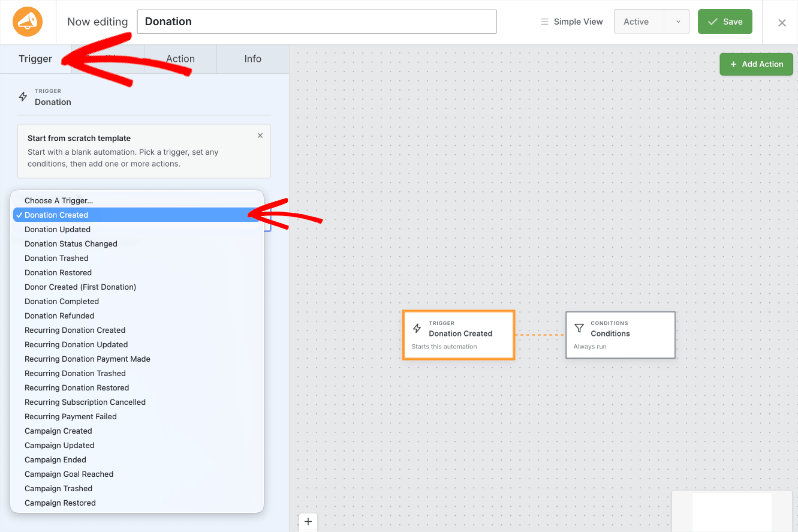
To set what starts the flow, open the Trigger tab in the left column, or click the Trigger card on the canvas. Then pick an event from the list of 21.
For this walkthrough, choose Donation Completed, so nothing runs until a payment has actually gone through. Your choice of trigger decides which conditions and which actions are available later, so if you change it, check the rest of the flow still makes sense.
Step 7. Add Conditions If You Need Them
Conditions are optional. To add one, open the Conditions tab, click Add Group, then choose a rule, an operator, and a value.
For this walkthrough, add Donation total is greater than 100. A group can match ALL of its rules or ANY of them, and you can add a second group when you want 2 separate sets of rules to both be able to let the flow through.
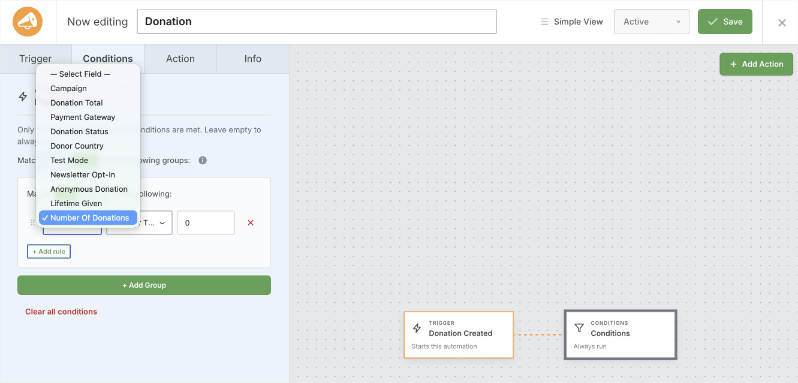
Leaving the Conditions tab empty is a perfectly good choice. Then the automation runs every time its trigger happens.
Step 8. Add Your First Action
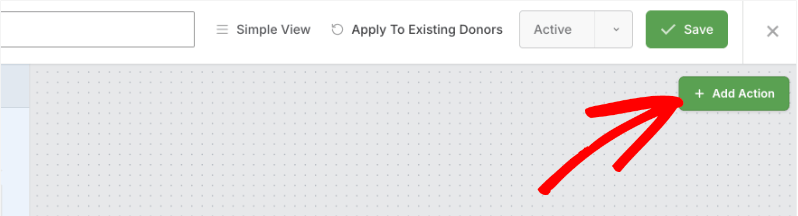
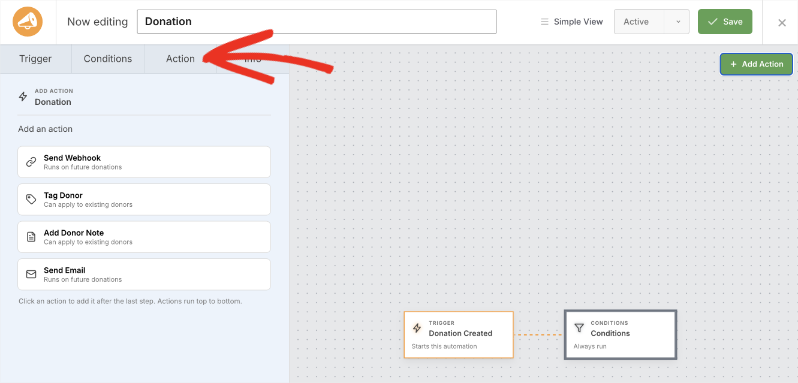
To add what happens, click Add Action on the canvas. The palette opens with the actions that work with your trigger, grouped under Donor, Notifications, and Integrations.
Choose Tag Donor. A new card appears in the flow, joined to the card before it.
Step 9. Set Up the Action
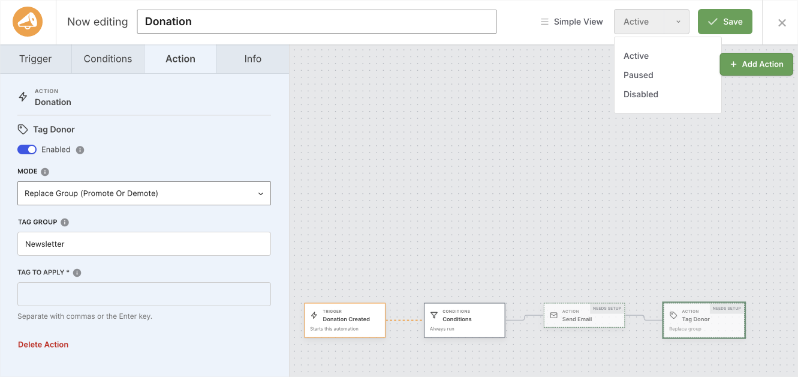
To configure a card, click it on the canvas and use the Action tab in the left column. Every field has a short help note beside its label.
For the Tag Donor action, set Mode to Replace group, type Giving level as the tag group, and add Major donor as the tag. The donor will then hold only 1 tag from that group at a time, which is what lets people move up and down a giving ladder cleanly.
Step 10. Add More Actions and Put Them In Order
To tell your team about the gift, click Add Action again and choose Send Email. Set “Send to” to your site admin, write a subject such as New major gift from {first_name} {last_name}, and write your message in the body.
Actions run from the top down, so drag the cards until they’re in the order you want. If the layout gets messy, click Tidy Up and the cards line up again in a clean row.
One ordering tip to follow. Put the actions that run inside Charitable first, such as Tag Donor, and put any webhook last, so the donor record is already correct if your webhook sends data to a CRM that reads those tags.
Step 11. Set the Status and Save
To switch it on, use the status control in the top bar to set the automation to Active, then click Save. The button confirms the save on screen.
Only active automations run. Paused and disabled ones are kept exactly as they are, which makes pausing a safe way to stop one for a week without losing your work.

Step 12. Confirm It’s Live
Back on Charitable » Automations, your new automation is listed with its name, its trigger, its status, and a Health column that reads Healthy, Failing, or Never run.
From this screen you can also duplicate an automation, export it to a file, and import one from another site. Imported automations arrive disabled, so you’ll get a chance to look them over before anything runs.
Bonus Step. Send the Donation to Another Tool
If your donations also need to reach a CRM, a spreadsheet, or a Slack channel, add a Send Webhook action to the same automation. The other tool gives you a delivery address, and you paste it into the Delivery URL field.
JSON is the right request format for almost everything, and async delivery should stay on so your donation form is never held up while the request goes out. You can also set a signing secret, which lets the receiving service confirm the request really came from your site.
Our documentation covers the field-by-field detail in the Visual Automation Builder guide, including how to verify a signature on your own endpoint.
Every Event That Can Start a Donation Automation
The walkthrough above used Donation Completed, because that’s the event most automations should start from. There are 20 others, and reading the full list is usually where people spot the automation they actually needed.
They’re grouped into 3 sets in the trigger picker, and each one shows a line of help text beside its name.
Donation Triggers
These 8 cover the life of a single gift, from the moment the record is created to the moment it’s refunded.
- Donation Created: a new donation is saved, which can happen before the payment has gone through.
- Donation Completed: the donation moves to the Completed status. Use this one when you only want to act on gifts that were actually paid.
- Donation Updated: an existing donation is changed.
- Donation Status Changed: the status changes, and the data carries both the previous and the new status.
- Donation Refunded: a donation is refunded, in full or in part.
- Donation Trashed and Donation Restored: a donation is moved to the trash or brought back from it.
- Donor Created (First Donation): a donor gives for the very first time.
That last one is the trigger people miss most often. Identifying a first-time supporter usually means running a report, and here it’s a single event you can act on immediately.
Recurring Donation Triggers
If you run monthly giving, these 7 are where the money is. A recurring donor who leaves quietly costs far more than a single missed thank-you.
- Recurring Donation Created: a new monthly or annual plan is set up.
- Recurring Donation Updated: an existing plan is changed.
- Recurring Donation Payment Made: each renewal payment is taken, and the data includes the renewal number.
- Recurring Subscription Cancelled: a donor or an admin cancels a plan.
- Recurring Payment Failed: a scheduled charge is declined.
- Recurring Donation Trashed and Restored: a plan is trashed or brought back.
The renewal number on that third trigger opens up something small and lovely. A condition on it lets you send a different message on someone’s 12th payment than on their 2nd.
Campaign Triggers
The last 6 are about the campaign rather than the donor, which makes them useful for keeping a team or a group of volunteers informed.
- Campaign Created and Campaign Updated: a campaign is published or edited.
- Campaign Ended: a campaign reaches its end date.
- Campaign Goal Reached: a campaign first reaches its goal, and the data includes the amount raised, the goal, and the percentage funded.
- Campaign Trashed and Campaign Restored: a campaign is trashed or brought back.
The Conditions You Can Set
Your choice of trigger decides which conditions are available, so a campaign trigger won’t show you donor country. For donation triggers, these are the rules you can build with.
- Campaign: which campaign the donation was made to, and campaign category or creator for campaign triggers.
- Donation total: the value of this gift, more than, less than, or equal to an amount you set.
- Lifetime given and number of donations: everything the donor has given so far, and how many times they’ve given. These 2 are how you build giving levels.
- Payment gateway and donation status: which gateway took the payment, such as Stripe or PayPal, and the status of the gift.
- Donor country: the country on the donation, which is useful if your follow-up differs by region.
- Test mode, newsletter opt-in, and anonymous donation: 3 yes or no rules that keep automations behaving properly around test gifts, consent, and anonymous donations.
- Recurring period: how often a recurring plan is charged.
Rules can be grouped, and a group can match ALL of its rules or ANY of them. So a single automation can run for gifts over $500 from any campaign, or for any gift at all from 1 specific campaign, without needing 2 separate automations.
How to Automatically Tag Donors After a Donation
Of everything in this tutorial, tagging is the one I’d set up first. It costs you 5 minutes and it changes what every future email and report can do.
A tag is just a label on a donor record. A tag group is a set of labels where a donor should only ever hold 1 of them at a time, which is what makes giving levels work.
The Tag Donor action has 3 modes, and picking the right one is most of the job.
- Replace group: swaps 1 tag for another inside a group, so Bronze becomes Silver and the old label is removed for you.
- Add tag: keeps every tag the donor already has and adds a new one. Use this for things that stack, like “Gala 2026 attendee”.
- Remove tag: takes a label away, which is useful when a donor’s situation changes.
Tags you type in are created for you if they don’t exist yet, so there’s no separate list to set up beforehand.
Building a Giving Ladder With 3 Automations
A giving ladder is a set of levels donors move up as they give more over time. The rule that makes it work is Lifetime given, which looks at everything a donor has given so far rather than the size of this 1 gift.
Build 1 automation per level, all using the same tag group, and donors will move up on their own.
- Trigger Donation Completed, condition Lifetime given is greater than or equal to 100, action Tag Donor in Replace group mode with the tag Bronze.
- The same again with 500 and the tag Silver.
- The same again with 1,000 and the tag Gold.
Because all 3 use the same tag group, a donor crossing $500 loses Bronze and gains Silver in the same moment. You’ll never have to clean up a donor holding 2 levels at once.
From there, those tags are what you filter on when you write to donors, and what shows up in your fundraising reports and your donor management screens. A tag set today is a segment you can use for years, and segments are what make a real donor engagement strategy possible.
How to Personalize Automated Emails and Notes
An automated email that opens with “Dear Supporter” tells the reader exactly how it was sent. Merge tags fix that.
A merge tag is a placeholder in curly brackets that is swapped for a real value when the automation runs. They work in email subjects, email bodies, custom recipient addresses, email headlines, and donor notes.
The ones you’ll reach for most often are these.
- {first_name} and {last_name} for the donor’s name.
- {email} for their email address, which is handy in a custom recipient field.
- {total} for the amount of the gift.
- {campaign_name} for the campaign they gave to.
- {date} and {donation_id} for your own records.
There’s an “Insert merge tag” picker beside each of those fields, and it lists every tag available for the trigger you chose. You’ll never have to guess a field name.
One thing to keep in mind while you write. A tag with no value for a particular run is replaced with nothing at all, so build your sentences to still read well when a field is empty.
Emails from this action use your existing Charitable email settings and any SMTP plugin you already have, so they go out the same way your receipts do. Leave the branded template switched on and the message will match the rest of your customized Charitable emails.
How to Apply an Automation to Donors You Already Have
A new automation only runs on things that happen from now on. That leaves a real question if you already have 2,000 donors in your database and none of them are tagged.
To updated those records, open a saved automation and use the Apply to existing donors control in the top bar. You’ll be told roughly how many donors would be affected and asked to confirm.

Donors are then worked through in the background in batches of 50, and each donor is checked against your conditions before anything runs for them. A giving ladder built today will sort your whole donor list into levels within a few minutes.
Only Tag Donor and Add Donor Note run during a catch up. Send Webhook and Send Email are skipped on purpose, so nobody gets an email about a donation they made 3 years ago.
That single limit is what makes the catch up safe to run without holding your breath.
How to Test a Donation Automation Before You Trust It
Automations run when nobody is watching, which is the point of them and also the risk. So test every new one before you set it to Active.
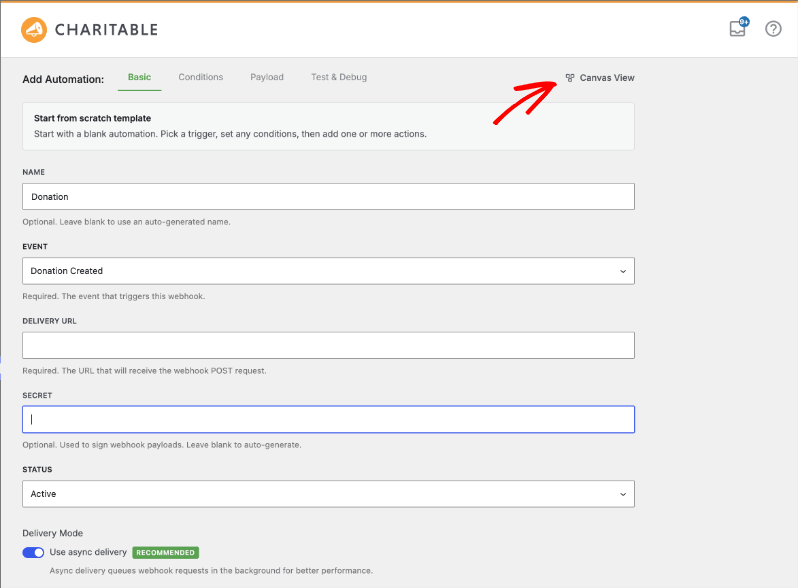
If your automation includes a webhook, save it first, then use the Simple View link in the top bar and open the Test & Debug tab. Simple View is the classic form version of the same automation, and it’s where payload fields and test sends live.

You have 2 choices for what to send.
- Sample data sends made-up values in the right shape, which is enough to finish setting up a Zap or a scenario in another tool.
- Test data sends a real record, either your most recent matching one or a specific record ID, so you see exactly what a live donation would send.
Click Send Test Payload and the response appears right there, including the HTTP status code. A test send skips the background queue, so you get your answer immediately rather than waiting on a scheduled job.
Reading Your Delivery History
Once an automation has run for real, the same Test & Debug tab has a Recent Deliveries list. Each row shows the date, the event, whether the run succeeded or failed, and the message that came back from the other side.
Every row has a “View payload sent” link so you can see the exact data, and a Resend button for trying a failed delivery again once you’ve fixed the cause.
There’s also a safety net built in. If a webhook fails 5 times in a row, the automation is disabled so it stops sending to an address that isn’t answering. Fix the endpoint, then set the automation back to Active.
You get a 14-day money-back guarantee on every plan, so testing an automation on a real donation record is a decision you can reverse.
Try the Charitable Pro plugin risk-free and build your first automation today »
7 Donation Automation Workflows to Build First
Knowing how the builder works is one thing. Knowing which automation to build on a Tuesday afternoon is another.
These are the 7 I’d build in this order. Each one is written as a trigger, a condition, and the actions, so you can copy it straight onto the canvas.
1. Mark Every First-Time Donor
- Trigger: Donor Created (First Donation).
- Conditions: none.
- Actions: Tag Donor in Add tag mode with “First-time donor”, then Add Donor Note.
A first gift is the only moment you can identify a brand new supporter with total confidence. Tag it while you can, because a second-gift ask written for people who have given exactly once is a different message from your general newsletter. Our guide to writing a donation thank you email covers what to say in it.
2. Tell a Named Person About a Major Gift
- Trigger: Donation Completed.
- Conditions: Donation total is greater than the number your organization treats as major.
- Actions: Tag Donor, then Send Email to a custom address.
Send this one to a person, not a shared inbox. A subject line like “New major gift from {first_name} {last_name}, {total}” means your director can act on it from a phone without opening anything.
3. Sort Your Donors Into Giving Levels
- Trigger: Donation Completed.
- Conditions: Lifetime given is greater than or equal to your level amount.
- Actions: Tag Donor in Replace group mode.
This is the giving ladder from earlier in the tutorial, and it’s the automation with the longest useful life. Build it once and every future appeal has segments ready to use.
4. Reach a Monthly Donor When Their Card Fails
- Trigger: Recurring Payment Failed.
- Conditions: none.
- Actions: Send Email to the donor, then Add Donor Note, then Send Email to your admin.
A declined card is usually an expired card, and the donor still wants to give. Most lost recurring donations are lost to silence rather than to a decision, so a same-day message asking them to update their details is one of the highest value automations on this list.
5. Record Every Cancelled Recurring Plan
- Trigger: Recurring Subscription Cancelled.
- Conditions: none.
- Actions: Add Donor Note, then Tag Donor in Add tag mode with “Lapsed monthly”.
Cancellations are the easiest thing in fundraising to not notice. A tag turns them into a list you can write to in 3 months, which is a far better use of the information than a report you read once.
6. Say Something When a Campaign Hits Its Goal
- Trigger: Campaign Goal Reached.
- Conditions: Campaign category, if you only want it on certain campaigns.
- Actions: Send Email to the campaign creator, then Send Webhook to a Slack channel.
The payload for this trigger includes the amount raised, the goal, and the percentage funded, so the message can carry the actual numbers. This one matters most if you run peer-to-peer fundraising, where the person who needs to hear the good news is a volunteer rather than a staff member.
7. Send Every Donation Into Your Other Tools
- Trigger: Donation Completed.
- Conditions: Test mode is no, so your test gifts stay out of your real records.
- Actions: Tag Donor first, then Send Webhook last.
This is the automation that removes CSV exports from your month. If your other tool is an email platform, check the Charitable integrations list first, because Mailchimp, ActiveCampaign, and several others connect directly on Plus plans and higher without needing a webhook at all.
Build these 7 and the follow-up work that used to fill a morning happens while you’re doing something else. For a wider view of which jobs across your whole organization to hand over, our ultimate nonprofit task automation guide covers the strategy side.
When Zapier or Uncanny Automator Is the Better Choice
I’d rather tell you where this stops being the right tool than pretend it covers everything.
The 4 actions in the Visual Automation Builder cover the work that happens to a donor record and the messages that go out about it. Anything beyond that needs a second tool, and the webhook action is how you reach one.
- Use Charitable on its own when the work is tagging, notes, internal alerts, and follow-up emails. Nothing sits between 2 services, so there’s nothing to break and nothing extra to pay for.
- Use Zapier when the donation needs to land in an app that Charitable doesn’t connect to directly, like a specific CRM, an accounting tool, or a Google Sheet. Our guide to connecting Charitable to Zapier walks through the setup.
- Use Uncanny Automator when the next step involves another WordPress plugin on the same site, such as a membership plugin or a learning platform. It runs inside WordPress rather than sending data out.
- Use a webhook to your own endpoint when your organization has a developer and its own systems. The signing secret and custom headers are there for exactly that.
These aren’t competing choices. A single automation can tag the donor inside Charitable and send a webhook to Zapier in the same run, which is usually the arrangement I’d recommend. For a worked example, see how to manage fundraising event attendees with Google Calendar and Zapier.
What I would avoid is paying an outside service to do a job Charitable already does. Tagging a donor through a third-party tool means a monthly bill and 2 systems that can disagree with each other.
Advanced Tips for Donation Automation
A few habits separate an automation setup that stays reliable from one you stop trusting after a month.
- 1 automation per job. It’s tempting to put everything into one big flow. Separate automations are easier to pause, test, and explain to whoever takes over your role.
- Pause instead of deleting. A paused automation keeps all of its settings, so a seasonal one can come back next year without being rebuilt.
- Use Donation Completed rather than Donation Created for anything a donor will see. Created happens when the record is saved, which can be before the payment has actually gone through.
- Add a Test mode condition to anything that writes to your real records or another system, so your own test gifts don’t turn into real data.
- Check your conditions before your trigger when something isn’t running. A rule that can never match will quietly stop the whole flow, and that’s the most common cause I see.
- Fix email sending at the source. If automated emails aren’t arriving and your receipts aren’t either, the problem is your site’s email rather than the automation. An SMTP plugin usually sorts it out.
- Export before you migrate. Automations can be exported to a file and imported on another site, which saves rebuilding them on a staging site or a second organization’s site.
One more thing to know about licenses. If your license expires, automations keep running for 30 days, then delivery stops until you renew, and the reason is written to your Charitable logs at Charitable » Tools » Logs.
That log is also the first place to look when a site has gone unexpectedly quiet, because a blocked run is recorded there rather than disappearing without a trace.
FAQs on Donation Automation in WordPress
Here are the questions we’re asked most often about automating donations in WordPress.
Can I automate donations in WordPress without a developer?
Yes. Everything in this tutorial is done by dragging cards and filling in fields, with no code anywhere. A developer is only needed if you want to send donation data to a system your organization built itself.
Which Charitable plan do I need for donation automation?
Automation Connect needs the Charitable Pro plugin on a Pro plan or higher, and nothing is delivered on the Basic and Plus plans. If you’re on Lite today, you can start with Charitable Lite for free and upgrade once donations are coming in.
Do I need Zapier to automate donations?
No. Tag Donor, Add Donor Note, and Send Email all run inside Charitable, so there’s nothing to connect and no extra subscription. Zapier is only needed when the donation has to reach an app Charitable doesn’t integrate with directly.
How many actions can a single automation have?
There’s no set limit. They run from the top of the list down, so arrange the cards in the order you want things to happen.
Will my existing webhooks keep working after I update?
Yes. An automation built before version 2.3.0 is read as an automation with 1 webhook action, so your existing Zaps and scenarios keep running exactly as they did. There’s no migration step for you to run.
Can I automate donors I already have, or only new ones?
Both. The “Apply to existing donors” control runs Tag Donor and Add Donor Note against your current donor records, in batches, checking your conditions for each one. Webhooks and emails are skipped during a catch up on purpose.
Why isn’t my automation running?
Check its status first, because only active automations run. Then check your conditions for a rule that can never match, and last of all check that your license is active on a Pro plan or higher.
Do automated emails replace my donation receipts?
No, they’re separate. Receipts are handled by your normal Charitable email settings, and the Send Email action is for the follow-up messages that come after them. If you want to get the receipt itself right, our deep dive on the donation receipt email is the place to start.
Can I move an automation to another site?
Yes. Export it from the automations list, then import the file on the other site. Imported automations arrive disabled so you can check them before they run.
Why did my automation switch itself off?
After 5 failed deliveries in a row, an automation is disabled so it stops sending to an address that isn’t answering. Check the delivery history, fix the cause, then set it back to Active.
Do I have to use the canvas?
No. Simple View edits the same automation in a classic form, and you can move between the 2 editors whenever you like. Payload field editing happens in Simple View only.
If you want to see it working on your own site, every plan carries a 14-day money-back guarantee with no questions asked, and setup is code-free from start to finish.
Get the Charitable Pro plugin and automate your donations »
Next, you might like to read our guides to setting up automated donation receipts, nonprofit email marketing, and whether recurring donations are right for your nonprofit.
Charitable Has 1+ Million Downloads!
Trusted by millions to power successful fundraising campaigns. Try Charitable risk-free today.
✅ 14-day money-back
✅ Transparent pricing
✅ Code-free setup
Stay Connected for More Nonprofit Resources
For more tutorials and videos tailored to nonprofits, subscribe to our YouTube channel. We regularly publish expert tips, step-by-step guides on online donations, fundraising strategies, and practical resources to help your organization succeed.
🗞️ Get weekly tips and exclusive guides in your inbox
Join our newsletter →
🎥 Watch step-by-step tutorials and success stories
Subscribe to our YouTube channel →
👩🏽💻 Connect with our community and get daily nonprofit insights
Follow us on LinkedIn →
🥳 Fun reels and non-profit insights
Follow us on Instagram →
👀 Insightful & fun videos to help you grow your cause
Follow us on TikTok→
🌎 Subscribe and follow for general fundraiser tips
Get Fundraiser Tips on TikTok →
Powerful Fundraising Resources
⬇️ Download proven strategies, campaign ideas, and expert tools
Get the Fundraising Kit →
💸 Get Free Fundraising Resources
Head to the Charitable Fundraising Hub →
🤔 Got questions about Charitable?
Charitable FAQs →
🏎️ Take Charitable for a spin
Create your Charitable Demo →
Understand non-profit terms and jargon
Non-Profit Glossary →
% Looking for non-profit deals and discounts?
Best Non-Profit Deals and Discounts →




Leave a Reply