Do you want to see exactly what an automation will do before it runs? The Visual Automation Builder gives you a full-screen canvas where every automation is laid out as connected cards, so you can build a complete flow without writing any code.
Available in Pro plans and higher (Pro plugin), with Charitable Automation Connect 2.3.0 or later.
See everything you need to know about the new visual automation builder »
What’s In This Guide?
- How the Visual Automation Builder Works
- What You Need Before You Start
- Canvas View and Simple View
- Triggers You Can Choose From
- Conditions You Can Add
- Actions You Can Run
- Building Your First Automation
- Merge Tags for Emails and Notes
- Applying an Automation to Existing Donors
- Testing and Delivery History
- Troubleshooting
- Developer Reference
- FAQs on the Visual Automation Builder
How the Visual Automation Builder Works
Every automation you build has 3 parts, and the canvas shows all 3 as cards joined by connecting lines.
- Trigger is the event in Charitable that starts the flow, such as a new donation or a cancelled recurring plan. Each automation has one trigger.
- Conditions are optional rules that decide whether the flow keeps going. You can require that a donation is over a certain amount, or that it came from one campaign.
- Actions are the things that happen. An automation can run several actions, and they run from top to bottom in the order you arrange them.
Before version 2.3.0, one automation meant one webhook sent to one web address. Now a single donation can tag the donor, add a note to their record, email your team, and send a webhook to your CRM, all from the same automation.
Note: The builder is styled to match the Charitable Campaign Builder, so if you have built a campaign page, the layout will already feel familiar.
What You Need Before You Start
- The Charitable Pro plugin with an active Pro or Elite plan.
- Charitable Automation Connect 2.3.0 or later. Version 2.3.1 adds the “Tidy Up” button and the welcome tour described below.
- WordPress 6.2 or later.
- Working scheduled tasks on your site. Webhooks, emails, and the backfill all run in the background through Action Scheduler, which is included with the addon.
Important Note: If your license expires, automations keep running for 30 days. After that, delivery stops until you renew, and the reason is written to your Charitable logs.
Canvas View and Simple View
Each automation can be opened in 2 different editors. Both edit the same automation, and you can move between them whenever you like.
- Canvas View takes over the whole screen. You’ll see a top bar with the automation name, a status control, and a “Save” button, a left column with the Trigger, Conditions, Action, and Info tabs, and the cards themselves on a grid with zoom controls and a small map of the flow.
- Simple View is the classic form inside the normal WordPress admin, with Basic, Conditions, Payload, and Test & Debug tabs. It is quicker for small edits, and it is the only place you can change which fields go into a webhook payload.
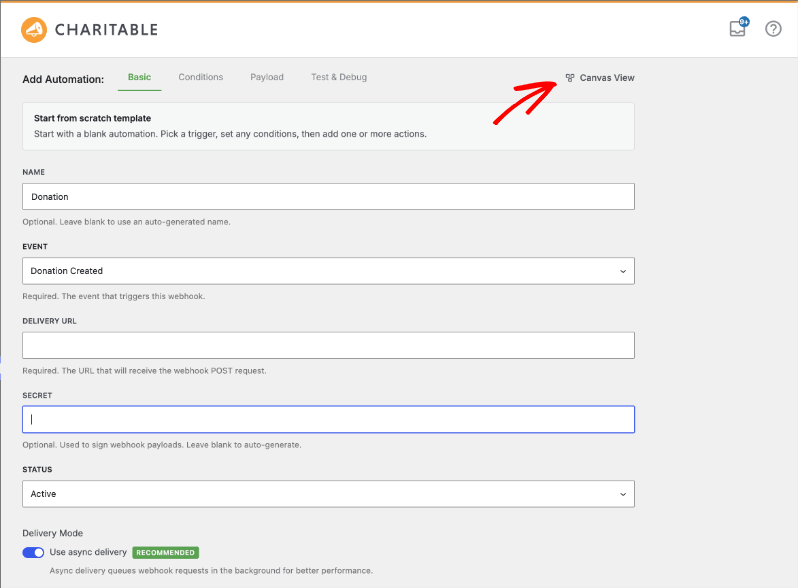
New automations and automations started from a template open in Canvas View. To move between the 2 editors, use the “Simple View” link in the top bar of the canvas, or the “Canvas View” link in the form.
Note: If you have unsaved changes when you switch, you’ll be asked whether to save them first.
Triggers You Can Choose From
There are 21 triggers, grouped into Donations, Recurring Donations, and Campaigns. Each one shows a short line of help text in the trigger picker.
Donations
| Trigger | When it fires |
|---|---|
| Donation Created | A new donation is saved. |
| Donation Completed | A donation moves to the Completed status. Use this one when you only want to act on donations that were paid. |
| Donation Updated | An existing donation is updated. |
| Donation Status Changed | A donation status changes. The payload also carries the previous and new status. |
| Donation Refunded | A donation is refunded, in full or in part. |
| Donation Trashed | A donation is moved to the trash. |
| Donation Restored | A donation is restored from the trash. |
| Donor Created (First Donation) | A donor gives for the very first time. |
Recurring Donations
| Trigger | When it fires |
|---|---|
| Recurring Donation Created | A new recurring plan is set up. |
| Recurring Donation Updated | A recurring plan is updated. |
| Recurring Donation Payment Made | Each renewal payment is taken. The payload includes the renewal number. |
| Recurring Subscription Cancelled | A donor or an admin cancels a recurring plan. |
| Recurring Payment Failed | A scheduled charge fails, which is useful for failed payment alerts. |
| Recurring Donation Trashed | A recurring plan is trashed. |
| Recurring Donation Restored | A recurring plan is restored from the trash. |
Campaigns
| Trigger | When it fires |
|---|---|
| Campaign Created | A new campaign is published. |
| Campaign Updated | An existing campaign is updated. |
| Campaign Ended | A campaign reaches its end date. |
| Campaign Goal Reached | A campaign first reaches its goal. The payload includes the amount raised, the goal, and the percentage funded. |
| Campaign Trashed | A campaign is moved to the trash. |
| Campaign Restored | A campaign is restored from the trash. |
Conditions You Can Add
Conditions are optional. If you leave the Conditions tab empty, the automation runs every time its trigger fires.
You can build one or more rule groups, and each group can match ALL of its rules or ANY of them. The rules on offer change with the trigger you picked, so a campaign trigger will not show donor country, for example.
| Rule | What it checks |
|---|---|
| Campaign | Which campaign the donation was made to. |
| Donation total | The value of this donation, more than, less than, or equal to an amount you set. |
| Lifetime given | Everything the donor has given so far, which is how you build giving levels. |
| Number of donations | How many donations the donor has made so far. |
| Payment gateway | The gateway that took the payment, such as Stripe or PayPal. |
| Donation status | The status of the donation, such as Completed or Pending. |
| Donor country | The country on the donation. |
| Test mode | Whether the donation was made in test mode. |
| Newsletter opt-in | Whether the donor ticked your newsletter box. |
| Anonymous donation | Whether the donor chose to give anonymously. |
| Recurring period | How often a recurring plan is charged. |
| Campaign category | The category on the campaign. |
| Campaign creator | The user who created the campaign. |
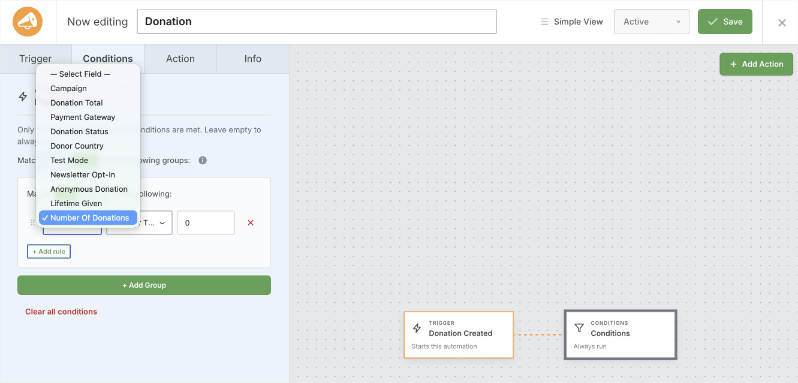
Pro tip: A “Lifetime given” rule plus a Tag Donor action is all you need for a giving ladder. Set one automation per level, and donors move up on their own as they give.
Actions You Can Run
Version 2.3.0 gives you 4 actions. Three of them run inside Charitable, so there is no outside service to set up.
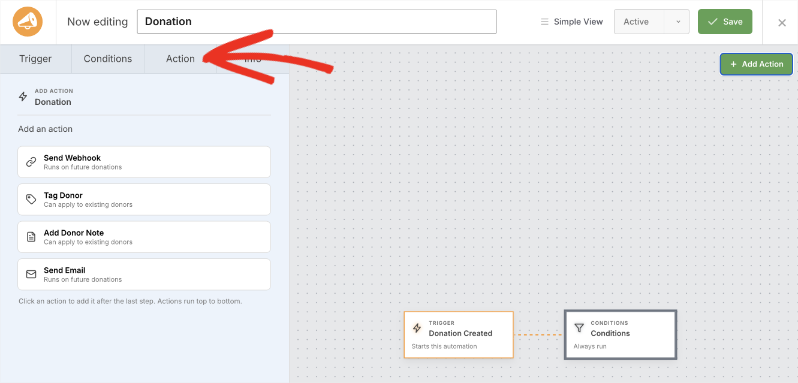
Send Webhook
This action sends the event data to any web address that accepts an HTTP POST request. It is how you connect Charitable to Zapier, Make, n8n, Pabbly Connect, Slack, and your own endpoints.
| Setting | Default | What it does |
|---|---|---|
| Delivery URL | empty | Required. The address that receives the data. Your other tool gives you this URL to paste in. |
| Request Format | JSON | JSON works with almost every tool. Pick Form-encoded only if your endpoint asks for it. |
| Signing secret | auto-generated | Optional. Charitable signs each request with it so the receiver can confirm the request really came from you. |
| Custom Headers | empty | Optional. Extra headers such as an API key or a bearer token. The content type and signature headers are added for you and cannot be replaced. |
| Use async delivery | On | Sends the request in the background so your donation form is never held up. |
| Payload | all fields | The fields included in each request. Turn off anything the receiver does not need. Payload editing happens in Simple View. |
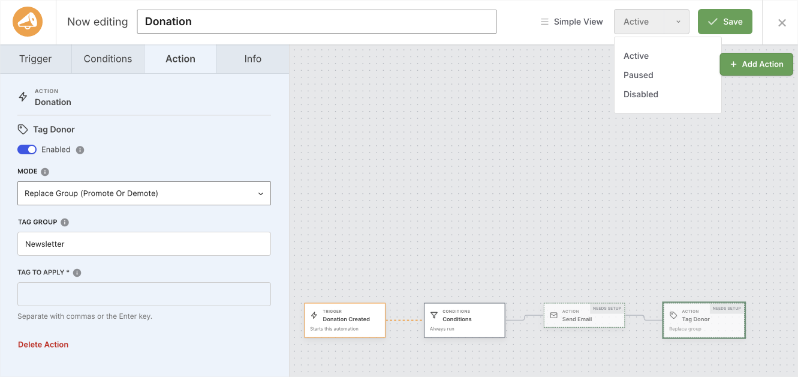
Tag Donor
This action changes a donor’s tags inside Charitable, with no outside service involved. It is the fastest way to build donor groups as donations come in.
| Setting | Default | What it does |
|---|---|---|
| Mode | Replace group | “Replace group” swaps a tag within one group, for example Bronze to Silver. “Add tag” keeps the tags the donor already has. “Remove tag” takes a tag away. |
| Tag group | empty | Used with Replace group. The donor keeps only one tag from this group at a time. |
| Tag to apply | empty | Required. The tag or tags to apply. Type one and press Enter, and separate several with commas. Tags that do not exist yet are created for you. |
Send Email
This action emails the donor, your site admin, the campaign creator, or any address you type in. Your Charitable email settings and any SMTP plugin you use are respected, because the email goes out the same way your receipts do.
| Setting | Default | What it does |
|---|---|---|
| Send to | The donor | Who receives the email. Choose the donor, your site admin, the campaign creator, or a custom address. |
| Email address | empty | Shown when you choose a custom address. Merge tags such as {email} work here. |
| Subject | empty | Required. Merge tags such as {first_name} work here. |
| Message | empty | Required. The body of the email, with an “Insert merge tag” picker beside it. |
| Format | HTML | Send a designed HTML email or a plain text one. |
| Use Charitable branded email template | On | Wraps your message in your Charitable email template, so it matches your receipts. |
| Email headline | empty | The large heading at the top of the branded template. If you leave it blank, your subject line is used. |
Add Donor Note
This action adds a note to the donor’s record, stamped with the word Automation and the date, so you can tell automatic notes apart from ones your team wrote. Merge tags work in the note text.
Note: Tag Donor and Add Donor Note can also be run against donors you already have. Send Webhook and Send Email cannot, which keeps you from emailing your whole donor list or flooding an endpoint by accident.
Building Your First Automation
In this walkthrough, you’ll build an automation that tags a donor and tells your team about the gift. The same steps work for any trigger and action you pick.
Step 1. Open the Automations Screen
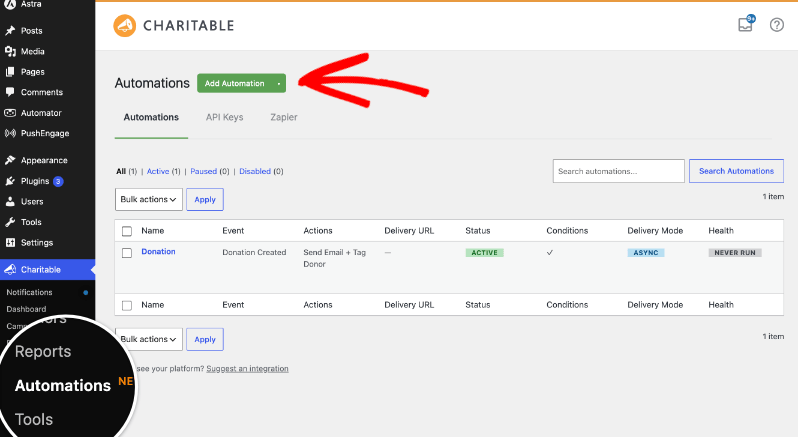
To get started, head over to Charitable » Automations in your WordPress admin. You’ll see every automation you have, with its trigger, its status, and how its last run went.
Then click “Add Automation” at the top of the page.
Step 2. Pick a Template or Start From Scratch
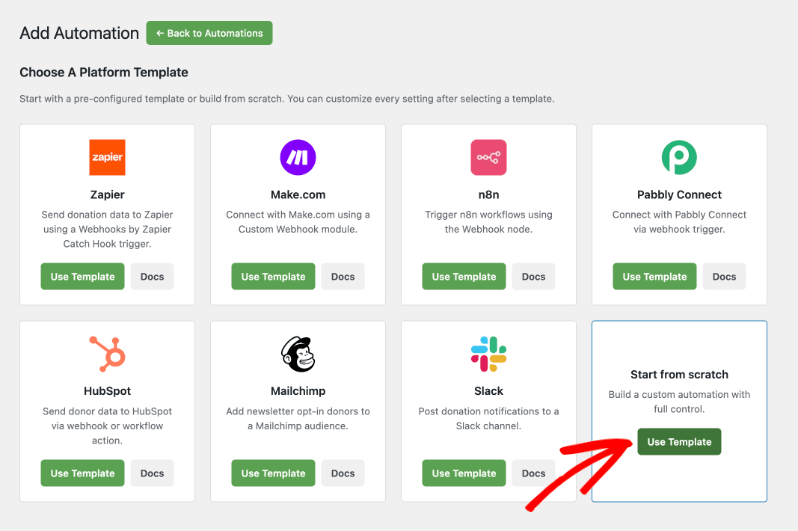
You’ll see a set of templates for the tools people connect most often, including Zapier, Make.com, n8n, Pabbly Connect, HubSpot, Mailchimp, and Slack. A template fills in sensible defaults for that tool, and you can change anything afterwards.
For this walkthrough, choose “Start from scratch”.
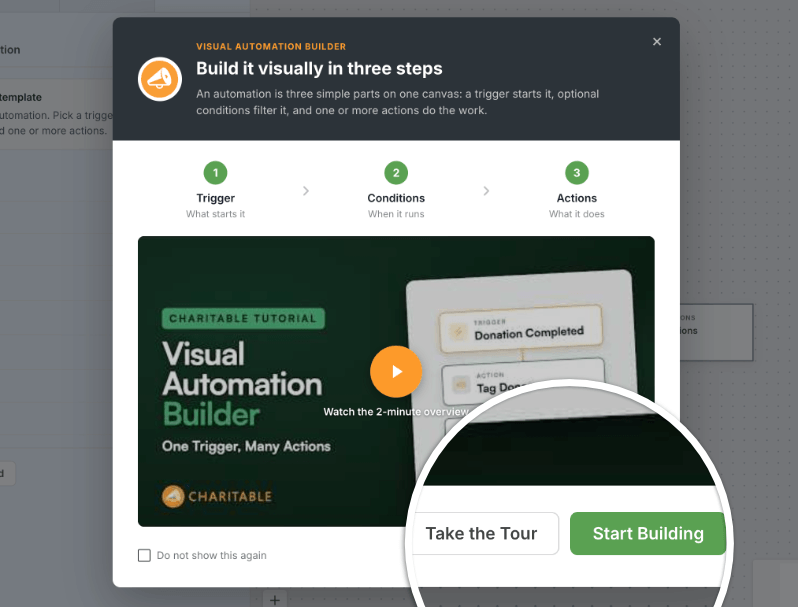
The first time you create an automation, a short welcome screen explains triggers, conditions, and actions. From there, you can watch a 2 minute overview video, click “Take the Tour” for a 7 step walk around the builder, or click “Start Building” to go straight in. Tick “Do not show this again” once you know your way around.
Step 3. Name Your Automation
The name sits in the top bar of the canvas. To rename it, click the name field and type over it, for example “Tag new donors and tell the team”.
Note: If you leave the name blank, one is generated for you. A clear name makes the list much easier to read once you have several automations.
Step 4. Choose Your Trigger
To set what starts the flow, open the Trigger tab in the left column, or click the Trigger card on the canvas. Then pick an event from the list.
For this walkthrough, choose “Donation Completed”, so nothing runs until a payment has actually gone through.
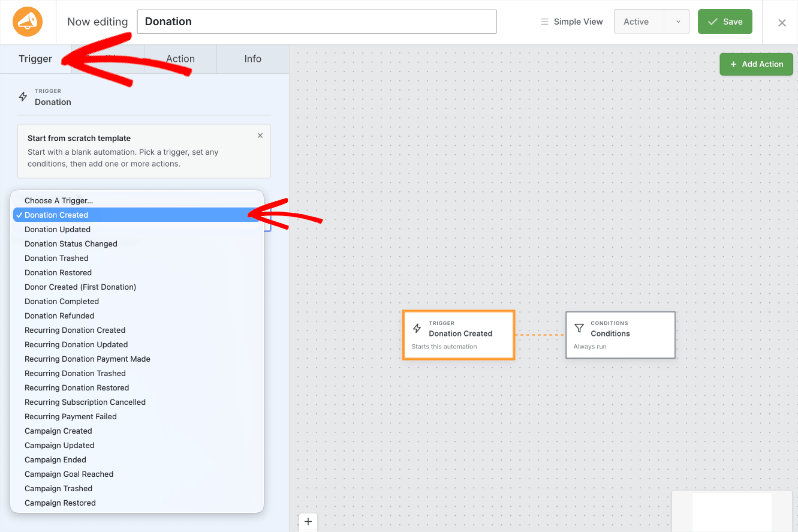
Important: Your trigger decides which actions and which conditions are available. If you change the trigger later, check that the rest of your flow still makes sense.
Step 5. Add Conditions (Optional)
To limit when the automation runs, open the Conditions tab and click “Add Group”. Then choose a rule, an operator, and a value.
A group can match ALL of its rules or ANY of them. Add a second group when you want 2 separate sets of rules to both be able to let the flow through.
For this walkthrough, add “Donation total is greater than 100” and leave it there. To run on every completed donation instead, skip this step.
Step 6. Add Your First Action
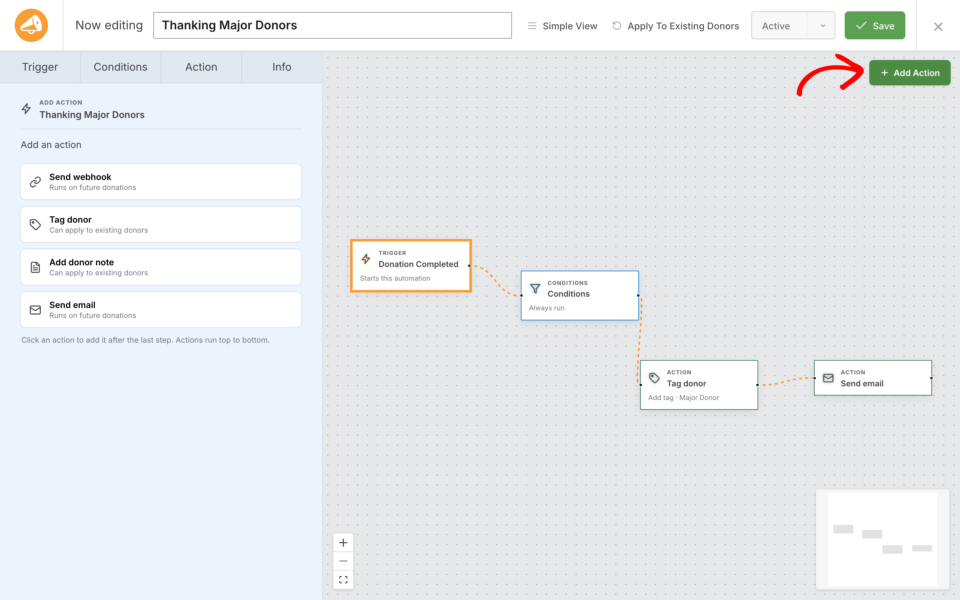
To add what happens, click the “Add Action” button on the canvas. The palette opens with the actions that work with your trigger, grouped under Donor, Notifications, and Integrations.
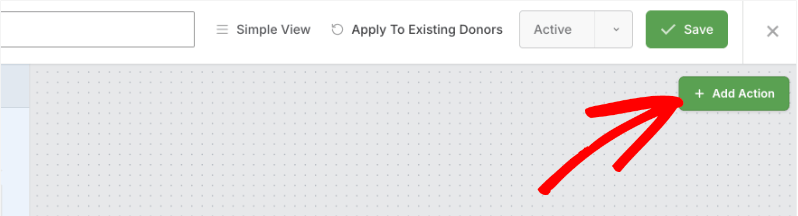
Choose “Tag Donor”. A new card appears in the flow, joined to the card before it.
Step 7. Set Up the Action
To configure a card, click it on the canvas and use the Action tab in the left column. Every field has a short help note beside its label.
For the Tag Donor action, set Mode to “Replace group”, type Giving level as the tag group, and add Major donor as the tag. The donor will now hold only one tag from that group at a time, which is what lets you promote and demote people cleanly.
Step 8. Add More Actions and Put Them In Order
Click “Add Action” again and choose “Send Email”. Set “Send to” to your site admin, write a subject such as New major gift from {first_name} {last_name}, and write your message in the body.
Actions run from the top down, so drag the cards until they are in the order you want. If the layout gets messy, click “Tidy Up” and the cards line up again in a clean row.
Pro tip: Put your in-Charitable actions such as Tag Donor first and your webhook last. That way the donor record is already correct if your webhook sends data to a CRM that reads those tags.
Step 9. Test a Webhook Before It Goes Live
If your automation includes a Send Webhook action, test it before you switch the automation on. Save the automation first, then open Simple View and go to the Test & Debug tab.
You have 2 choices for what to send.
- Sample data sends made-up values in the right shape, which is enough to set up a Zap or a scenario.
- Test data sends a real record, either your most recent matching one or a specific record ID, so you see exactly what a live donation would send.
Click “Send Test Payload” and the response appears right there, including the HTTP status code. A test send skips the background queue, so you get the answer immediately. “Preview Payload” shows the data without sending anything.
Step 10. Set the Status and Save
Use the status control in the top bar to set the automation to Active, then click “Save”. The button confirms the save on screen.

Only active automations run. Paused and disabled ones are kept exactly as they are, and nothing is dispatched for them.
Step 11. Check Your Automations List
Back on Charitable » Automations your new automation is listed with its name, trigger, status, and a Health column that reads Healthy, Failing, or Never run. Health covers every kind of action, not only webhooks.
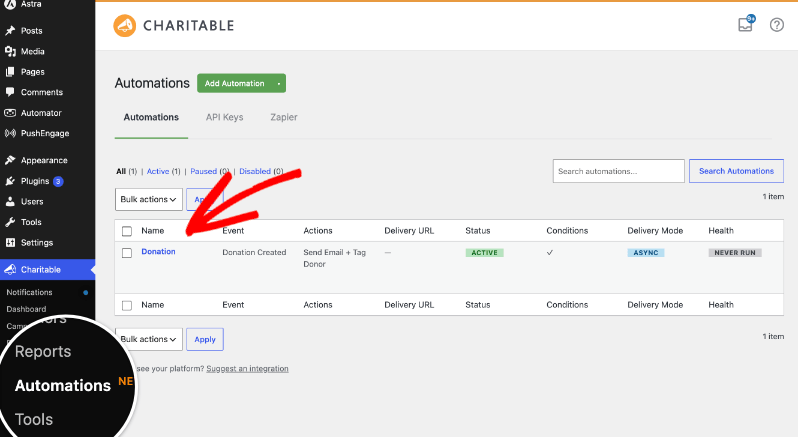
From this screen, you can also duplicate an automation, export it to a file, and import one from another site. Imported automations arrive disabled so you can look them over first.
Merge Tags for Emails and Notes
Merge tags are placeholders in curly brackets that are swapped for real values when the automation runs. They work in email subjects, email bodies, custom recipient addresses, email headlines, and donor notes.
The “Insert merge tag” picker beside those fields lists every tag available for the trigger you chose, so you never have to guess a name. Commonly used ones include {first_name}, {last_name}, {email}, {total}, {campaign_name}, {date}, and {donation_id}.
Merge tags use the same field names as the webhook payload, so you only have to learn one set of names for both.
Note: A tag that has no value for a particular run is replaced with nothing rather than printing the raw tag, so write your sentences so they still read well if a field is empty.
Applying an Automation to Existing Donors
New automations only run on things that happen from now on. To catch up your existing donor records, use the “Apply to existing donors” control on a saved automation.

You’ll be told roughly how many donors would be affected and asked to confirm. Donors are then processed in the background in batches, and each donor is checked against your conditions before anything runs for them.
Important: Only Tag Donor and Add Donor Note run during this catch up. Send Webhook and Send Email are skipped on purpose, because those donations were not made just now and nobody wants an inbox full of old news.
Testing and Delivery History
Once an automation has run, open it in Simple View and look at the Test & Debug tab. Under “Recent Deliveries” you’ll see the date, the event, whether the run succeeded or failed, and the message that came back.
Each row has a “View payload sent” link so you can see the exact data, and a “Resend” button so you can try a failed delivery again once you have fixed the cause.
Note: If a webhook fails 5 times in a row, the automation is disabled so it stops sending to an address that is not answering. Fix the endpoint, then set the automation back to Active.
Troubleshooting
My Automation Is Not Running
Check the status first, because only active automations run. Then check your conditions, since a rule that never matches will quietly stop everything. Last of all, check that your license is active and on a Pro plan or higher, because delivery is blocked otherwise and the reason is written to Charitable » Tools » Logs.
Webhooks Are Queued But Never Arrive
Webhooks are sent in the background, which depends on your site’s scheduled tasks. Check Tools » Scheduled Actions for stuck or failed jobs in the charitable-automation-connect group. For an immediate result while you are testing, use “Send Test Payload”, or turn off “Use async delivery” on that action.
The Receiving Service Rejects My Requests
If your endpoint checks signatures, make sure it verifies the X-WP-Webhook-Signature header against the same signing secret you set on the action. If it expects form fields rather than JSON, change Request Format to Form-encoded.
Emails Are Not Arriving
The Send Email action uses the same email system as the rest of WordPress, so if your receipts are not arriving either, the problem is your site’s email sending rather than the automation. An SMTP plugin usually fixes it. Also check that the recipient you chose can actually be worked out, since a campaign creator with no email address on file means nothing is sent.
My Older Webhooks Stopped Working After Updating
They should not have. An automation built before 2.3.0 is treated as an automation with one webhook action, so existing Zaps and scenarios keep firing exactly as before, and there is no migration for you to run. If one has stopped, open it and check its status and its delivery history.
Switching Views Lost My Payload Settings
Payload fields are edited in Simple View only, so make your payload changes there and save before you move to the canvas.

Developer Reference
This section covers the parts of Automation Connect 2.3.x that matter if you are extending it, sending data to your own endpoint, or debugging a site. Everything below is namespaced under Charitable\Pro\AutomationConnect and the text domain is charitable-automation-connect.
How an Automation Is Stored
Automations live in the {$wpdb->prefix}charitable_webhook_subscriptions table, reachable through charitable_get_table( 'webhook_subscriptions' ). API keys for the Zapier connection live in {$wpdb->prefix}charitable_api_keys, hashed at rest.
| Column | Notes |
|---|---|
event | The trigger slug. This is the only required column since 2.3.0. |
actions | LONGTEXT JSON holding the ordered list of actions. This is where webhook, tag, email, and note configuration now lives. |
conditions | LONGTEXT JSON holding the condition groups. |
payload_config | LONGTEXT JSON holding the payload field selection and ordering. |
layout | LONGTEXT JSON holding each automation’s canvas positions, so the builder reopens where you left it. |
status | active, paused, or disabled. Only active dispatches. |
failure_count | Consecutive failures. Reset to 0 on a successful delivery. |
url, secret, content_type, custom_headers, delivery_mode | Pre-2.3.0 single-webhook columns, kept for legacy rows and for the Zapier controller. |
managed_by | Set when something other than the admin UI owns the row, such as the Zapier app. |
Each entry in the actions array has the same shape.
{
  "id": "act_68b2c1f0",
  "type": "tag_donor",
  "enabled": true,
  "mode": "sync",
  "config": { "mode": "replace_group", "group": "Giving level", "tags": ["Major donor"] }
}
The mode key controls dispatch, not action behaviour. Webhook actions default to async and every other action defaults to sync. A legacy row that has a url but no actions is normalized on read into a single webhook action, so old subscriptions dispatch identically without a migration step.
Trigger Event Slugs
| Slug | Label | Payload type |
|---|---|---|
donation_created | Donation Created | donation |
donation_updated | Donation Updated | donation |
donation_status_changed | Donation Status Changed | donation |
donation_completed | Donation Completed | donation |
donation_refunded | Donation Refunded | donation |
donation_trashed | Donation Trashed | donation |
donation_restored | Donation Restored | donation |
donor_created | Donor Created (First Donation) | donation |
recurring_donation_created | Recurring Donation Created | recurring_donation |
recurring_donation_updated | Recurring Donation Updated | recurring_donation |
recurring_donation_payment_made | Recurring Donation Payment Made | recurring_donation |
recurring_donation_trashed | Recurring Donation Trashed | recurring_donation |
recurring_donation_restored | Recurring Donation Restored | recurring_donation |
subscription_cancelled | Recurring Subscription Cancelled | recurring_donation |
subscription_payment_failed | Recurring Payment Failed | recurring_donation |
campaign_created | Campaign Created | campaign |
campaign_updated | Campaign Updated | campaign |
campaign_ended | Campaign Ended | campaign |
campaign_goal_reached | Campaign Goal Reached | campaign |
campaign_trashed | Campaign Trashed | campaign |
campaign_restored | Campaign Restored | campaign |
Action Types
| Slug | Label | Palette group | Backfillable | Config keys |
|---|---|---|---|---|
webhook | Send Webhook | Integrations | No | url, content_type, secret, custom_headers, payload_config |
tag_donor | Tag Donor | Donor | Yes | mode, group, tags |
add_note | Add Donor Note | Donor | Yes | note |
send_email | Send Email | Notifications | No | recipient, custom_email, subject, body, format, use_template, headline |
webhook supports every event. tag_donor and add_note support the 10 donor-bearing donation and recurring events. send_email supports those same 10 plus campaign_created, campaign_ended, and campaign_goal_reached.
Actions run in isolation. The runner catches any throwable and turns it into a failed result, so one broken action never stops the others in the list. Every run is recorded through charitable_log() with type set to automation, so results appear in the Charitable logs alongside the automation ID and action type.
Condition Fields
| Field ID | Operators | Applies to |
|---|---|---|
campaign_id | is, is_not, is_any_of | Donation events |
total | greater_than, less_than, equal_to | Donation events |
lifetime_total | greater_than, greater_than_or_equal, less_than, less_than_or_equal, equal_to | Donation events plus donation_completed |
donation_count | greater_than, greater_than_or_equal, less_than, less_than_or_equal, equal_to | Donation events plus donation_completed |
donation_gateway | is, is_not | Donation and recurring events |
status | is, is_not | Donation events |
country | is, is_not, is_any_of | Donation events |
test_mode | yes, no | Donation and recurring events |
newsletter_opt_in | yes, no | Donation events |
anonymous_donation | yes, no | Donation events |
recurring_period | is, is_not | Recurring events |
campaign_category | is, is_any_of | Campaign events |
campaign_creator | is, is_not | Campaign events |
A condition that names a field the evaluator does not recognise counts as a misconfiguration and bumps the automation’s failure count, so a broken rule surfaces in the admin rather than failing silently.
Payload Fields
Payloads are flat key and value arrays, built per event type. Merge tags use these same keys.
- Donation gives you
donation_id,title,first_name,last_name,email,address,address_2,address_3,city,state,postcode,country,phone,subtotal,total,date,status,donation_gateway,gateway_transaction_id,test_mode,campaign_id,campaign_name,contact_consent,cover_fees,fee_amount,consent_to_track,newsletter_opt_in,giftaid_claimed,anonymous_donation, anddonor_comment. - Recurring donation gives you the donor and address fields above plus
recurring_donation_id,first_donation_id,recurring_subtotal,recurring_total,recurring_period,recurring_interval,recurring_length,recurring_expiration_date,recurring_renewal_date,gateway_subscription_id, and the GoCardless customer and mandate IDs. - Campaign gives you
campaign_id,slug,description,goal,end_date,title,date,campaign_creator_id,campaign_creator_name,campaign_creator_email,donated_amount,donor_count,status,permalink,recipient,fundraiser_type,supports_child_campaigns, and the team fields.
Campaign custom fields flagged “Send in Automation Webhooks” are added by name, and they are registered from the donation itself at build time, so they are present for live sends, background sends, and Zapier polling alike. A single field whose value cannot be read falls back to an empty string rather than dropping the whole payload.
Merge tags resolve from the payload first. When there is no payload, which is the case during a backfill, identity tags such as {first_name}, {email}, and the address fields fall back to the donor record. Anything unresolved renders as an empty string.
Webhook Delivery Details
| Detail | Value |
|---|---|
| Method | POST, sent with wp_safe_remote_request() |
| Timeout | 60 seconds, with redirects not followed |
| Body | application/json, or application/x-www-form-urlencoded when Request Format is Form-encoded. Your blog charset is appended. |
| User agent | Charitable/{version} AutomationConnect (WordPress/{wp_version}) |
X-WP-Webhook-Source | Your site’s home URL |
X-WP-Webhook-Signature | Sent when a signing secret is set. Base64 of an HMAC over the final encoded body, SHA-256 by default. |
| Protected headers | content-type, content-length, host, x-wp-webhook-source, and x-wp-webhook-signature can never be replaced by a custom header. |
| Custom headers | Names must be letters, digits, and hyphens. Carriage returns and line feeds are stripped from values. |
| Success | Any 2xx response. Anything else counts as a failure and increments failure_count. |
To verify a signature on your side, compute the HMAC over the raw request body exactly as received, using your signing secret, then compare it to the header value.
// PHP, on the receiving endpoint.
$body     = file_get_contents( 'php://input' );
$expected = base64_encode( hash_hmac( 'sha256', $body, MY_CHARITABLE_SECRET, true ) );
$given    = $_SERVER['HTTP_X_WP_WEBHOOK_SIGNATURE'] ?? '';

if ( ! hash_equals( $expected, $given ) ) {
    http_response_code( 401 );
    exit;
}
Note: SSL verification is off by default so that self-signed staging endpoints work. Return false from charitable_automation_connect_allow_unverified_ssl to enforce certificate checks in production.
Background Jobs
Background work runs through Action Scheduler in the charitable-automation-connect group, which you can watch under Tools » Scheduled Actions.
| Hook | Arguments | Purpose |
|---|---|---|
charitable_automation_connect_run_action | automation ID, action ID, context array | Runs one action asynchronously. |
charitable_automation_connect_deliver | subscription ID, payload | Legacy single-webhook delivery, still honoured. |
charitable_automation_connect_backfill_batch | automation ID, offset, limit | Processes one batch of existing donors, then queues the next. |
Backfill batches are 50 donors at a time, ordered by donor ID, and each batch queues the next until the table is exhausted. Non-backfillable actions are skipped with a recorded reason rather than run.
License Enforcement
License\LicenseGuard::is_delivery_blocked() gates every dispatch path. Delivery is blocked when the Pro plugin is not active, when the plan slug is not pro, agency, or elite, or when the license expired more than 30 days ago. Inside those 30 days delivery continues and a warning is shown in the admin.
A blocked dispatch is written to the Charitable log rather than failing quietly, so an unexpectedly silent site is quick to diagnose.
REST API
The builder talks to the site over the charitable/v1 namespace. These routes require an authenticated admin user, so they are for the editor and for your own admin tooling, not for public integrations.
| Route | Method | Purpose |
|---|---|---|
/automations | GET, POST | List and create automations. |
/automations/{id} | PUT, DELETE | Update and delete one automation. |
/automations/actions | GET | Available action types with their config schemas. |
/automations/{id}/test | POST | Send a test payload and return the response. |
/automations/{id}/logs | GET | Delivery and action history. |
/automations/{id}/replay | POST | Resend a past delivery. |
/automations/{id}/backfill | POST | Queue the “apply to existing donors” sweep. |
/automations/{id}/backfill/estimate | GET | Estimated donor count for the confirmation dialog. |
/automations/condition-fields/{event} | GET | Condition fields for an event. |
/automations/payload-fields/{event} | GET | Payload fields for an event. |
/automations/sample-data/{post_type} | GET | Sample records for test sends. |
Important Note: The same routes are also registered under the older /webhooks base, which is deprecated and slated for removal one release after 2.3.0. Point new code at /automations.
The Zapier app uses a separate set of routes under /wp-json/charitable/v1/zapier/, authenticated with an API key you create at Charitable » Automations » API Keys. They cover auth/test, subscription create and delete, recent and sample events per event type, campaign, gateway, and category dropdowns, and donor lookups.
Hooks and Filters
| Hook | What it does |
|---|---|
charitable_automation_connect_actions | Filters the registered action types, so you can add your own action to the palette. |
charitable_automation_connect_events | Filters the registered trigger events. |
charitable_automation_connect_event_labels | Filters the slug to label map. |
charitable_automation_connect_events_for_editor | Filters the event list and help text sent to the builder. |
charitable_automation_connect_condition_fields | Filters the fields offered in the condition builder, per event. |
charitable_automation_connect_merge_tags | Filters the merge tags offered for an event. |
charitable_automation_connect_payload_fields | Filters the payload fields offered in the payload editor. |
charitable_webhook_donation_payload_fields | Filters the donation payload field list. Recurring and campaign have matching filters. |
charitable_webhook_donation_payload_field_value | Filters a single resolved donation field value. Recurring and campaign have matching filters. |
charitable_automation_connect_templates | Filters the starter templates on the template picker. |
charitable_automation_connect_zapier_templates | Filters the featured Zap templates, with companion filters for the browse and docs URLs. |
charitable_automation_connect_default_editor_mode | Filters which editor new automations open in. Return simple to keep the classic form. |
charitable_automation_connect_http_args | Filters the outgoing wp_remote_request() arguments. |
charitable_automation_connect_secret_key | Filters the signing secret used for a delivery. |
charitable_automation_trigger_signature_encrypt_type | Filters the HMAC algorithm, sha256 by default. |
charitable_automation_connect_allow_unverified_ssl | Filters whether certificate verification is skipped. |
charitable_automation_allow_unsafe_urls | Filters whether delivery may target a private or local address. |
charitable_webhook_subscription_failure_threshold | Filters how many consecutive failures disable an automation, 5 by default. |
charitable_automation_connect_recent_events | Filters the recent events returned to Zapier. |
charitable_automation_connect_fire_event | Action you fire to dispatch your own event through the engine. |
charitable_automation_connect_start | Action fired once the addon has booted. |
charitable_automation_connect_enqueue_editor_scripts | Action for enqueuing your own assets into the editor. |
charitable_automation_connect_before_list_table | Action fired above the automations list table. |
Adding Your Own Action
An action is a class implementing Actions\ActionInterface. Extending Actions\AbstractAction gives you sensible defaults, so you only declare what is different. The config schema you return is what the builder renders, and run() returns an ActionResult.
use Charitable\Pro\AutomationConnect\Actions\AbstractAction;
use Charitable\Pro\AutomationConnect\Actions\ActionContext;
use Charitable\Pro\AutomationConnect\Actions\ActionResult;

class Push_To_Slack_Action extends AbstractAction {

    public function get_slug() {
        return 'my_slack_ping';
    }

    public function get_label() {
        return 'Ping Slack';
    }

    public function get_group() {
        return 'Notifications';
    }

    public function get_supported_events() {
        return array( 'donation_completed', 'campaign_goal_reached' );
    }

    public function is_backfillable() {
        return false; // Never run for every historical donor.
    }

    public function get_config_schema() {
        return array(
            array(
                'key'      => 'channel',
                'type'     => 'text',
                'label'    => 'Channel',
                'tooltip'  => 'The Slack channel that receives the message.',
                'required' => true,
            ),
        );
    }

    public function run( ActionContext $context, array $config ) {
        $extra   = $context->get_extra();
        $payload = isset( $extra['payload'] ) ? $extra['payload'] : array();

        if ( empty( $config['channel'] ) ) {
            return ActionResult::skipped( 'no channel configured' );
        }

        // Do the work here, then report what happened.
        return ActionResult::success( array( 'channel' => $config['channel'] ) );
    }
}

add_filter(
    'charitable_automation_connect_actions',
    function ( $actions ) {
        $action                            = new Push_To_Slack_Action();
        $actions[ $action->get_slug() ]    = $action;
        return $actions;
    }
);
Important: Return false from is_backfillable() for anything that contacts the outside world or sends a message. The backfill sweeper only runs actions that say yes, which is what stops a catch up run from emailing your entire donor list.
Adding Your Own Trigger Event
Register the event so it appears in the trigger picker, then fire it from your own code when the thing happens.
add_filter(
    'charitable_automation_connect_events',
    function ( $events ) {
        $events['my_volunteer_signed_up'] = array(
            'label'        => 'Volunteer Signed Up',
            'description'  => 'Fires when someone signs up to volunteer.',
            'payload_type' => 'donation',
            'group'        => 'Other',
        );
        return $events;
    }
);

// Later, when a volunteer signs up.
do_action( 'charitable_automation_connect_fire_event', 'my_volunteer_signed_up', $object, array( 'source' => 'volunteer-form' ) );
Adding Your Own Condition Field
add_filter(
    'charitable_automation_connect_condition_fields',
    function ( $fields, $event_slug ) {
        $fields['my_donor_region'] = array(
            'label'     => 'Donor region',
            'operators' => array( 'is', 'is_not' ),
            'type'      => 'text',
            'events'    => array( 'donation_created', 'donation_completed' ),
            'callback'  => 'my_evaluate_donor_region', // Receives the object and the rule.
        );
        return $fields;
    },
    10,
    2
);
Keep new automations opening in the classic form with a single filter if that suits your team better.
add_filter( 'charitable_automation_connect_default_editor_mode', function () {
    return 'simple';
} );
FAQs on the Visual Automation Builder
Will my older webhooks keep working after I update?
Yes. An automation built before 2.3.0 is read as an automation with one webhook action, so your existing Zaps and scenarios keep firing exactly as they did. There is no migration step for you to run.
How many actions can one automation have?
There is no set limit. They run from the top of the list down, so put them in the order you want things to happen.
Do I have to use the canvas?
No. Simple View edits the same automation in a classic form, and you can move between the 2 editors whenever you like. Payload field editing happens in Simple View only.
Can I tag donors without connecting an outside service?
Yes. Tag Donor, Add Donor Note, and Send Email all run inside Charitable, so there is nothing to connect and nothing that can break between 2 services.
Why were no webhooks sent when I applied an automation to existing donors?
That is on purpose. A catch up run only does the actions that are safe to repeat on old records, which means Tag Donor and Add Donor Note. Webhooks and emails are skipped, because those donations did not happen just now.
Which plan do I need?
Automation Connect needs the Charitable Pro plugin on a Pro plan or higher. If you are on Lite, you can start with Charitable Lite and upgrade when you are ready to automate.
Can I move an automation to another site?
Yes. Export it from the automations list, then import the file on the other site. Imported automations arrive disabled so you can check them before they run.
Why did my automation switch itself off?
After 5 failures in a row, an automation is disabled so it stops sending to an endpoint that is not answering. Check the delivery history, fix the cause, then set it back to Active.
That’s it! You’ve learned how to build, test, and extend automations with the Visual Automation Builder.
More Documentation
- How to Use the Donor Management System
- Email Customization
- Hooks and filters in Automation Connect
- Introducing the Visual Automation Builder
Charitable Has 1.2+ Million Downloads!
Trusted by millions to power successful fundraising campaigns. Try Charitable risk-free today.
✅ 14-day money-back guarantee
✅ Transparent pricing
✅ Code-free setup
Helpful Links
🤝 Get help when you need it
Connect with Customer Support →
📑 Find the guide you need
Browse the Documentation Hub →
⬇️ Download proven strategies, campaign ideas, and expert tools
🔗 Let your AI Assistant do the fundraising work for you.
Connect Charitable to your AI assistant →
💸 Get Free Fundraising Resources
Head to the Charitable Fundraising Hub →
🤔 Got questions about Charitable?
Charitable FAQs →
Need help understanding non-profit terms and jargon?
See our Non-Profit Glossary →