Requires: Charitable Pro plugin 1.8.16+
Pro plan and higher
Do you want to set up your first Charitable reward without learning every setting first? The setup wizard walks you through building 1 reward from scratch in about 3 minutes.
This guide covers each of the 6 wizard steps, the starter examples it can add, and how to run it again later.
Your first reward is where the ideas are newest, so the wizard asks plain questions and picks the right settings for you. Everything it asks can be changed afterward.
Charitable Rewards needs version 1.8.16 or higher of the Charitable Pro plugin, on the Pro plan and higher.
What’s In This Guide?
Watch the Video
If you’d rather watch than read, this video walks through the wizard from start to finish.
Opening the Wizard
The first time you open Rewards, the setup wizard offers to walk you through building 1 reward from scratch.
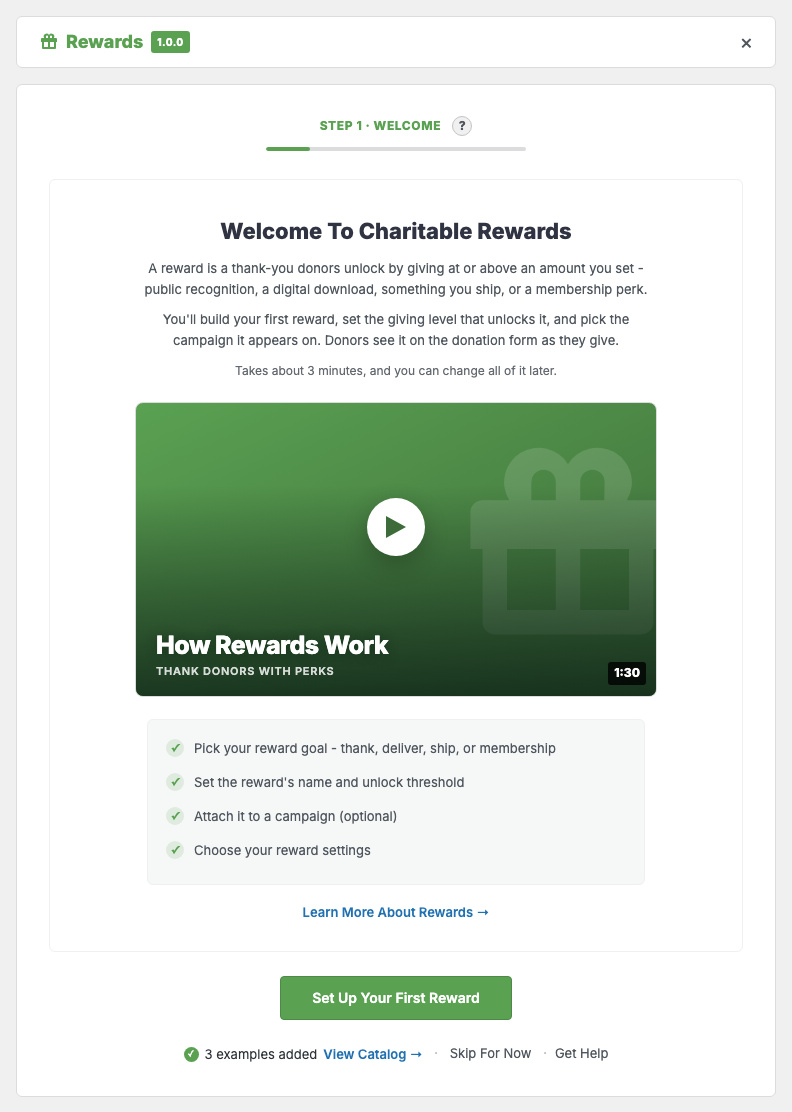
You don’t have to use it. If you’d rather build rewards by hand, click “Skip For Now” and go straight to the Catalog.
The 6 Steps
The wizard moves through 6 short steps, and you can go back to any of them before you finish.
1. Welcome
The first step gives an overview of what a reward is and what you’re about to set up. There’s nothing to fill in.
2. Your Goal
Instead of asking which of 4 reward types you want, the wizard asks what you’re trying to do. Your answer picks the type for you.
| The wizard asks | You get |
|---|---|
| Publicly thank donors | A recognition reward |
| Give a digital download or code | A digital reward |
| Ship a physical item | A physical reward |
| Offer a membership perk | A membership reward |
Important: A reward’s type can’t be changed after it’s created, and the step says so on screen. If you pick the wrong one, you’ll need to create a replacement and archive the first one.
3. Reward Details
This step sets up the reward itself.
- Name (required) is what donors see on the card.
- Short description is a sentence on what they get.
- Giving level to unlock (required) is the donation amount that earns it.
- Fair market value (optional) is the item’s real value, for tax receipting.
The wizard rejects a giving level of zero. A reward that unlocks at nothing would attach itself to every donation, including a $1 gift.
4. Add to a Campaign
This step is optional. A picker lets you attach the new reward to an existing campaign straight away, or you can skip it and attach the reward later from the Catalog.
Attaching here is a convenience, not a commitment. Rewards live in a shared library, so the same reward can serve several campaigns, and you can add it to or remove it from any of them at any time.
5. Settings
This step covers 2 site-wide settings. Both also live on the Other tab afterward.
- Tax receipting records fair market value and shows the deductible portion on receipts. Turn this on if you’re a US charity offering rewards with real value.
- Reservation hold is how many minutes a limited reward is held for a donation that’s still going through payment. It defaults to 30.
6. Done
The last step confirms that you’re set up, with links onward to the Catalog and your campaign.
Starter Examples
The wizard can add a few example rewards to your catalog, so you have something to look at before you build your own. Each one starts with Example: in its name, so they’re easy to spot and archive later.
Important: They’re real rewards, not placeholders. Archive them before you go live, or a donor may unlock one.
Running It Again
To run the wizard again at any time, head over to Charitable » Rewards » Other and click “Re-Run Setup Wizard” under Help & Onboarding.
This is the only supported way to reset it. The wizard saves which step you reached and what it created for you, and editing that by hand leaves it pointing at rewards that may no longer exist.
The First-Run Panel
Separately from the wizard, the Overview tab shows a welcome panel with a short explanation and a button while your catalog is still empty. As soon as you have 1 reward, the real dashboard replaces it.
If you want the panel back for a screenshot or a demo, the catalog has to be empty again. That’s a bigger job than running the wizard again.
Tips Worth Keeping in Mind
These habits help your first reward go live without surprises.
- Do step 4 even if you’re not ready to launch. An attached reward on a draft campaign is the fastest way to see how the donation form changes.
- If you’re a US charity, turn tax receipting on during step 5 rather than later. Values are saved onto claims as they happen, so switching it on after donations have come in won’t fill in the older ones.
- Leave the reservation hold at 30 minutes unless you know your checkout takes longer than that.
Developer Reference
Filters
| Filter | Default | Purpose |
|---|---|---|
charitable_rewards_onboarding_enabled | true | Turn the wizard off entirely |
charitable_rewards_onboarding_steps | welcome, goal, details, attach, settings, complete | Add, remove, or reorder steps |
charitable_rewards_onboarding_capability | charitable_manage_rewards | Who can run the wizard |
charitable_rewards_onboarding_should_show_panel | state-dependent | Whether the Overview entry panel renders |
charitable_rewards_onboarding_campaign_limit | plugin default | How many campaigns the step 4 picker lists |
charitable_rewards_onboarding_step_errors | validation result | Adjust or add per-step validation messages |
charitable_rewards_onboarding_docs_url | /documentation/charitable-rewards | Base URL for the “Learn more” links |
charitable_rewards_onboarding_docs_url_for_step | the base URL | Per-step docs URL, for deep-linking to an anchor |
charitable_rewards_onboarding_video_id | None | Video ID for the step 1 tile |
charitable_rewards_onboarding_video_file | None | Self-hosted video file for the step 1 tile |
charitable_rewards_onboarding_video_params | None | Player parameters for the step 1 tile |
Actions
| Action | Runs when |
|---|---|
charitable_rewards_onboarding_complete | The wizard reaches the final step |
charitable_rewards_onboarding_reset | Re-Run Setup Wizard is used |
charitable_rewards_onboarding_help_slot | The Help & Onboarding block renders, so you can add your own buttons |
State
Wizard progress is stored in the charitable_rewards_onboarding option. It holds the status, current step, per-step data, and an artifacts map of what the wizard created (the example reward IDs, the reward it built, and any attachment).
Use the Re-Run Setup Wizard action rather than writing to the option directly.
Customization Examples
Turn the wizard off for everyone.
add_filter( 'charitable_rewards_onboarding_enabled', '__return_false' );Let any campaign editor run it, not only reward managers.
add_filter( 'charitable_rewards_onboarding_capability', function () {
    return 'edit_campaigns';
} );
Do something once setup finishes.
add_action( 'charitable_rewards_onboarding_complete', function () {
    // Notify the team, log it, kick off your own tour.
} );
Wrapping Up
You now know how to build your first reward with the setup wizard, clear out the starter examples, and run the wizard again whenever you need it.
Next, you can add more rewards in the Catalog. If you get stuck on any step, our support team is happy to help.
You May Also Want to Read
These guides pick up where the wizard leaves off.
- Charitable Rewards. Start with the main guide and the 2 reward modes.
- Creating Rewards. Build rewards by hand in the Catalog.
- Tax Receipting and Fair Market Value. Learn more about the setting step 5 asks about.
Helpful Links
🤝 Get help when you need it
Connect with Customer Support →
📑 Find the guide you need
Browse the Documentation Hub →
⬇️ Download proven strategies, campaign ideas, and expert tools
🔗 Let your AI Assistant do the fundraising work for you.
Connect Charitable to your AI assistant →
💸 Get Free Fundraising Resources
Head to the Charitable Fundraising Hub →
🤔 Got questions about Charitable?
Charitable FAQs →
Need help understanding non-profit terms and jargon?
See our Non-Profit Glossary →