
Mollie is a European payment processor supporting the leading local payment methods, including credit cards, Apple Pay, Google Pay, PayPal, Klarna, iDEAL, SEPA, Bancontact, Cartes Bancaires, EPS and PostePay.
This guide walks through installing the addon, enabling the gateway, adding your Mollie API keys, accepting recurring donations, testing, and letting donors cover the transaction fee.
What’s In This Guide?
Before You Start
- The Mollie payment integration is available on Basic plans and higher in the Charitable Pro Plugin. If you’re not yet on Pro, you can create your account now » Here’s a guide to help you install Charitable Pro »
- Next, you’ll need to install the Charitable Mollie addon. We’ll show you how to do that next. The Mollie addon comes with the Charitable Pro plugin. After purchasing a plan, you can install it, along with any other included addons, from the addons menu at no extra cost.
- You’ll need your own Mollie account before you begin. If you don’t have one yet, sign up at mollie.com.
Mollie serves organizations across Europe. Charitable connects to your own Mollie account, so your donor details and your transactions stay between you and Mollie.
Mollie only charges you for successful transactions, and the rate varies depending on the payment method your donor chooses. There are no monthly fees, no minimum costs and no hidden fees. You can find a breakdown on Mollie’s pricing page »
The Mollie addon needs PHP 7.2 or higher and Charitable 1.6.43 or higher. If your site runs an older version of either, update before you begin.
All you need from Mollie to start taking donations is your API key. Let’s get started.
Installing the Mollie Addon
Go to Charitable » Addons and find Mollie in the list. Click “Install Addon”, then click “Activate” once the install finishes.
If you’d rather install from a zip file, you can download the addon and upload it yourself.
- In your Charitable account, go to the Downloads tab and scroll down to the Mollie addon. Download the addon here.
- In your WordPress dashboard, go to Plugins » Add New » Upload Plugin.
- Choose the zip file, click “Install Now”, then click “Activate Plugin”.
If you’re not sure how to install the Mollie addon, we recommend first reading our guide to installing Charitable extensions »
Enabling the Gateway
Once the addon is active, you need to enable Mollie as a payment gateway. If you’re still on the Plugins page, you can do it straight from there by clicking the “Activate Mollie gateway” link.

You can also enable it from the settings page. Go to Charitable » Settings » Payment Gateways and click “Enable Gateway” in the Mollie block.
A “Gateway Settings” button will appear next to Mollie. Click it to open the Mollie settings page, where you’ll add your API keys next.
Adding Your Mollie API Keys
Charitable only needs your Mollie API keys to start accepting donations through Mollie.
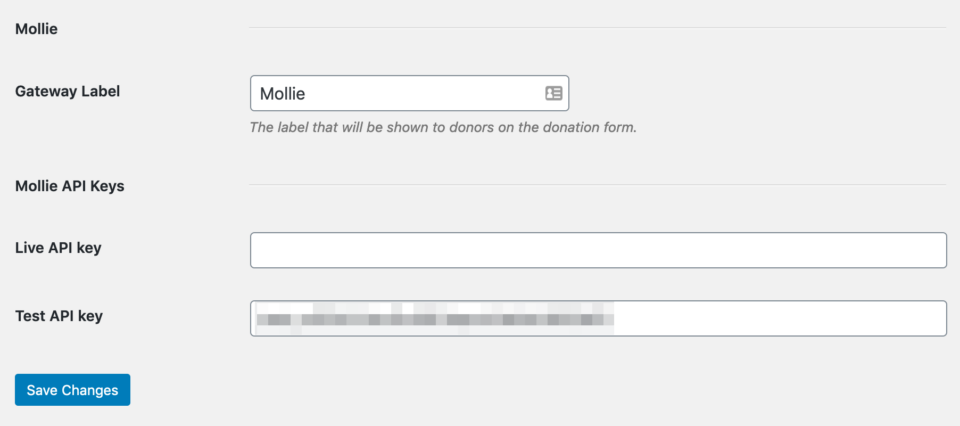
- Log into your Mollie dashboard.
- In the menu on the left, go to Developers » API Keys.
- Copy your Live API key and your Test API key from Mollie into your Charitable settings.
- Click “Save Changes”.
Note: Add both keys while you’re on the page. The Test API key is what lets you run a test donation later without swapping settings around.
Payment Methods Available With Mollie
Mollie’s stand-out feature is its support for the leading local payment methods in Europe. Your donors can support your campaigns using the method they already prefer, including the following.
- Credit cards
- Apple Pay
- Google Pay
- PayPal
- Klarna
- iDEAL
- SEPA Bank Transfer
- SEPA Direct Debit
- Bancontact
- Cartes Bancaires
- EPS
- PostePay
- Przelewy24
Apple Pay and Google Pay have their own short setup guide. See How to Set Up Apple Pay and Google Pay With Mollie »
Note: Payment methods and their availability change from time to time, and some are limited to particular countries. We’ve covered the highlights here, so check Mollie’s payment methods page for the current list.
Accepting Recurring Donations with Mollie
Mollie works alongside Charitable’s Recurring Donations feature, so a donor can set up a repeating gift once and Charitable bills each renewal after that. There are no extra setup steps on the Mollie side, so once both are active you can start collecting weekly, monthly, quarterly, semi-annual and annual donations.
Important Note: Recurring Donations is available on Plus plans and higher, while the Mollie gateway starts on Basic. If your plan is Basic, you can take one-off Mollie donations but not recurring ones.
Testing Before You Go Live
We always recommend testing a new gateway before you accept real donations. Mollie has a test mode you can switch on inside Charitable.

- In your WordPress dashboard, go to Charitable » Settings » Payment Gateways and check the “Turn on Test Mode” setting. Click “Save Changes”.
- Make a donation on your own website and choose Mollie as the payment method.
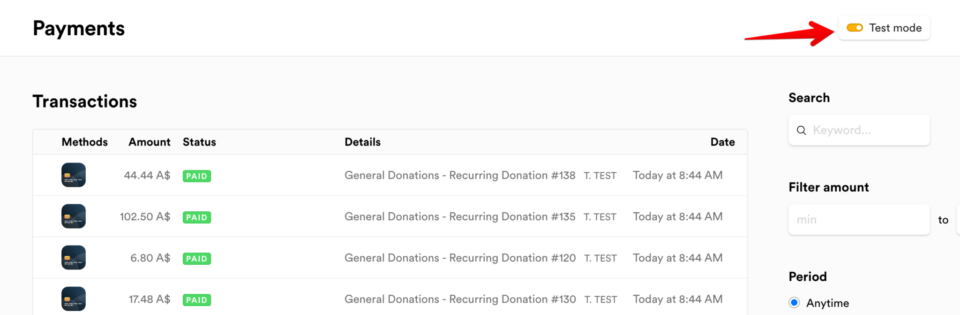
- After you finish the payment you’ll come back to your website. Go to Charitable » Donations and check that the donation is there and marked as Paid. This can take a moment, but it should be marked as Paid within a few minutes.
- Check the transaction in your Mollie dashboard on the Transactions page. You’ll need to turn on Test Mode in the top right corner to see it.
- When the test donation looks right, go back and uncheck “Turn on Test Mode”, then click “Save Changes” again.
Important: Clear your test donations out of Charitable » Donations before you go live if you don’t want them showing up in your reports.
Making Mollie the Default Gateway
If you have more than one gateway enabled, the default is the one selected for your donors when your donation form loads. Go to Charitable » Settings » Payment Gateways, choose Mollie in the “Default” column, and click “Save Changes”.
Pro tip: If most of your donors are in one country, set the default to the gateway that offers their local method. A Dutch audience reaching iDEAL straight away will convert better than one that has to hunt for it.
Adding Fee Relief
Mollie charges a fee on every donation it processes. Charitable’s Fee Relief feature invites your donors to add a little extra to cover that fee, so more of the gift reaches your cause. It works with Mollie the same way it works with any other gateway, and you can configure how the fee is calculated.
Here’s how to set up Fee Relief »
Security and Donor Data
Your donors give knowing their details are processed by a payment processor they recognize. Mollie’s checkout page is PCI-DSS level 1 compliant, and Mollie stores that data on Dutch servers.
As with every payment gateway integration Charitable develops, the Mollie addon follows best practices for handling donor details. Sensitive payment data is never stored in your WordPress database.
FAQs on Mollie
Do I need my own Mollie account to use this addon?
Yes. The addon connects to an account you create directly with Mollie. If you don’t have one yet, sign up at mollie.com before you start.
What do I need from Mollie to start taking donations?
Just your API key. Mollie issues a Live key and a Test key, and both go into your Charitable gateway settings. There are no other credentials to request.
Where do donors enter their card details?
On a checkout page hosted by Mollie, which donors reach after they submit your donation form. Card numbers never reach your website or your database.
Which plan do I need for Mollie?
Basic and higher. Recurring donations through Mollie need the Recurring Donations feature, which starts on the Plus plan.
What does Mollie charge?
Mollie charges per successful transaction, and the rate depends on the payment method your donor picks. There are no monthly fees, no minimum costs and no charge for failed transactions. See Mollie’s pricing page for current rates.
Can I accept recurring donations through Mollie?
Yes, on Plus plans and higher. Once the Recurring Donations feature is active there are no extra Mollie settings to configure, and you can offer weekly, monthly, quarterly, semi-annual and annual gifts.
Can donors pay in their own currency?
Yes. Mollie accepts, settles and pays out in several currencies including EUR and GBP. Payments made in a currency you haven’t enabled are converted to your primary currency before payout.
My test donation went through but never showed as Paid. What should I check?
First check that “Turn on Test Mode” is still enabled in your Charitable gateway settings, because a live key paired with test mode will not report back. Then confirm the Test API key you pasted came from the same Mollie account you made the donation against.


