Want to let donors check out with Apple Pay or Google Pay through Mollie? Charitable Mollie 1.1.0 adds a status panel that shows exactly which wallets are active on your account, and this guide walks you through turning them on.
Before You Start
Apple Pay and Google Pay for Mollie build on top of the standard Charitable Mollie setup. Before continuing, make sure you have:
- Charitable Mollie 1.1.0 or later installed and activated.
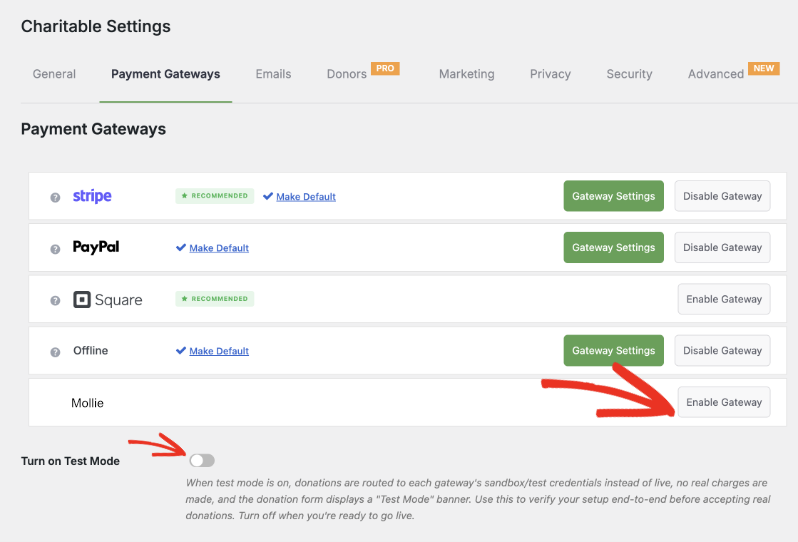
- The Mollie gateway enabled in Charitable » Settings » Payment Gateways.
- Your Mollie Live and Test API keys entered and saved in Mollie’s Gateway Settings.
Note: Haven’t installed Mollie yet or need help finding your API keys? Follow the full Charitable Mollie setup guide first, then come back here.
Important Note: Apple Pay and Google Pay are also available through the Stripe and Square gateways. This guide covers enabling them specifically for Mollie.
Enabling Apple Pay & Google Pay in Your Mollie Dashboard
Apple Pay and Google Pay are turned on in Mollie, not in Charitable. Mollie handles displaying the wallet buttons and verifying the donor at checkout; Charitable’s role is to submit the donation once the donor confirms it. Here’s how to switch them on:
- Log in to your Mollie Dashboard.
- In the menu, go to Payment methods.
- Find Apple Pay and Google Pay in the list and toggle each one on.
- Save your changes in the Mollie Dashboard.
You don’t need to add anything to your donation form for this to work. Once a wallet is enabled in Mollie, it appears automatically at checkout for the right visitors: Apple Pay on Safari and iOS, Google Pay on Chrome and Android.
Confirming Status in Charitable
Charitable Mollie 1.1.0 adds an Apple Pay & Google Pay panel to your Mollie gateway settings so you can check what’s live without leaving your WordPress dashboard.
Go to Charitable » Settings » Payment Gateways » Mollie.
Make sure the gateway is enabled here. Turn on test mode if you want to test payments before making it live,
Inside the Gateway Settings, enter your API keys and connect to Mollie (if you haven’t done that already).
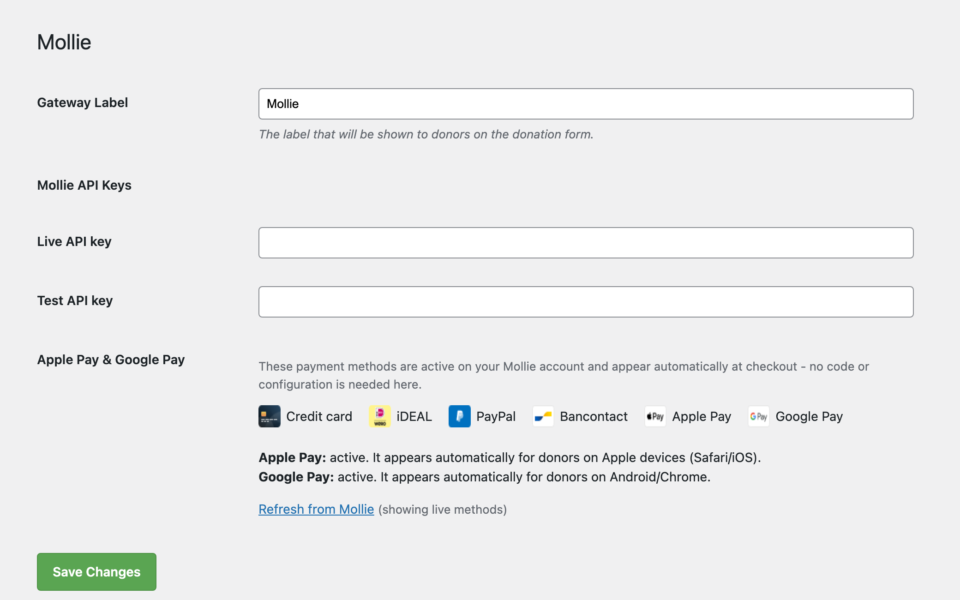
Look for the Apple Pay & Google Pay panel. Each wallet is marked as active or inactive based on your connected Mollie account.
If a wallet shows as inactive, click the link provided to go straight to that setting in your Mollie Dashboard.
Made a change in Mollie? Click Refresh from Mollie to recheck your account status without reloading the page.
Testing Before You Go Live
As with any payment change, test it before accepting real donations.
- In Charitable » Settings » Payment Gateways, check the “Turn on Test Mode” setting and save your changes.
- Visit a donation form on your site from a device that supports Apple Pay or Google Pay, and start a test donation.
- Confirm the wallet button appears and that the test payment completes.
- Go to Charitable » Donations and confirm the test donation is marked as Paid.
- Turn Test Mode back off when you’re ready to accept live donations.
Pro tip: Test on an actual mobile device where possible. Wallet buttons depend on the browser and device recognizing a saved card, and that’s easiest to confirm on the real thing rather than a desktop browser simulating mobile.
What Donors See at Checkout
Once both wallets are active, donors reach Mollie’s hosted checkout as usual after submitting your donation form. If their browser and device support it, they’ll see an Apple Pay or Google Pay button alongside your other payment options. Tapping it lets them confirm the donation with Face ID, Touch ID, a fingerprint, or their device passcode, instead of typing card details.
If a donor’s browser or device doesn’t support either wallet, they simply see your other available payment methods. Nothing changes for them, and nothing breaks on your form.
Cancellations and the charitable_mollie_cancel_url Filter
If a donor starts a payment through Mollie and cancels partway through, they’re returned to your site’s donation cancellation page. This applies to Apple Pay, Google Pay, and any other Mollie payment method.
If you need to send cancelled donors somewhere specific instead, such as a custom “we’d still love your support” page, use the charitable_mollie_cancel_url filter. It receives the donation object, so you can build a URL based on the campaign, donor, or any other donation detail.
Note: This filter is a developer-facing option and requires adding a small snippet of code to your site, typically in a custom plugin or your theme’s functions.php file.
FAQs on Mollie Apple Pay and Google Pay
Do I need to add anything to my donation form? No. Once Apple Pay and Google Pay are enabled in your Mollie Dashboard, they show up automatically at checkout. There’s nothing to configure in the Charitable form builder.
The Apple Pay & Google Pay panel shows a wallet as inactive. What do I do? Click the link next to that wallet to go directly to the setting in your Mollie Dashboard, enable it there, then click Refresh from Mollie back in Charitable to update the status.
Why isn’t the wallet button showing up for me when I test it? Wallet buttons only appear on supported browsers and devices: Apple Pay on Safari and iOS, Google Pay on Chrome and Android. If you’re testing on an unsupported browser, you won’t see the button, and that’s expected.
Is there extra PCI compliance work required on my end? No. Apple Pay and Google Pay run through Mollie’s hosted checkout, so card data never touches your server, and there’s no additional compliance or domain setup required.
Can I use Apple Pay and Google Pay with other gateways too? Yes. Apple Pay and Google Pay are also supported through the Stripe and Square gateways. This guide only covers enabling them for Mollie.
That’s it! You’ve learned how to set up Apple Pay and Google Pay with Mollie.
Next, you may also want to read the full Charitable Mollie setup guide or learn more about setting up other payment gateways.
Not yet on Charitable Pro? You can get up to 50% off when you sign up for or upgrade to Charitable Pro. We want to ensure that you can try the advanced fundraising features like Recurring Donations, Donation Recovery, and more at a significantly reduced cost.
Join over a million satisfied Charitable Pro users today. Every purchase comes with a 14-day money-back guarantee, ensuring you’re supported every step of the way.
If you have any questions or need assistance, our support team is ready to help you make the most of these new features.
Helpful Links
🤝 Get help when you need it
Connect with Customer Support →
📑 Find the guide you need
Browse the Documentation Hub →
⬇️ Download proven strategies, campaign ideas, and expert tools
🔗 Let your AI Assistant do the fundraising work for you.
Connect Charitable to your AI assistant →
💸 Get Free Fundraising Resources
Head to the Charitable Fundraising Hub →
🤔 Got questions about Charitable?
Charitable FAQs →
Need help understanding non-profit terms and jargon?
See our Non-Profit Glossary →