
Would you like to send your Charitable donation data to your CRM, email tool, spreadsheet, or chat app the moment a donation happens? Zapier connects Charitable to thousands of apps, so new donations, recurring renewals, donor signups, and campaign milestones can each kick off a workflow in any service you already use.
This guide will walk you through the steps to connect Charitable to Zapier and build your first Zap.
Note: Charitable’s Zapier integration requires Charitable Pro and the Automation Connect addon (Pro plan or higher).
Before you get started, make sure Charitable Pro is installed and activated on your site.
Generating an API Key
The Zapier integration is delivered through the Charitable Automation Connect addon. See Installing Extensions for the general install steps if you haven’t activated it yet.
Zapier connects to your Charitable site using an API key – a long, unique string that proves Zapier is allowed to read your donation data and listen for events. Each key belongs to one WordPress user, and you can have several active keys at the same time, with one key per integration.
From the WordPress admin, go to Charitable » Automation and switch to the API Keys tab.
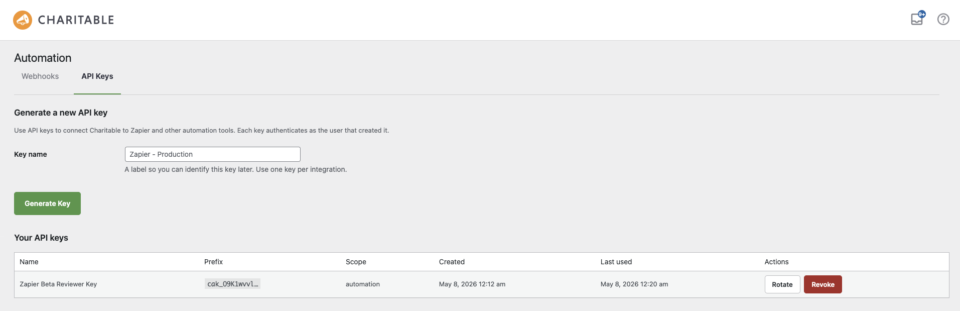
In the Key name field at the top of the page, type a label that explains where the key will be used – for example “Zapier production” or “Zapier – reviewer”. The label is internal-only, never shared with Zapier or visible to donors. When you’re ready, click Generate Key.
The new key appears in the Your API keys table below, and the full plain-text value is shown once at the top of the page.
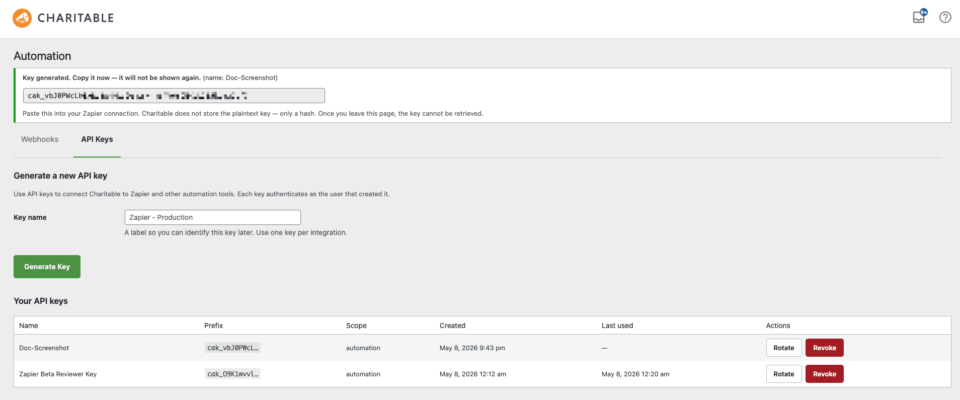
Note: Make sure to copy the key immediately. The plain-text value is shown only once and cannot be retrieved later. If you lose it, generate a new key and update Zapier with the new value.
Connecting Charitable to Zapier
With your API key in hand, the next step happens inside Zapier.
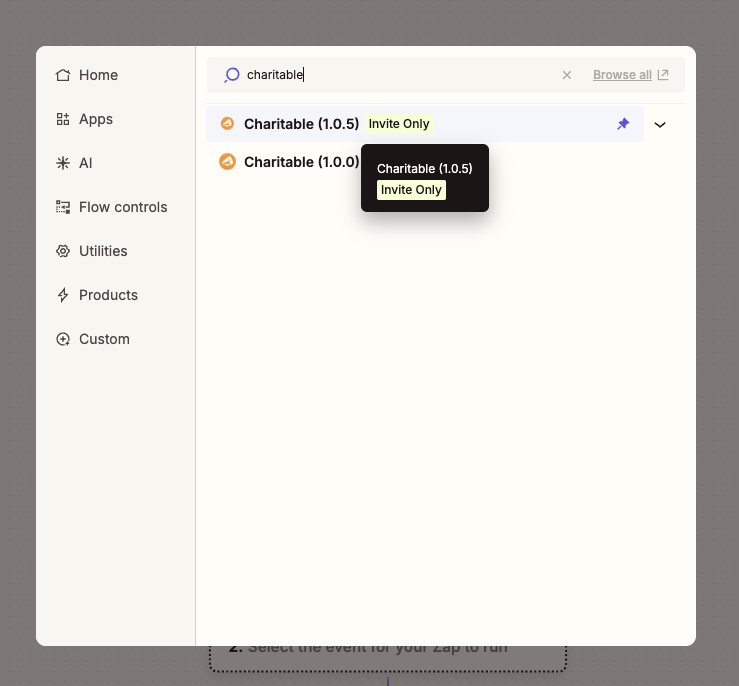
From the Zap editor, look up Charitable in the app picker and select it. Zapier will prompt you for two pieces of information.
- Site URL – the address of your Charitable site, for example
https://example.org. Don’t include a trailing slash. Zapier appends the rest of the path automatically. - API Key – paste the
cak_…string you generated in the previous step.
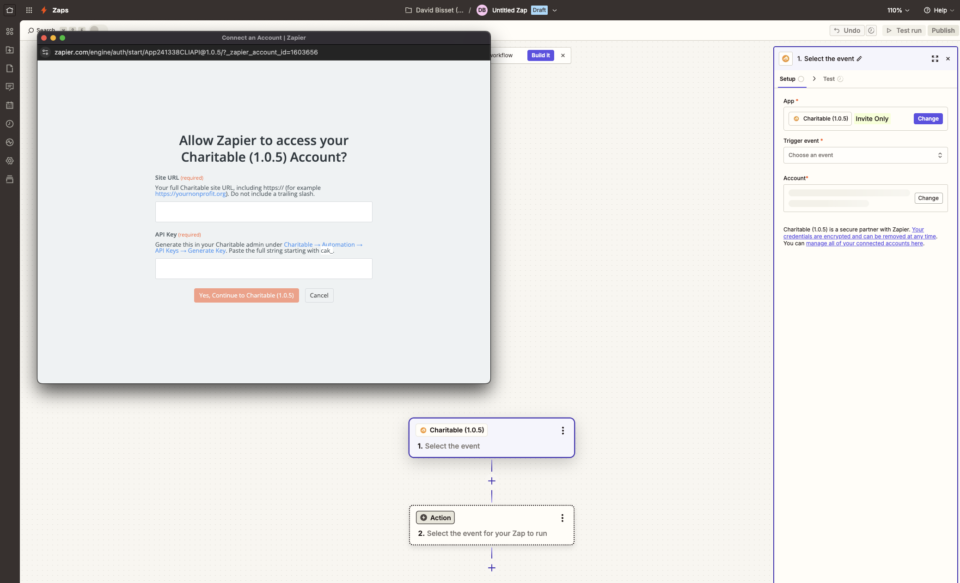
After you confirm, Zapier sends a test request to your site. A green success confirmation means the connection works and Zapier can now see your donations, donors, and campaigns.
Note: If your site enforces SSL, the Site URL must start with https://. A mismatch between the URL scheme and the site’s actual configuration is the most common cause of connection failures.
Trigger Events
A trigger is something that happens on your Charitable site that starts a Zap. Charitable provides ten trigger events.
- New Donation – fires the moment a new donation row is created on your site, regardless of payment status. Choose this when you want to log every attempt, including pending ones.
- Donation Completed – fires when a donation is marked complete by its payment gateway. Choose this for thank-you sequences and post-donation receipts.
- Donation Refunded – fires when a donation is refunded, in full or in part. Useful for accounting reconciliation and donor-relationship workflows.
- New Recurring Subscription – fires when a donor sets up a new recurring donation plan. Choose this to onboard recurring donors into a separate CRM list.
- Recurring Donation Renewed – fires each time a recurring donation charges successfully. Choose this for renewal-acknowledgement emails or CRM logging of every renewal.
- Recurring Subscription Cancelled – fires when a recurring plan is cancelled, either by the donor or by an admin. Choose this for win-back outreach and to update CRM lifecycle stages.
- Recurring Payment Failed – fires when a scheduled recurring charge fails. Choose this for dunning workflows and donor-recovery alerts.
- Campaign Goal Reached – fires the first time a campaign’s donations cross its goal. The event is recorded once per campaign so it never repeats. Choose this for celebration messages to your team or board.
- Campaign Ended – fires when a campaign reaches its end date. Choose this to trigger end-of-campaign reporting and wrap-up communications.
- First-Time Donor – fires when a donor’s very first completed donation is recorded. Choose this for welcome sequences and first-time-donor stewardship.
All triggers fire instantly the moment the event happens on your site – there’s no polling delay. Each trigger can also be scoped to a specific campaign in the Zap editor, so the Zap only runs for that one campaign. For more advanced filtering – by payment gateway, donation amount, donor email, or any other payload field – add a Filter by Zapier step right after the trigger.
Action and Search Steps
An action is something Zapier does on your Charitable site at the end of a Zap. A search is an action that looks up data and feeds it into later steps. Charitable provides two of each.
- Create Donor (action) – adds a new donor record to Charitable. If a donor with the same email already exists, the existing record is returned instead, so this step is safe to use repeatedly without creating duplicates.
- Update Donor (action) – updates an existing donor by email or donor ID. Only the fields you provide are changed; everything else stays as-is.
- Find Donor by Email (search) – looks up a Charitable donor by email and returns their full record. The Zap can be configured to either halt or continue when no match is found.
- Find Campaign (search) – looks up a campaign by slug or ID and returns the full record, including the current donation total and goal.
Building and Testing Your First Zap
The fastest way to confirm the integration works end-to-end is to build a small Zap and watch it fire.
From the Zap editor, pick New Donation as the trigger and choose your connected Charitable account. Zapier will pull a recent real donation from your site so you can map fields against the actual data shape, not synthetic samples.
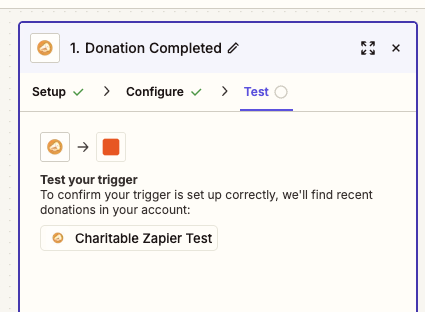
For the action step, pick any service you already use – Email by Zapier, Slack, Google Sheets, or your CRM. Map the donor name and donation amount into the action’s fields, then publish the Zap.
Once the Zap is on, make a small test donation on your site. A $1 donation through your usual payment method works fine. Within a few seconds, Zapier receives the event and the action runs.
If something doesn’t fire as expected, the Zap History tab in Zapier shows the exact payload Charitable sent and any errors from the action step, which makes it easy to spot a missing field map or a misnamed value.
Troubleshooting
Zapier reports “Authentication failed” when I save the connection
This means Zapier received an HTTP error from your site. Confirm the API key is the full cak_… string – it’s longer than most short keys you may be used to. The Site URL must point to the WordPress install root, not a subdirectory or a CDN domain. If your site enforces SSL, the URL must start with https://.
My Zap doesn’t fire when a donation is made
First, confirm the Zap is published and on in the Zap dashboard. Zaps in draft state don’t receive events. If it’s published, open the Zap History tab in Zapier – events Charitable sent will appear there with their full payload. If nothing appears in the history, your site may be blocking outbound HTTPS calls; common causes are aggressive security plugins, request firewalls, or staging environments where outbound traffic is restricted.
The trigger setup screen shows synthetic samples instead of my real donations
The trigger setup pulls your three most recent matching records so you can map fields against real shapes. If only synthetic samples appear, your site has no recent records of that type yet. Make a small test donation, then click Find new records in the Zap editor to refresh the list.
I changed my API key and now nothing works
API keys are tied to the Zapier connection, not to individual Zaps. When you regenerate a key, every Zap on the old key stops receiving events. The fastest fix is to open the Zapier connections list, edit the existing Charitable connection, and paste the new cak_… value – that updates every Zap using that connection at once.
That’s it! Charitable is now connected to Zapier and you can route donation, donor, and campaign events into any of the thousands of apps Zapier supports. Next, see Filtering Charitable Zaps by Campaign to scope individual Zaps, and the Charitable Zapier Field Reference for the complete list of fields each trigger sends.
FAQ
Can I have more than one Zapier account connected at the same time?
Yes. Each Zapier connection uses one API key, and you can generate as many keys as you need from Charitable » Automation » API Keys. A separate key per integration makes it easy to revoke access for a single tool without disrupting the others.
Do triggers fire for donations made before I installed the addon?
No. Triggers fire only on events that happen after a Zap is published and listening. To migrate historical data, export it from Charitable » Donations and import it into your destination app directly.
Does Zapier see my donors’ payment card details?
No. Charitable never stores card numbers, and the data Zapier receives contains only donor profile fields, donation amounts, campaign details, and gateway transaction IDs.
Can I use Zapier on a multisite network?
Yes, but each site in the network needs its own Charitable Pro license, Automation Connect addon, and API key. Zapier connections are per-site, not per-network.
How do I revoke a key without breaking everything?
In the Your API keys table on the Charitable » Automation » API Keys tab, each key has a row-level Revoke action. Revoking a key takes effect immediately and stops all Zaps using that key. Generate a replacement first, update the Zapier connection, and then revoke the old one to avoid downtime.

