Payfast is a South African payment gateway that lets your organization accept donations in South African Rand, through card payments, Instant EFT, QR codes, Mobicred and more than a dozen other methods South African donors already use.
This guide walks through installing the addon, enabling the gateway, setting your currency to Rand, adding your merchant credentials, testing in the sandbox, and going live.
What’s In This Guide?
Before You Start
- The Payfast payment integration is available on Basic plans and higher in the Charitable Pro Plugin. If you’re not yet on Pro, you can create your account now » Here’s a guide to help you install Charitable Pro »
- Next, you’ll need to install the Charitable Payfast addon. We’ll show you how to do that next. The Payfast addon comes with the Charitable Pro plugin. After purchasing a plan, you can install it, along with any other included addons, from the addons menu at no extra cost.
- You’ll need your own Payfast merchant account before you begin. If you don’t have one yet, sign up at payfast.io.
Payfast is built for the South African market and settles to South African bank accounts. Charitable connects to your own Payfast account, so your donor details and your transactions stay between you and Payfast.
Payfast charges no setup fee and no monthly fee. You pay per transaction, and the rate depends on the method your donor chooses. See payfast.io for current rates.
The addon needs Charitable 1.3 or higher and PHP 5.3 or higher. Any currently supported version of PHP is comfortably above that minimum.
Let’s get started.
Installing the Payfast Addon
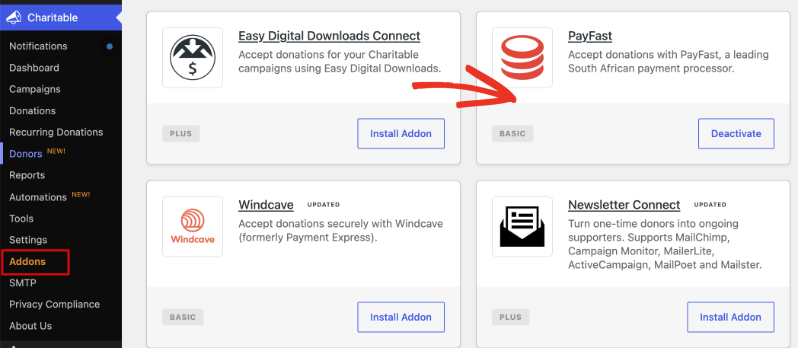
Go to Charitable » Addons and find Payfast in the list. Click “Install Addon”, then click “Activate” once the install finishes.
If you’d rather install from a zip file, you can download the addon and upload it yourself.
- In your Charitable account, go to the Downloads tab and scroll down to the Payfast addon. Download the addon here.
- In your WordPress dashboard, go to Plugins » Add New » Upload Plugin.
- Choose the zip file, click “Install Now”, then click “Activate Plugin”.
If you’re not sure how to install the Payfast addon, we recommend first reading our guide to installing Charitable extensions »
Enabling the Gateway
Go to Charitable » Settings » Payment Gateways. You’ll see Payfast listed with the other gateways. Turn on its toggle, then click “Save Changes”.
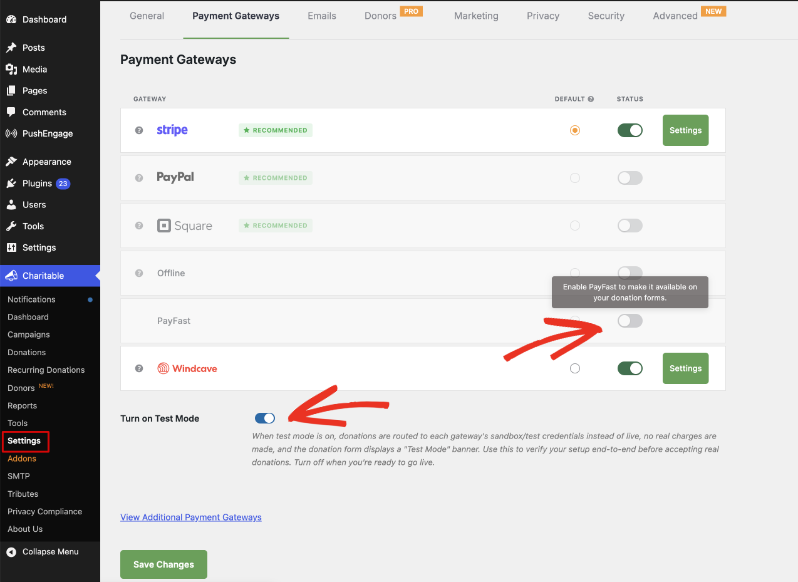
A green “Settings” button will appear next to Payfast. That’s where you’ll add your merchant credentials in a moment.
Note: The “Turn on Test Mode” toggle at the bottom of this same page is what you’ll use later to test Payfast before going live.
Setting Your Currency to Rand
Payfast settles in South African Rand, so Rand has to be your base currency in Charitable. Once you enable the gateway, Charitable checks this for you and shows a notice if your currency is set to something else.
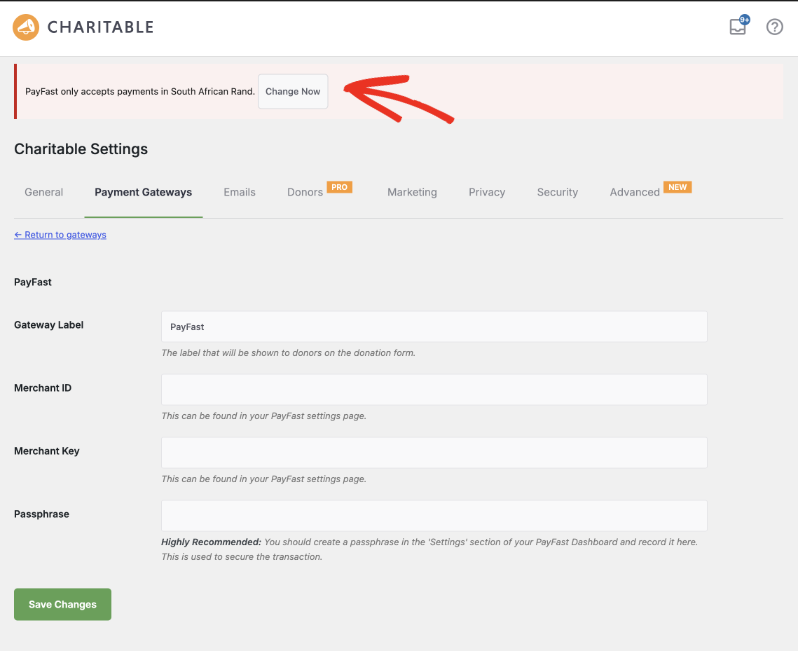
Click “Change Now” and the currency is set for you. You don’t have to do anything further. You can confirm it under Charitable » Settings » General » Setup, where the currency dropdown will read South African Rand (R).
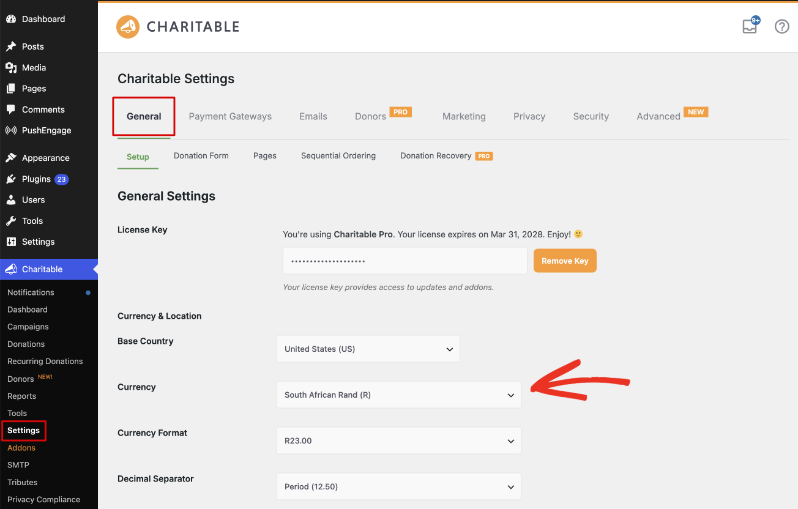
Note: Rand being your base currency doesn’t stop international donors giving. Payfast’s Multi-Currency Pricing feature lets a donor pick their own currency at the Payfast checkout, and Payfast converts it and pays you out in Rand. It works with Visa and Mastercard, but not American Express. Turn it on from your Payfast account, not from Charitable.
Adding Your Payfast Credentials
Click the green “Settings” button next to Payfast to open the gateway settings. You’ll find all 3 credentials in your Payfast account settings area.
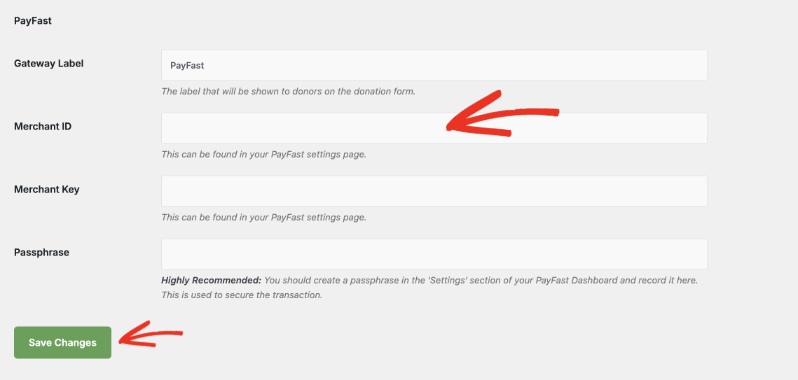
- Gateway Label is the name donors read on your donation form. Leave it as Payfast, or change it to something your supporters will recognize.
- Merchant ID is your Payfast merchant identifier.
- Merchant Key is the key paired with that Merchant ID.
- Passphrase is the value Payfast uses to sign the request. Set the same passphrase in your Payfast account and in Charitable, or your donations will be rejected. Older guides call this the salt.
Click “Save Changes” when you’re done.
Important: If you’re testing, take these details from sandbox.payfast.co.za rather than from your live Payfast account. Sandbox and live credentials are not interchangeable.
Setup Video
This short walkthrough covers installing the addon, adding your Payfast credentials and taking a donation.
Payment Methods Available With Payfast
Payfast gives your donors a wide range of payment options popular in South Africa, including the following.
- Card payments (Visa, Mastercard)
- Debit cards (Maestro, Visa Electron)
- Instant EFT
- SiD Secure EFT
- QR code payments
- Apple Pay
- Google Pay
- Samsung Pay
- Capitec Pay
- Absa Pay
- Mobicred
- MoreTyme (by TymeBank)
- Payflex
- MukuruPay
- MTN MoMoPay
- SnapScan
- Zapper
- Scan to Pay
- SCode
- Store cards (RCS)
- PayPal
Note: Payment methods change from time to time, and which ones you can offer depends on what is enabled on your own Payfast account. Check Payfast’s payment methods page for the current list.
Accepting Recurring Donations with Payfast
Payfast works alongside Charitable’s Recurring Donations feature, so a donor can set up a repeating gift once and Charitable bills each renewal after that. Recurring Donations is available on Plus plans and higher, while the Payfast gateway starts on Basic, so on a Basic plan you can take one-off Payfast donations but not recurring ones.
Testing Before You Go Live
We always recommend testing a new gateway before you accept real donations. Payfast runs a separate sandbox, so testing means using sandbox credentials rather than your live ones.
- Sign in at sandbox.payfast.co.za and take the Merchant ID, Merchant Key and Passphrase from there.
- Go to Charitable » Settings » Payment Gateways and turn on “Turn on Test Mode” at the bottom of the page. Click “Save Changes”.
- Open your Payfast gateway settings, paste in the sandbox credentials, and click “Save Changes”.
- Make a donation on your own website and choose Payfast as the payment method. You’ll be sent to the Payfast hosted payment page.
- After you finish, you’ll come back to your website. Go to Charitable » Donations and check the donation is there and marked as Paid.
- When the test donation looks right, turn test mode off, replace the sandbox credentials with your live ones, and click “Save Changes” again.
Important: Your test donations were made against a different Payfast account, so clear them out of Charitable » Donations before you go live if you don’t want them in your reports.
Making Payfast the Default Gateway
If you have more than one gateway enabled, the default is the one selected for your donors when your donation form loads. Go to Charitable » Settings » Payment Gateways, choose Payfast in the “Default” column, and click “Save Changes”.
Pro tip: If most of your donors are in South Africa, making Payfast the default puts Instant EFT and the local card options in front of them straight away, rather than leaving them to find it in a list.
Security and Donor Data
Every Payfast donation is completed on a PCI-compliant payment form hosted on Payfast’s own website. Donors reach it after submitting your donation form, and card numbers never touch your website or your database.
Payfast is a name South African donors recognize, which means they can give without worrying about who is handling their card details.
FAQs on Payfast
Do I need my own Payfast account to use this addon?
Yes. The addon connects to a merchant account you open directly with Payfast. If you don’t have one yet, sign up at payfast.io before you start.
Which currency do I need to use?
South African Rand. Payfast settles in Rand, so Rand is your base currency in Charitable. When you enable the gateway, Charitable shows a notice with a “Change Now” button that sets it for you.
Can international donors give in their own currency?
Yes, through Payfast’s Multi-Currency Pricing feature. Your donor picks their currency at the Payfast checkout, sees the converted amount, and Payfast pays you out in Rand. It covers Visa and Mastercard but not American Express, and you turn it on in your Payfast account rather than in Charitable.
Where do I find my Merchant ID, Merchant Key and Passphrase?
All 3 come from the settings area of your Payfast account. The Merchant ID and Merchant Key identify your account. The Passphrase is used to sign each request, and it has to match on both sides, so set the same value in Payfast and in Charitable. Older guides call this the salt.
Where do donors enter their card details?
On a PCI-compliant payment form hosted by Payfast, which donors reach after they submit your donation form. Card numbers never reach your website or your database.
Which plan do I need for Payfast?
Basic and higher. Recurring donations through Payfast need the Recurring Donations feature, which starts on the Plus plan.
What does Payfast charge?
There is no setup fee and no monthly fee. Payfast charges per transaction, and the rate depends on the payment method your donor picks. Check payfast.io for current rates.
How do I test Payfast without taking real money?
Use the Payfast sandbox at sandbox.payfast.co.za. It issues its own Merchant ID, Merchant Key and Passphrase, separate from your live account. Enter those in Charitable with “Turn on Test Mode” switched on.
My donors reach Payfast but the donation never comes back as Paid. What should I check?
Check the Passphrase first, because a passphrase set in Payfast but not in Charitable, or the other way round, is the most common cause. Then confirm your Merchant ID and Merchant Key are both from the same account and the same mode, since a live Merchant ID paired with a sandbox key will fail.