
DonorTrust shows recent donations made on your website in real-time. This is a great way to build trust and encourage more people to give to your cause!
Why it Works: People are more likely to trust what others are doing. When visitors see that others are donating, they’re more likely to trust your organization and donate too.
With DonorTrust, real-time notifications in neat non-intrusive popups will appear on your site. Here’s an example:

Setting up DonorTrust notifications is simple and easy to do. Let’s get started!
Prerequisites
- A WordPress site with Charitable Pro (1.8.7.3+) installed. Not sure how to do that? See our guide on How to Install Charitable »
- At least one campaign with paid donations.
- Minimum requirements:
- PHP 7.2+
DonorTrust is an addon that comes with the Charitable Pro plugin and is available on the Plus, Pro, or Elite plan.
You can install and activate it like any other Charitable addon. See our documentation on how to download and activate addons easily.
If you are a Charitable Lite user, consider Upgrading to Pro to access DonorTrust and many more features. You may also see the difference between Charitable Lite vs Pro.
Step 1: Enabling DonorTrust
We’ve made it as easy as 1 click to enable this feature. Go to the Charitable » Settings » Advanced tab within your WordPress admin.
Open the DonorTrust tab, and you’ll see a toggle switch to enable this feature.
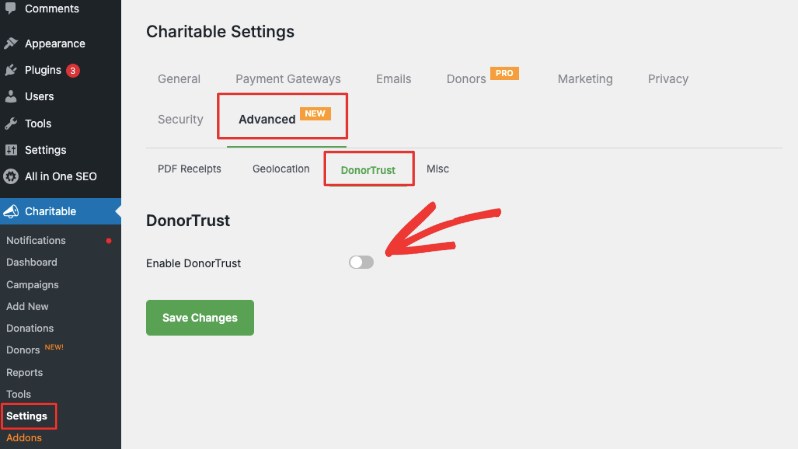
Once enabled, new settings will appear.
Step 2: Selecting Campaigns to Display
In the Campaigns section, you can choose which campaigns you want to show notifications for. Simply select individual campaigns and use the arrows to move them to the right column.
When a campaign is added to the right column, Charitable will start creating and displaying popups for donations made to that specific campaign.
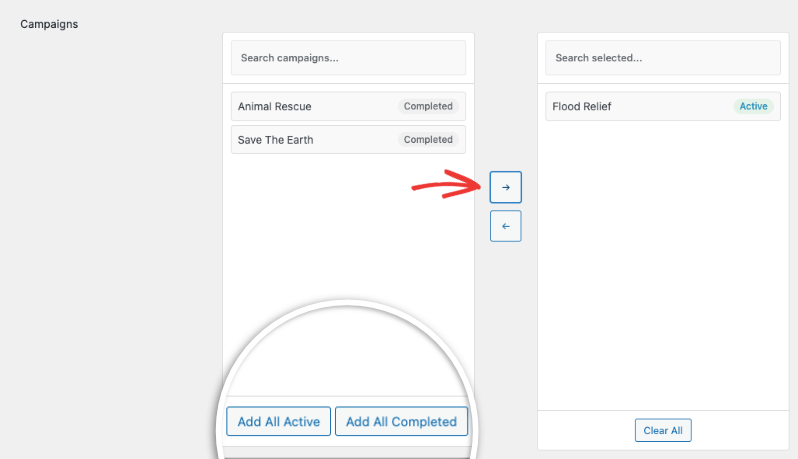
You can choose to quickly add all active campaigns or all completed campaigns.
Step 3: Making Clickable Popups
By default, the popups will link to the campaign page. This option is already enabled. When someone clicks on a notification, the campaign will open in a new tab.

If you’d prefer to only show the recent donation information without links, turn this switch off.

Step 4: Choosing a Minimum Donation Amount
You might not want to show every donation. You can set a minimum donation amount, like $25 or $100. Decide what amount you think will have a positive impact on potential donors.

The default amount is set to $0.00, which means all donations will be displayed.
Step 5: Setting up Display Rules
Charitable lets you control where and to whom your popups appear. First, choose who can see the notifications using the Show To options:
- All visitors
- Only logged out users
- Only logged in users

Below that, you can choose where the popups appear using the Show On options:
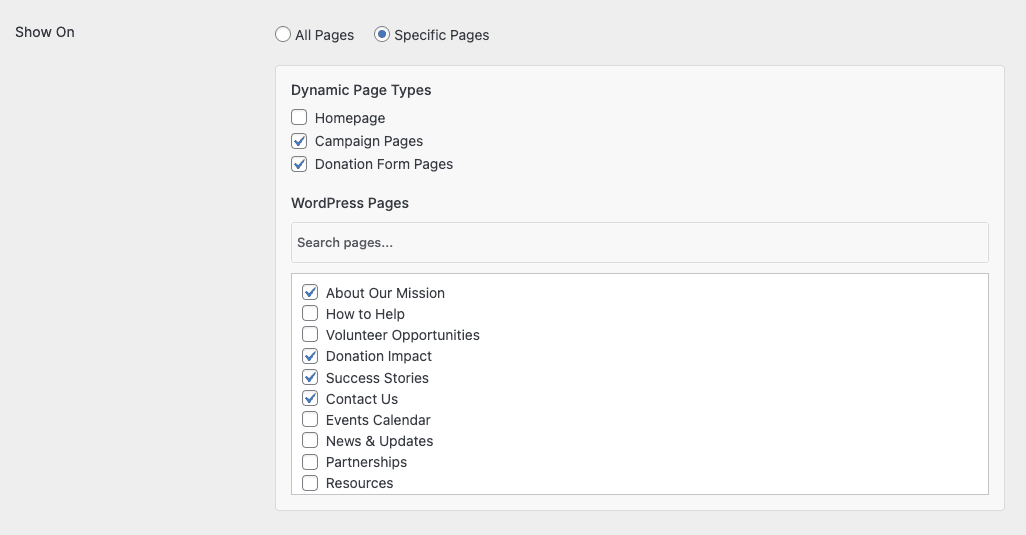
DonorTrust popups can appear on any frontend page of your site. You can also select specific pages:
- The homepage
- Campaign pages
- Donation form pages
- Individual WordPress pages
You can choose as many of these options as you want.
Step 6: Customizing the Popup Details
Next, you can control what details appear in the popup. These include:
- First name
- Last name
- Donation amount
- State/region
- Country

Important: Remember to consider privacy and data laws when choosing this information.
You can also choose how you want the popups to be ordered. You can arrange them by donation date, campaign creation date, or randomly.

You can also choose the maximum number of donation records to display. We recommend setting it at around 10, up to a maximum of 20.
Step 7: Increasing the Trust Factor
Below this, you can choose to show how long ago the donation was made, adding a “Time ago” detail. This helps build trust.
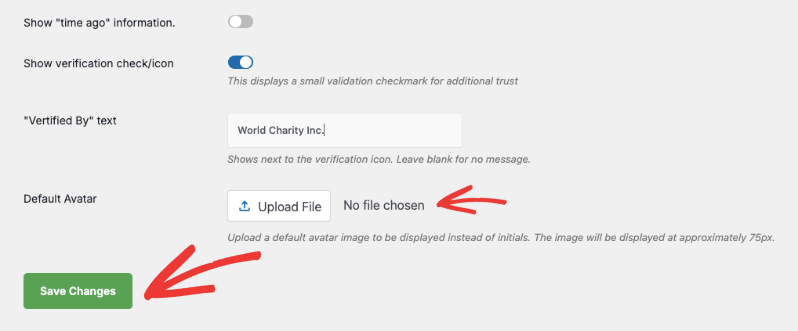
You can also display a validation checkmark to further add trust and credibility. This will add text like “Verified by [Your Organization Name]” to the popup, for example, “Verified by World Charity Inc.”

By default, Charitable will show the initials of the donor. You can choose to add an avatar instead.
That’s it! Save Changes, and your popups will now appear on your site according to the settings you’ve chosen.
DonorTrust is a simple yet powerful tool to help increase donations by building trust and showing social proof. You can leverage the power of real-time notifications and encourage more visitors to support your cause.
Next up are frequently asked questions to help clear up any doubts you may have.
Frequently Asked Questions
What is Charitable?
Charitable is a powerful and flexible WordPress donation plugin designed to help nonprofits and charities easily accept online donations. It simplifies the process of creating donation forms, managing campaigns, and tracking contributions.
What is DonorTrust? Do I need to use it with DonorTrust?
DonorTrust is a feature within Charitable Pro. It displays real-time notifications of recent donations made on your site. This is a form of social proof that can encourage more visitors to contribute to your cause.
How many donation records should I display?
Most websites display 5-10 donations. This provides enough social proof without creating information overload or making the page feel cluttered.
Can I customize the appearance of the popups?
Yes, you can control the details displayed in the popups (name, donation amount, country, etc.). You can also change the order the records are displayed and control where popups appear on your site.
What can I change about the popups?
Tailor the notifications to match your brand and campaigns. You have the flexibility to:
- Choose which active and completed campaigns to feature.
- Set a minimum donation amount to be displayed.
- Add a customizable “verification” checkmark for added credibility.
- Display a custom logo or a personalized avatar based on the donor’s name.
- Control the content of the notifications and select the pages where they appear, such as the homepage, campaign pages, or Charitable donation pages. You can pick any WordPress page as well.
Is there a privacy concern with displaying donor information?
Yes, that’s an important consideration. Be mindful of privacy laws and only display information that donors are comfortable with. Consider showing only donation amounts and a general location (e.g., State/Region) and avoid displaying full names or other personally identifiable information if you are unsure of local rules.
Can I test DonorTrust before making it live?
Yes. Once you’ve saved settings, you can manually create a test donation to verify that the popups appear and are displaying correctly. Make sure to view your site as a visitor before fully launching it.
What if I don’t want the popups to be clickable?
You can easily turn off the clickable link within the settings; the popups will simply display the donation information without redirecting to the campaign page.
Does DonorTrust work with all WordPress themes?
DonorTrust should work with most well-coded WordPress themes.
You may also want to connect your Charitable campaigns to Google Analytics to get indepth insights on your campaigns.
To make the most of Charitable and its features, check out our Documentation Hub »

