
GoCardless collects donations straight from a donor’s bank account using Direct Debit, so your donors don’t need a credit or debit card at all. Bank payments usually cost around 1% per donation instead of the 2.5% to 3% most card gateways charge, which leaves more money for your cause.
This guide walks through installing the addon, enabling the gateway, creating your access token, adding a webhook, and testing everything before you accept real donations.
GoCardless is available on Basic plans and higher.
What’s In This Guide?
- Before You Start
- Installing the GoCardless Addon
- Enabling the Gateway
- Creating Your Access Token in GoCardless
- Adding Your Access Token in Charitable
- Adding Your Webhook Endpoint
- Accepting Recurring Donations with GoCardless
- Testing GoCardless in Test Mode
- Making GoCardless the Default Gateway
- FAQs on GoCardless
- More Documentation
Before You Start
You’ll need your own GoCardless account before you begin. If you don’t have one yet, you can sign up at gocardless.com.
Charitable connects to that account directly. You’re never asked to connect through a partner account, so your donor details and your transactions stay between you and GoCardless.
GoCardless works with Direct Debit schemes in more than 30 countries.
- Bacs covers the United Kingdom, the Channel Islands, the Isle of Man, and Gibraltar.
- SEPA Core covers the Eurozone, including Austria, Belgium, Cyprus, Estonia, Finland, France, Germany, Greece, Ireland, Italy, Latvia, Lithuania, Luxembourg, Malta, Monaco, the Netherlands, Portugal, San Marino, Slovakia, Slovenia, and Spain.
- ACH covers the United States.
- PAD covers Canada.
- BECS covers Australia, and BECS NZ covers New Zealand.
- Autogiro covers Sweden, and Betalingsservice covers Denmark.
You’ll also need PHP 7.2 or higher and Charitable 1.6.55 or higher.
Note: Bank payments are not instant. A GoCardless donation sits as Pending in your dashboard for a few days before it is marked as Paid. That’s normal, and the webhook you set up later is what updates it for you.
Installing the GoCardless Addon
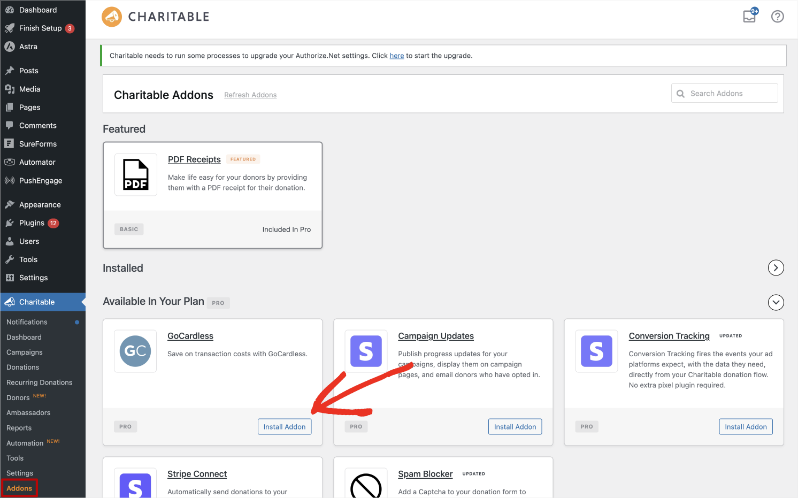
To install the addon, head over to Charitable » Addons and find GoCardless in the list. Click “Install Addon”, then click “Activate” once the install finishes.
If you’d rather install from a zip file, you can download the addon and upload it yourself.
- Download the GoCardless zip file from your Charitable account page.
- In your WordPress dashboard, go to Plugins » Add New » Upload Plugin.
- Choose the zip file you downloaded and click “Install Now”.
- Click “Activate Plugin”.
Note: If you’ve never installed a Charitable addon before, our guide to installing Charitable extensions covers both methods in more detail.
Enabling the Gateway
Activating the addon doesn’t switch the gateway on by itself, so there’s one more step.
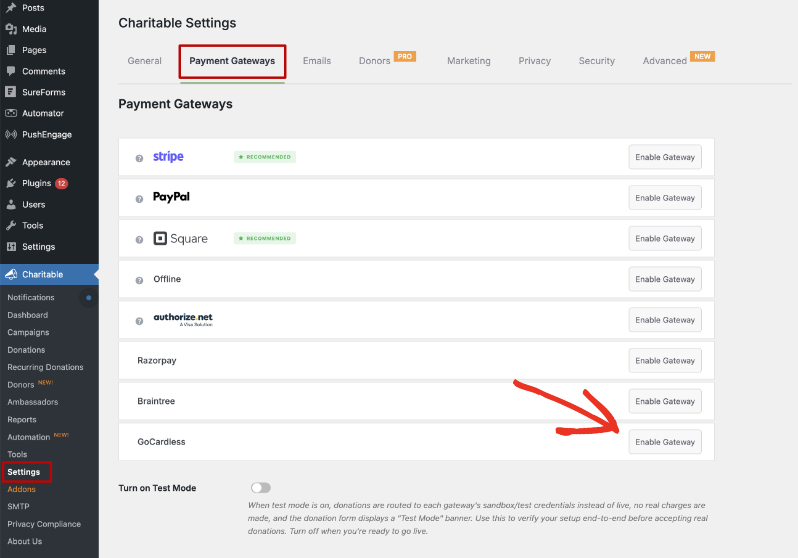
To turn it on, go to Charitable » Settings » Payment Gateways. You’ll see GoCardless listed with the other gateways. Click “Enable Gateway” next to it.
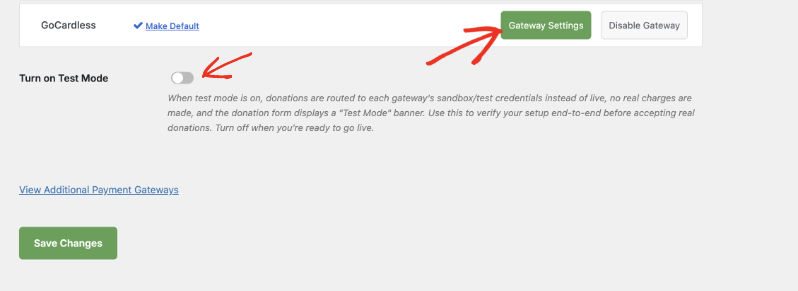
After the page reloads, a green “Gateway Settings” button appears next to GoCardless, along with a “Make Default” link and a “Disable Gateway” button.
Pro tip: You can also enable the gateway straight from the Plugins page. Right after you activate the addon, click the “Activate GoCardless gateway” link shown under the plugin name.
Creating Your Access Token in GoCardless
Charitable uses an access token to talk to your GoCardless account. An access token is a long string of characters that stands in for your login, and you create it inside your GoCardless dashboard.
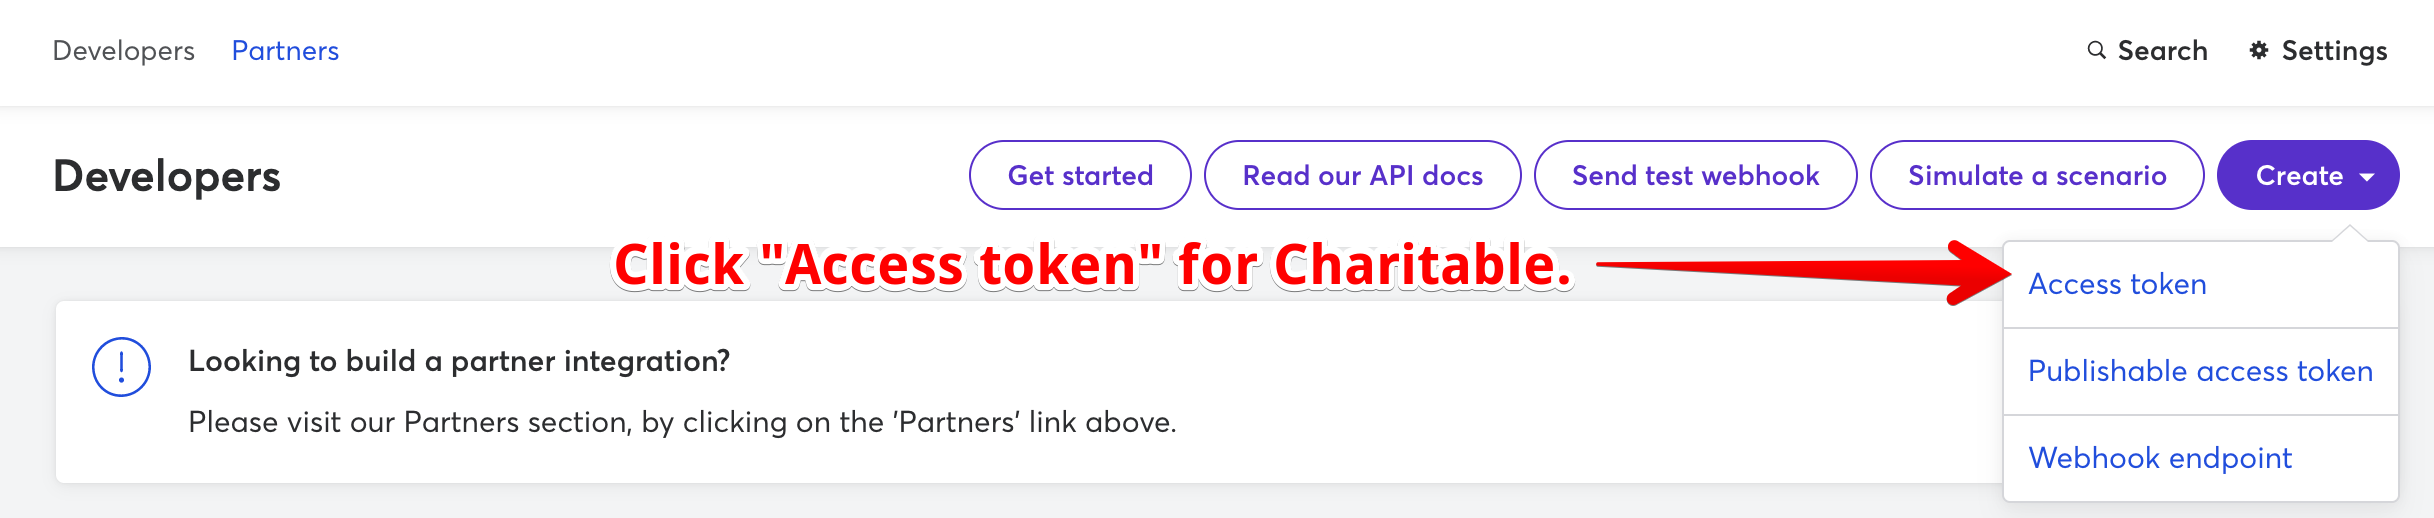
- To get started, log into your GoCardless account at manage.gocardless.com.
- Click “Developers” in the sidebar menu.
- At the top right, click “Create”, then click “Access token”.
- Give the token a name you’ll recognize later. “Charitable” works well.
- Copy the access token that GoCardless gives you.
Important: Treat your access token like a password. Anyone who has it can act on your GoCardless account, so don’t post it in a support forum or share it over chat.
Adding Your Access Token in Charitable
To open the gateway settings, go to Charitable » Settings » Payment Gateways and click “Gateway Settings” next to GoCardless.
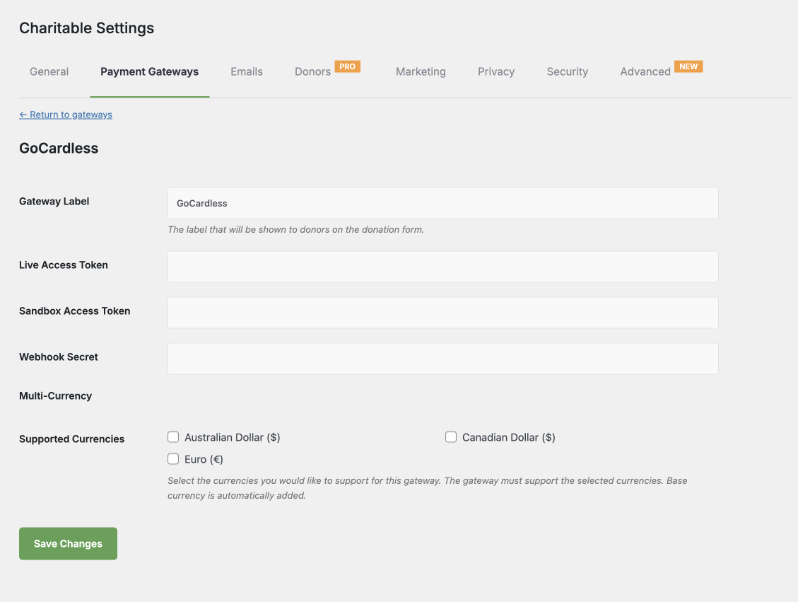
You’ll see five settings on this page.
- Gateway Label is the name donors see for this payment option on your donation form. It says GoCardless by default, and you can change it to something like “Direct Debit” if that’s clearer for your supporters.
- Live Access Token is where you paste the access token from your live GoCardless account.
- Sandbox Access Token is where you paste the access token from your GoCardless sandbox account. Charitable uses this one while Test Mode is on, and you can leave it empty until you’re ready to test.
- Webhook Secret is the secret you set on your GoCardless webhook endpoint. You’ll create that in the next section, so you can come back and fill this in afterwards.
- Supported Currencies lets you check any extra currencies you want to accept through GoCardless, such as Australian Dollar, Canadian Dollar, or Euro. Your site’s base currency is added for you automatically.
Once your live access token is in place, click “Save Changes”.
Adding Your Webhook Endpoint
A webhook is a message GoCardless sends to your website when something happens to a payment after the donor has left your site.
Without one, Charitable never finds out when a pending payment is collected or fails, and renewal donations from the Recurring Donations extension won’t be recorded.
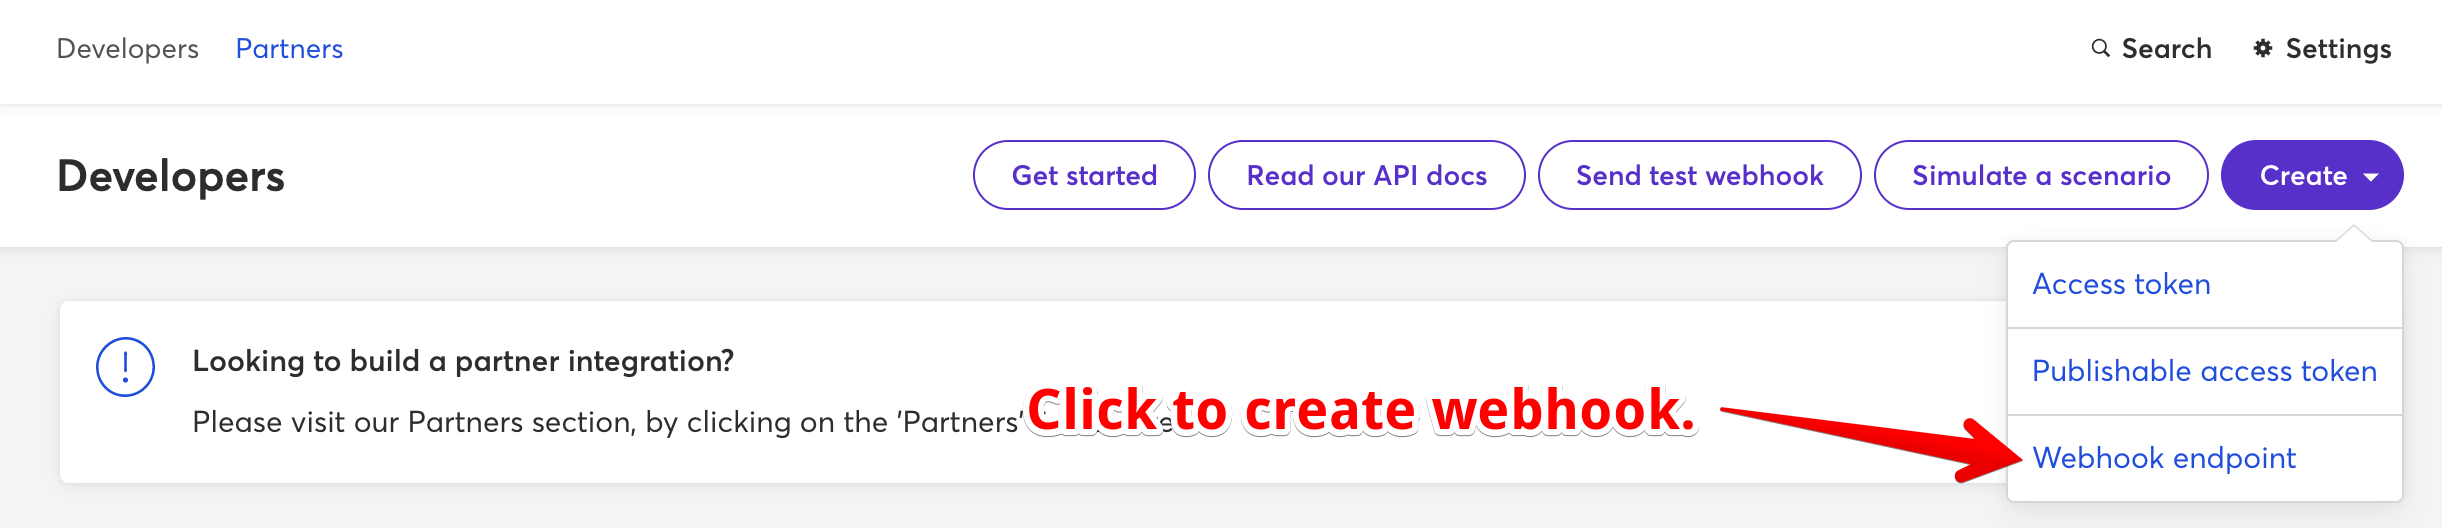
- To create it, go back to the Developers page in GoCardless, click “Create”, then click “Webhook endpoint”.
- Give it a “Name”. Charitable works well here, so you can tell later what the webhook is for.
- Set the “URL” to your website’s home address followed by
/charitable-listener/gocardless. For a site athttps://mynonprofit.org, the webhook URL ishttps://mynonprofit.org/charitable-listener/gocardless - Add a “Secret” that would be hard for anyone to guess, and keep a copy of it.
- Leave “Webhook client certificate” unchecked.
- Click “Create webhook endpoint”.
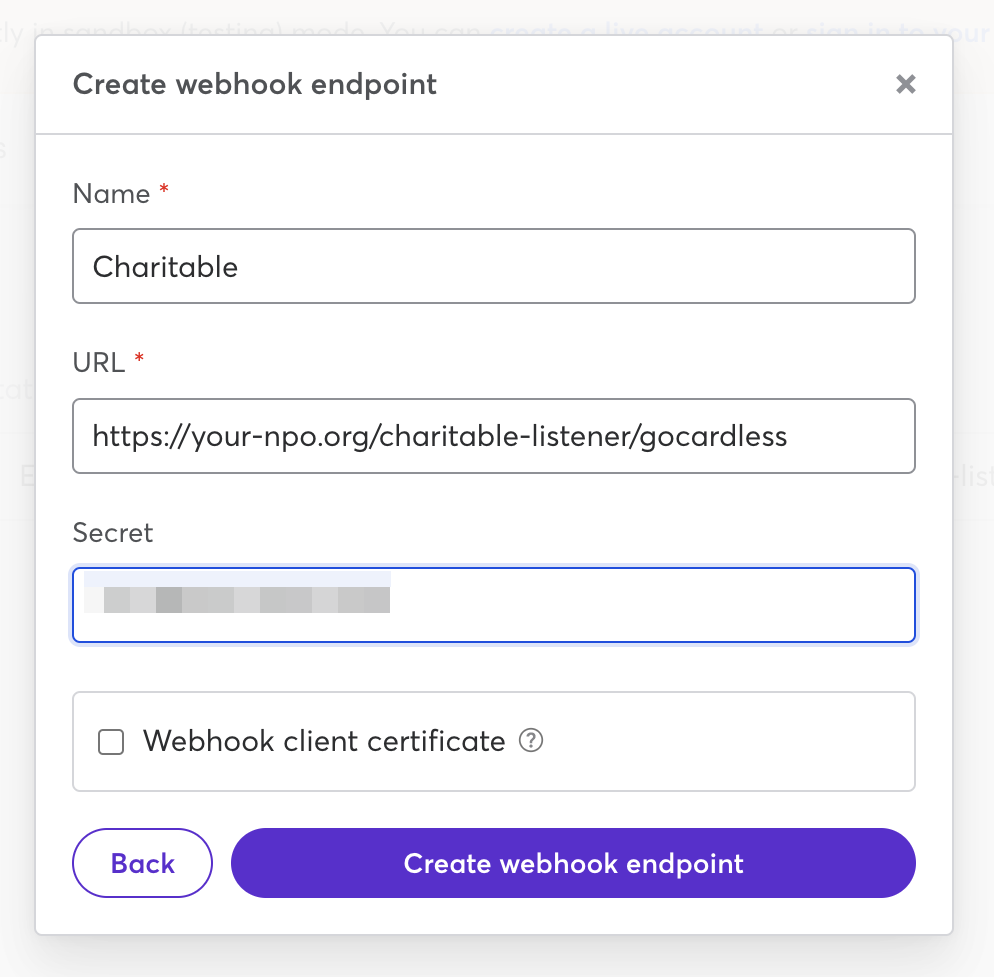
To finish, paste the same secret into the “Webhook Secret” field in your Charitable GoCardless settings and click “Save Changes”.
Important: The secret in GoCardless and the secret in Charitable have to match exactly. If they don’t, Charitable ignores the messages GoCardless sends and your donations will stay stuck as Pending.
Accepting Recurring Donations with GoCardless
GoCardless works alongside the Recurring Donations extension. Direct Debit suits regular giving well, because the donor authorizes it once and the payments are collected for them after that.
Donors can give weekly, monthly, quarterly, twice a year, or once a year. You don’t need to set up anything extra on the GoCardless side for this to work.
Important: Renewals depend on your webhook endpoint. If you plan to accept recurring donations, add the webhook before you go live.
Testing GoCardless in Test Mode
We always recommend testing a new gateway before you accept real donations. GoCardless keeps a separate sandbox account for testing, so you’ll create a second access token and a second webhook endpoint there.
- To set up the sandbox, go to manage-sandbox.gocardless.com and create or log into your sandbox account. The sandbox dashboard looks the same as your live one.
- Create an access token the same way you did before, then paste it into the “Sandbox Access Token” field in Charitable and click “Save Changes”.
- Create a webhook endpoint in the sandbox as well, pointed at the same URL you used for your live account, with the same secret.
- Go to Charitable » Settings » Payment Gateways, turn on “Turn on Test Mode”, and click “Save Changes”. Donations now use your sandbox credentials, no real money moves, and your donation form shows a “Test Mode” banner.
- Make a donation on your own website and choose GoCardless as the payment method. You can use the test bank details GoCardless publishes for the sandbox.
- After you finish the payment you’ll be back on your website. The donation shows as Pending under Charitable » Donations, because bank payments take a few days to clear.
- Open that donation and find the “Gateway Transaction ID” field. Clicking it takes you to the payment inside GoCardless, where you can watch its status.
- Check back in a few days. When the donation shows as Paid in Charitable, your webhook endpoint is working.
Important: Turn “Turn on Test Mode” back off before you start accepting real donations, or your live donors’ payments will keep going to the sandbox.
Making GoCardless the Default Gateway
If most of your donors will give by Direct Debit, you can have GoCardless already selected for them on the donation form.
To do that, go to Charitable » Settings » Payment Gateways and click the “Make Default” link next to GoCardless.
Note: GoCardless doesn’t take card payments. If some of your donors will want to pay by card, keep a card gateway such as Stripe or Square enabled alongside it.
That’s it! Your GoCardless gateway is ready to collect donations.
GoCardless is available in the Charitable Pro plugin starting on the Basic plan.
Not yet on Charitable Pro? You can get up to 50% off when you sign up for or upgrade to Charitable Pro. We want to ensure that you can try the advanced fundraising features like Recurring Donations, Donation Recovery, and more at a significantly reduced cost.
Join over a million satisfied Charitable Pro users today. Every purchase comes with a 14-day money-back guarantee, ensuring you’re supported every step of the way.
If you have any questions or need assistance, our support team is ready to help you make the most of these new features.
FAQs on GoCardless
Do I need my own GoCardless account to use this addon?
Yes. The addon connects to an account you create directly with GoCardless. If you don’t have one yet, sign up at gocardless.com before you start.
Do I have to connect through a partner account?
No. Charitable connects to your own GoCardless account with your own access token. Some donation platforms ask you to connect through their partner account, which gives them wide access to your donors and transactions. You don’t have to do that here.
Why does my donation show as Pending?
Direct Debit and bank transfers are not instant, so a new GoCardless donation is Pending for a few days. Your webhook endpoint updates it to Paid once GoCardless has collected the money.
Can donors pay by credit card through GoCardless?
No. GoCardless handles Direct Debit and local bank payments only. Keep a card gateway such as Stripe, Square, or PayPal enabled so donors who prefer a card still have an option.
Where do donors enter their bank details?
On a payment page hosted by GoCardless, which donors are sent to after they submit your donation form. Charitable never stores their bank details on your website.
Do I really need to add a Webhook Secret?
It’s optional, but we strongly recommend it. The secret is how Charitable checks that a message really came from GoCardless and not from someone else.
Can I use the same webhook URL for my live and sandbox accounts?
Yes. Both endpoints point at the same address on your website. Charitable works out which account to use from your Test Mode setting.
How much does GoCardless charge?
Fees are usually around 1% per payment, against roughly 2.5% to 3% on card payments, though the exact price depends on your country and how much you collect. Check gocardless.com/pricing for current rates.
You can also pair GoCardless with our Fee Relief extension, which invites donors to add a little extra to cover the processing fee.
My donations aren’t moving from Pending to Paid. What should I check?
Check the webhook endpoint first. The URL in GoCardless has to be your home address followed by /charitable-listener/gocardless, and the secret there has to match the “Webhook Secret” in your Charitable settings exactly. If you’re testing, confirm you created a webhook endpoint in the sandbox account too.
Which countries can I collect donations from?
More than 30, across the Direct Debit schemes listed at the top of this guide. That includes the United Kingdom, the Eurozone, the United States, Canada, Australia, New Zealand, Sweden, and Denmark.
More Documentation
- Installing Charitable Extensions
- Setting Up Payment Gateways
- Setting Up Recurring Donations
- GoCardless Integration for Charitable
Helpful Links
🤝 Get help when you need it
Connect with Customer Support →
📑 Find the guide you need
Browse the Documentation Hub →
⬇️ Download proven strategies, campaign ideas, and expert tools
Get the Fundraising Kit →
💸 Get Free Fundraising Resources
Head to the Charitable Fundraising Hub →
🤔 Got questions about Charitable?
Charitable FAQs →
Need help understanding non-profit terms and jargon?
See our Non-Profit Glossary →

