
Do you want your Windcave donors to be able to give every month instead of once?
Charitable’s Recurring Donations feature works with the Windcave gateway, so a supporter sets their gift up one time and each renewal is billed automatically after that.
This guide covers the credentials Windcave issues for recurring billing, where to enter them, how to switch recurring giving on for a campaign, and how to test it before you take real money.
Recurring Donations is available on Plus plans and higher.
What’s In This Guide?
- Before You Start
- How Recurring Windcave Donations Work
- Requesting Your REST Credentials From Windcave
- Adding Your REST Credentials in Charitable
- Turning On Recurring Giving for a Campaign
- Testing in the UAT Environment
- Managing Recurring Donations
- When a Renewal Fails
- Letting Donors Cancel Their Own Gift
- Not Yet on a Paid Plan?
- FAQs on Windcave Recurring Donations
- More Documentation
Before You Start
Set the Windcave gateway up first. If you haven’t done that yet, follow the Charitable Windcave guide, then come back here.
You’ll need all of the following.
- A Charitable plan of Plus or higher, because that’s where Recurring Donations starts. The Windcave gateway on its own starts at Basic, so a Basic plan takes one-off Windcave donations only.
- The Recurring Donations addon, version 2.2.0 or later, installed and activated from Charitable » Addons.
- The Windcave addon, with your PxPay credentials already saved and a test donation working.
- Your Windcave REST username and Restful API key, which Windcave issues separately from your PxPay and PxPost credentials.
How Recurring Windcave Donations Work
The first gift and every renewal after it take different routes through Windcave. Knowing which is which makes the credentials below make sense.
When a donor chooses a recurring amount and submits your form, Charitable sends them to the Windcave hosted payment page using your PxPay credentials. They enter their card there, on Windcave’s page.
Windcave stores that card and returns a token to Charitable. Card numbers never reach your website or your database.
From then on, Charitable bills each renewal through Windcave’s Restful API using that token. Your donor isn’t sent anywhere and doesn’t need to do anything. This is the part that needs the REST credentials.
Note: The integration is certified against Windcave’s Ecom API, including 3D Secure and tokenized rebilling.
Requesting Your REST Credentials From Windcave
Ask your Windcave account manager for HPP/Restful API access. They will send you a REST username and a Restful API key.
Windcave runs 2 environments, and each one has its own username and key.
- Live runs against sec.windcave.com and processes real transactions.
- Test runs against uat.windcave.com, for testing.
Important Note: Your REST username is not the same as your PxPay User ID, even though both come from the same Windcave account. Ask for both environments at once so you aren’t waiting on a second request when you go live.
Adding Your REST Credentials in Charitable
Go to Charitable » Settings » Payment Gateways, click “Settings” next to Windcave, and scroll down to the “REST API Settings” section.
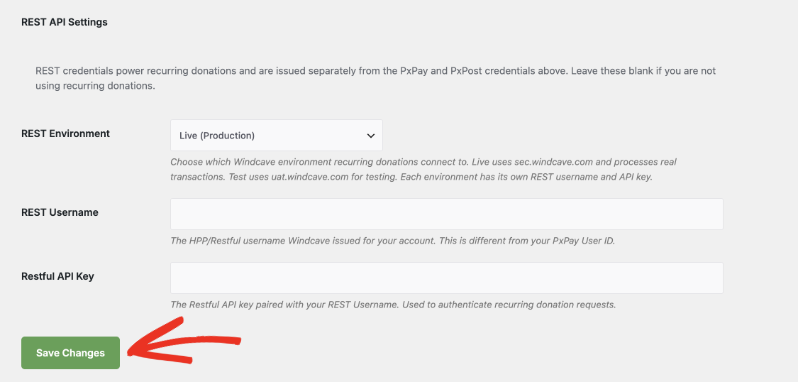
- REST Environment chooses which Windcave environment your recurring donations connect to. Select “Live (Production)” to process real transactions, or “Test” while you’re testing.
- REST Username is the HPP/Restful username Windcave issued for your account.
- Restful API Key is the key paired with that username. Charitable uses it to authenticate every recurring donation request.
Click “Save Changes” when you’re done.
Note: Leave this whole section blank if you aren’t accepting recurring donations. Your one-off Windcave donations work without it.
Turning On Recurring Giving for a Campaign
Recurring giving is set per campaign, so you decide which appeals offer it. Open a campaign in the Campaign Builder, go to Settings » Recurring Donations, and choose a mode.
- Disabled shows no recurring option at all.
- Simple adds a checkbox so a donor can make their gift recurring.
- Advanced lets the donor choose between a one-time gift and a recurring one, with a period selector.
- Recurring Only hides one-time giving completely. Every gift to the campaign is a subscription, which suits monthly giving clubs and operating funds.
Then set the periods and amounts you want to offer. Donation period covers daily, weekly, monthly, quarterly, twice a year, and yearly. Donation length is the number of payments to collect, where 0 means the gift continues until the donor cancels.
Save or publish the campaign and your next Windcave donor can start a recurring gift.
Testing in the UAT Environment
Test a recurring gift end to end before you take real money. Because Windcave has no separate test mode toggle, testing is a credentials swap.
- Enter your UAT PxPay credentials in the Windcave settings, so the first payment runs against the test environment too.
- Set “REST Environment” to “Test”, enter your test REST username and Restful API key, and click “Save Changes”.
- Go to a campaign with recurring giving switched on and make a donation on your own website, choosing a recurring amount and Windcave as the payment method.
- Enter a test card on the Windcave hosted payment page. Windcave publishes test card numbers for UAT, and your account manager can send them to you.
- Check that the subscription appears under Charitable » Recurring Donations with a status of Active and Windcave as the payment method.
- When it all looks right, swap in your live PxPay credentials, set “REST Environment” to “Live (Production)”, enter your live REST username and key, and click “Save Changes”.
Important: Cancel your test subscriptions before you go live. A test subscription left Active is pointing at credentials you’ve replaced, and it clutters your reports.
Managing Recurring Donations
Your Windcave subscriptions live alongside every other gateway’s under Charitable » Recurring Donations. The payment method shows under each amount, so you can tell a Windcave subscription from a Stripe one at a glance.
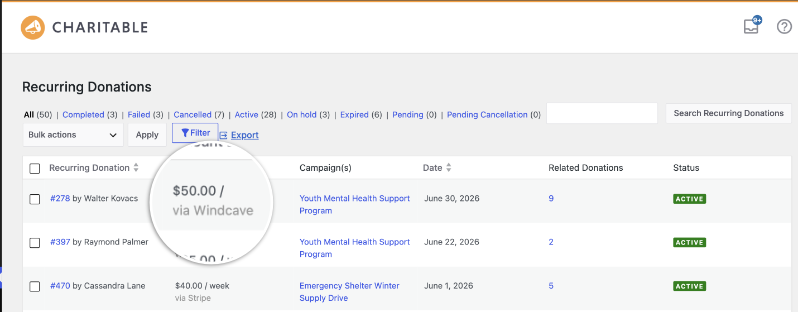
The links across the top filter the list by status, so you can pull up only the Active subscriptions, or only the Failed ones. “Related Donations” counts the renewals collected so far, and “Export” sends the list to CSV.
Click a subscription to open the Recurring Donation Details screen, which shows the donor, the campaign, the amount, and Windcave as the payment method.

Use the “Donation Actions” box on the right to act on the subscription, including cancelling it on the donor’s behalf.
When a Renewal Fails
Cards expire, and Windcave declines a renewal when one does. Charitable sends the donor the Payment Failed email automatically and moves the subscription into the Failed filter, so you can see it without going looking.
To edit that email’s wording, go to Charitable » Settings » Emails » Payment Failed.
Pro tip: Make sure your site can actually deliver email before you rely on this. A failed-renewal notice that lands in spam costs you the donor as surely as no notice at all.
Letting Donors Cancel Their Own Gift
Donors can view and cancel their own Windcave subscription from the Donor Dashboard, or from a page using the [my_recurring_donations] shortcode.
A “Cancel” link appears for any subscription that can be cancelled, meaning active, pending, or on-hold ones. The donor confirms, the status updates to Cancelled, and they’re returned to the dashboard. Subscriptions that are already completed, expired, or cancelled show a dash instead.
Not yet a Charitable Pro user? Sign up today and get up to 50% off on your plan. We’re confident you’ll love raising funds with Charitable. If, for any reason, Charitable is not the right fit for you, we’ll refund your purchase with our 14-day money-back guarantee. Get Charitable Pro Now »
FAQs on Windcave Recurring Donations
Which plan do I need?
Plus or higher. The Windcave gateway is included from Basic, but recurring billing needs the Recurring Donations feature, which starts on Plus.
Do my existing PxPay credentials cover recurring donations?
No. PxPay handles the first payment on the hosted page. Renewals go through Windcave’s Restful API, which needs a REST username and Restful API key that Windcave issues separately.
Do I need PxPost credentials for recurring donations?
No. PxPost is for refunding a donation from inside Charitable. Recurring billing doesn’t depend on it, though most sites add it anyway so refunds are possible.
Is my REST username the same as my PxPay User ID?
No, they’re different values from the same Windcave account. Entering your PxPay User ID as the REST username is the most common reason recurring donations don’t authenticate.
Does card data touch my website?
No. The donor enters their card on the Windcave hosted payment page, Windcave stores it, and Charitable holds a token only.
What schedules can donors choose?
Whichever ones you offer on the campaign, from daily, weekly, monthly, quarterly, twice a year, and yearly. You can fix the schedule yourself or let the donor pick.
Can I switch an existing one-off campaign to recurring?
Yes. Change the mode in the Campaign Builder and save. Donations already collected stay as they are, and only new gifts get the recurring option.
Do donors get a receipt for every renewal?
Yes. Each renewal is recorded as its own donation against the subscription, so your normal donation receipt goes out for it.
More Documentation
- Charitable Windcave
- Charitable Recurring Donations
- How to Use Recurring Donations 2.0
- Windcave Integration for Charitable
Charitable Has 1+ Million Downloads!
Trusted by millions to power successful fundraising campaigns. Try Charitable risk-free today.
✅ 14-day money-back
✅ Transparent pricing
✅ Code-free setup
Helpful Links
🤝 Get help when you need it
Connect with Customer Support →
📑 Find the guide you need
Browse the Documentation Hub →
⬇️ Download proven strategies, campaign ideas, and expert tools
Get the Fundraising Kit →
💸 Get Free Fundraising Resources
Head to the Charitable Fundraising Hub →
🤔 Got questions about Charitable?
Charitable FAQs →
Need help understanding non-profit terms and jargon?
See our Non-Profit Glossary →

