
Do you want to show visitors exactly how much time remains before your campaign closes? The Campaign Countdown Timer adds a live, real-time countdown to any Charitable campaign page – displaying days, hours, minutes, and seconds until your campaign end date.
Table of Contents
- Requirements
- Adding the Countdown Timer to Your Campaign
- Setting Your Campaign End Date
- Configuring the Timer
- How the Timer Appears to Donors
- Frequently Asked Questions
Requirements
The Campaign Countdown Timer is available on all Charitable Pro plans: Basic, Plus, Pro, and Elite. It is not available on Charitable Lite.
Important: Your campaign must have an end date set before the timer will display on the frontend. If no end date is configured, the timer block will appear in the campaign builder but will not be visible to visitors.
See more About Campaign Countdown »
Adding the Countdown Timer to Your Campaign
- In your WordPress dashboard, go to Charitable » Campaigns and open the campaign you want to edit.
- In the campaign builder, locate the Add Layout panel on the left side of the screen.
- Scroll down to the Pro section and click Countdown. The timer block will be added to your campaign canvas.
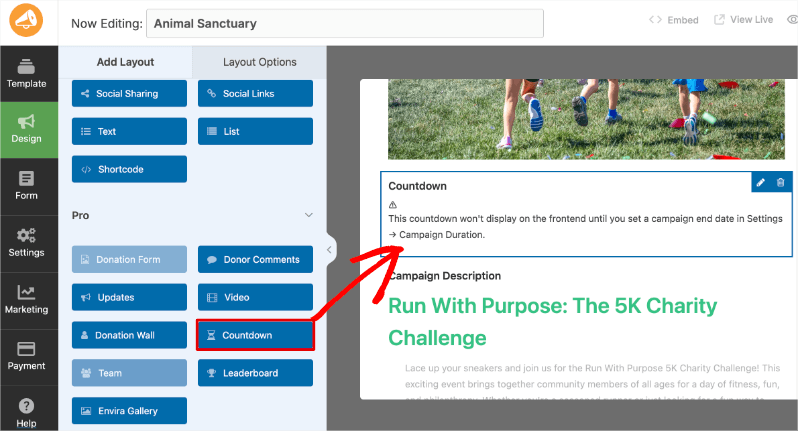
Note: After adding the block, you may see the message “This countdown won’t display on the frontend until you set a campaign end date in Settings » Campaign Duration.” See the next section to set your end date.
Setting Your Campaign End Date
The countdown timer reads your campaign’s end date automatically. If you haven’t set one yet:
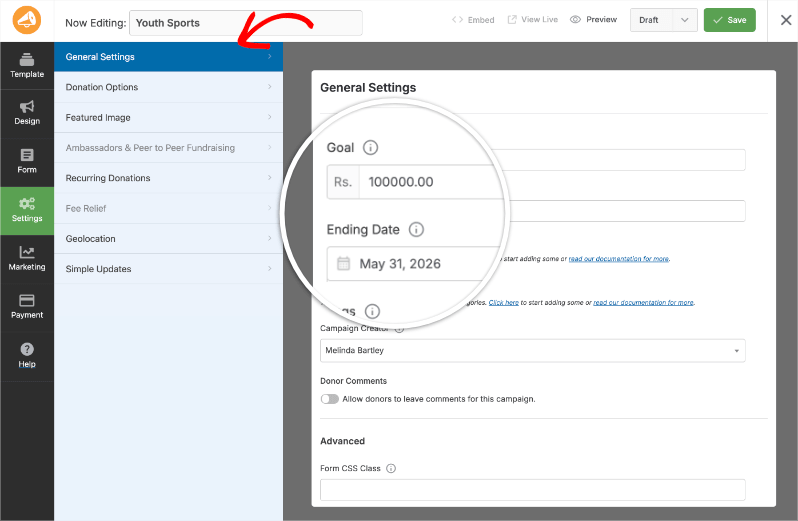
- In the campaign builder, click Settings in the left sidebar.
- Open General Settings.
- Click the Ending Date field and select your campaign’s end date.
- Save your changes using the button at the top right corner. The timer will now reflect the end date you’ve set.
Configuring the Timer
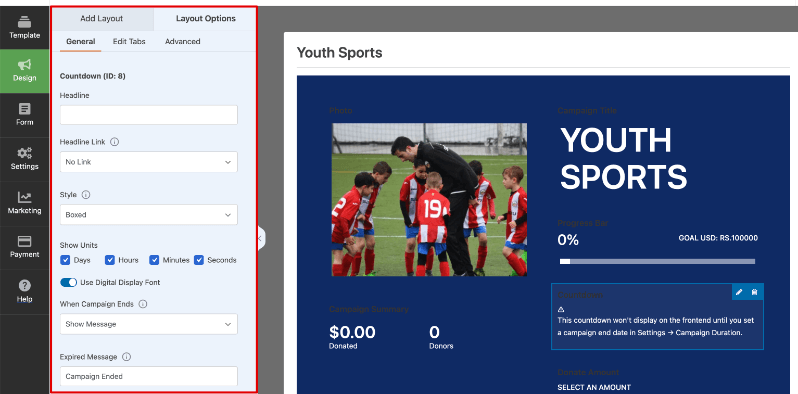
To access the timer settings, click the Countdown block on the campaign canvas, then click Layout Options in the panel on the left. All settings are under the General tab.
Celebration Effect
This displays an animated effect on the front end when the campaign ends.
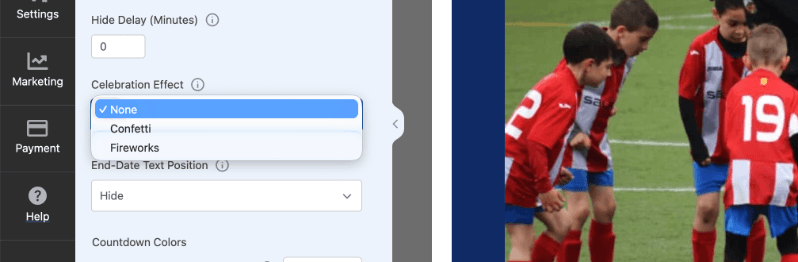
You can choose to display:
- None: No animation plays when the campaign closes (default)
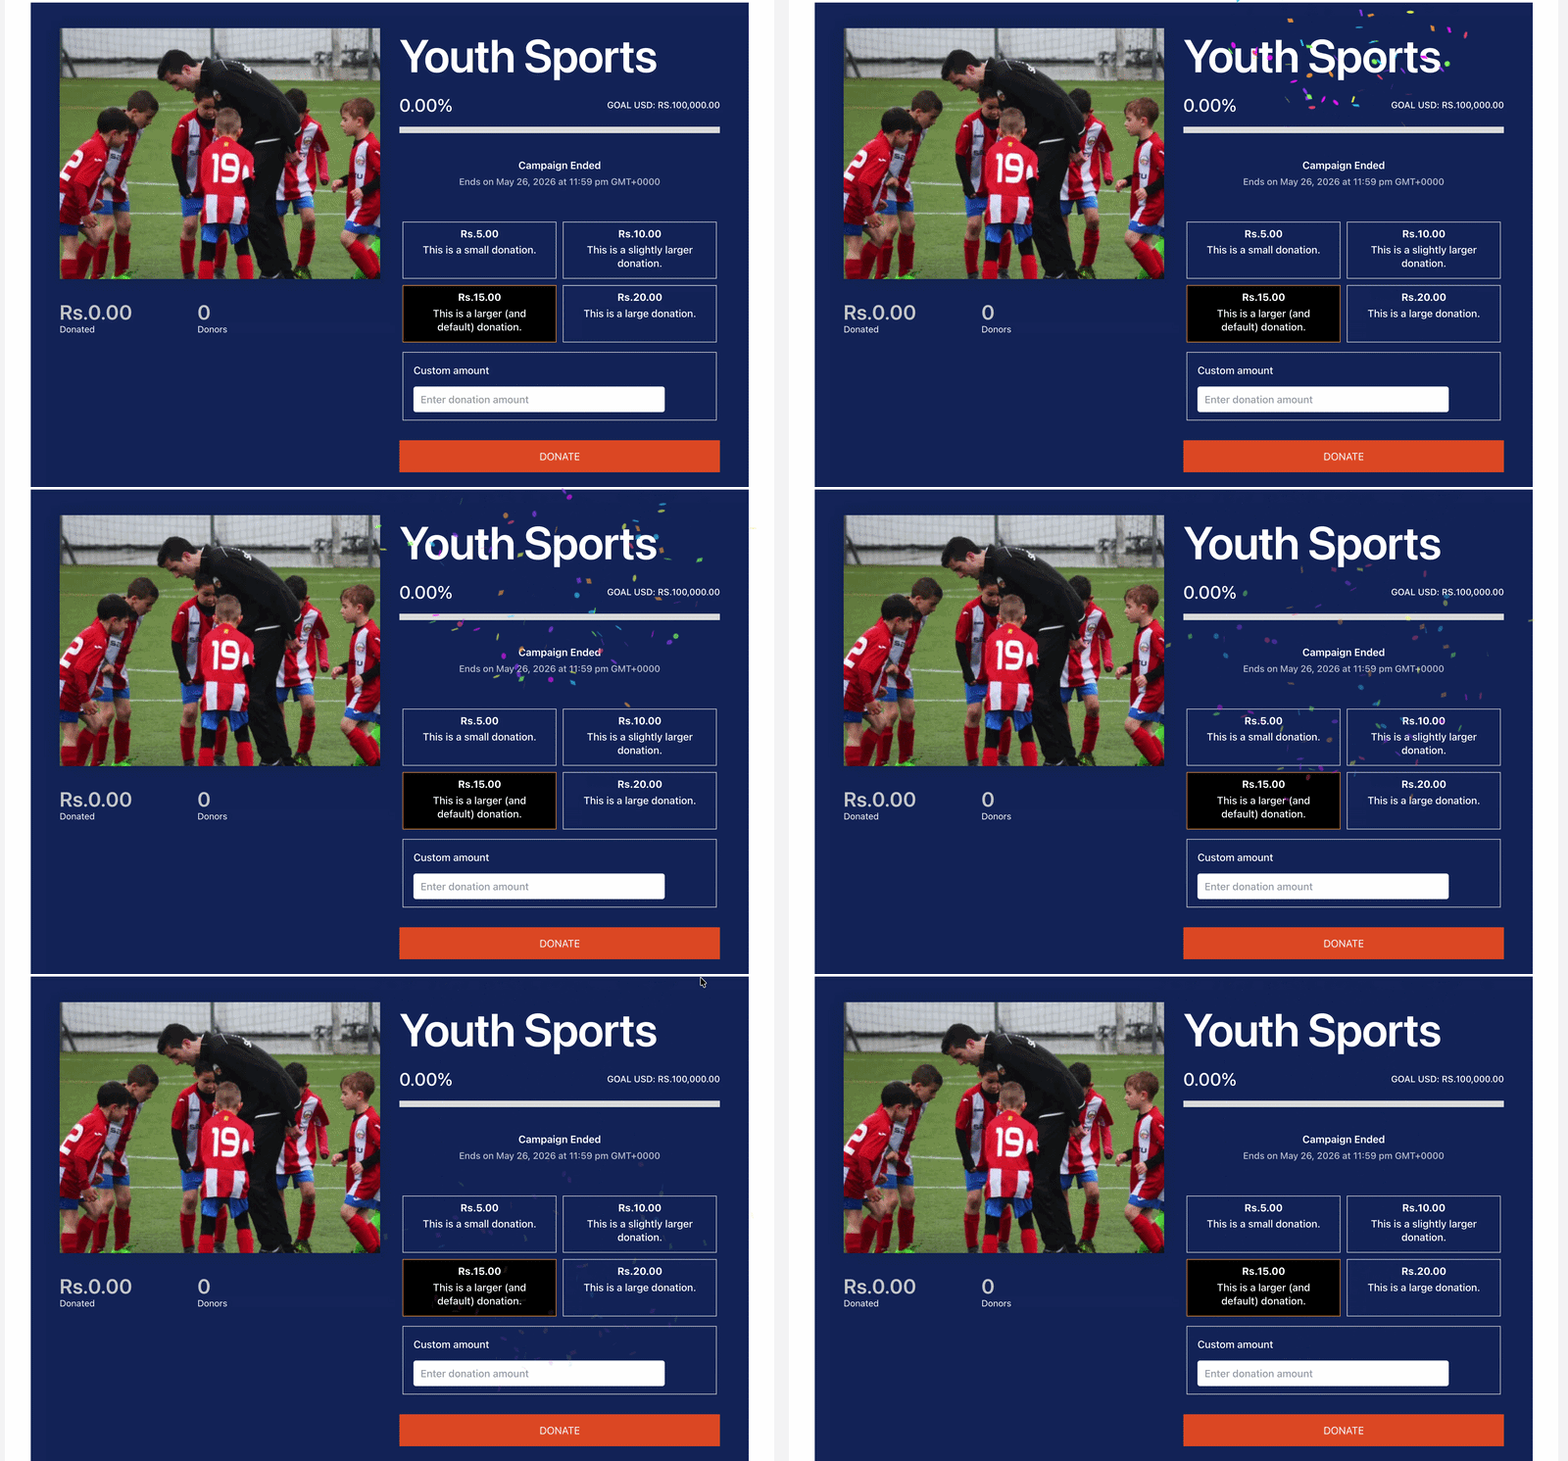
- Confetti: A confetti burst animation plays at campaign end
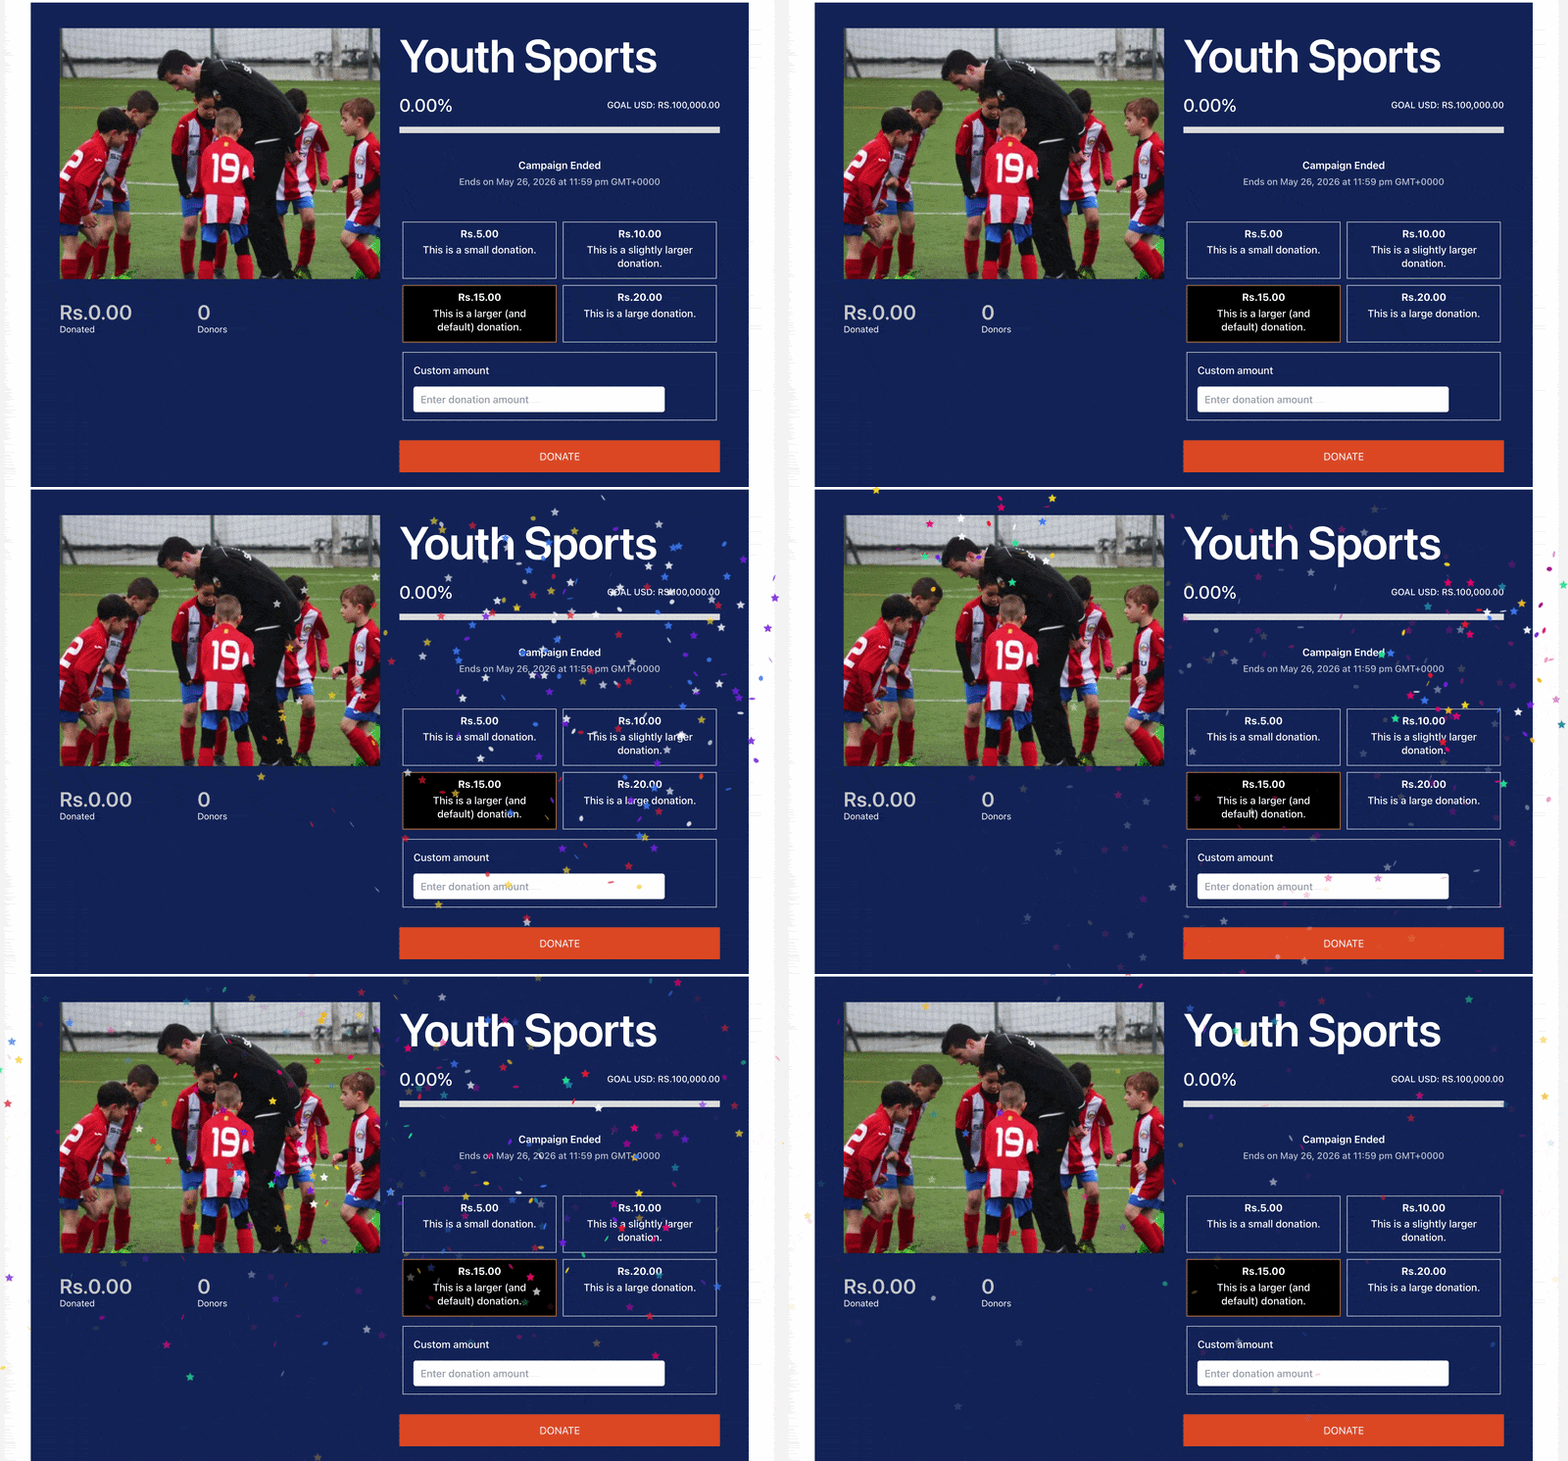
- Fireworks: A fireworks animation plays at campaign end
Here’s what the confetti looks like:
Here’s what fireworks look like:
End-Date Text Position
This controls where the end date label appears relative to the countdown:
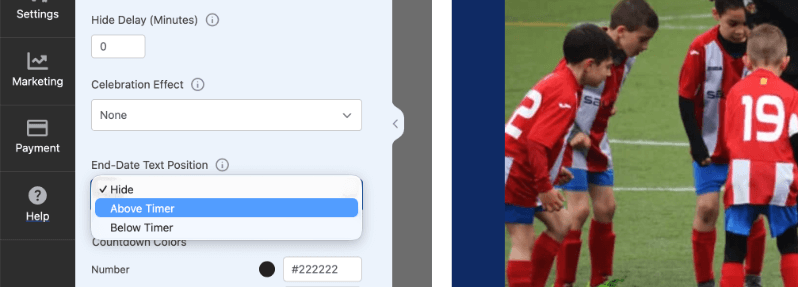
You can choose from:
- Hide: The end date label is not shown (default)
- Above Timer: The end date displays above the countdown numbers
- Below Timer: The end date displays below the countdown numbers
Countdown Colors
Set a custom color for each element of the timer display. Click any color swatch to open the color picker:
- Number: Color of the countdown digits
- Label: Color of the unit labels (Days, Hours, Minutes, Seconds)
- Background: Background color of each timer box
- Border: Border color of each timer box
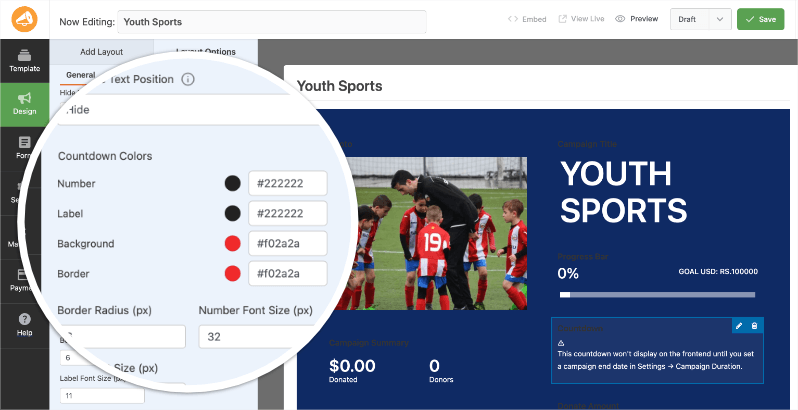
You can also adjust Border Radius (px) to control how rounded the corners of each timer box appear, Number Font Size (px) to set the size of the countdown digits, and Label Font Size (px) to set the size of the unit labels.
When Campaign Ends
Controls what donors see after the countdown reaches zero:
- Show Message: Displays a custom message you define in the Expired Message field. The default text is “Campaign Ended” — edit this to anything that fits your campaign.
- Keep Timer at Zero: The countdown block remains visible but stays frozen at 00:00:00:00
- Hide Countdown: The countdown block is removed from the page entirely once the campaign ends
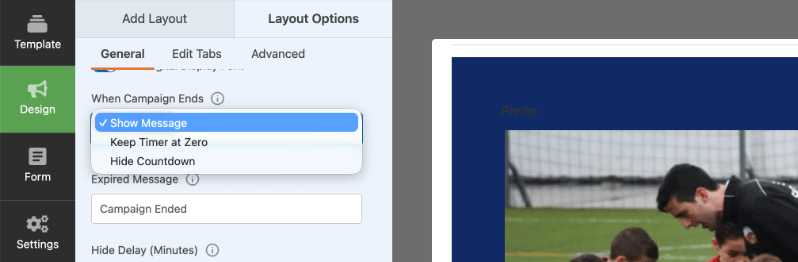
Hide Delay (Minutes)
If you’ve set “When Campaign Ends” to “Hide Countdown,” use this field to add a delay (in minutes) before the timer block disappears. This gives your donors more time to make a donation before the campaign ends.
Set to 0 to hide the countdown immediately when the campaign ends.
Once you’ve configured all settings, click Save to publish your changes.
How the Timer Appears to Donors
When a visitor views your campaign page, the countdown timer displays as a row of boxes showing the days, hours, minutes, and seconds remaining. The timer updates in real time without requiring a page refresh.
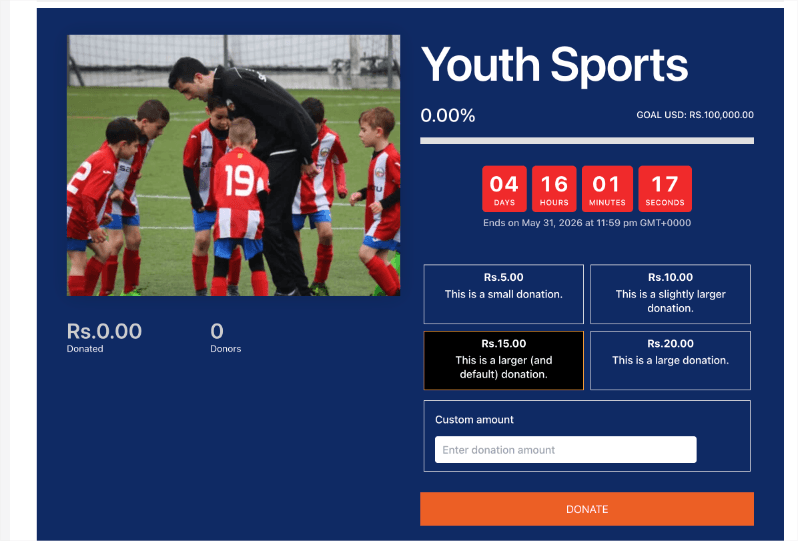
Pro tip: Place the Countdown block near the top of your campaign layout or just above the donation form so it’s visible to donors without scrolling.
Frequently Asked Questions
Why isn’t my countdown timer showing on the campaign page?
The timer requires a campaign end date to display. Go to Settings » General Settings in the campaign builder and make sure an Ending Date is set. Save the campaign after adding the date.
Can I use the countdown timer on Charitable Lite?
No. The Campaign Countdown Timer is available on all Charitable Pro plans (Basic, Plus, Pro, and Elite). Upgrade to Charitable Pro to access this feature.
Can I add the countdown timer to more than one campaign?
Yes. You can add the Countdown block to as many campaigns as you like. Each campaign uses its own end date independently.
What happens to the timer after the campaign ends?
That depends on your “When Campaign Ends” setting. You can choose to show a custom expired message, freeze the timer at zero, or hide it entirely.
Can I customize the colors to match my campaign?
Yes. The Countdown Colors section in Layout Options lets you set separate colors for the numbers, labels, background, and border of each timer box. No CSS required.
That’s it! You’ve learned how to add and configure the Campaign Countdown Timer on your Charitable campaigns.
Next, you may also want to learn how to set up Donation Goals or configure your Campaign Settings.
If you prefer video tutorials, check out our YouTube channel or watch below:
Stay Connected for More Nonprofit Resources
For more tutorials and videos tailored to nonprofits, subscribe to our YouTube channel. We regularly publish expert tips, step-by-step guides on online donations, fundraising strategies, and practical resources to help your organization succeed.
🗞️ Get weekly tips and exclusive guides in your inbox
Join our newsletter →
🎥 Watch step-by-step tutorials and success stories
Subscribe to our YouTube channel →
👩🏽💻 Connect with our community and get daily nonprofit insights
Follow us on LinkedIn →
🥳 Fun reels and non-profit insights
Follow us on Instagram →
👀 Insightful & fun videos to help you grow your cause
Follow us on TikTok→
🌎 Subscribe and follow for general fundraiser tips
Get Fundraiser Tips on TikTok →
Powerful Fundraising Resources
⬇️ Download proven strategies, campaign ideas, and expert tools
Get the Fundraising Kit →
💸 Get Free Fundraising Resources
Head to the Charitable Fundraising Hub →
🤔 Got questions about Charitable?
Charitable FAQs →
🏎️ Take Charitable for a spin
Create your Charitable Demo →
Understand non-profit terms and jargon
Non-Profit Glossary →
% Looking for non-profit deals and discounts?
Best Non-Profit Deals and Discounts →


