
Windcave is a payment gateway available in New Zealand, Australia, North America, Asia, the UK and Europe, supporting payments in more than 20 currencies.
This guide walks through installing the addon, enabling the gateway, adding your PxPay and PxPost credentials, testing, and refunding a donation.
What’s In This Guide?
Before You Start
- The Windcave payment integration is available on Basic plans and higher in the Charitable Pro Plugin. If you’re not yet on Pro, you can create your account now » Here’s a guide to help you install Charitable Pro »
- Next, you’ll need to install the Charitable Windcave addon. We’ll show you how to do that next. The Windcave addon comes with the Charitable Pro plugin. After purchasing a plan, you can install it – along with any other included addons – from the addons menu at no extra cost.
- You’ll need your own Windcave account before you begin. If you don’t have one yet, sign up at windcave.com.
Windcave operates in New Zealand, Australia, North America, Asia, the UK and Europe. Charitable connects to your own Windcave account, so your donor details and your transactions stay between you and Windcave.
Once your account is active, request your API credentials from your Windcave account manager. Windcave issues 3 separate sets, and which ones you need depends on what you want to do.
- PxPay 2.0 sends donors to the Windcave hosted payment page. You need this to accept any donation at all.
- PxPost handles server-to-server transactions. You need this to refund a donation from inside Charitable.
- HPP/Restful API powers recurring donations. You only need this if you plan to accept recurring gifts.
Note: Ask Windcave for all 3 when you open the account. They are issued separately, and waiting on a second request later is the slowest part of this setup.
Let’s get started.
Installing the Windcave Addon
Go to Charitable » Addons and find Windcave in the list. Click “Install Addon”, then click “Activate” once the install finishes.
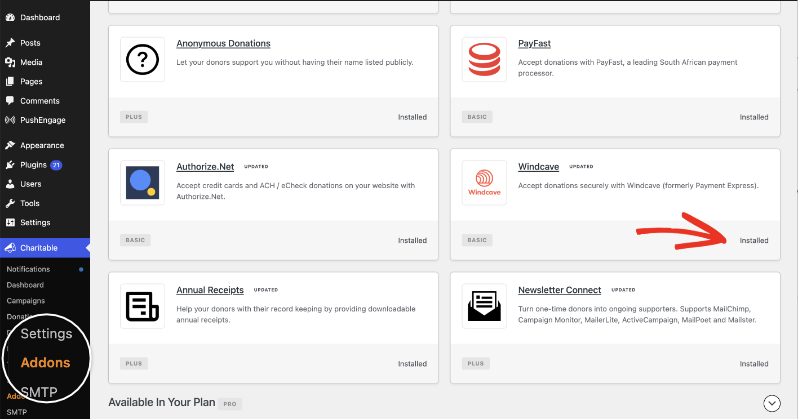
If you’d rather install from a zip file, you can download the addon and upload it yourself.
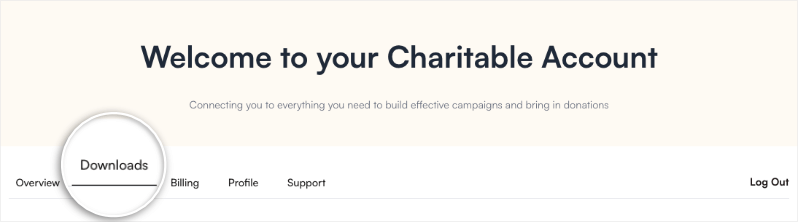
In your Charitable account, go to the Downloads tab and scroll down to the Windcave addon. Download the addon here.
In your WordPress dashboard, go to Plugins » Add New » Upload Plugin.
Choose the zip file, click “Install Now”, then click “Activate Plugin”.
If you’re not sure how to install the Windcave addon, we recommend first reading our guide to installing Charitable extensions.
Enabling the Gateway
Go to Charitable » Settings » Payment Gateways. You’ll see Windcave listed with the other gateways. Turn on the toggle in the “Status” column, then click “Save Changes”.
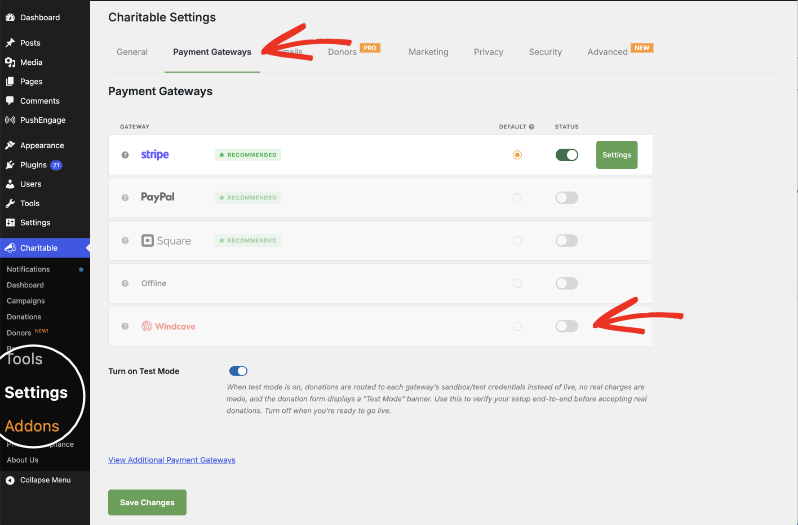
A “Settings” button will appear next to Windcave. This will take you to the Windcave settings page where you can configure the gateway.
Adding Your PxPay Credentials
PxPay is what sends your donors to the Windcave hosted payment page, so these 2 fields are the minimum needed to accept donations.
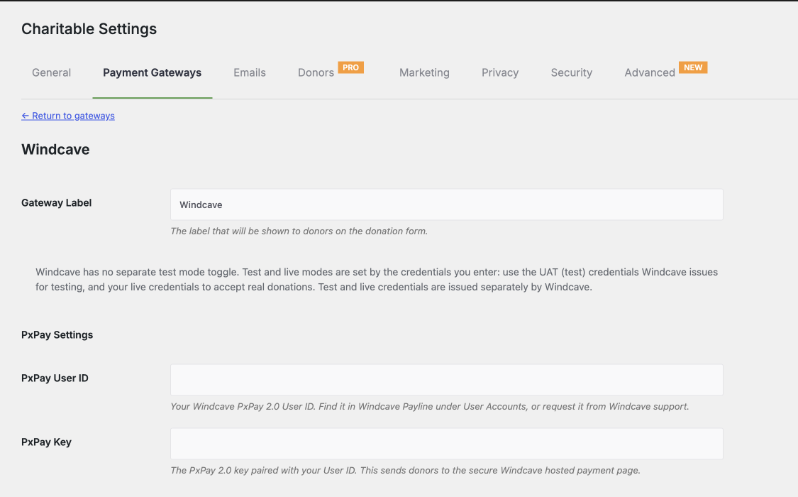
- Gateway Label is the name donors read on your donation form. Leave it as Windcave, or change it to something your supporters will recognize.
- PxPay User ID is your Windcave PxPay 2.0 User ID. Find it in Windcave Payline under User Accounts, or ask Windcave support for it.
- PxPay Key is the PxPay 2.0 key paired with that User ID.
Click “Save Changes” when you’re done. You can start accepting donations as soon as your PxPay settings are in.
Important Note: Windcave has no separate test mode toggle in Charitable. Test and live modes are set by the credentials you enter. Windcave issues test and live credentials separately, so use your UAT credentials while you’re testing and swap in your live credentials when you’re ready to accept real donations.
Adding Your PxPost Credentials
PxPost credentials are required to refund donations from within Charitable. Without them you can still take donations, but you’ll have to process refunds in Windcave Payline instead.
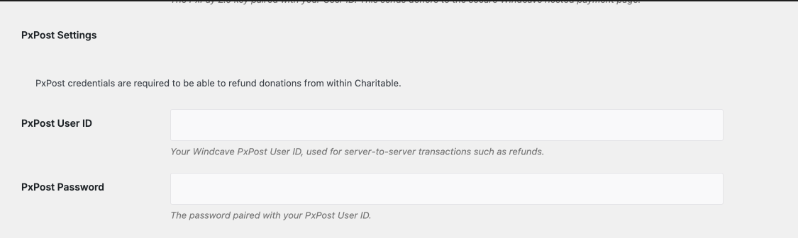
Enter your PxPost User ID and the PxPost Password paired with it, then click “Save Changes”. These are different from your PxPay credentials, so don’t reuse the PxPay values here.
Accepting Recurring Donations with Windcave
Windcave works alongside Charitable’s Recurring Donations feature, so a donor can set up a monthly or annual gift once and Charitable bills each renewal after that.
Recurring billing uses a third set of credentials, the REST username and Restful API key, which are separate from the PxPay and PxPost credentials above. There’s a “REST API Settings” section further down the same Windcave settings page for them.
Important Note: Recurring Donations is available on Plus plans and higher, while the Windcave gateway starts on Basic. If your plan is Basic, you can take one-off Windcave donations but not recurring ones.
The full setup is covered in its own guide. See Configuring Windcave for Recurring Donations.
Testing Before You Go Live
We always recommend testing a new gateway before you accept real donations. Because Windcave sets its mode from your credentials, testing means entering your UAT credentials rather than turning on a switch.
- Ask Windcave for your UAT PxPay User ID and key if you don’t have them already.
- Enter the UAT credentials in your Windcave settings and click “Save Changes”.
- Make a donation on your own website and choose Windcave as the payment method. You’ll be sent to the Windcave hosted payment page to enter a card.
- After you finish, you’ll come back to your website and the donation will appear under Charitable » Donations.
- When the test donation looks right, replace the UAT credentials with your live ones and click “Save Changes” again.
Important: Your test donations were made against a different Windcave account, so clear them out of Charitable » Donations before you go live if you don’t want them in your reports.
Refunding a Windcave Donation
With your PxPost credentials saved, you can refund straight from Charitable and the money is returned in Windcave at the same time.
- Go to Charitable » Donations and find the donation you need to refund.
- Click “View” to open it.
- In the “Donation Actions” box, select “Refunded”.
- Check the box to refund the donation in Windcave automatically.
- Click “Update Status”.
Note: If you leave that checkbox unchecked, Charitable marks the donation as refunded in your records but no money moves. Use that only when you’ve already refunded the donor in Payline.
Making Windcave the Default Gateway
If you have more than one gateway enabled, the default is the one selected for your donors when your donation form loads. Go to Charitable » Settings » Payment Gateways, choose Windcave in the “Default” column, and click “Save Changes”.
Pro tip: Keep a second gateway enabled even after you make Windcave the default. Donors who don’t want to leave your site for a hosted page still have somewhere to go.
Adding Fee Relief
Windcave charges a fee on every donation it processes. Charitable’s Fee Relief feature invites your donors to add a little extra to cover that fee, so more of the gift reaches your cause.
Fee Relief lets you configure the way the fee is calculated, and it works with Windcave the same way it works with any other gateway.
Here’s how to set up fee relief »
Windcave is available starting on the Basic plan.
Not yet a Charitable Pro user? Sign up today and get up to 50% off on your plan. We’re confident you’ll love raising funds with Charitable. If, for any reason, Charitable is not the right fit for you, we’ll refund your purchase with our 14-day money-back guarantee. Get Charitable Pro Now »
FAQs on Windcave
Do I need my own Windcave account to use this addon?
Yes. The addon connects to an account you create directly with Windcave. If you don’t have one yet, sign up at windcave.com before you start.
Is Windcave the same thing as Payment Express?
Yes. Payment Express renamed itself Windcave. If your account paperwork or your bank still says Payment Express, your credentials work here.
Where do donors enter their card details?
On a payment page hosted by Windcave, which donors are sent to after they submit your donation form. Card numbers never reach your website or your database.
Why is there no Test Mode setting for Windcave?
Windcave issues separate credentials for testing and for live donations, so the credentials you save decide which mode you’re in. Enter your UAT credentials to test, and your live credentials to accept real money.
Do I have to add PxPost credentials?
No, donations work without them. You need them to refund a donation from inside Charitable, which is why we recommend adding them while you’re on the settings page anyway.
Can I accept recurring donations through Windcave?
Yes, on Plus plans and higher. Recurring billing needs a REST username and Restful API key from Windcave, which are separate from your PxPay credentials. See Configuring Windcave for Recurring Donations.
Which currencies and payment methods does Windcave support?
More than 20 currencies and over 300 payment methods, including Visa, Mastercard, American Express, Diners Club, Apple Pay, Google Pay, and EFTPOS in Australia and New Zealand. Payment methods change from time to time, so check windcave.com for the current list.
My donors reach Windcave but the donation never comes back as complete. What should I check?
Check that your PxPay User ID and PxPay Key are both from the same Windcave account and the same mode. A live User ID paired with a UAT key, or the other way round, is the most common cause.
More Documentation
- Configuring Windcave for Recurring Donations
- Installing Charitable Extensions
- Setting Up Payment Gateways
- Windcave Integration for Charitable
Charitable Has 1+ Million Downloads!
Trusted by millions to power successful fundraising campaigns. Try Charitable risk-free today.
✅ 14-day money-back
✅ Transparent pricing
✅ Code-free setup
Helpful Links
🤝 Get help when you need it
Connect with Customer Support →
📑 Find the guide you need
Browse the Documentation Hub →
⬇️ Download proven strategies, campaign ideas, and expert tools
Get the Fundraising Kit →
💸 Get Free Fundraising Resources
Head to the Charitable Fundraising Hub →
🤔 Got questions about Charitable?
Charitable FAQs →
Need help understanding non-profit terms and jargon?
See our Non-Profit Glossary →


