Do you want your treasurer or board to see your fundraising numbers every week, without logging in to WordPress? The Email This Report card sends your Reports Overview by email at the start of each week.
This guide covers turning on the weekly summary, editing the email, and what your recipients will get.
Once it’s set up, nobody has to remember to check the numbers, because the numbers come to them.
The weekly summary is available in version 1.8.19 of the Charitable Pro plugin.
What’s In This Guide?
- Before You Start
- Turning On the Weekly Summary
- Editing the Weekly Summary Email
- What Your Recipients Will Get
- Tips Worth Keeping in Mind
- FAQs on the Weekly Summary
Before You Start
The summary is sent by your site’s email. Check that Email Status on your Charitable dashboard isn’t showing a warning before you turn it on.
Important: If Email Status says your emails are not secure, set up email delivery first. Otherwise, the summary may land in spam or not arrive at all.
Turning On the Weekly Summary
To turn on the summary, follow these steps.
- To get started, head over to Charitable » Reports.
- On the right side of the page, find the Email This Report card. While it’s off, the card says Report disabled.
- Turn on the switch. Your change saves straight away, with no page reload.
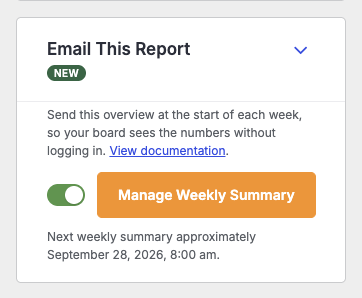
Under the switch, you’ll now see the date and time the next summary will go out.
Editing the Weekly Summary Email
To edit the email, click “Manage Weekly Summary” on the Email This Report card.
The email will open under Charitable » Settings » Emails as Admin: Weekly Report Summary. You’ll also find it there any time, under Admin Notifications in the list of available emails.
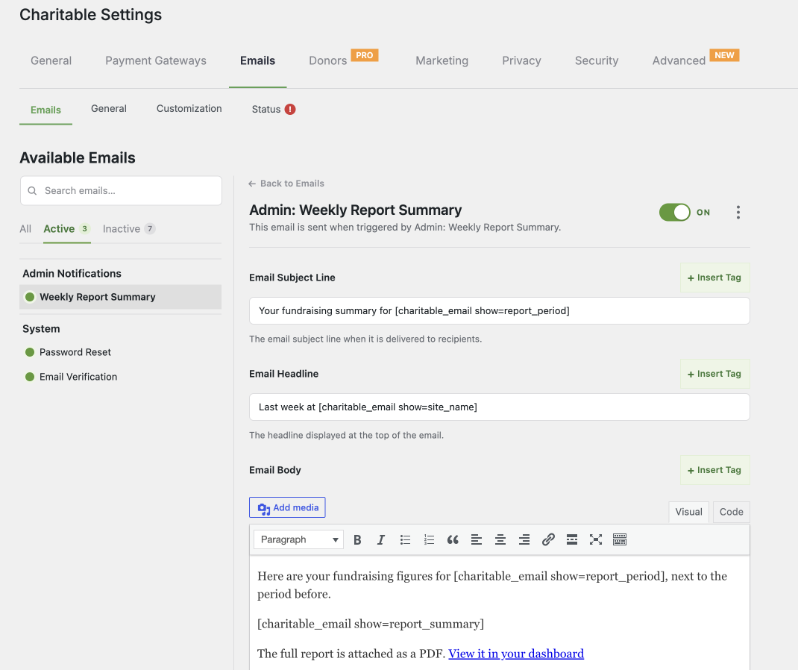
On this screen, you can change 4 parts of the email.
- Email Subject Line is the subject your recipients see in their inbox. By default, it reads “Your fundraising summary for” followed by the dates.
- Email Headline is the large line at the top of the email. By default, it reads “Last week at” followed by your site name.
- Email Body is the message itself, with the table of figures and a link back to your dashboard.
- Recipients lets you choose who receives this email.
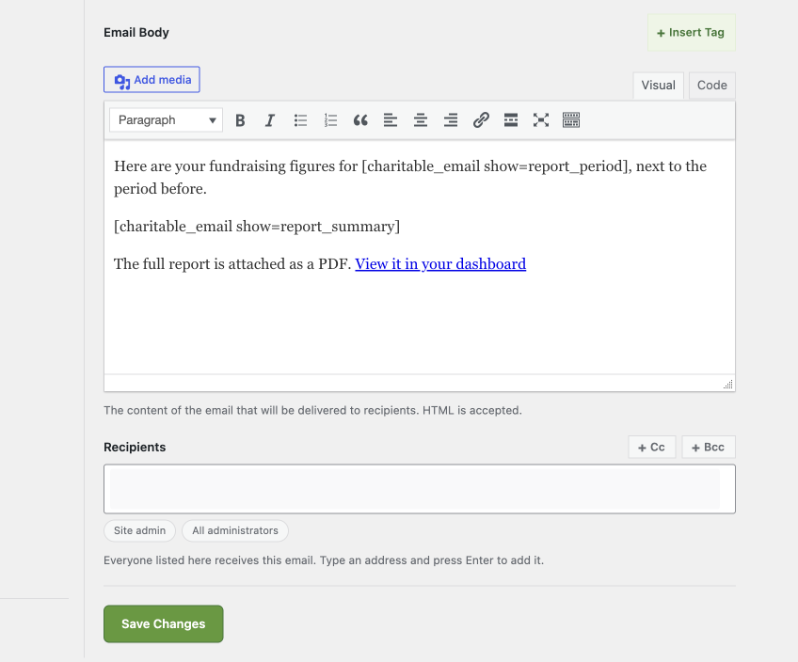
To add the dates, your site name or the figures anywhere in the email, click “+ Insert Tag” beside the field. The tag [charitable_email show=report_period] adds the dates, and [charitable_email show=report_summary] adds the table of figures.
Important: Keep the [charitable_email show=report_summary] tag in the Email Body. Without it, your recipients won’t see any figures.
You can also turn the email on or off with the switch at the top right of this screen. When you’ve finished your changes, save the email.
What Your Recipients Will Get
Each summary covers the previous Monday to Sunday. Your recipients will see the dates written out in full, a table of that week’s figures next to the week before, and a link to view the report in your dashboard.
The full report is also attached as a PDF, so anyone without a WordPress login can still read it.
Tips Worth Keeping in Mind
A few habits that keep the weekly summary useful.
- Read the first summary yourself before you rely on it, so you know what your team sees.
- Add a line to the Email Body that tells recipients who to contact with questions.
- Check the summary still arrives after any change to your email settings.
FAQs on the Weekly Summary
When does the summary go out?
At the start of each week. You’ll see the exact date and time of the next one under the switch on the Email This Report card.
Do recipients need a WordPress account?
No. The figures are in the email and the PDF is attached. They’ll only need a login if they click through to your dashboard.
How do I stop the summary?
Turn off the switch on the Email This Report card. The card will say “Report disabled”, and no more summaries will be sent.
Wrapping Up
You now know how to turn on the weekly summary, edit its subject, headline and body, and what your recipients will get each week.
Your team will see your numbers every Monday without anyone having to ask. If you get stuck on any step, our support team is happy to help.
You May Also Want to Read
These guides help you get the most out of your Charitable emails.
- Getting Started With the Email Manager. Learn your way around the screen where the weekly summary lives.
- How to Fix Issues on Your Dashboard Status Card. Fix an Email Status warning before you turn on the summary.
- How to Export Your Donation Reports as a PDF or CSV. Download the same report whenever you need it.
Helpful Links
🤝 Get help when you need it
Connect with Customer Support →
📑 Find the guide you need
Browse the Documentation Hub →
⬇️ Download proven strategies, campaign ideas, and expert tools
🔗 Let your AI Assistant do the fundraising work for you.
Connect Charitable to your AI assistant →
💸 Get Free Fundraising Resources
Head to the Charitable Fundraising Hub →
🤔 Got questions about Charitable?
Charitable FAQs →
Need help understanding non-profit terms and jargon?
See our Non-Profit Glossary →

Charitable Now Works With the AI Assistant You Already Use
This is the most fun thing we’ve shipped all year, and you have to try it. You can now use ChatGPT, Claude, or any AI assistant you’re already using to build and launch fundraiser campaigns.
You can create donation records, manage donor profiles, fetch data, and get fundraising reports too. Simply connect your AI agent, and start asking for what you want.
No Charitable addon needed, no coding, and no elaborate setup. Anyone can do it!