
Do you want a $10 gift and a $500 gift to be asked for different processing fees? Charitable’s Fee Relief feature can now set a separate rate for every size of donation, so your smallest donors are not asked for the largest share of what they gave.
Most payment gateways charge a percentage of the gift plus a fixed amount per transaction. That fixed amount is a much bigger share of a small donation than a large one, which is why a single rate across every gift rarely matches what you are actually charged.
This guide covers turning tiered rates on for a payment gateway, setting your donation bands, capping the ask with a maximum fee, and checking what your donors see on the form before you save.
Tiered rates arrive in Fee Relief 1.3.0 and are available in the Charitable Pro plugin, Plus plan and higher.
Important Note: Fee Relief needs to be installed and set up before you can use tiered rates. Our guide on how to use Charitable’s Fee Relief walks through installing Fee Relief, picking a fee relief mode and setting a rate for each gateway. Come back to this page once that is in place.
What’s In This Guide?
- Before You Start
- Where to Find Tiered Rates
- How Donation Bands Work
- Setting Up Your Bands
- Checking Your Numbers With the Example Line
- Setting a Maximum Fee
- Setting Rates Gateway by Gateway
- What Your Donors See
- Choosing the Default Fee Relief Mode
- Choosing Your Fee Relief Formula
- Filters for Developers
- Tips Worth Keeping in Mind
- Not Yet on a Charitable Paid Plan?
- FAQs on Fee Relief Tiered Rates
- Wrapping Up
- You May Also Want to Read
Before You Start
A few things need to be in place before the tiered rates table appears on your settings screen.
- The Charitable Pro plugin on the Plus plan or higher, with your license key added.
- Fee Relief 1.3.0 or higher, installed and activated from Charitable » Addons. If you have not installed an addon before, read our guide on how to install and activate Charitable extensions.
- At least one payment gateway enabled, because bands are set per gateway rather than once for the whole site.
- The fee percentages and fixed amounts your processor charges you at each donation size. Your processor’s pricing page is a starting point, and your own donation records are more accurate.
Where to Find Tiered Rates
In your WordPress dashboard, go to Charitable » Settings » Advanced » Fee Relief. Every payment gateway listed on that screen now has a Use Tiered Rates switch.
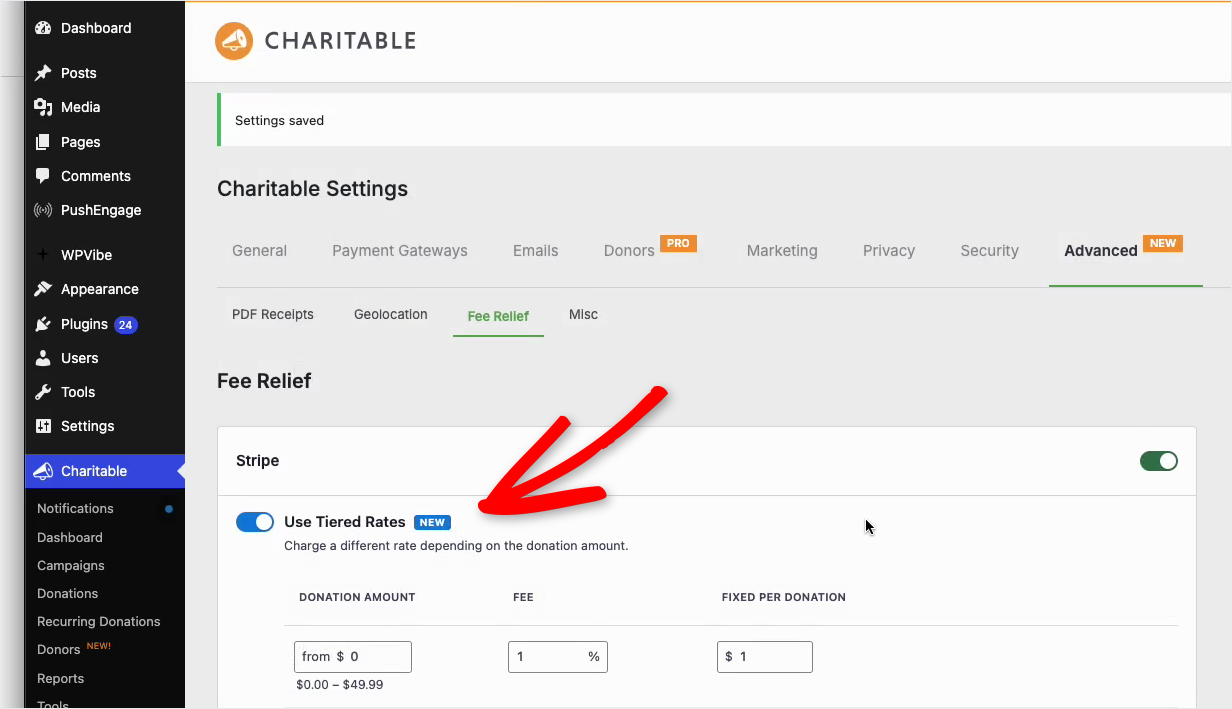
Switch it on and a table of donation bands opens underneath that gateway, with a first row ready for you to fill in. Leave the switch off and the gateway keeps the single percentage and fixed amount it already had.
Nothing changes on your donation forms until you turn the switch on yourself and save, so your current rates are safe while you read through this.
How Donation Bands Work
A band is a range of donation amounts with its own rate. Each row in the table starts at a from amount and applies from there up to wherever the next row starts.
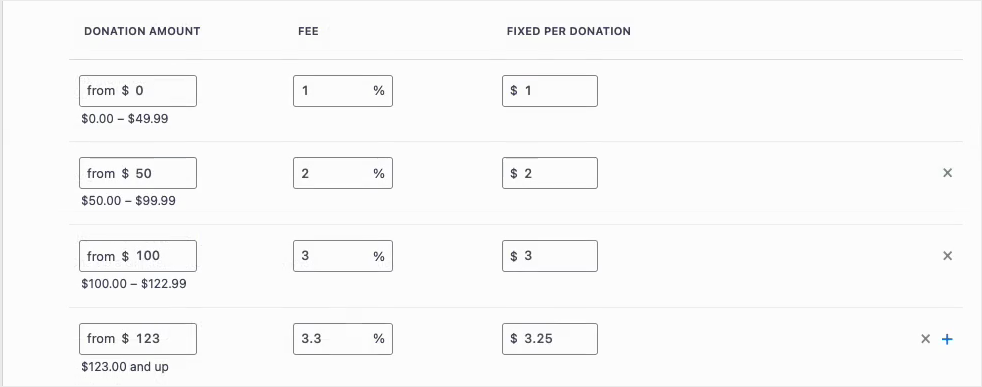
Every row carries 3 values, which are the amount it starts from, a percentage fee, and a fixed amount per donation. Charitable works out the range for you and prints it under the row while you type.
In the screenshot above, the row starting at $50 reads $50.00 to $99.99, because a row starting at $100 exists above it. The last row in the table has no upper limit, so it covers every gift from its own starting amount upward.
Only one rate ever applies to a donation, picked by the band that donation amount falls into. A $75 gift is charged the $50 band’s rate and nothing from the bands above or below it.
You add a row with the plus button on the right of the table, and remove one with the × beside it.
Setting Up Your Bands
To get started, head over to Charitable » Settings » Advanced » Fee Relief. Everything below happens on that one screen, and it takes about 5 minutes.
- Find the gateway you want to change and turn on Use Tiered Rates. The band table will appear underneath it with a first row ready.
- For that first row, set the from amount to 0, then enter the percentage and the fixed amount you want to ask for on your smallest gifts.
- To add the next row, click the plus button, set its from amount, and give it its own percentage and fixed amount. Repeat that for as many bands as you need.
- If you want a ceiling on the largest gifts, enter a number in Maximum fee (optional) just under the table.
- Read the example line under the table to confirm the numbers behave the way you expect, then click Save Changes.

Starting your first row at 0 matters, because a donation below the lowest band has no rate to fall into. The band in the screenshot above starts at $0 and asks for 1% plus $1.00, which covers every gift up to where the next row begins.
Pro tip: If your donation form offers suggested amounts, put a band around each of those amounts. You then know exactly what every button on the form will ask a donor for.
Checking Your Numbers With the Example Line
Under the table sits a worked example that recalculates while you edit. It names the band a sample donation lands in, the percentage, the fixed amount and the rough total.
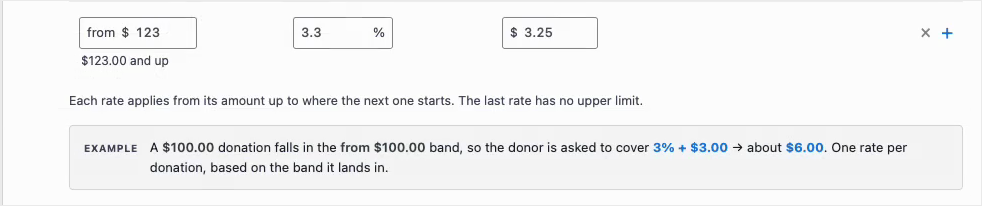
The example above reads that a $100.00 donation falls in the from $100.00 band, so the donor is asked to cover 3% plus $3.00, which comes to about $6.00.
Use it as your check on typing. A percentage entered as 0.3 instead of 3 shows up here straight away, before you save and before a donor ever sees it.
Setting a Maximum Fee
Each gateway has an optional Maximum fee field below the table. Whatever your bands work out to, the donor is never asked to cover more than the number you put there.

Stripe is capped at $100 in that example. A $20,000 gift in the top band would work out well above that, and the ask stops at $100 instead.
A very large fee sitting next to a very large gift can put a donor off, and this keeps that number reasonable however big the donation is. Leave the field empty if you would rather your top band run without a ceiling.
Setting Rates Gateway by Gateway
Bands belong to a gateway, not to your whole site. Stripe can run on 4 bands while Windcave and Payfast stay on a single percentage and fixed amount.
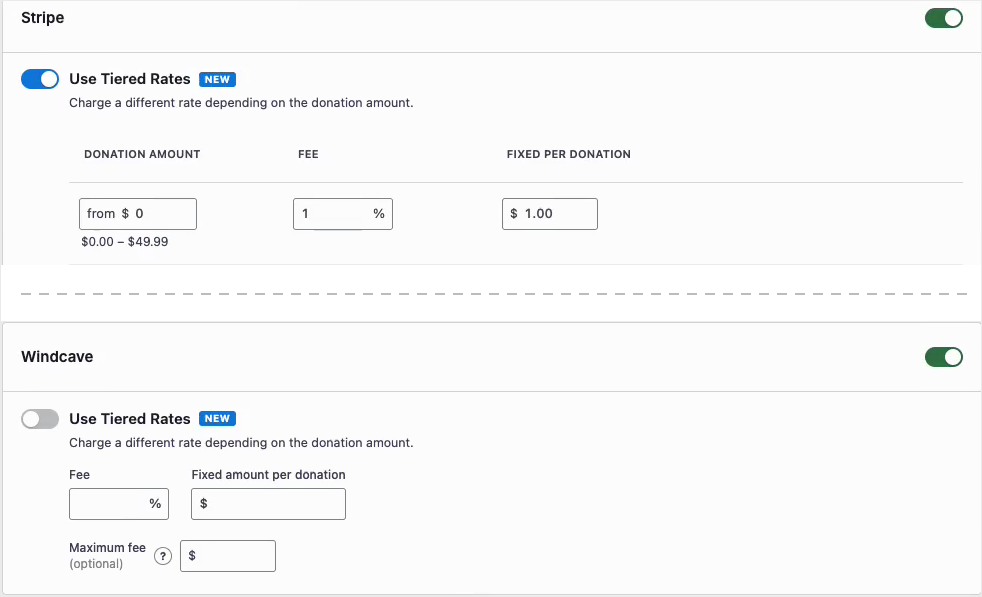
Windcave in that screenshot has Use Tiered Rates switched off, so it shows one Fee field, one Fixed amount per donation field and its own Maximum fee. The maximum fee is per gateway whether bands are on or off.
This means you can set bands on the gateway that carries most of your donations and leave the rest alone. That is often the quickest way to start.
What Your Donors See
Nothing about the donation form changes. The donor still sees a checkbox with the fee amount in it and the new total underneath.
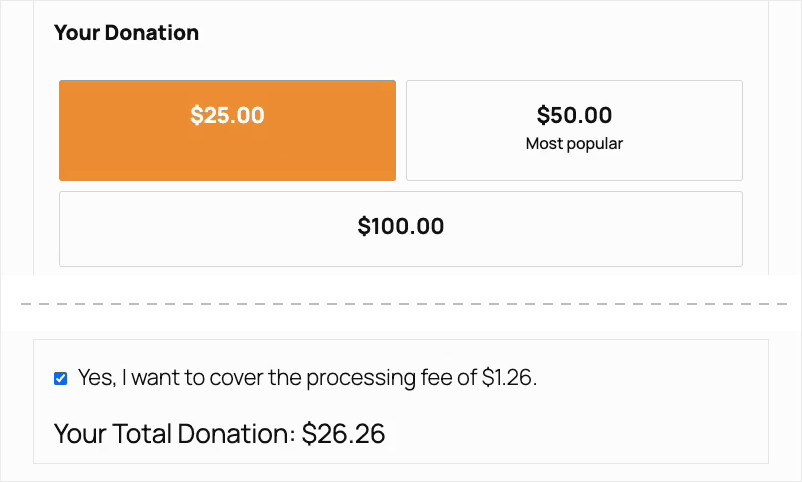
With the bands from earlier in this guide, a $25 gift lands in the first band. The form asks for $1.26 and shows a total of $26.26.
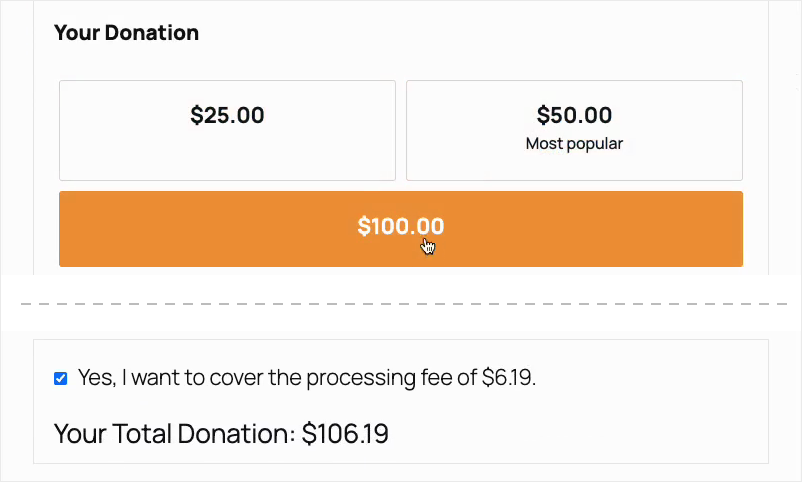
Pick $100 on that same form and the ask becomes $6.19, for a total of $106.19. Same form, same donor, different band.
Note: Both numbers sit slightly above the band rate on its own. The default formula also covers the processing cost on the extra amount, so your organization receives the full $25 or $100 the donor picked.
Once you have saved, open a campaign page and try a couple of different amounts. Your donation forms pick the new rates up right away.
Choosing the Default Fee Relief Mode
The Default fee relief mode setting is unchanged by tiered rates and still decides what your donors meet on the form. It sits on the same Fee Relief settings screen, above the gateway list.

There are 4 choices here.
- Disabled. Fee Relief is off on your campaigns by default, and you turn it on for individual campaigns in the campaign settings.
- Opt-in checkbox, not checked by default. The donor sees an empty checkbox and has to tick it to cover the fee.
- Opt-in checkbox, checked by default. The donor sees a ticked checkbox and covers the fee unless they untick it.
- Automatic opt-in. The fee is added to the total with no checkbox, so the donor cannot opt out.
You can also change the mode for a single campaign. Open that campaign in the Campaign Builder and go to Settings » Fee Relief, so a year-end appeal can behave differently from your everyday donation page.
Choosing Your Fee Relief Formula
The Fee relief formula setting also stays as it was, and it decides how the amount in the checkbox is worked out. There are 2 options.

- Subtotal + Fixed/Percentage, the default. This adds enough to also cover the processing cost on the extra amount, so your organization receives the whole gift.
- Fixed + (Subtotal * Percentage). This simply adds your percentage and fixed fee together.
The settings screen shows what each one does with a $1,000 donation at 2.9% plus $0.30. That works out to $30.18 under the default and $29.30 under the alternative.
The formula applies on top of whichever band a donation lands in, so it is the reason a form shows $1.26 where your band reads 1% plus $1.00.
Filters for Developers
Filters for Templates and Translations
Fee Relief exposes charitable_fee_relief_theme_template_path for pointing the template directory somewhere else. It defaults to charitable/charitable-fee-relief.
charitable_fee_relief_languages_directory does the same job for translation files. Both come with usage examples in the Fee Relief hooks and filters reference.
Either filter drops neatly into a code snippets plugin if you would rather not edit a theme file.
Set Your Bands From Real Numbers
Charitable’s Gateway Processing Fee Tracking feature records the fee each gateway actually reported against a donation. Building your bands from that data is more accurate than working off a published pricing page.
It is also the quickest way to check, a month later, whether the bands you set are recovering what you meant them to.
Tips Worth Keeping in Mind
A few habits that make bands easier to get right and easier to keep right.
- Start your lowest band at 0 so no donation falls outside your bands.
- Go gentler at the bottom. On a $10 gift, a 30 cent fixed charge is another 3% all by itself, so small donors feel a flat rate the most.
- Build your bands from what your gateway actually charged you. Charitable’s Gateway Processing Fee Tracking feature records the fee reported against each donation, which is more accurate than a published pricing page.
- Check back in a month using that same fee data, to see whether your bands are recovering what you meant them to.
- Test a real donation at 2 or 3 different amounts after saving, so you see the bands switch over on the form yourself.
- Set a maximum fee if you accept major gifts. It stops a large percentage turning into an alarming number beside a large donation.
Fee Relief, including tiered rates, is available in the Charitable Pro plugin, Plus plan and higher.
Not yet on Charitable Pro? You can get up to 50% off when you sign up for or upgrade to Charitable Pro. We want to ensure that you can try the advanced fundraising features like Recurring Donations, Donation Recovery, and more at a significantly reduced cost.
Join over a million satisfied Charitable Pro users today. Every purchase comes with a 14-day money-back guarantee, ensuring you’re supported every step of the way.
If you have any questions or need assistance, our support team is ready to help you make the most of these new features.
FAQs on Fee Relief Tiered Rates
Which plan includes tiered rates?
Tiered rates ship with Charitable’s Fee Relief feature, which is in the Charitable Pro plugin, Plus plan and higher. You will need Fee Relief 1.3.0 or higher.
Do I have to use bands?
No. Leave Use Tiered Rates switched off on a gateway and it keeps the single percentage and fixed amount it already had.
What happens to my current Fee Relief settings?
They stay exactly as they are. Nothing about your rates changes until you switch tiered rates on for a gateway yourself and save.
How many bands can I add?
As many as you need. Each new row is added with the plus button, and the last row always runs on with no upper limit.
Can one donation be charged 2 bands at once?
No. A single rate applies to each donation, chosen by the band that donation amount falls into.
Can I set different bands for each payment gateway?
Yes. The Use Tiered Rates switch, the band table and the maximum fee all belong to one gateway, so each gateway is set up on its own.
Why is the amount on the form higher than my band rate?
The default formula also covers the processing cost on the extra amount, so your organization receives the whole gift. Switch to the second option under Fee relief formula if you would rather it just added your band rate.
What if a donation is smaller than my lowest band?
Set your first row’s from amount to 0 and that cannot happen. Starting the lowest band above 0 leaves the gifts underneath it without a rate.
Does the maximum fee work without tiered rates?
Yes. The Maximum fee field shows for a gateway whether tiered rates are on or off, and it caps the ask either way.
Can I use a different fee relief mode for each campaign?
Yes. Open the campaign in the Campaign Builder and go to Settings » Fee Relief to pick a mode for that campaign only. Your bands still come from the gateway settings.
Wrapping Up
You now know how to turn tiered rates on for a payment gateway, build a set of donation bands, cap the ask with a maximum fee, and read the example line to check your numbers before saving.
Your donors get an ask that matches the size of their gift, and your organization keeps more of what it was given.
If anything on the settings screen does not behave the way this guide describes, our team is happy to look at it with you. Open a support ticket »
You May Also Want to Read
These guides cover the settings around tiered rates and the data that helps you set them.
- Gateway Processing Fee Tracking. Records what each gateway actually charged you on a donation, which is the best source for your band rates.
- Fee Relief Hooks and Filters. The developer reference for changing Fee Relief templates and translations.
- How to Install and Activate Charitable Extensions. What to do if Fee Relief is not showing under Charitable » Addons yet.
- Using AI with Charitable. Connect your fundraising to your AI assistant and let it do the work for you.
See our full documentation hub »
Helpful Links
🤝 Get help when you need it
Connect with Customer Support →
📑 Find the guide you need
Browse the Documentation Hub →
⬇️ Download proven strategies, campaign ideas, and expert tools
🔗 Let your AI Assistant do the fundraising work for you.
Connect Charitable to you AI assistant →
💸 Get Free Fundraising Resources
Head to the Charitable Fundraising Hub →
🤔 Got questions about Charitable?
Charitable FAQs →
Need help understanding non-profit terms and jargon?
See our Non-Profit Glossary →


