
This is a huge announcement and we’re excited! 🤩
Up until now, you had to open your WordPress dashboard, head to Charitable and create your campaign or manage donations there.
Now you can just ask AI!
Charitable works with the AI assistant you already have open!
Type one sentence into ChatGPT or Claude, and a real campaign appears inside Charitable’s own drag-and-drop builder.
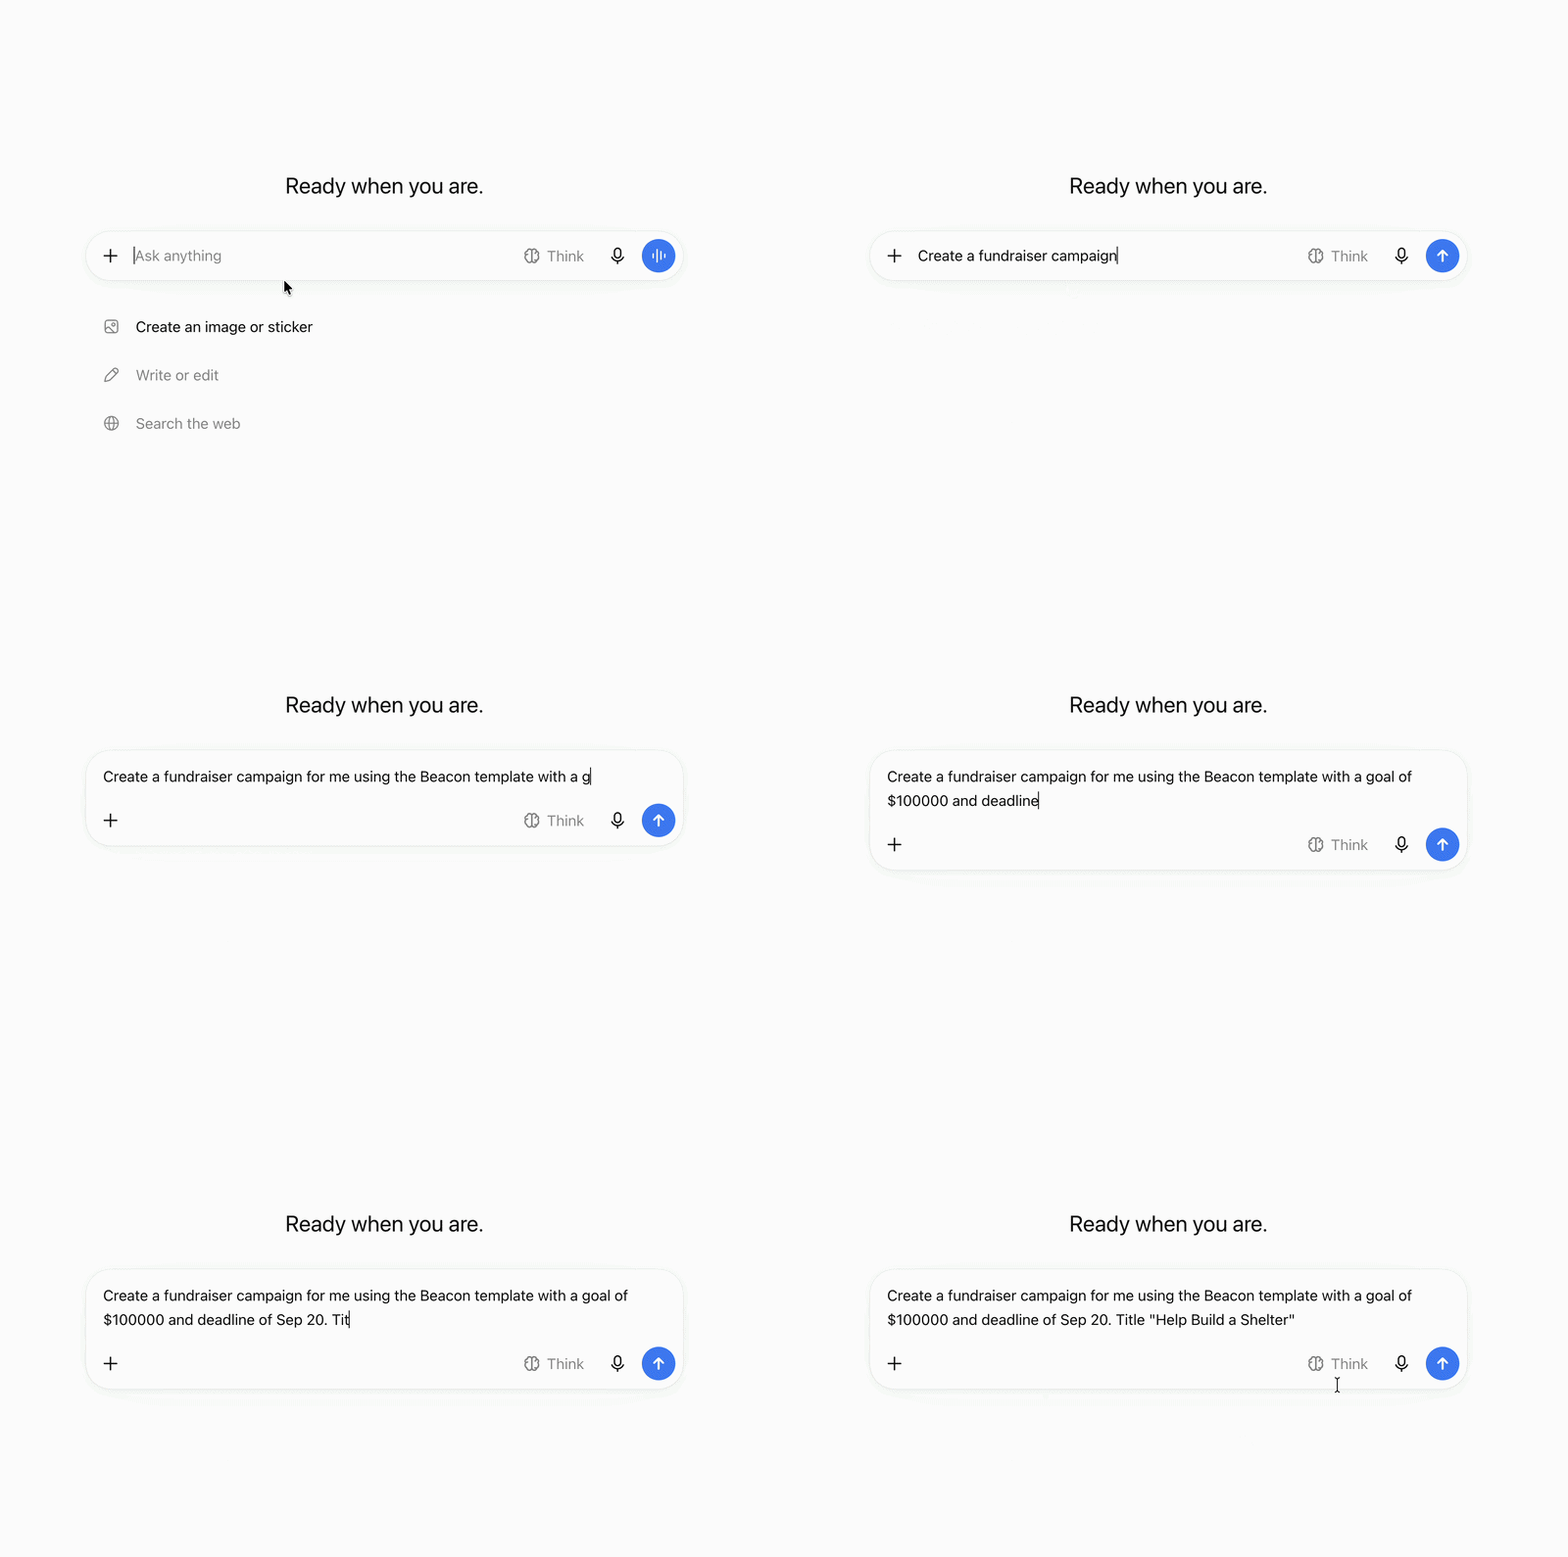
Built from a real template. Suggested donation amounts already scaled to the goal you named. Sitting there as a draft, waiting for you to look it over.
And campaigns are only the beginning!
- Log a donation that arrived as a check in the mail.
- Add a new donor to your records.
- Ask which campaign is raising the most this month and get real names and real totals back.
You never leave the chat window.
Here is the part I still find hard to believe myself. There is nothing to switch on in Charitable to make any of this work.
No setup screen, no API keys to paste anywhere, and no second AI subscription to buy. It runs on the AI you already have. ⚡
I’m going to be honest with you, the sheer amount of things you can do with this connection blew my mind. So you’ll see me mentioning that I was surprised by what’s possible!
Here’s What One Sentence Builds
Before we get into how any of this is wired up, look at the result. I asked for a borewell fundraiser with a $100,000 goal and a September 30 deadline, and gave it a description and an image folder.
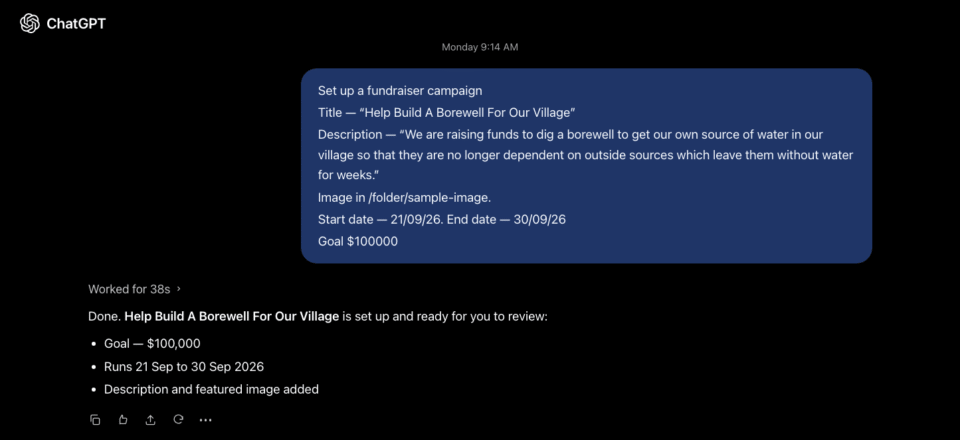
That gave me a finished campaign in the Charitable campaign builder, laid out and styled, with the headline, description, and image already in place.
Here’s the result:
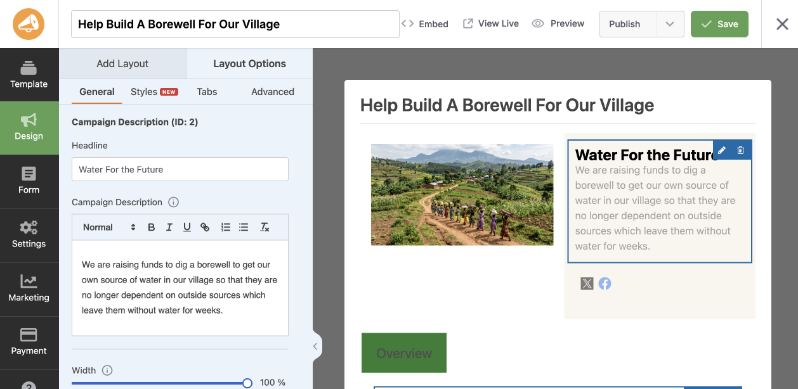
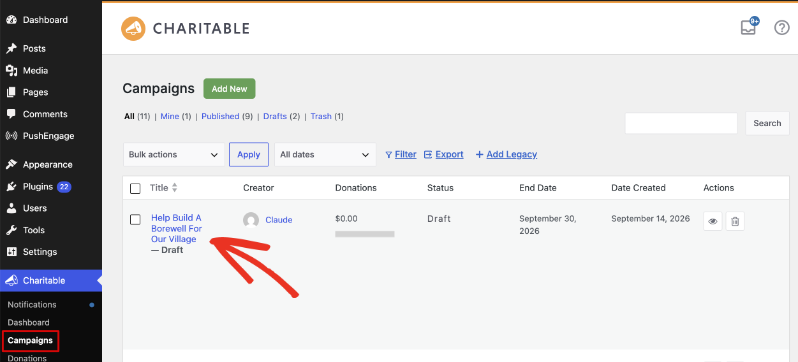
The campaign lands in your Campaigns list as a draft, credited to the assistant that made it, so you always know where it came from.
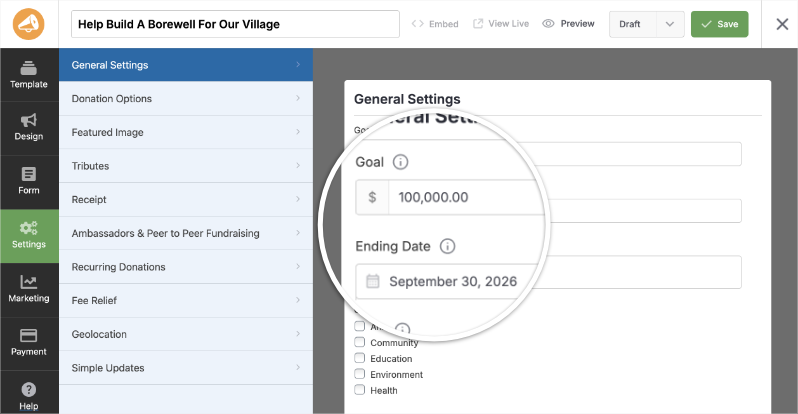
And the numbers I asked for are really set, not just mentioned in the text. The goal and ending date are filled in on the campaign’s own settings panel.
Nothing here was hand-built. No custom code, no copy and paste between screens, and no separate campaign template to pick out first.
This is Secure: Built on a WordPress Standard
Plenty of tools will let an AI write a blog post into WordPress. Far fewer will let it operate a real fundraising system, because donations involve money, donor records, and reporting that has to stay correct.
Charitable does this through the WordPress Abilities API. That is a new WordPress standard for describing what a plugin can do in a way an AI assistant can read and use safely.
The practical benefit is that your assistant runs Charitable’s own code. When it creates a campaign, the plugin sets the builder layout, the colors, and the suggested amounts exactly as it would if you had clicked through the screens yourself.
That matters for your data as much as your design. Your campaigns, donations, and donor records stay in your own WordPress database, on your own hosting. Nothing is copied out to an outside fundraising service for the AI to read.
Ideas on How You Can Use
This is not meant to replace the campaign builder. It just gives you the freedom to ask your AI chat or agent to do things for you.
This can include:
⚡ An fundraising appeal: Whip up a goal-based campaign and have it go live before the morning.
📬 A check in the mail: Record an offline donation against the right campaign and donor without opening a single admin screen.
📊 A board question: Someone asks which campaign is performing best, and you want the answer before the meeting ends.
🙏 Thank-you season: Ask who your biggest supporters are and get real data and totals ranked across your whole giving history.
🎨 A quick fix: Change a form question to a drop-down, or make the donate button green, without hunting for the setting.
🗂️ Bulk tidying: Spin up several similar campaigns for a multi-chapter appeal instead of duplicating one by hand.
That’s just a few things you can do. You can even do something as simple as asking how much money you raised last month and your AI Assistant can pull that data from Charitable.
What Your Assistant Can Do With a Campaign
Your assistant can list your campaigns, read any one of them in detail, and create new ones from any of Charitable’s built-in templates. It can also update a campaign after the fact, change its status, move it to the trash, and restore it again.
So for example, you can even add just one field to an existing campaign to collect more data. Here, I’ve asked it to add a dropdown to my campaign along with the question and choices.
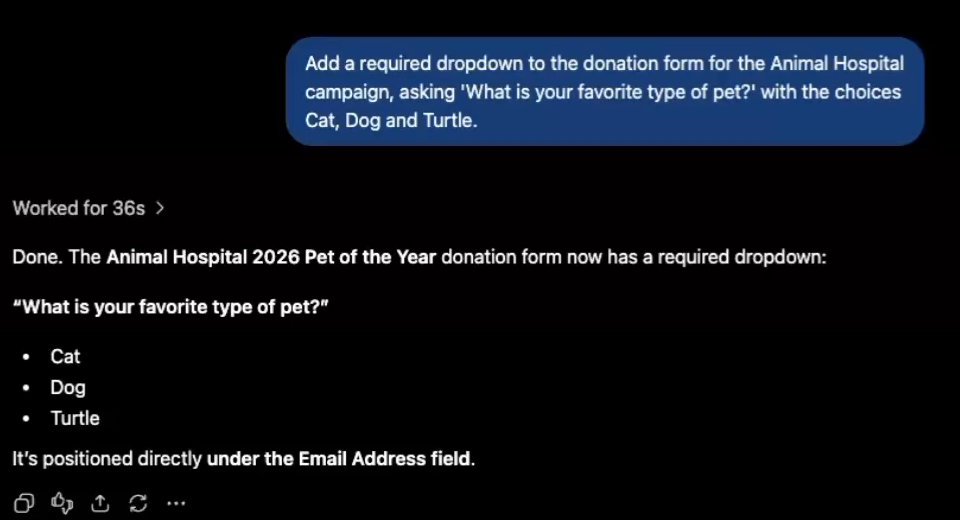
This is what it did:
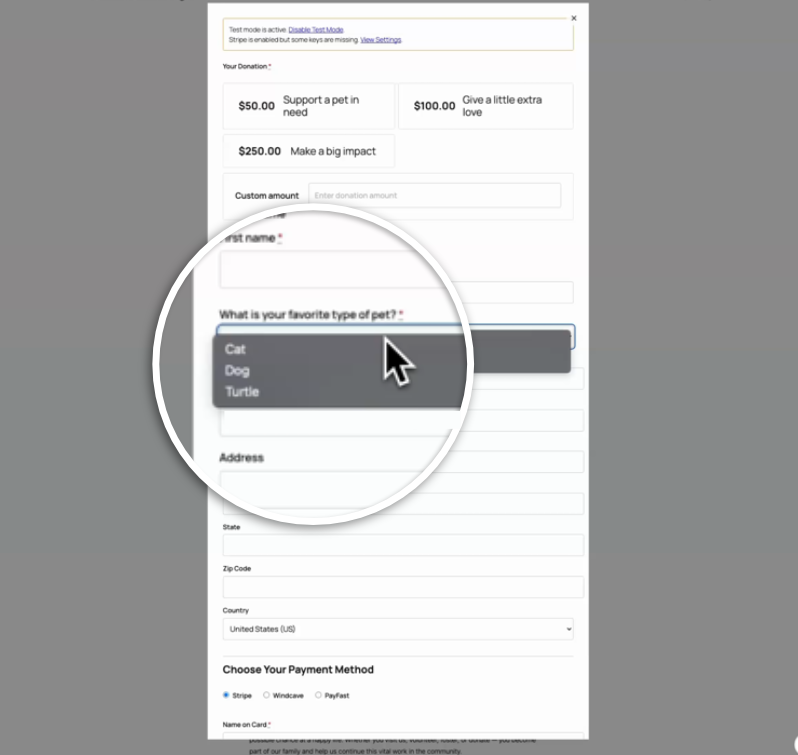
It reaches inside the campaign too. The donation form and the styling are both editable by asking, so adding a question to a form or recoloring a button is a sentence rather than a trip through the campaign builder.
What Else You Can Do With AI
Building a campaign by asking is the headline. The part that changes your actual week is everything else.
Once you’ve connected your site, your whole Charitable admin is reachable from the chat window. Donation records, donor profiles, and your fundraising numbers, all of it available by asking for it in plain English.
Logging a Donation That Arrived Offline
Every nonprofit has a pile of these. A check in the mail, cash handed over at an event, a bank transfer someone tells you about by text. Each one normally means opening Charitable, finding the campaign, and filling in a form.
Here is the whole thing instead. A donor name, an amount, a date, and how it was paid.
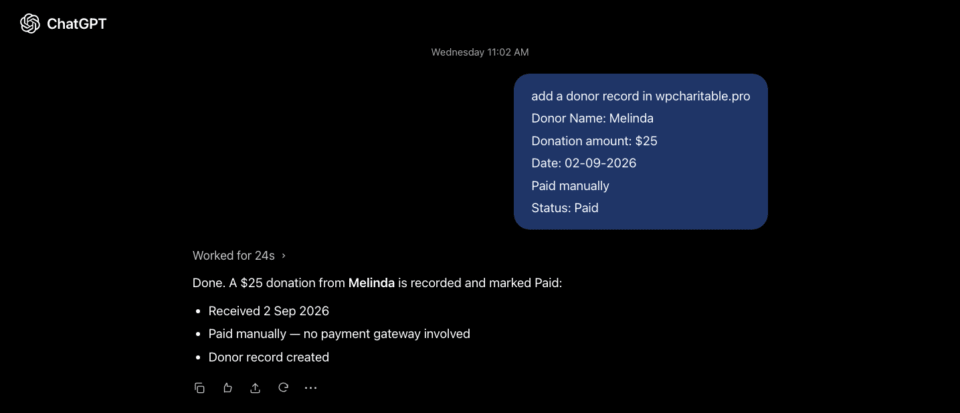
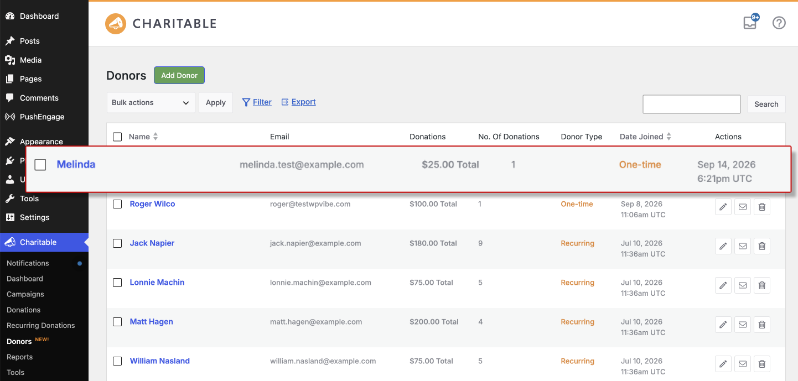
That one sentence did two jobs at once. It created the donor, who now shows up in Charitable » Donors with her giving total already calculated.
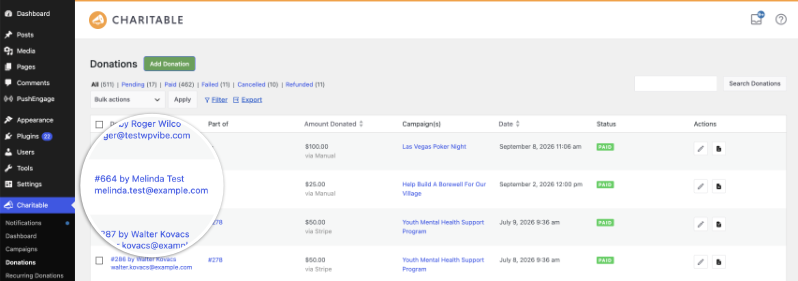
And it created the donation itself, attached to the borewell campaign from earlier in this post, marked as paid manually on the date I asked for.
Open it up and it is a complete donation record. Donor, email, campaign, subtotal, processing fee, payment method. Nothing half-filled, nothing needing a second pass to tidy up.
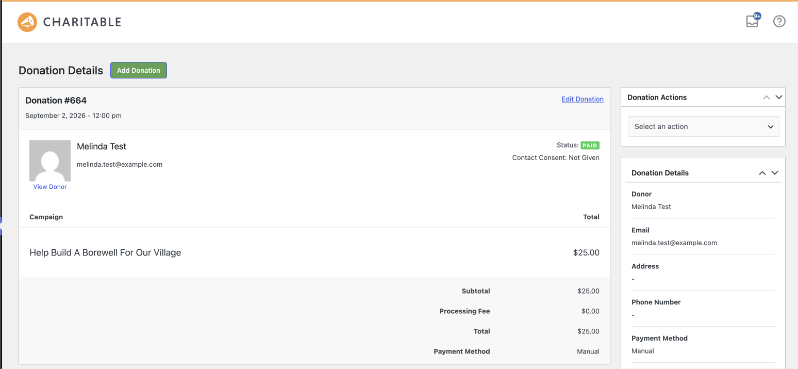
This is the future, and now it’s here for your fundraising too! Simply ask and it’s done for you.
Looking Up a Donor Without Hunting for Them
Donor profiles work the same way. You can ask for one person’s full giving history, ask who has given more than once, or ask for your biggest supporters ranked by total given across your whole history.
It is the question every board member asks and the one that normally means exporting a spreadsheet and sorting it by hand.
Donor email addresses are deliberately left out of what the assistant reads back, so asking for a supporter list never hands your contact details to an AI.
Getting Your Fundraising Numbers on Demand
Everything on your reports screens is reachable too. Ask for your overview figures, your recent donation activity, how one specific campaign is tracking against its goal, or which campaigns are performing best overall.
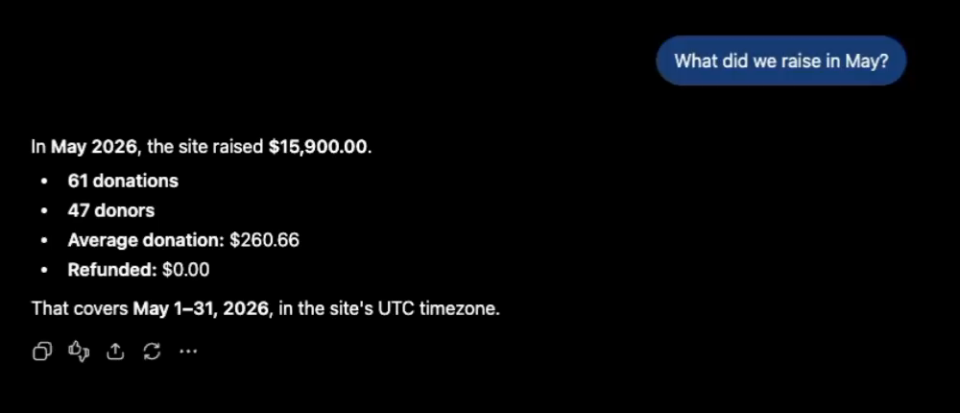
It understands date ranges as you would say them, so a question about last quarter gives you last quarter rather than a running total of everything you have ever raised.
Because the answer lands in your chat, you can keep going from there. Ask it to compare 2 campaigns, or to pull out the 10 donors who gave the most last month, and you are still in the same conversation. 📊
It Can Read Everything and Change Nothing, Until You Say So
A connected assistant starts out read-only. It can look at your campaigns, donations, donors, and reports, and it cannot alter any of it until you turn write access on yourself.
You choose what it is allowed to touch, and you can narrow that later or switch it off completely.
Every change it does make is written to your logs, so you can go back and see exactly what happened and when. Campaigns it creates arrive as drafts, which means a real person still decides what goes live.
Setting This Up, Step by Step
Charitable supplies the fundraising side of this, and it needs no setup at all. The one piece you have to add is a free plugin called WPVibe, which is what securely connects your AI assistant to your WordPress site.
WPVibe is an MCP server for WordPress, built by the team at SeedProd. MCP stands for Model Context Protocol, an open standard that lets an AI assistant connect to an outside tool and use it.
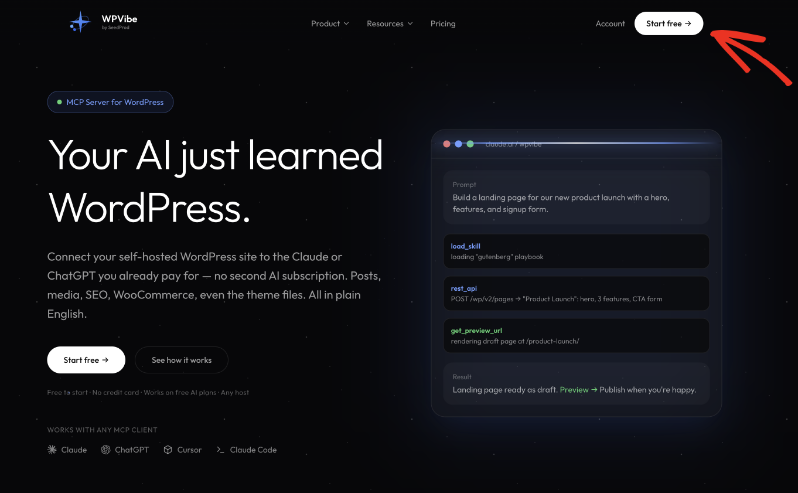
You install it once. After that, you are only ever talking to Charitable.
Step 1: Installing the plugin
There are 3 ways to do this. They all end in the same place, so pick whichever suits how you normally add plugins.
Method 1: Let WPVibe Generate the Installer Link
This is the quickest route. To get started, head over to wpvibe.ai and find the Open the Installer box on the home page.
Enter your WordPress site address in the Your WordPress site URL field, then choose Open WordPress installer.
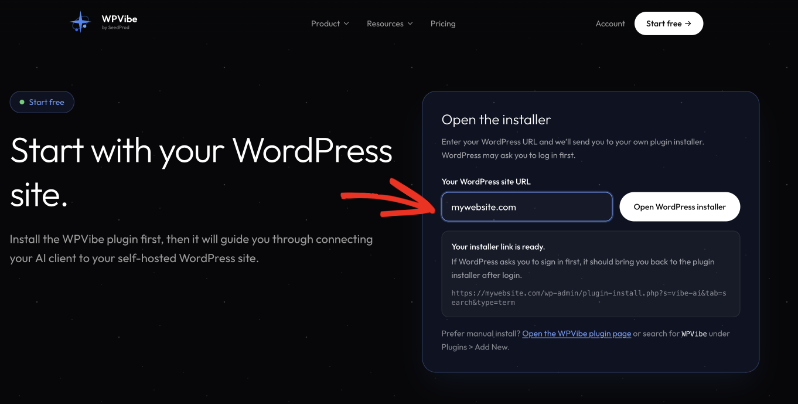
That hands you a link straight into your own site’s plugin installer, with WPVibe already searched for. If WordPress asks you to sign in first, it will bring you back to the installer once you have.
From there, choose Install Now and then Activate.
Method 2: Search for It From Your WordPress Admin
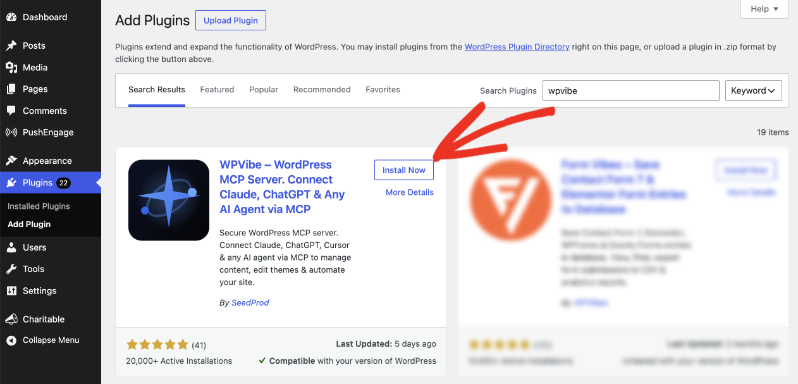
If you would rather not leave your dashboard, open Plugins » Add New and search for wpvibe.
The one you want is WPVibe – WordPress MCP Server, by SeedProd. Choose Install Now, then Activate.
Method 3: Upload the Plugin File Yourself
Some hosts lock down plugin searching, and some teams like to read a plugin’s source before installing it. Manual upload works exactly as it does for any other WordPress plugin.
Start by downloading the plugin from its WordPress.org page, which leaves you with a .zip file.

Then go to Plugins » Add New » Upload Plugin in your WordPress admin, pick the file you just downloaded, and install it.
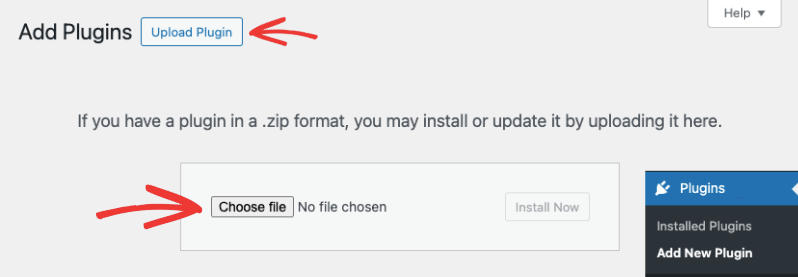
Finish by choosing Activate, the same as the other 2 methods.
Step 2: Connect Your Site and Choose Its Permissions
However you installed it, activation starts a short setup that walks you through connecting the site and deciding what your AI is allowed to do.
This is where you set read-only or allow changes. If you are trying this on a live site, read-only is the sensible place to begin.
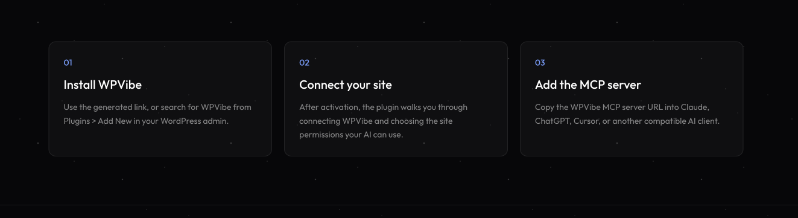
WPVibe does not ask for your WordPress password. It connects using WordPress Application Passwords, the same built-in mechanism Jetpack uses, so you can revoke the connection from WordPress at any time.
Step 3: Add the MCP Server to Your AI Client
The last step happens in the AI tool itself. Copy the WPVibe MCP server URL into ChatGPT, Claude, Claude Code, Cursor, Windsurf, or any other client that supports MCP.
You need to confirm your email with a 6-digit code, then authorize the site from your WordPress admin in one click.
WPVibe is free to use, and paid tiers are available if you start making enough requests each day to run into the free allowance.
Step 4: Ask for Your First Campaign
With the connection in place, there is nothing left to set up. Your assistant finds Charitable on your site on its own.
Try something short and see what comes back, such as create a fundraising campaign with a goal of 100000, deadline 30/09/26.
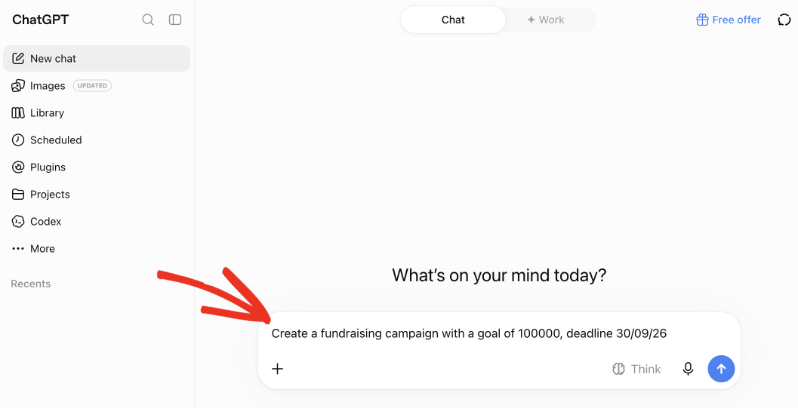
The more you tell it, the less you will have to adjust afterwards. A title, a sentence of description, a goal, and an end date is usually enough to get a campaign you only need to review. 🐾
Read the Full Charitable AI Setup Tutorial →
For Agencies and Developers
The Abilities Charitable Registers
Charitable registers its abilities in the wp-abilities/v1 namespace, so you can enumerate them yourself with a request to /wp-json/wp-abilities/v1/abilities. Each one publishes its own input schema at /wp-abilities/v1/abilities/<name>.
They are grouped the way the plugin is. Campaign work runs through charitable/list-campaigns, charitable/create-campaign, charitable/update-campaign, and charitable/set-campaign-status, with charitable/list-campaign-templates covering the template catalog.
Donation and donor data is reachable through charitable/list-donations, charitable/create-manual-donation, charitable/get-donor-donations, and charitable/get-top-donors. Reporting is handled by charitable/get-reports-overview, charitable/get-campaign-performance, and charitable/get-top-campaigns.
Calling Them Without an AI Client
Abilities are ordinary REST endpoints, so you can script them. Each one runs at /wp-abilities/v1/abilities/<name>/run.
Read-only abilities use GET and ignore a request body, so their input has to travel in the query string as ?input[campaign_id]=660. Write abilities take a POST with a JSON body shaped as {"input":{...}}.
One detail that will save you some time. When creating a campaign, set mode to visual along with a template slug to get something editable in the drag-and-drop builder. The default legacy mode returns a bare classic-editor campaign with no template, colors, or suggested amounts.
FAQs on Charitable and AI Assistants
Do I need a paid AI subscription for this?
No second AI subscription is needed beyond whatever you already use. The connection works with ChatGPT, Claude, Claude Code, Cursor, Windsurf, and other MCP-compatible clients.
Does this require the Charitable Pro plugin?
Yes. The AI abilities ship with the Charitable Pro plugin, and there is nothing extra to buy or switch on once you have it.
Is WPVibe really free?
Yes, and it is a WordPress.org plugin you can inspect before installing. Paid tiers exist for heavy daily use, but the free plan covers normal fundraising work.
Can the AI publish a campaign without me seeing it?
No. It has no write access until you grant it, and campaigns it creates arrive as drafts for you to review.
How do I disconnect it?
Revoke the Application Password in your WordPress admin, or deactivate WPVibe. Charitable keeps working normally either way.
Get Started With Charitable and Your AI Assistant
The fundraising side is ready in the Charitable Pro plugin already, with nothing to configure. Install the free WPVibe plugin, connect your site, and then describe the campaign you want.
Read the Charitable AI Documentation
Charitable Has 1+ Million Downloads!
Trusted by millions to power successful fundraising campaigns. Try Charitable risk-free today.
✅ 14-day money-back
✅ Transparent pricing
✅ Code-free setup
What’s New in Charitable
We also launched several new features and improvements recently:
💰
Let donors set up repeating gifts through Windcave, managed inside WordPress.
⚡
Build donor follow-up workflows by dragging blocks around, with no code anywhere.
🧩
Native campaign widgets for the Elementor, WPBakery, and Divi page builders.
🗒️
Design the thank-you page donors see after giving, without touching a template file.
We’ve been adding to Charitable constantly, features and improvements designed to help you raise more and serve your donors better. See everything we’ve shipped at the Charitable Changelog.
Not yet a Charitable Pro user? Sign up today and get up to 50% off on your plan. We’re confident you’ll love raising funds with Charitable. If, for any reason, Charitable is not the right fit for you, we’ll refund your purchase with our 14-day money-back guarantee. Get Charitable Pro Now »
Stay Connected for More Nonprofit Resources
For more tutorials and videos tailored to nonprofits, subscribe to our YouTube channel. We regularly publish expert tips, step-by-step guides on online donations, fundraising strategies, and practical resources to help your organization succeed.
🗞️ Get weekly tips and exclusive guides in your inbox
Join our newsletter →
🎥 Watch step-by-step tutorials and success stories
Subscribe to our YouTube channel →
👩🏽💻 Connect with our community and get daily nonprofit insights
Follow us on LinkedIn →
🥳 Fun reels and non-profit insights
Follow us on Instagram →
👀 Insightful & fun videos to help you grow your cause
Follow us on TikTok→
🌎 Subscribe and follow for general fundraiser tips
Get Fundraiser Tips on TikTok →
Powerful Fundraising Resources
⬇️ Download proven strategies, campaign ideas, and expert tools
Get the Fundraising Kit →
💸 Get Free Fundraising Resources
Head to the Charitable Fundraising Hub →
🤔 Got questions about Charitable?
Charitable FAQs →
🏎️ Take Charitable for a spin
Create your Charitable Demo →
Understand non-profit terms and jargon
Non-Profit Glossary →
% Looking for non-profit deals and discounts?
Best Non-Profit Deals and Discounts →







Leave a Reply