

Charitable Blog

Everything you need to know about Charitable and our team.

How to Add a Stripe Donation Button in WordPress

How to Add a Stripe Donation Button in WordPress

Last updated on

  • By

Looking to add a donation button to your WordPress site? Stripe is one of the most secure and professional options. What I love is that it keeps your donors right there on your website instead of redirecting them somewhere else.

I’ve run my own non-profit site and here’s what I’ve learned: the easier you make it to donate, the more donations you’ll receive. 

In this step-by-step tutorial, I’ll show you exactly how to add a Stripe donation button to your WordPress site. No coding required. You can do this in the next 15 minutes.

Let’s begin.

Do you prefer to learn through video tutorials? Check out our step-by-step tutorial on how to set up your fundraiser with Stripe integration:

Now on to our tutorial here.

What You Need

While there are several WordPress donation plugins available, Charitable stands out as the most straightforward solution for adding Stripe donations to your website. I’ve found it to be the most user-friendly option, especially for those who aren’t technically inclined.
WPCharitable homepage

Charitable comes with Stripe built into the plugin. You won’t need any extensions or addons for this to work. The best part is that you won’t even need API keys and other info. You simply need to log into your Stripe account to make the connection. It’s that easy.

Charitable has both a lite and pro version. The lite version is completely free to use and it includes Stripe, however, there’s a 3% transaction fee + Stripe fees. With the Pro version, the 3% fee disappears and you only incur any fees charged by Stripe.

The Pro version not only enables Stripe payments but also includes recurring donations, multiple currency support, and advanced donor management tools – features that typically require various plugins with other solutions.

What really sets Charitable apart is how seamlessly it integrates with WordPress. The donation buttons and forms match your website’s design automatically, creating a professional look that builds trust with your donors. Plus, donors can complete their contributions without ever leaving your site, which significantly increases donation completion rates.

What I love about Charitable is its user-friendly approach to Stripe integration. This helps ensure you’re not losing potential donors to a complicated donation process.

Remember, the easier you make it for people to donate, the more likely they are to follow through.

Ready to get started? Let’s move on to setting up the plugin.

Step 1: Setting Up Charitable

First things first, let’s get Charitable installed and configured on your WordPress site. I’ll walk you through this initial setup process step by step.

Start by logging into your WordPress dashboard. Head over to Plugins » Add New and search for “Charitable.” You’ll see the free version of Charitable in the results. Click “Install Now” and then “Activate.” This gives you the foundation we need to build on.
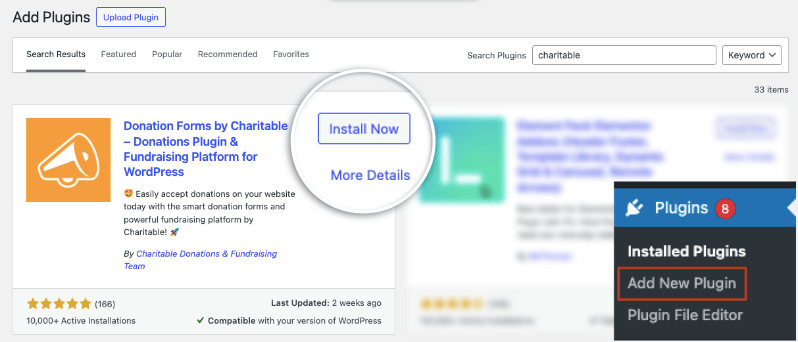
Install Charitable

For the Pro version, visit Charitable’s website and purchase a plan. Then you’ll get your own account with a license key.
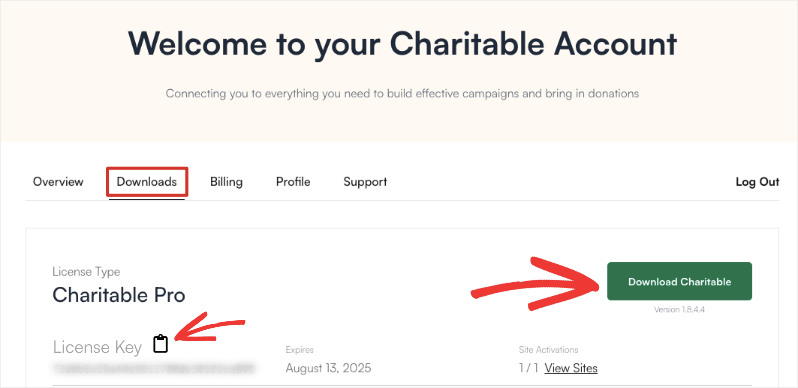
Download plugin and copy license key

Copy this key and go to Charitable » Settings » License in your WordPress dashboard and enter your key. This unlocks the Stripe functionality and other premium features.

One thing that stands out about Charitable is that as soon as you activate the plugin, it launches an onboarding wizard. This takes you through all the important steps to get you set up with the essentials including Stripe.

You can follow the setup wizard if you’re comfortable with that or continue to follow along.

Step 2: Enabling the Stripe Gateway

Now headover to the ‘Payment Gateways’ tab, and you’ll see the Stripe gateway ready to be enabled.
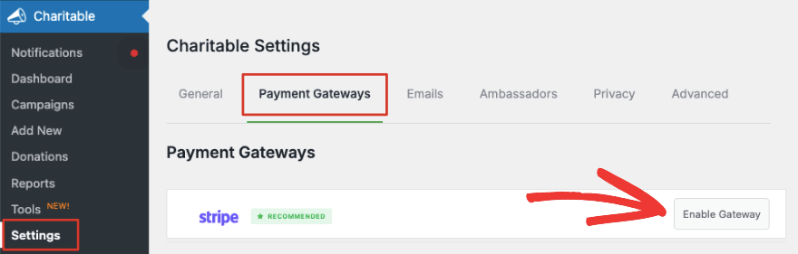
Enable Stripe payment gateway

Before we enable this, you need to know about test mode. You’ll see this below the list of gateways available.
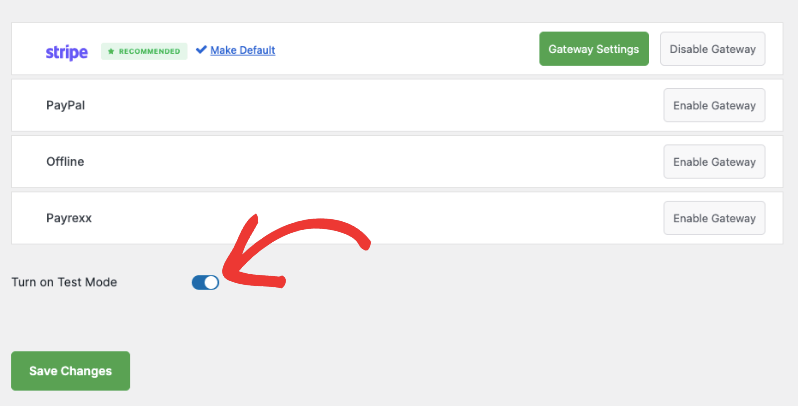
Turn on test mode for payment gateways

Test mode is a crucial feature in Charitable that lets you safely experiment with donations before going live. When you’re first setting up your donation system, you need to make sure everything works smoothly. Test mode lets you simulate the entire donation process without charging actual credit cards. 

Pro tip: I always recommend making at least 2-3 test donations with different amounts to ensure everything works as expected. This includes testing both one-time and recurring donations if you’re using them.

Now you can enable the Stripe Gateway and you’ll automatically redirect you to the Stripe settings page. Or you can use the green ‘Gateway Settings’ button to access the same page.

On the next page, you can add a label for this gateway. It’s prefilled with ‘Stripe’ for you but you can change that if you need.
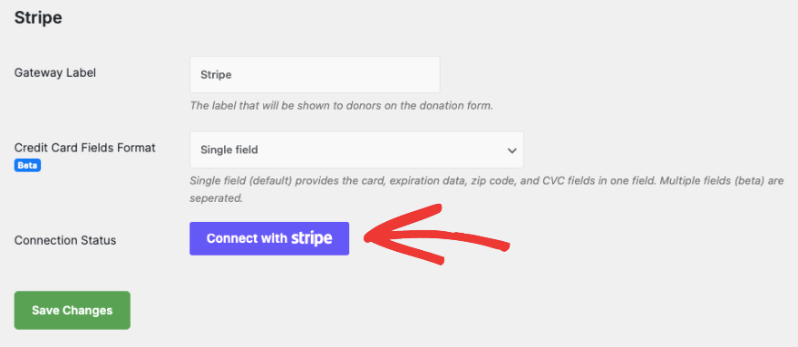
Connect with Stripe

Below this, you’ll see Credit Card Fields Format. This lets you decide how you want customers to enter their credit card information. There are 2 options here:

  • Single Field asks for the card number, expiration date, zip code, and CVC fields in one field.
  • Multiple Fields creates a separate field for each item.

Here’s what it will look like on the front end:
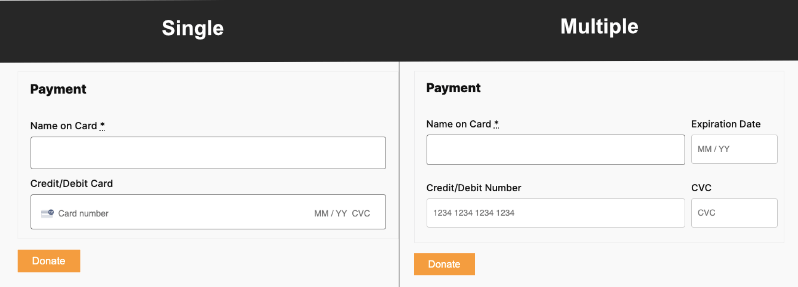
Single vs multiple payment fields

After you choose the Credit Card Fields format, click on the ‘Connect with Stripe’ button.

This will take you to the Stripe page where you can log into your account. If you don’t have an account, you can enter your email address and you’ll be able to sign up for a Stripe account.
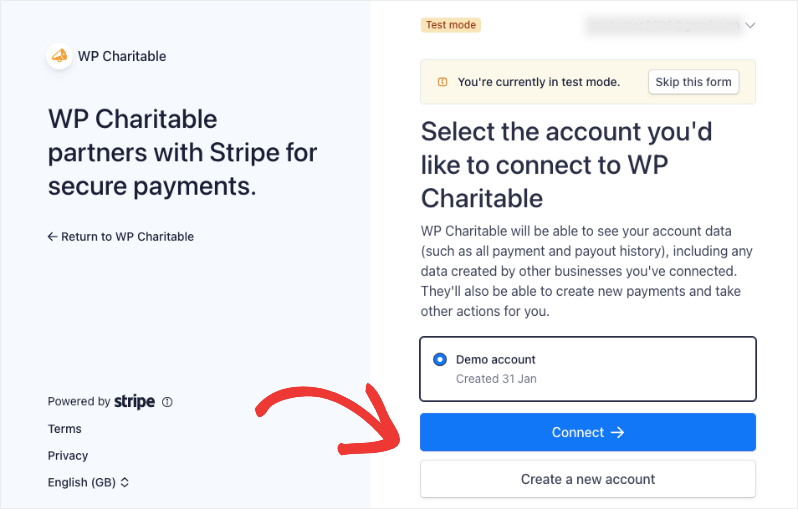
Connect Stripe account on Stripe page

Once you’re logged into your Stripe account, use the ‘Return to WP Charitable’ link on the left. This will take you back to your WordPress dashboard and you’ll see the Connection Status should either say ‘Connected in test mode’ or ‘Connected in live mode’ depending on which mode you chose earlier.
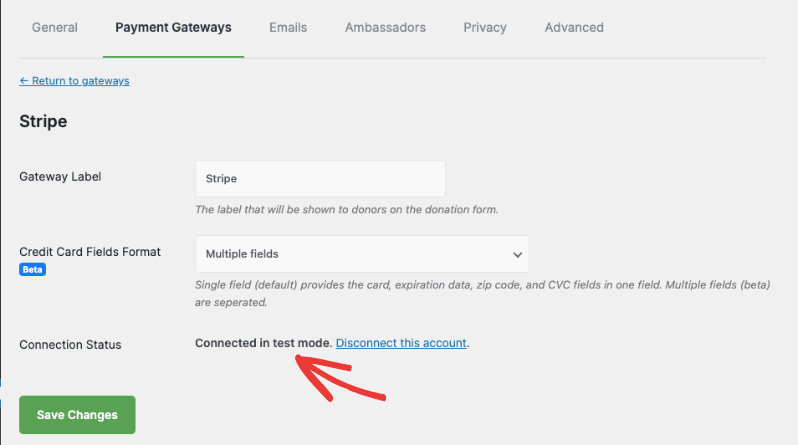
Stripe connected in test mode

Now you’re ready to add the Stripe donate button to your fundraiser and donation campaigns.

Step 3: Adding the Stripe Donate Button to Your Campaigns

Head over to Charitable » Campaigns page in your WordPress dashboard. Here, you can ‘Add a New Campaign’.
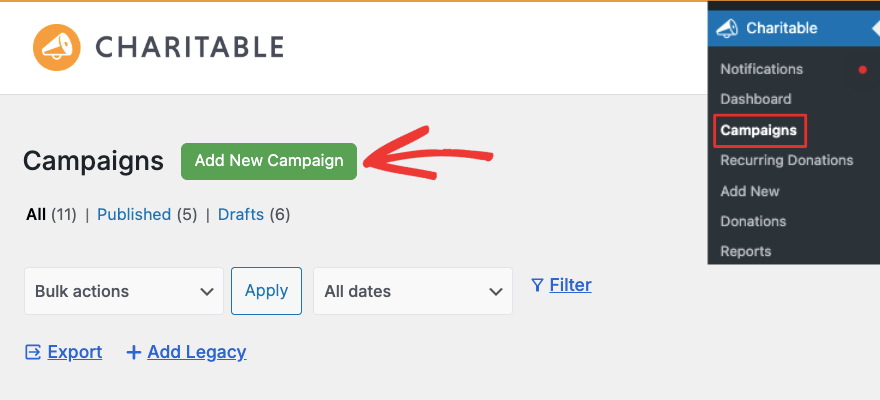
Add new campaign

This will open up the template library where you can give your campaign a name. Then you can browse through the templates available and choose the right one for your fundraiser. Keep in mind that all these templates are editable, so you can change just about anything you need.
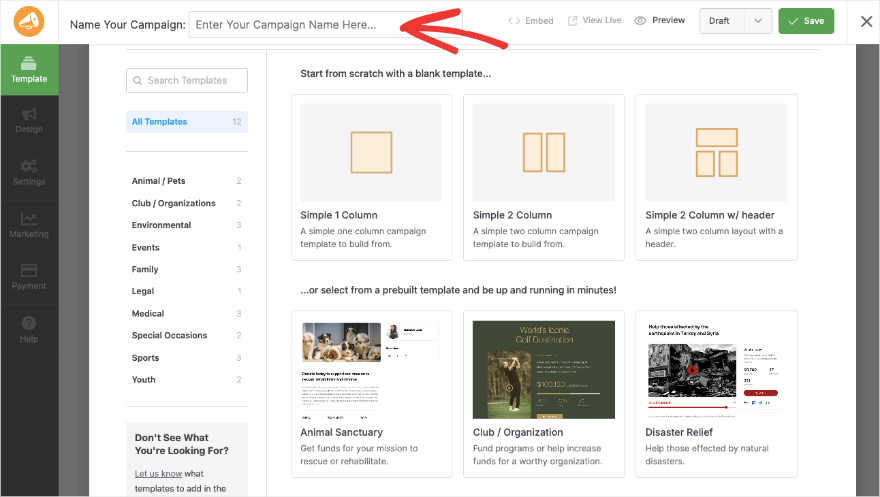
Template library

I’m going to choose the Disaster Relief template. This will open up the visual campaign builder where you can edit your campaign.

On the left, you’ll see a taskbar with fields you can drag and drop into your campaign. There are fields like photos, progress bar, social sharing, donation amounts, and more.

On the right is a visual preview of your campaign. You can directly edit this preview which makes it easy to see what your campaign will look like when it’s live on your site.
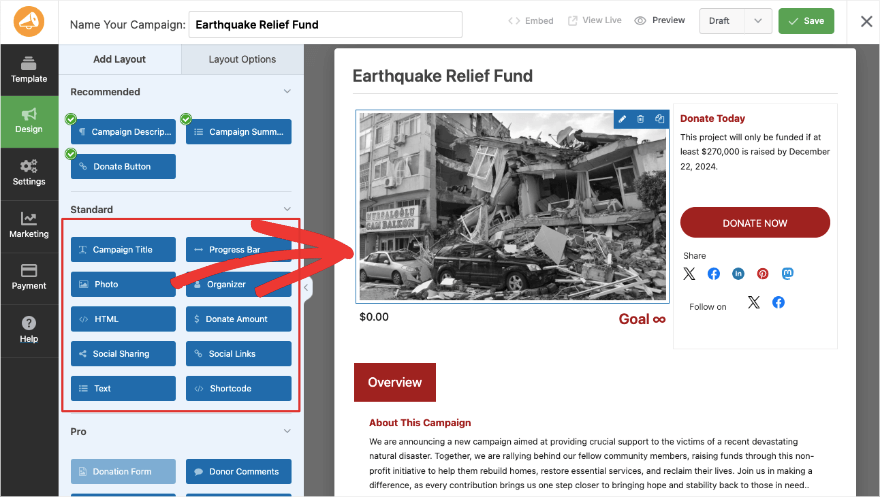
Charitable drag and drop visual builder

If you choose a field in the preview, editing options will open on the left. So for instance, select the ‘Donate Now’ button.

On the left, you can edit the text of the button, the alignment, and width.
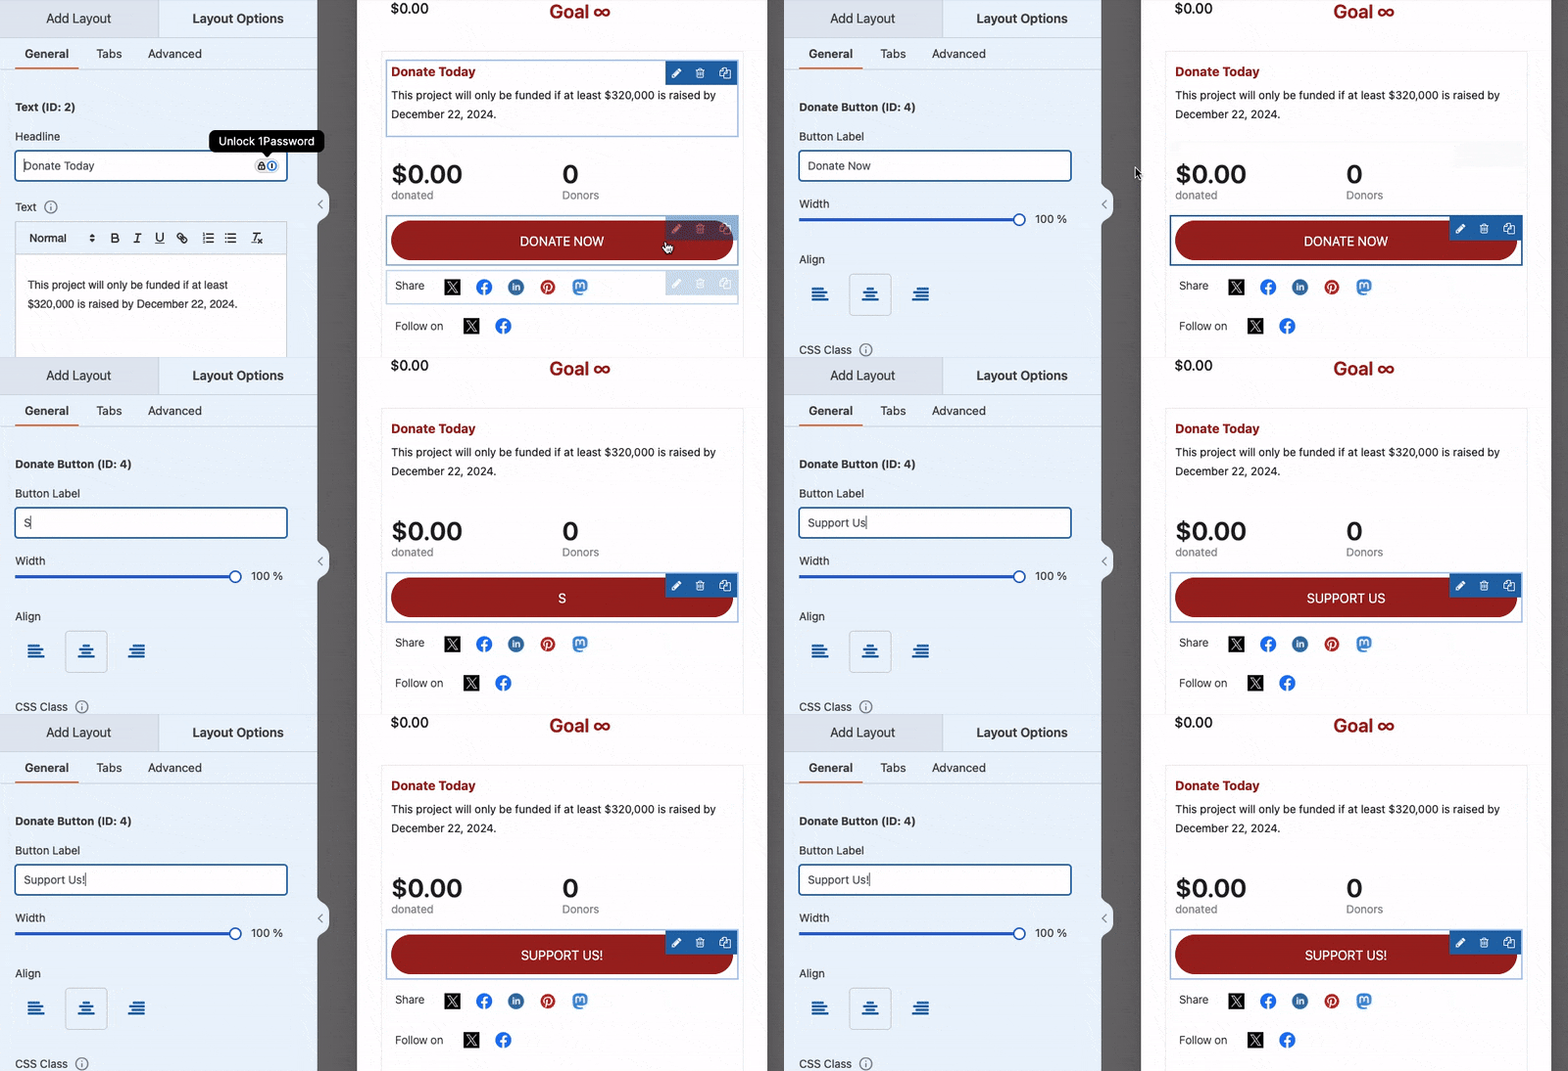
Edit donate button

If you switch from the General to the Advanced tab, you’ll get options to choose different button styles, sizes, colors, and more.
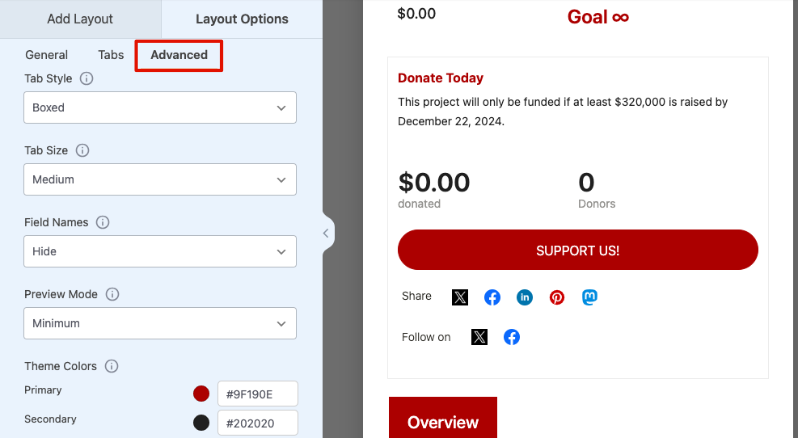
Donation button styles

Stripe is already integrated into Charitable, so the button here will automatically use the enable gateway which is Stripe.

At the top of this campaign builder, you can save and publish the campaign.
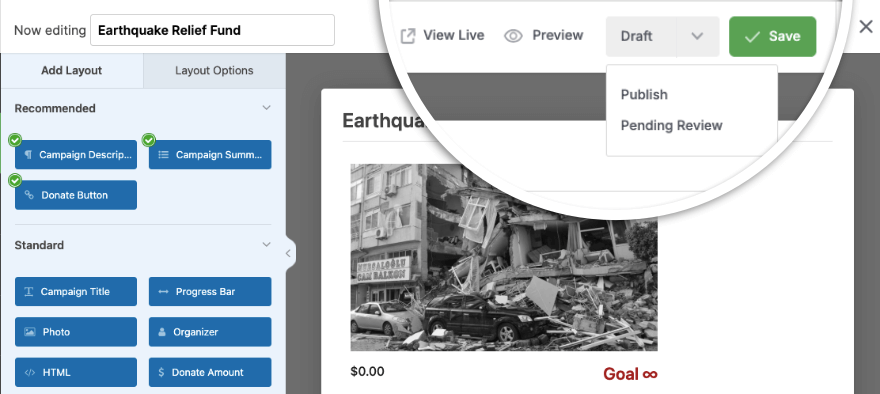
Save and publish campaign

To add this campaign to your WordPress site, open up a page or post. I’m using the WordPress block editor here.

You can add a new block, search for ‘Charitable’ and select the ‘Charitable Campaign’ block.

This will add a new block along with a dropdown menu from which you can choose the campaign you want to display.
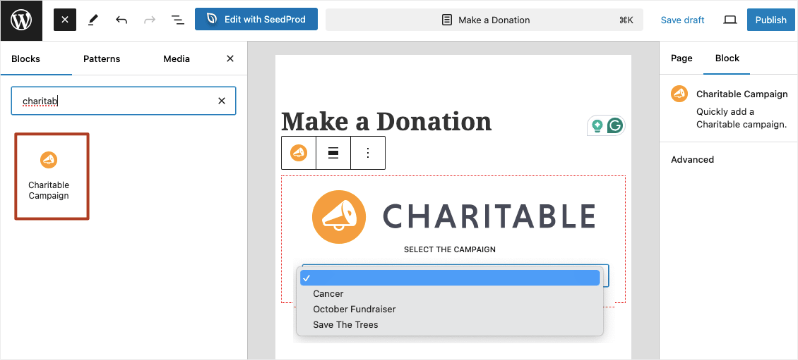
Add Charitable campaign to block editor

That’s it! You’ve added a Stripe Donation button in WordPress. When you visit this campaign on your site, you’ll see your stunning new button that’s powered by Stripe payments.

You can continue to build and launch more fundraisers for your cause.

Need more help creating fundraiser campaigns? Check out our step-by-step set up guide.

Once you launch fundraisers, Charitable has built-in reports to show you how your campaigns are performing, who are your top donors, real-time activity, and so much more. Learn more about Fundraising Reports you need »
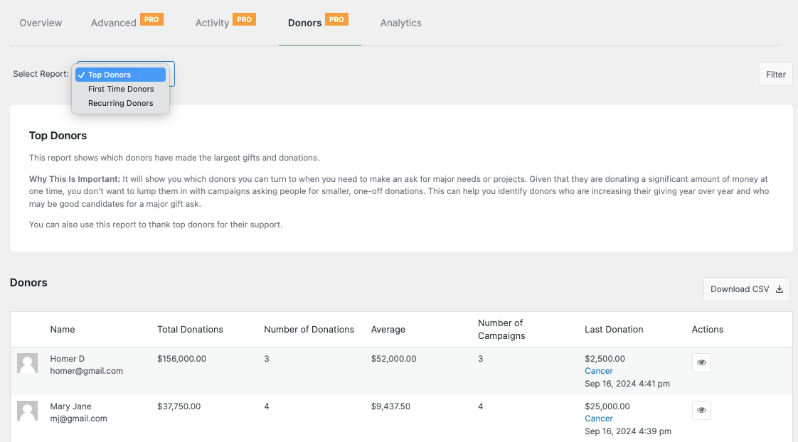
Top donors report

I hope you found this guide helpful. You may also want to see our other Payment Integrations available.


author avatar
Melinda Bartley
I’m the senior writer at Charitable, with over 15 years of experience in content creation, digital marketing, and SEO. Beyond my professional role, I’m the co-founder and trustee of a non-profit organization committed to animal rescue and welfare. Throughout my career, I’ve helped build 17+ blogs – many from the ground up, transforming them into successful marketing platforms that drive traffic, boost brand visibility, and generate revenue.

Disclosure: Our content is reader-supported. This means if you click on some of our links, then we may earn a commission. We only recommend products that we believe will add value to our readers.

Leave a Reply

Your email address will not be published. Required fields are marked *

Get free tips and resources right in your inbox, along with 60,000+ others

Join our Newsletter

We won’t spam you. We only send an email when we think it will genuinely help you. Unsubscribe at any time!

Featured Video:

Watch more videos on our YouTube channel.

What's New In Charitable

View The Latest Updates
🔔 Subscribe to get our latest updates
📧 Subscribe to Emails

Email Subscription

Join our Newsletter

We won’t spam you. We only send an email when we think it will genuinely help you. Unsubscribe at any time!

donation form Feature New

📝 Donation Form Block: Embed a Working Donation Form Anywhere

With the new Donation Form Block for Charitable Pro, you can drop a fully working donation form directly onto any page or post in the WordPress block editor. No redirects, no page reloads, and zero friction between reading your story and making a contribution.

📝 Drop Forms Anywhere: Place a working form directly onto your homepage, inside a story-driven blog post, on a dedicated landing page, or within a campaign announcement.

🎯 Dynamic Campaign Binding: Easily choose a specific campaign from the block sidebar or set it to automatically bind to whichever campaign is currently being viewed.

📐 Full vs. Minimal Form Views: Switch between a full layout or a compact minimal view to perfectly fit sidebars, narrow columns, or wide landing pages.

🎨 Scoped No-Code Styling: Customize typography, container spacing, border radius, amount buttons, and accent colors independently for every form instance without touching a line of CSS.

Learn more here.

author avatar
Melinda Bartley
I'm the senior writer at Charitable, with over 15 years of experience in content creation, digital marketing, and SEO. Beyond my professional role, I'm the co-founder and trustee of a non-profit organization committed to animal rescue and welfare. Throughout my career, I've helped build 17+ blogs - many from the ground up, transforming them into successful marketing platforms that drive traffic, boost brand visibility, and generate revenue.
ambassadors New

👤 Creator Profiles: Put a Face to Every Peer-to-Peer Campaign

Ambassadors 3.3.0 now provies Creator Profiles — giving your supporters a permanent, shareable public home that turns one-time fundraisers into ongoing relationships.

👤 Public Creator Pages: Give every fundraiser an instant, clean landing page at /creator/their-name/ to showcase their custom avatar, bio, and a browsable grid of their campaigns.

📊 Proof of Impact: Boost donor trust by displaying site-wide milestones on the profile—like total funds raised and total donor counts.

💳 Interactive Hover Cards: When donors hover over a creator’s name on a campaign page, a compact card expands with their bio and social handles right at the moment of decision.

📍 Responsible Location Sharing: Allow creators to safely show local supporters where they are based using only city, state, and country details.

🛠️ Self-Serve Customization: Fundraisers can update their own profiles and link up to six social networks directly from the My Campaigns hub, saving you admin time.

Ready to empower your advocates? Update to Ambassadors 3.3.0 and turn on “Enable Public Creator Page” today!

author avatar
Melinda Bartley
I'm the senior writer at Charitable, with over 15 years of experience in content creation, digital marketing, and SEO. Beyond my professional role, I'm the co-founder and trustee of a non-profit organization committed to animal rescue and welfare. Throughout my career, I've helped build 17+ blogs - many from the ground up, transforming them into successful marketing platforms that drive traffic, boost brand visibility, and generate revenue.
Improvement Payments

📱 Turn Mobile Scrollers Into Donors: Meet Charitable’s Mollie Upgrade

Losing mobile supporters because they hate typing out long card numbers on their phones? Charitable’s updated Mollie integration features:

⚡ One-Tap Wallet Checkout: Enable donors to complete their gifts instantly using Apple Pay or Google Pay with a simple face scan, fingerprint, or tap.

💰 No Extra PCI Burden: Skip complex domain verification and security compliance since all wallet transactions run safely through Mollie’s hosted checkout.

🛠️ Custom Cancel Routing: Keep the experience predictable by automatically sending donors who back out to your cancellation page, or use developer filters to route them to a custom page.

Visit this page to learn more.

author avatar
Melinda Bartley
I'm the senior writer at Charitable, with over 15 years of experience in content creation, digital marketing, and SEO. Beyond my professional role, I'm the co-founder and trustee of a non-profit organization committed to animal rescue and welfare. Throughout my career, I've helped build 17+ blogs - many from the ground up, transforming them into successful marketing platforms that drive traffic, boost brand visibility, and generate revenue.
ambassadors improved New

Moderation and Directory Screens In Ambassadors 3.0

Ambassadors 3.0 has new features: moderation and directory screens… now easily see those who are earning donations on your peer to peer network – including campaign creators that might need to be verified – all in one place. Generate reports, email ambassadors and campaign creators directly and more.

🚀 See when campaign creators and ambassadors have updated their campaigns, what donors/donation they have brought in and more.

🎉 Manually add ambassadors and campaign creators, and approve them in one-click!

Visit this page to learn more.

author avatar
Melinda Bartley
I'm the senior writer at Charitable, with over 15 years of experience in content creation, digital marketing, and SEO. Beyond my professional role, I'm the co-founder and trustee of a non-profit organization committed to animal rescue and welfare. Throughout my career, I've helped build 17+ blogs - many from the ground up, transforming them into successful marketing platforms that drive traffic, boost brand visibility, and generate revenue.
New Payments

⚡ Unlock India-Based Donations: Meet Charitable’s Native Razorpay Integration

Trying to collect donations in India? Charitable’s native Razorpay integration features:

⚡ Instant UPI Integration: Accept fast, local donations directly inside your form via apps like PhonePe, Google Pay, Paytm, and BHIM without sending donors away from your site.

📲 Auto-Generated Campaign QRs: Instantly render scannable QR codes encoding a UPI deep link directly on your public campaign pages and sidebars for an effortless “scan-to-give” experience.

💰 Dual Local & Global Reach: Headline your campaigns in INR while seamlessly accepting major international currencies like USD, EUR, GBP, and CAD to maximize global support.

🔁 Seamless Recurring Giving: Fully integrates with the Charitable Recurring addon to manage automatic monthly subscriptions directly through Razorpay without extra code.

↩️ Automatic Two-Way Sync: Keep your books perfectly clean with two-way refund syncing—issue a refund inside WordPress or your Razorpay dashboard and both sides update automatically.

🔒 Webhook-Verified Security: Automatically protect your donation records using HMAC-signed webhook verification to ensure every status update represents real money cleared on the rails.

Visit this page to learn more.

author avatar
Melinda Bartley
I'm the senior writer at Charitable, with over 15 years of experience in content creation, digital marketing, and SEO. Beyond my professional role, I'm the co-founder and trustee of a non-profit organization committed to animal rescue and welfare. Throughout my career, I've helped build 17+ blogs - many from the ground up, transforming them into successful marketing platforms that drive traffic, boost brand visibility, and generate revenue.

