

A lot of fundraising may have moved online, but real world fundraising events like gala dinners still represent a key component of many organizations’ annual fundraising. Today, I want to show how you can use your WordPress website to sell tickets to your gala dinner — and automatically link it into an online fundraising campaign.
Introducing FGDD — our fictional organization
To help put things in context, we’re going to pretend we are setting this up for a fictional organization called FGDD (Fundraising Gala Dinner Demo — get it?), who run an annual fundraising campaign to raise money for clean water projects in Uganda. This year, their goal is to raise $45,000 — enough to fund three clean water projects. They’re accepting online donations and selling tickets to their gala dinner.
You can see the demo site up at http://demo.wpcharitable.com/fundraising-gala-dinner-demo/, or watch the video below to see what we will create:
If you’re following along with this tutorial, I am going to assume you already have a website up and running with WordPress installed. On the FGDD site, I have used the Twenty Seventeen theme, the most recently released default WordPress theme, but as long as your theme has been written with WordPress development standards in mind, these instructions should apply to you as well.
Step 1: Install the plugins we need
As with most things WordPress, there are quite a few plugins that allow you to sell event tickets. I have chosen Event Tickets and its companion Event Tickets Plus, a plugin by the creators of The Events Calendar. Alongside it, we’re going to use Easy Digital Downloads as the e-commerce system for selling tickets. And finally, using our Easy Digital Downloads Connect extension, we will loop Charitable into the mix.
First of all, let’s install the three free plugins. In your WordPress dashboard, go to Plugins > Add New and install each of these plugins: Charitable, Event Tickets and Easy Digital Downloads. Just search for them by name; they should pop up, allowing you to quickly install and activate each one.
Next, you’ll need to purchase the two premium plugins we’ll use. Let’s start with Event Tickets Plus. This one costs $89 for a single-site license, which comes with a year of access to support and updates. The reason you’ll need Event Tickets Plus instead of just using Event Tickets (the free plugin) is that the Plus plugin allows you to sell tickets. The free plugin only supports RSVP functionality, without any payment.
After you’ve purchased Event Tickets Plus, download it and then return to the Plugins > Add New page in your dashboard. Click “Upload Plugin” and then install the file you just downloaded. After installing it, you will need to activate the plugin.
Finally, purchase and install Charitable Easy Digital Downloads Connect. We’ll use it to automatically include the proceeds from your ticket sales to your fundraising campaign.
That’s it. For about $150, we have everything we need to sell tickets to the events.
Step 2: Create your fundraising campaign
First of all, let’s set up our fundraising campaign page. You can do this by going to Charitable > Add Campaign. Below is a screenshot showing the basic setup of our campaign.
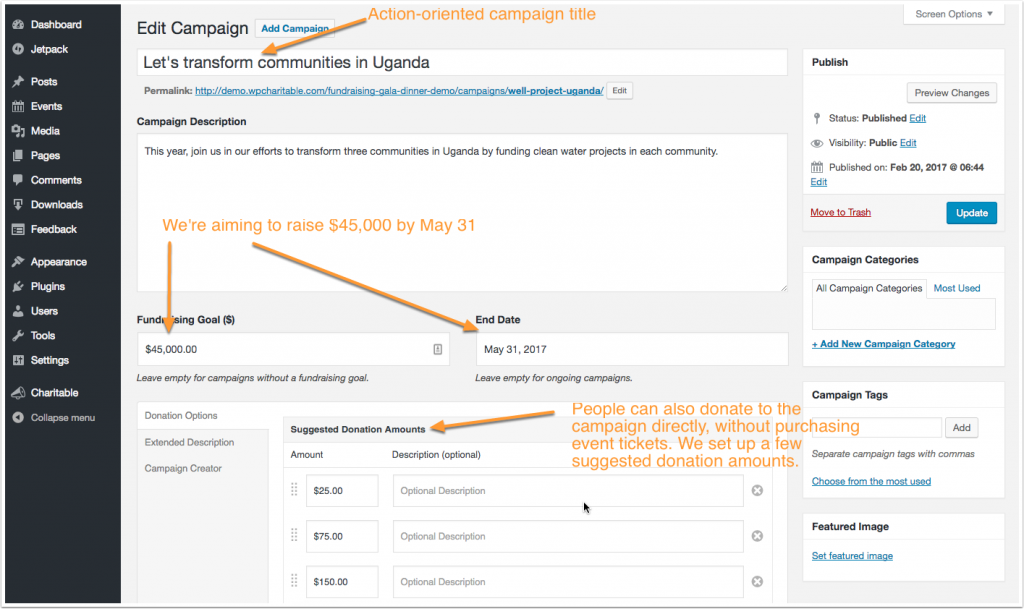
As you can see, we have given our campaign a strong, action-oriented title that is designed to resonate with supporters. We have a clear goal of $45,000 and a set timeframe which gives our campaign a sense of urgency. We also want people to be able to donate directly to the campaign, even if they can’t attend the fundraising dinner, so we have suggested a few donation options.
We can also use the Extended Description tab to add a little more information about the campaign, as well as including a photo.
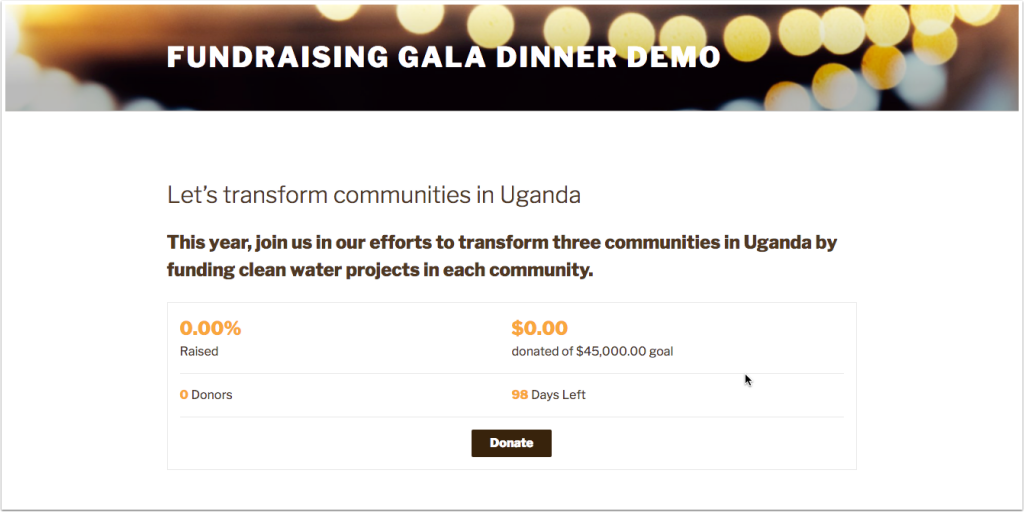
Step 3: Create your ticketed event
Event Tickets is a cool plugin. Most other event plugins with ticketing functionality require you to set up a standalone event and then link the tickets to that. Under the hood, the events are a separate “post type”, which is a WordPress-speak for a type of content. Pages and posts are two other post types.
Event Tickets is a little different. Though you can combine it with The Events Calendar (created by the same people), that’s not essential. You can attach tickets to any post type you nominate. In our case, we’re going to use Event Tickets to transform our fundraising campaign into a ticketed event.
Configure Event Tickets settings
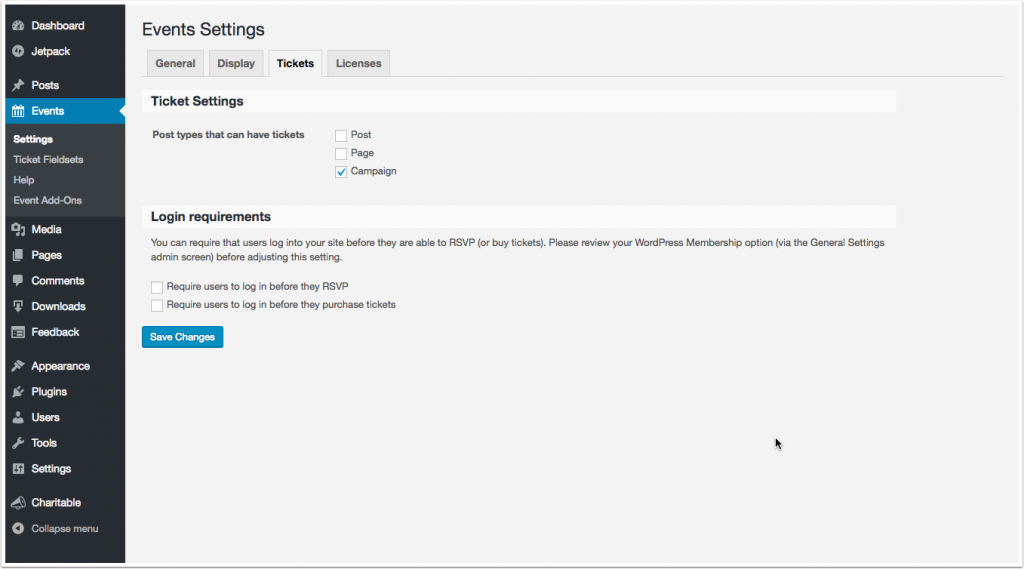
First of all, we need to configure Event Tickets to allow campaigns to have tickets.
- In your WordPress dashboard, go to Events > Settings.
- Open the “Tickets” tab.
- For the “Post types that can have tickets” setting, check the box next to “Campaign”.
- Click “Save Changes”.
Add tickets to the campaign
Next, let’s return to the fundraising campaign we created earlier. If you don’t have it open anymore, you can find it by going to Charitable > Campaigns and clicking on the one you created.
Now when we scroll down, we’ll see a new “Tickets” metabox.
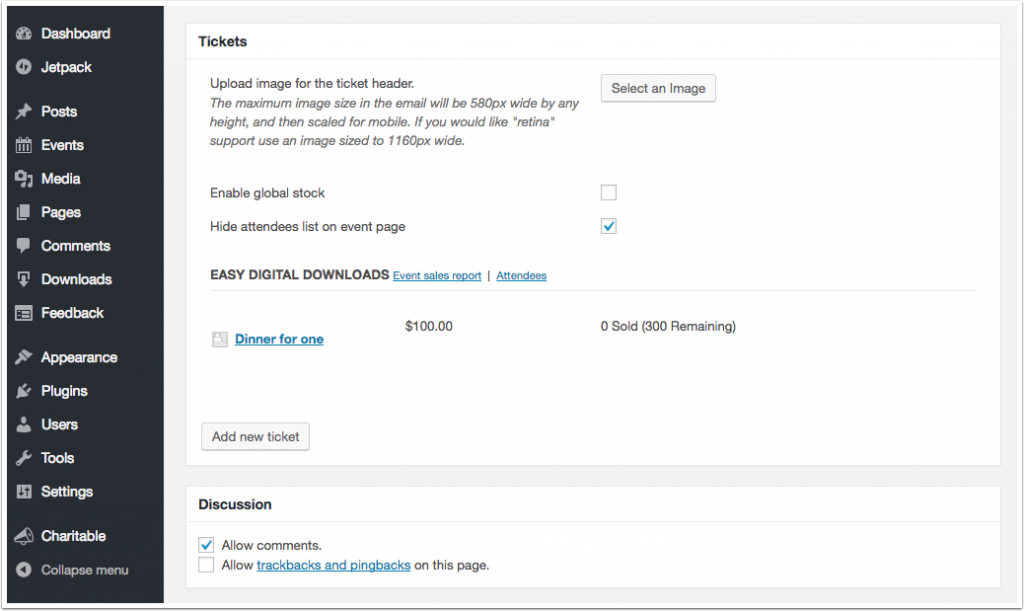
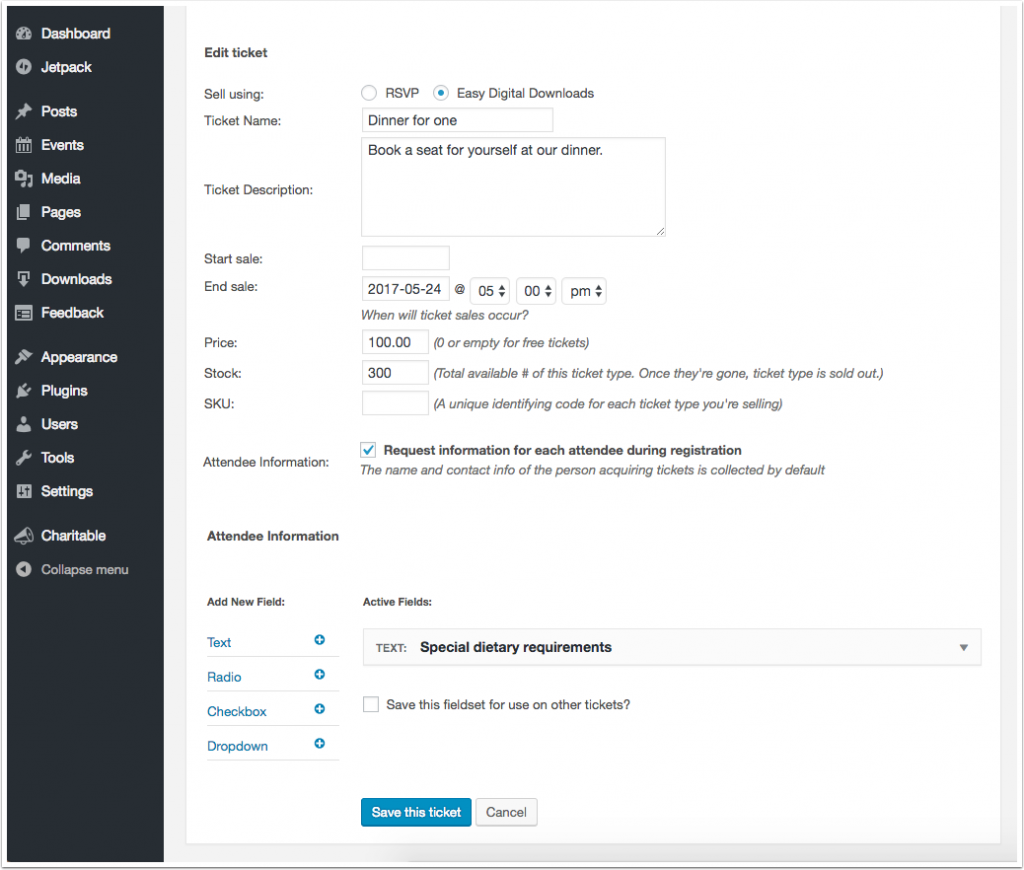
To create a new ticket, click on the “Add new ticket” button. There are quite a few configuration options available here, including the option to set dates for when the tickets are on sale, the price, and the stock available. Note also that we are selling these using Easy Digital Downloads — not RSVP.
We can also ask ticket purchasers to fill out information about the attendees they’re purchasing for.
When you have finished creating your ticket, click on “Save this ticket”. You can always edit a ticket later.
Preview the campaign
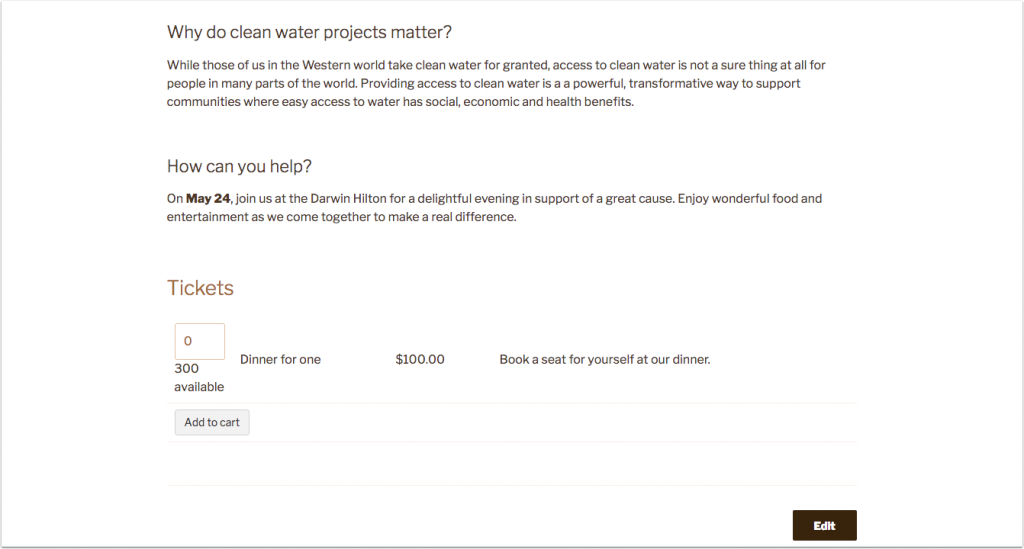
If we preview the campaign now, we’ll see it includes a Tickets section where people can purchase tickets.
Step 4: Set up a payment gateway in Easy Digital Downloads
We now have our fundraising campaign set up, with tickets ready to purchase, but we haven’t configured Easy Digital Downloads yet. Let’s go to Downloads > Settings to set it up.
There are quite a few options available to set up.
For our purposes, we just need to turn on a payment gateway so that we can start accepting donations & ticket payments.
As you can see, Easy Digital Downloads includes PayPal Standard and Amazon by default, as well as a Test Payment gateway. On the demo site, we’re going to use Test Payment since we don’t actually want to take anyone’s money, but you should choose your preferred gateway and configure that. You can find more payment gateways on Easy Digital Downloads’ website.
Step 5: Count ticket sales towards the fundraising campaign
Remember how our fundraising campaign page shows the total amount raised? The way we have things set up at the moment, people can purchase tickets to the dinner, but those sales aren’t included in the total amount raised by the fundraising campaign. Ideally, we want our funds raised to reflect ticket sales as well as any donations to the campaign.
With Easy Digital Downloads Connect, that’s incredibly easy to set up.
Head back to our campaign page in the dashboard and scroll down to the “Donation Options” section. At the bottom of that, you’ll see a section titled “Easy Digital Downloads – Contributions from Purchases” — this is where we’ll set up the link between ticket sales and the campaign fundraising.
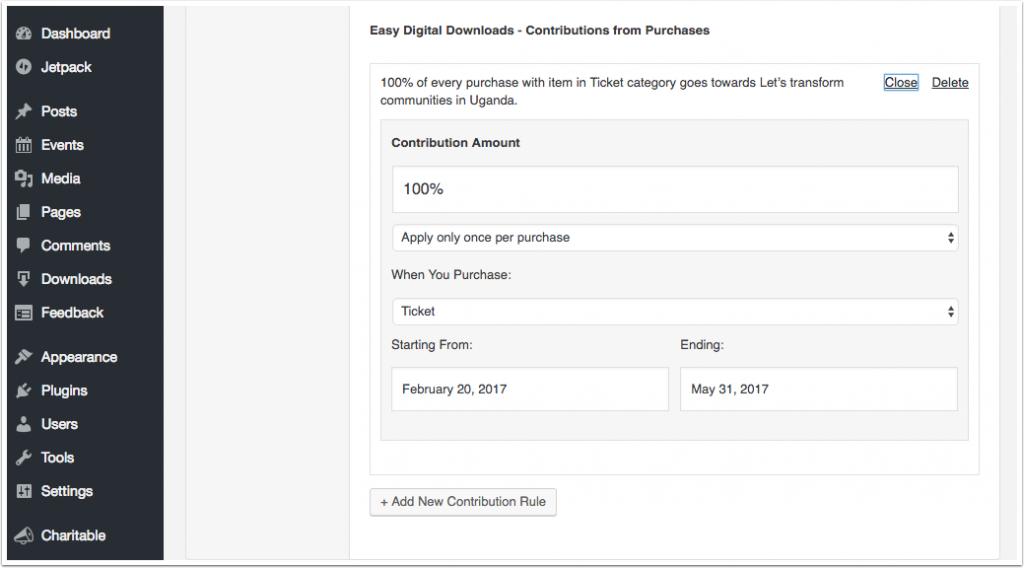
- Click on “Add new Contribution Rule”.
- Set how much of the ticket sale should be counted towards the fundraising tally. We’ve put 100% here, but you may have fixed costs related to the event, so you could set that to 50% or $75 — any amount that accurately reflects how much of the ticket sale will go towards the fundraising campaign.
- Under “When You Purchase”, you can choose to link purchases from any Easy Digital Downloads product, any product within a specific category, or one specific product. If you’re using Easy Digital Downloads to sell other products, you might want to choose a specific category or specific product. In our case, we applied this to all products with the “Ticket” category.
- Finally, you can define when the rule runs from. We set this up to correspond to the date from which the campaign was created until fundraising ends.
Try it out
We’re done! We have created our fundraising campaign and made it a ticketed event, with all proceeds from ticket sales going towards our fundraising efforts. All that remains to be done is to try it out.
You can test out the whole process yourself on the demo site.





Leave a Reply