
Charitable Documentation

Learn how to make the most of Charitable with clear, step-by-step instructions.

How to Allow & Manage Donor Comments

Do you want to give donors an option to leave a message with their donation?

This Donor Comments feature lets you do that with just a few clicks. Once enabled, donor comments can help build community engagement and transparency by giving donors a voice to share their support.

This guide will walk you through the process of enabling and managing donor comments on your donation campaigns.

Table of Contents

Enabling Donor Comments

To allow donor comments on your campaigns, go to the Charitable » Settings page. Here, open the Donors tab and then choose Donor Comments from the submenu.

In this settings page, you’ll see “Enable Donor Comments” with a toggle button next to it. Click this button to enable donor comments feature in the Charitable plugin.
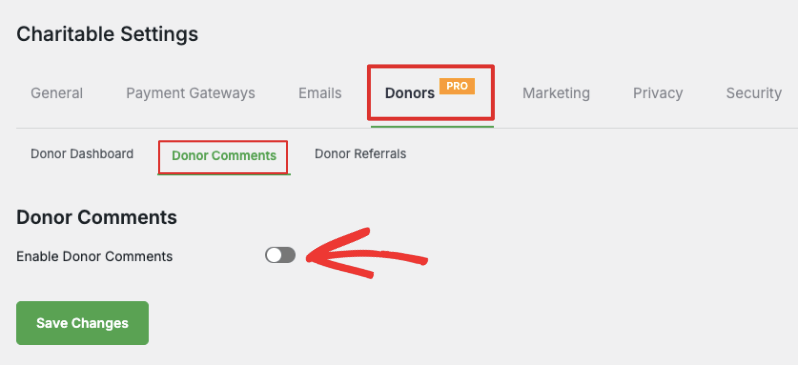
Enable donor comments

Make sure you hit the ‘Save Changes’ button to store your changes.

Configure Donor Comments Settings

When you enable donor comments, new settings will appear on the same page. There are two options here: Show donor comments and comment instructions.

Show Donor Comments in Campaign
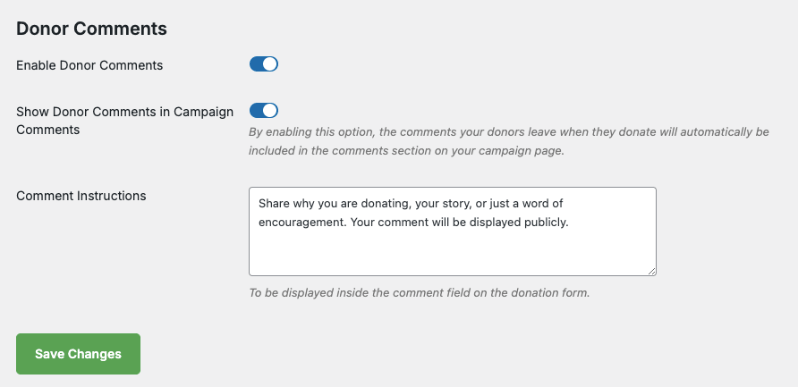
Donor Comments settings page

You can show or hide donor comments on Campaign Pages.

  • Hide: If you choose to hide donor comments, donors can leave messages but only you and your team will be able to view these comments in the donor management system. The donor can view their comments inside their own donor dashboard (if you’ve enabled it).
  • Show: If you choose to show comments, then comments will be publicly viewable. So anyone who can view your campaign page, can also view comments from donors.

Add Comment Instructions

Below this, there is a field called ‘Comment Instruction’. You can enter custom instructions that will appear to your donors inside the comment field in the donation form.

A default message has already been entered for you, but you can edit this as per your needs.

Hit the ‘Save Changes’ button to store your changes.

Now you’ve enabled and configured the donor comments feature on your website. Next, Charitable lets you enable/disable it on individual campaigns that you create. We’ll learn how to do that next.

Important Note: Charitable gives you the flexibility to choose which campaigns can have comments. For this reason, the plugin does not automatically enable the comments section on all campaigns. You need to switch on comments inside the settings of individual campaigns.

Enable Comments in Campaign

Head over to Charitable » Campaigns. Here, you can create a new campaign or edit an existing one.

Inside the campaign builder, in the left menu, choose the Settings » General Settings tab.

On this page, you’ll see a toggle button to enable Donor Comments for this campaign. Click the button to enable comments for this campaign.
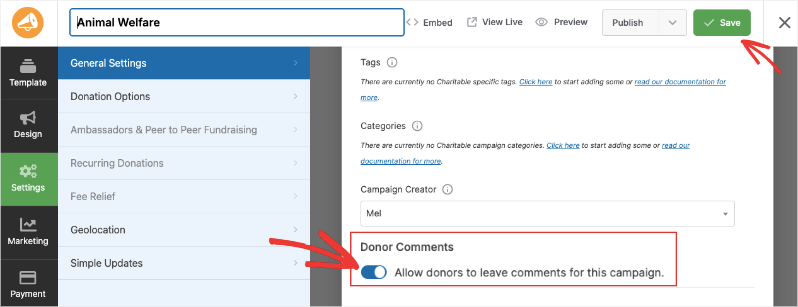
Allow donor comments in campaign settings

Now you can save and publish the campaign.

When a donor chooses to make a contribution, they will see an option to Leave a Comment in the donation form.

Here is an example of that:
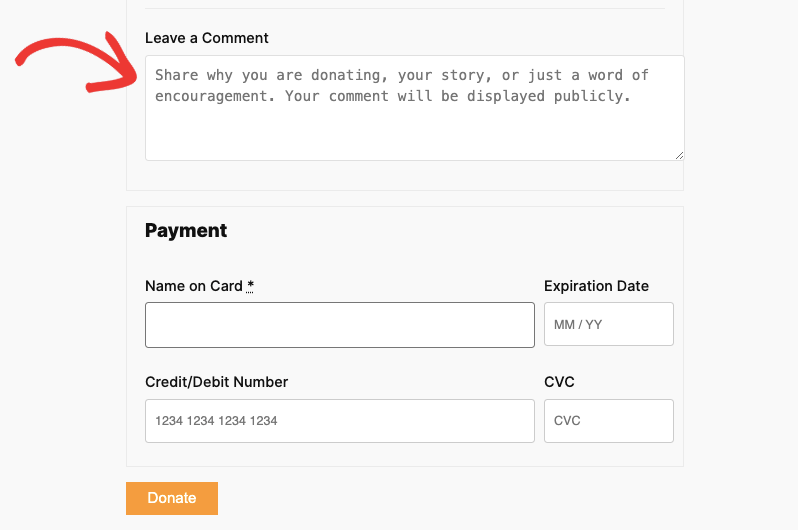
Leave a comment in donation form

Displaying Comments Section in Your Campaign

To display the donor comments in your campaign for the public to view, in the campaign builder, go to the Design tab. Scroll to the Pro section in the left panel.

Select the Donor Comments field and drag and drop into your campaign where you would like it to appear.
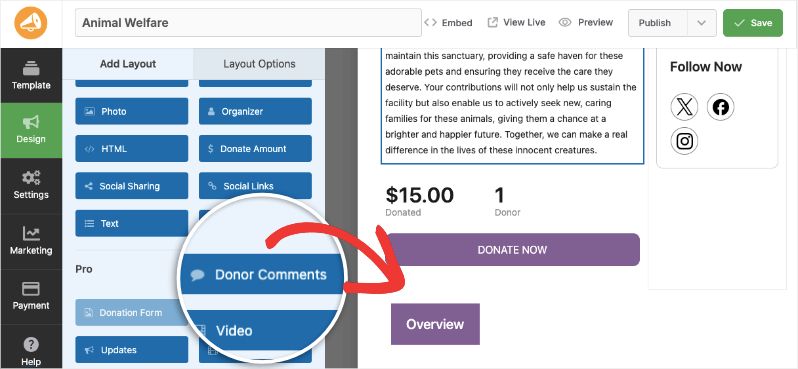
Add donor comments to campaign

When you save your campaign, the comments section will appear in the campaign.

Managing Comments

Charitable Comments can be managed through the default WordPress Comments page as well as inside the Charitable dashboard.

Managing Donor Comments in WordPress

In the left menu of your WordPress menu, open the Comments page. You’ll see a list of all comments donors have left. You can see the donor name, comment text, the campaign, and the date.

Here, you can approve, reject, edit or reply to comments directly from the WordPress dashboard. You can also send them to spam or trash.
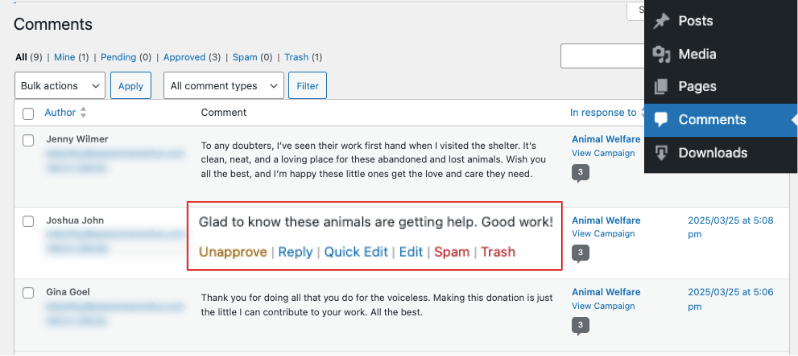
Manage comments in WordPress

Note: Since donor comments are added as regular comments, they will automatically go through the same Akismet SPAM filtering that regular comments do, if you have Akismet installed.

Managing Donor Comments in Charitable

Inside the Charitable dashboard, go to the Donors tab and edit any donor. Scroll down and you’ll see a section with options to view different tabs: Donations, Campaigns, Comments, Social, Logs, and Notes.

Under the Comments tab, you can view, edit, and delete all comments left by the donor.
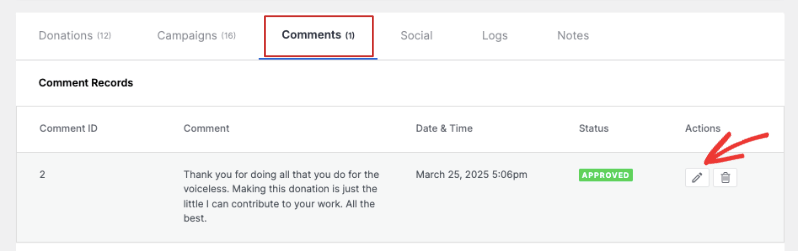
Comments in donor dashboard

Let Donors View & Manage Their Own Comments

If you want to allow donors to manage their own comments, you need to enable the Donor Dashboard. Follow this guide to Enable and Manage the Donor Dashboard »

Once done, your donors can log into their donor account and view all their donations, manage recurring contributions, view comments, and download their donation receipts.

To view comments, donors can log into their account and open the donor dashboard. They’ll see a Comments tab under which all their comments will appear.
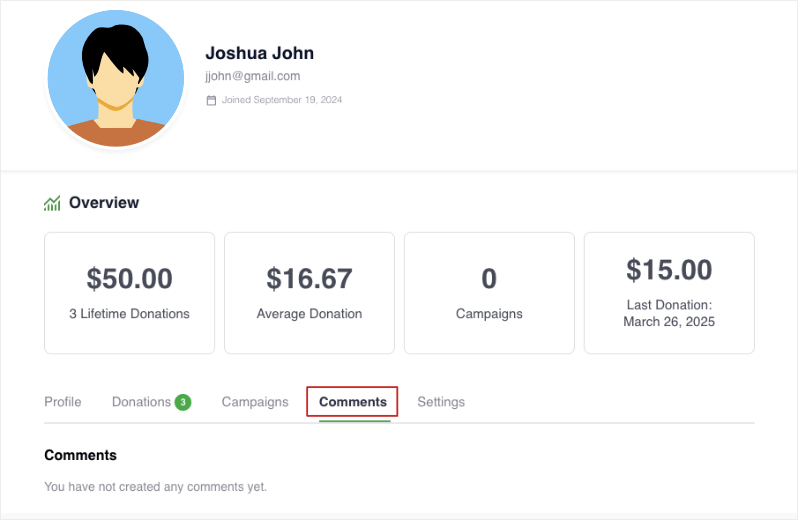
Comments in donor dashboard

That’s it. You’ve learned how to allow and manage comments in Charitable.

To maximize this feature, head over to the full breakdown of Donor Comments »

Next, you may also want to learn how to use the Donor Management System and explore Donor Referrals and what they can do for your cause.


Still have questions? We’re here to help!

Last Modified:

What's New In Charitable

View The Latest Updates
🔔 Subscribe to get our latest updates
📧 Subscribe to Emails

Email Subscription

Join our Newsletter

We won’t spam you. We only send an email when we think it will genuinely help you. Unsubscribe at any time!

Improvement Payments

💰 Accept Recurring Donations with Windcave and Charitable

A donor sets their gift up once on Windcave’s secure payment page, and Charitable bills every renewal after that on schedule. Why this is important:

🏦 Organizations banked in New Zealand or Australia: monthly giving on the gateway your bank already set you up with, with no second processor to onboard.
⛪ Churches taking regular tithes and offerings: congregants set their own schedule once, which is the simplest way to launch recurring church giving without a separate platform.
🌏 Groups with donors in several currencies: Windcave handles more than 20, so a supporter can give in the currency they actually hold.
📅 Operating funds rather than one-time campaigns: switch on Recurring Only mode and the one-off option disappears, so every gift to that campaign is a subscription.
🧾 Teams with no developer on staff: 3 sets of credentials pasted into a settings page, and no code anywhere.

Check out our announcement here.

automation update

⚡ Visual Automation Builder: Drag and Drop With No Code!

Charitable Automation Connect 2.3.0 introduces the Visual Automation Builder, a full-screen canvas that lays each automation out as a flow of connected cards: a trigger, optional conditions, and a list of actions that run in order.

🧩 Many actions, one trigger: Tag a donor, send an email, add a note, and fire a webhook from a single event, dragged into any order.

✉️ Act inside Charitable: New Send Email, Tag Donor, and Add Donor Note actions run with no external service required.

🔤 Merge tags: Personalize emails and notes with live fields like {first_name}, {total}, and {campaign_name}.

🔁 Apply to existing donors: Run Tag Donor and Add Donor Note against the donors you already have.

🖥️ Canvas or Simple: Switch views anytime, and automations built before 2.3.0 keep working unchanged.

Read more here.

Integration updated

📬 Introducing Brevo for Charitable: Turn Donors into Subscribers Automatically

The moment a supporter makes a gift is when they are most engaged. With the new Brevo integration for Charitable, you can automatically turn those one-time donors into long-term subscribers without touching a single spreadsheet.

Simply collect donor consent right on your donation form and start your welcome series immediately.

What’s New:

🔄 Automated Subscriber Sync: New donors who opt in are added straight to your Brevo contact list as soon as their payment clears—no manual exports or CSV imports required.

🎯 Granular Consent & Opt-In Control: Customize your checkbox label, choose whether it defaults to checked or unchecked, or turn on Brevo double opt-in to keep your list clean and compliant.

📋 Per-Campaign List Mapping: Route supporters to your global email list or map specific campaigns to targeted Brevo lists to tailor your follow-up messaging.

⚡ 5-Minute Setup: Connect instantly by pasting your Brevo API key into the Newsletter settings, map your contact fields, and start building your email list on autopilot.

Ready to grow your mailing list? Brevo is available now starting on the Charitable Plus plan—connect your account today!

recurring donations updated

💳 Introducing Card Updates: Fix Expired Cards Without Losing Subscriptions!

newExpired or updated credit cards are one of the biggest silent leaks in recurring fundraising. With Card Updates in the Recurring Donations extension, donors can now refresh their payment details directly—keeping their subscription, schedule, and giving history completely intact.

No canceled plans, no lost history, and zero administrative headache for your team.

What’s New:

⚡ 30-Second Self-Service: Donors get a dedicated “Update Card” button in their dashboard that opens Stripe’s secure, PCI-compliant Customer Portal to update card details instantly.

🔒 Scoped & Safe Access: Scoped exclusively to card updates by default, donors can’t accidentally cancel or alter their plans from inside the portal, keeping your webhooks and data in sync.

🤝 Admin-Assisted Support: Helping a donor on the phone? Open their secure Stripe portal in one click from your admin screen or generate a single-use update link to email them.

📋 Automatic Audit Trail: Every payment method update is recorded automatically with a timestamp in both system-wide logs and the individual donor’s profile.

Ready to protect your recurring revenue? Get the Plus or Pro plan and update Recurring Donations to 2.3.0+ and enable “Update Payment Method” under your Settings today!

Integration page builder

Divi Fans Rejoice! Native Divi 5 Campaign Progress Bar Module!

With our new native Divi 5 module, you can anchor your microsites with real-time fundraising stats directly on the visual canvas. Here’s how it works, and why it’s worth turning on today.

Create campaign updates that are VISUAL AND LIVE. You can also:

📊 Campaign Progress Bar: Drop a live progress bar into any Divi 5 layout and show goal progress in real time.

🎨 Deep styling controls: Easily customize the bar and track color, height, and radius to match your brand perfectly.

👁️ Visual Builder ready: Configure and preview everything directly on the Divi canvas as a first-class module.

🔁 Identical rendering: The same exact engine powers this module, meaning consistent design without legacy shims.

✅ Faster launches: Never leave the Divi 5 interface to configure shortcodes or guess how your goal labels will look.

Learn more here.
