
Often charitable campaign creators want to customize their donation forms. The most common customization is adding an additional field to the form, such as a text field to enter a specific code or an alternative email address. Other times, it is a checkbox to confirm if the donor would like to be informed of additional services.
It is possible to add custom fields to a donation form, and this can be done through easily modifiable code snippets that can be added to the functions.php file or a dedicated plugin. But for those who are not developers or are not comfortable with code, there is an easier and faster method to add and activate code snippets in Charitable using WPCode.
Prerequisites
Ensure you are using Charitable version 1.8.1.7 or higher.
In This Guide
Installing WPCode
The first step is to install WPCode itself. You can install and activate the free version just like you can with any other WordPress plugin. However, Charitable has an easier built-in process.
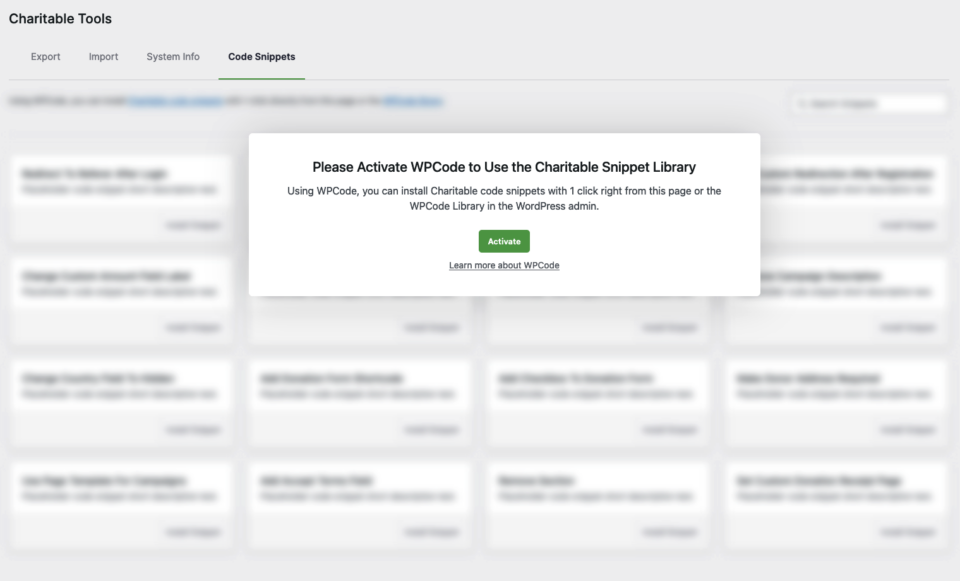
Go to “Tools” and then click on the “Code Snippets” tab.
If you have not already installed WPCode, you should see a prompt that will allow you to install and activate the plugin right there.
Activating Code Snippets
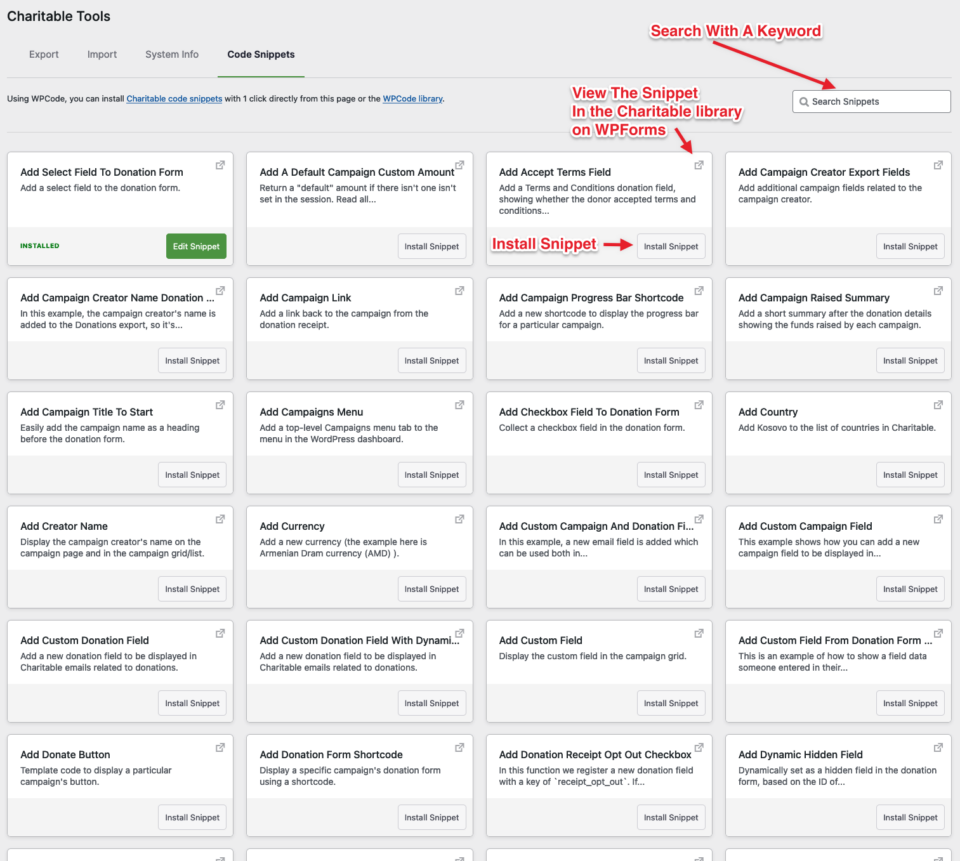
Once that is successful, the same tab will be populated with code snippets. Each box on the page contains the title, a brief description, a link to the snippet’s location on WPCode, and an install button.
For example, if you were looking to add a custom text box to a donation form, search for “text box” in the search box and the page will update with results that match that keyword. You can locate an example script and click install, and that script will automatically be copied and added to your WPCode snippet library.
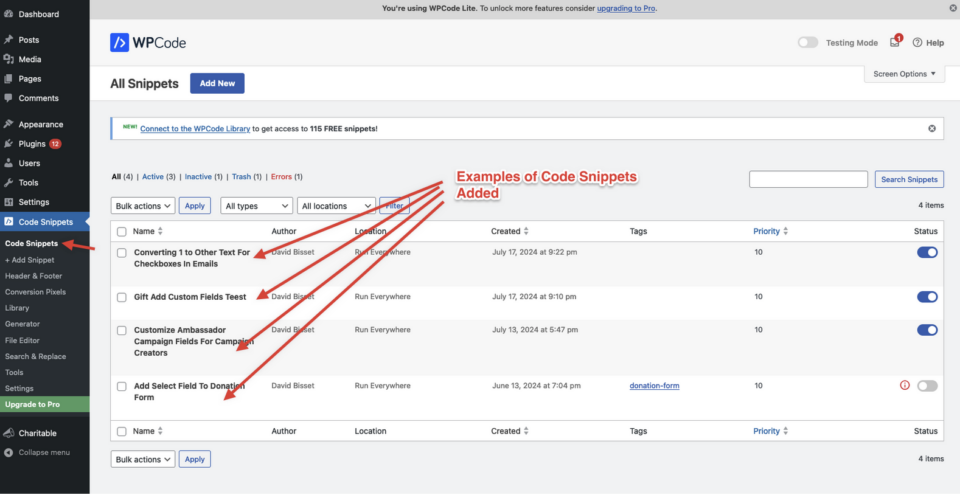
Customizing Code Snippets For Charitable
Often installed code snippets have comments and documentation inside them, so you can customize the snippet. For example, if I wanted a text area for a donor to share how they learned about the campaign, this “Add Textbox To Donation Form” snippet could be modified as shown here:
/**
 * Collect a textarea field in the donation form.
 *
 * This snippet only works in Charitable 1.5 or above.
 *
 */
function wpchar_charitable_register_new_textarea_field() {
    /**
     * Define a new textarea field.
     */

	if ( ! class_exists("Charitable_Donation_Field" ) ) {
		return;
	};

    $field_1 = new Charitable_Donation_Field( 'textarea_example', array(
        'label' => __( 'How did you learn about this campaign?', 'charitable' ),
        'data_type' => 'user',
        'donation_form' => array(
            'type' => 'textarea',
			'show_after' => 'phone', // adjust to where you want this to show up
                        'required'   => false,
             ),
        'admin_form' => false,
        'show_in_meta' => false,
        'show_in_export' => false,
        'email_tag' => array(
            'description' => __( 'How did you learn...' , 'charitable' ),
        ),
    ) );

    /**
     * Register the textarea fields.
     */
	charitable()->donation_fields()->register_field( $field_1 );

}

add_action( 'init', 'wpchar_charitable_register_new_textarea_field' );
There are many other snippets that go beyond creating a text box on a donation form and extend into customizing your campaigns and donation forms even further. Feel free to explore the library either on WPCode‘s website or in the screen in the Charitable plugin.
Have an idea for a code snippet that doesn’t exist yet? Contact us and we’ll add it!
You may also be interested in WPCode documentation to learn more about how their plugin works and the additional features that you can assign to code snippets, including Charitable code snippets.
Get Fundraising Tips & Non-Profit Advice
We regularly share practical guides, proven strategies, and insider tips to help you raise more funds and build stronger donor relationships. Join thousands of nonprofits who get our best content delivered straight to them:
- Join our newsletter – Get weekly tips and exclusive guides in your inbox
- Subscribe to our YouTube channel – Watch step-by-step tutorials and success stories
- Follow us on LinkedIn – Connect with our community and get daily nonprofit insights
- Follow us on TikTok – Insightful & fun videos to help you grow your cause
- Follow us on Instagram – Fun reels and non-profit tips
No fluff, just actionable advice from people who understand the challenges you face every day.
FAQs: Adding Custom Fields to Charitable Donation Forms
What are custom fields and why would I need them?
Custom fields allow you to collect additional information from donors beyond the standard name, email, and donation amount. Common uses include:
- Collecting referral codes or promotional codes
- Adding “In memory of” or dedication fields
- Gathering feedback on how donors heard about your campaign
- Including checkboxes for newsletter subscriptions
- Adding company information for corporate donors
Do I need coding experience to add custom fields?
No. While custom fields can be added through code, WPCode provides a user-friendly solution that doesn’t require any programming knowledge. You can install pre-built snippets with just a few clicks.
Will adding custom fields affect my donation conversion rates?
This depends on implementation. Optional fields typically have minimal impact, while too many unnecessary required fields may possibly reduce conversions. We recommend:
- Making additional fields optional when possible
- Keeping forms concise and user-friendly
- Testing different configurations to see what works for your audience
Is WPCode free to use?
Yes! WPCode offers a free version that includes access to many code snippets. There’s also a premium version with additional features, but the free version is sufficient for most custom field needs.
Will custom fields work with my WordPress theme?
Custom fields should work with any properly coded WordPress theme. However, you may need to add custom CSS to match your theme’s styling. If you experience display issues, contact our support team.
How do I install WPCode?
- Go to Charitable → Tools → Code Snippets
- If WPCode isn’t installed, you’ll see an installation prompt
- Click the install button to automatically install and activate WPCode
- Once activated, you’ll see available code snippets
I don’t see the Code Snippets tab. What’s wrong?
This usually means:
- Your Charitable version is outdated (update to 1.8.1.7+)
- You don’t have admin permissions
- There’s a plugin conflict (try deactivating other plugins temporarily)
How do I find the right code snippet for my needs?
Use the search functionality in the Code Snippets tab. Search for terms like:
- “text field” for additional text inputs
- “checkbox” for opt-in options
- “dropdown” for selection menus
- “textarea” for longer text inputs
Can I modify the code snippets?
Absolutely! Most snippets include comments and documentation to guide customization. You can change:
- Field labels and descriptions
- Field positioning on the form
- Whether fields are required or optional
- Field types (text, textarea, dropdown, etc.)
Where do custom field submissions appear?
Custom field data appears in:
- Donation details in your WordPress admin
- Email notifications (if configured)
- Export reports (if enabled in the snippet settings)
Can I add multiple custom fields to one form?
Yes! You can install and activate multiple code snippets to add several custom fields to your donation forms.
My custom field isn’t showing on the donation form. What’s wrong?
Check these common issues:
- Ensure the code snippet is activated in WPCode
- Verify your Charitable version meets requirements
- Clear any caching plugins
- Check if the field is set to display in the correct location
The field appears but looks strange or doesn’t match my theme.
This is usually a styling issue. You may need to add custom CSS. Contact our support team for assistance with theme-specific styling.
Can I remove a custom field after adding it?
Yes! Simply deactivate or delete the code snippet in WPCode. Note that data from previously submitted forms will remain in your database.
I activated a snippet but it’s causing errors on my site.
Immediately deactivate the snippet in WPCode. This usually resolves the issue. If problems persist:
- Check for plugin conflicts
- Ensure your WordPress and Charitable versions are up to date
- Contact support with specific error messages
Where can I learn more about WPCode?
Visit the WPCode documentation to explore advanced features like snippet scheduling, device targeting, and conditional logic.
Are there video tutorials available?
Yes! Subscribe to the Charitable YouTube channel for step-by-step tutorials and success stories.
Need support? Have a question? If you are a lite/free user of Charitable, you can reach out to our team on the WordPress.org support forums and our team will respond in a timely fashion. If you have an active license, feel free to reach out us directly for priority support.


