
Are you tired of a buggy platform and too many add-on fees? Wondering if there’s a better way to fundraise on WordPress?
Switch from GiveWP to Charitable and save money, unlock more features, and keep all your donor data intact with zero hassle.
The migration process is straightforward and keeps all your donor data safe while opening up cost savings and new features.
Many nonprofits find Charitable’s unlimited campaigns starting at $69/year, plus built-in tools like recurring donations, a great fit as they grow. You’ll move your donors, donations, and forms with our simple one-click import – no technical headaches involved.
This guide walks you through each step clearly, so you can decide if it’s right for your team and make the switch smoothly. Let’s get you set up for success.
What’s In This Guide?
- Why Switch to Charitable
- How to Migrate From GiveWP to Charitable Seamlessly
- 1. Automatically Transfer GiveWP Data
- 2. Migrate Manually From GiveWP Using CSV Import
- Post Migration: Clean Up and Test
- Next Steps in Charitable
- Frequently Asked Questions – GiveWP to Charitable Migration
- Stay Connected for More Nonprofit Resources
Why Switch to Charitable

At Charitable, we’ve been deep in nonprofit fundraising for over 15 years now – helping teams just like yours manage everything from small church drives to big annual campaigns.
We built Charitable because we saw firsthand how plugins like GiveWP can work great at first, but then the add-ons stack up, costs climb, and things get clunky as you scale.
What Made Us Create Charitable
Nonprofits don’t have room for surprise fees or chasing down extra tools for essential features. That’s why Charitable packs everything you need right into plans starting at $69/year (renews at $149) – no upsells needed. You’ll get features like:
- Unlimited campaigns
- Templates
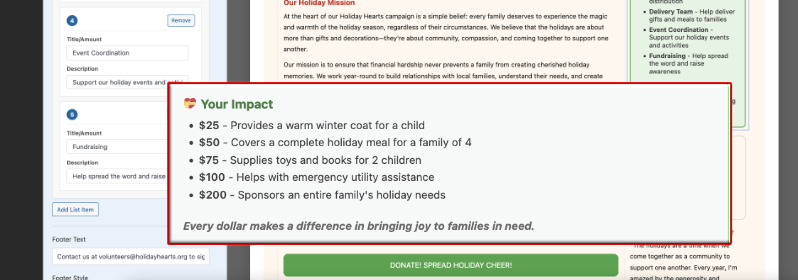
- Visual Campaign Builder
- Full donation management
- Auto-generated receipts
- Indepth reporting
- Donor dashboard
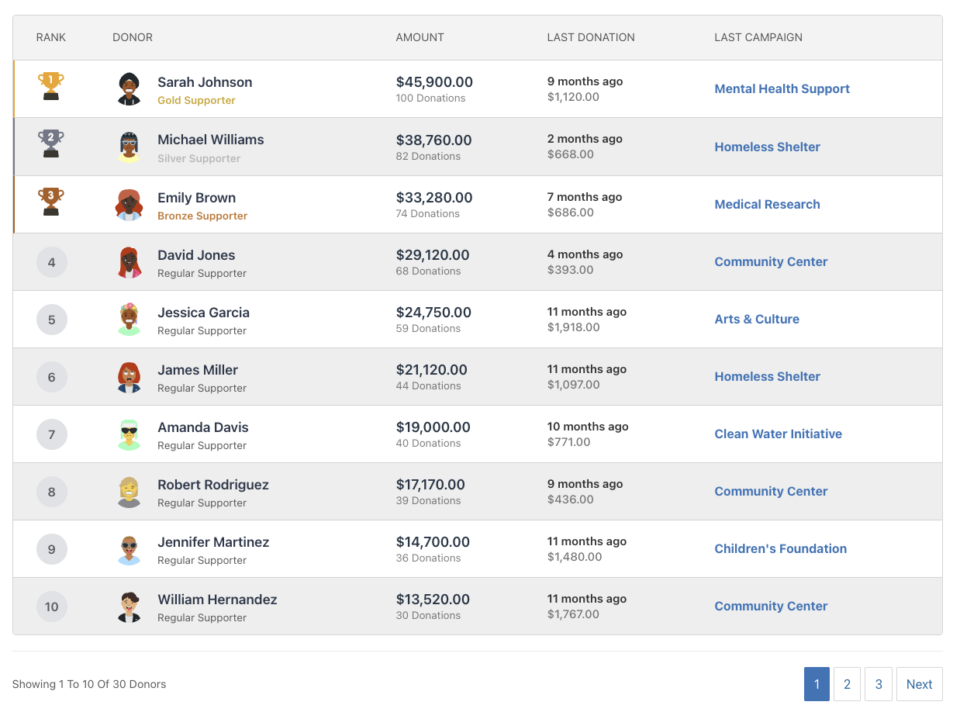
- Leaderboards
- Fundraising Goals
You also get access to offline donations, credit card payments, and 11+ payment gateways including Stripe, Square, and PayPal.
If you need advanced features, get started with our Pro Plan at just $199/year (renews at $399)- a massive cut down from GiveWP’s $499. The Pro plan includes EVERYTHING:
- Recurring Donations
- Fee Relief
- Annual Receipts
- Gift Aid
- Anonymous Donations
- Peer to Peer Fundraising
- Crowdfunding
- Ambassadors
- Donations Teams
- Google Analytics
- Email Marketing Integrations
- Automated Workflows
There’s no need to pay for add-ons and extensions. You get everything included in your plan and you’re free to enable/disable the features you need, when you need it!
Plus, if you’re on the fence, we offer a 14-day money back guarantee. So you can give Charitable a try risk-free!
We’ve talked to hundreds of orgs switching over, and they love how it just… works without the hassle.
If you’re ever stuck with something, you can reach out to our friendly support team that’s ever ready to help you.
Real Wins You’ll Notice
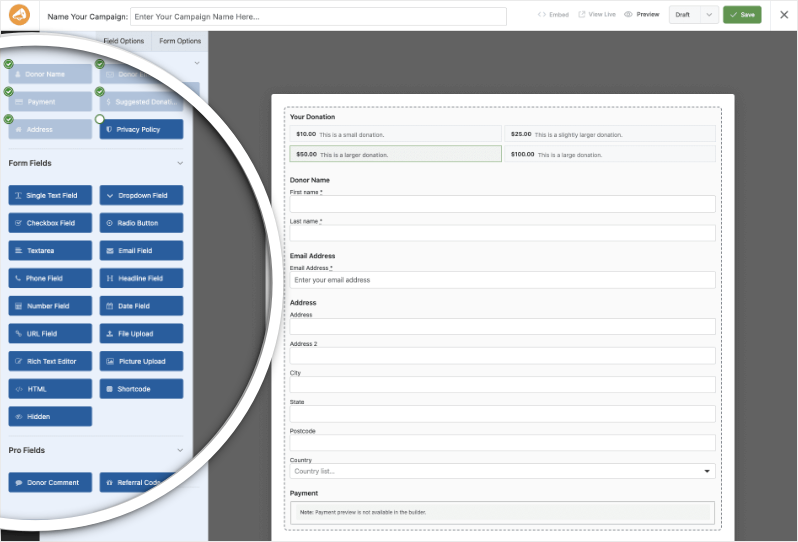
Setup takes minutes with our wizard (trust me, I’ve tested it on live sites). You get drag-and-drop forms, fast-loading pages, and integrations that actually play nice with MailChimp or Zapier.
Plus, our one-click migration means your GiveWP donors and data come over clean, so you hit the ground running. See why Charitable is the best alternative to GiveWP below:
Real Reviews and Testimonials From Our Users
Read testimonials from non-profits and users just like you who have loved their experience when they switched to Charitable. To see more about what our users have to say, head to our Testimonials page. Or better yet, you can check them out on the WordPress.org Reviews page too!
@heidimaria

I tried “Give” before this plugin but I really couldn’t figure it out and found it frustrating. I didn’t experience any of the issues I had with Give with Charitable. I needed some help setting it up and Eric was amazingly helpful. He answered all my questions and helped me get it all working — and I’m a bit of a noob so I had a bunch of questions for him. When I got my first donation I was elated. Thanks Eric for the awesome plugin!
I tried the plugin ‘Give’ first, but I just couldn’t get it to work, it would freeze my WP dashboard. I found this plugin which has the same feature that I could add campaigns with a specific donation option that I can add to my pages. Overall a great plugin and free! When I feel I need to take my donations to the next level, there is a paid upgrade available as well. Thanks!
I stumbled upon this plugin while doing an extensive search for donation plugins on the WordPress directory. I was initially hesitant, but decided to give it a try. I found it very easy to setup, configure settings, and customize the CSS styles to my liking. Would like to see some minor improvements, but I’m sure the developers will work it out in future releases. Well done!
This plugin is fabulous! My client’s non-profit cannot afford more fees… and this plugin is free… with no additional fees. Plus, when I noticed a weird little glitch in the Chrome browser on a Mac, they fixed it right away. My thanks to the developers for a great plugin and for really fabulous support.
We’ve tried some of the other donation management systems, but they were way too expensive and, as a small org, we didn’t need all the features we were paying for. Charitable Pro is just right for us. Everything works so well right out of the box, integrates perfectly with our WordPress site, and is so user friendly. Also, support is responsive & effective.
Now let’s show you just how easy it is to make the switch from any platform – including GiveWP.
How to Migrate From GiveWP to Charitable Seamlessly
Let’s talk about how simple it is to actually make the switch. I’ve guided dozens of nonprofits through this, and it usually takes under 30 minutes. There are two methods you can use:
- Automatically Transfer GiveWP Data
- Migrate Manually From GiveWP Using CSV Import
We’ll start with the easiest method first.
Important: Make sure you backup your website before making any major changes. You can back up your site using the Duplicator plugin. It takes just a few clicks. In case of any mishaps with the migration process, your data will be safe, and you can simply restore your backup.
1. Automatically Transfer GiveWP Data
If you have GiveWP activated on your site, you can import items with just a click. You don’t have to download and upload any files to Charitable.
Log into your WordPress dashboard and navigate to Charitable » Tools » Import.
Open the GiveWP tab and you’ll see file upload options up top, but ignore those for now.

Scroll down to the automatic buttons where you’ll see:
- Import Campaigns
- Single Donations
- Recurring Donations
- Donors
Import Campaigns
Pick your campaign from the dropdown (it lists all your GiveWP ones) and hit “Import GiveWP Campaign”. A new legacy campaign appears in Charitable, ready to go.

Note: For this to work, Legacy Mode needs to be on. This setting is turned on by default, but you can check it under Charitable » Settings » Advanced » Misc. Read the Legacy Campaigns documentation for more details.
Import Single Donations
Before you can import single donations automatically, you’ll need the Fee Relief addon activated – it’s what powers this specific import feature.
Head to Charitable » Addons, find Fee Relief in the list, and switch it on See full steps on installing addons here.
With that done, go back to the Import screen and click “Import Single Donations”.

Charitable will scan your GiveWP records, grab every one-time donation record (amounts, dates, notes – all intact), and add them to your system. It smartly skips anything marked as recurring, so those wait for their own step. No overlap, no mess.
Import Recurring Donations
First, activate the Recurring Donations addon under Charitable » Addons to enable this import option. (See the full addon installation guide here)
With the addon active, return to the Import screen and select “Import Recurring Donations”. Charitable will automatically detect all recurring donation records in GiveWP, sync the data, including schedules, amounts, and donor details. Next, it will import them directly into your system.

The process completes without additional steps, keeping your recurring pledges active and accurate.
Import Donors
Last but not least, to import your donor records, you can use this option.
When you click “Import GiveWP Donors”, it auto-finds your donor list, skips any duplicates (by email), and even links them to matching WordPress users on your site.

In 15+ years of nonprofit work, this is the smoothest migration I’ve seen – your data stays intact, and you’re fundraising with Charitable in minutes. Test it with a small donation to double-check, then you’re good to go.
That’s it. You’ve successfully migrated to Charitable. You can deactivate and delete the GiveWP plugin.
You are now ready to start creating your campaigns with Charitable and managing it all with ease.
Get started with Charitable here »
2. Migrate Manually From GiveWP Using CSV Import
Sometimes you just want a bit more control over exactly what gets moved and how it’s mapped. That’s where the manual CSV import comes in. Instead of relying on the automatic migration, you’ll export your donors and donations from GiveWP, review them in a spreadsheet, and then import them into Charitable on your terms.
This method is especially helpful if you have older data, multiple sites, or you simply like to double-check everything before it goes live.
In the steps below, you’ll walk through exporting your GiveWP data, preparing your CSV files, and importing them into Charitable so your records are clean, organized, and ready for your next campaign.
Step 1: Export Your Data from GiveWP
First, you need to get a clean copy of your data out of GiveWP so you can bring it safely into Charitable. You’ll export your donations and donors into CSV files, which work nicely with both spreadsheets and Charitable’s import tool.
Start by logging into your WordPress dashboard and going to GiveWP » Donations » Tools » Exports. From there, you can generate CSV files for your donation history and donors, with options to filter by date range or specific forms if you need to narrow things down.

Export donation history
Head into the Exports tab under Donations » Tools. Spot Export Donation History and click “Generate CSV”. This pops open a handy filter screen – set a date range if you want only last year’s gifts, pick a specific form for one campaign, or leave it wide open to grab everything.

Once you’re good, hit Generate CSV again, and it’ll download to your computer.
Export donors
Scroll down to Export Donors. Choose your date range, maybe filter by a particular campaign if that’s your focus, and select the fields you care about.

This includes name, email, address, how many times they’ve given, or their total donated. I’ve always grabbed the full set just to be safe.

Click Generate CSV, and another file will download to your computer.
I recommend storing these files in a separate folder on your computer so it’s easier to find them when you’re ready to import it into Charitable.
(Optional) Export any extra reports you need
- If you want a summary of revenue and donations by date, you can also use Export Revenue and Donation Stats in the same Exports tab.
- This report cannot be imported into Charitable but can be helpful for your records or reconciliation.
Once those files are downloaded and saved somewhere safe on your computer, you’re ready to move on to prepping them for import.
Step 2: Prepare your CSV files
Before we send those CSVs into Charitable, let’s give them a quick read through. I’ve seen imports go sideways from a single shifted column, so this step is worth the couple minutes it’ll take.
Open and Review Your Files
Open each CSV in Google Sheets, Excel, or any spreadsheet program. Check the column headers – they should read clearly like “Donor Name,” “Email,” “Amount.” Make sure data lines up properly in each row, with no shifted columns, strange characters, or empty rows.
Confirm CSV Format
Verify the file saves as .csv (not .xlsx or other formats). If you make changes, save again as CSV UTF-8. You don’t need to rename columns to match Charitable exactly – the import tool handles mapping during upload.
Your files are ready now. Clean data in, clean data out.
Step 3: Import your data into Charitable
Log into your WordPress dashboard as an admin and go to Charitable » Tools » Import. You’ll see tabs for different sources like Charitable, GiveWP, GiveButter, and a general CSV option. Click the GiveWP tab.

Import Donations
First, you can pick the Charitable campaign where you want these donations to be stored.
Click Upload File, select your donations CSV from that folder you made, then hit Import GiveWP Donations.

All the original details- amounts, dates, notes – come over intact, and it won’t touch any existing records.
Import Donors
Next, import your donors using the uploaded CSV file. Click the Upload File button, select the donors file you exported from GiveWP, then click Import GiveWP Donors. Charitable will process the file automatically.

Once complete, a confirmation message will display the number of records successfully imported.
To verify everything transferred correctly, navigate to Charitable » Donations and review amounts, dates, and linked campaigns.
Check Charitable » Donors for accurate names and emails, and Charitable » Campaigns for proper titles
If any details appear incorrect, such as missing donors or mismatched amounts. Compare a few records against your original GiveWP CSV to identify mapping issues, then re-import as needed.
Post Migration: Clean Up and Test
With your data now safely in Charitable, run a final check and test to confirm everything works smoothly.
You can set up your payment gateway such as PayPal or Stripe. You can also use offline donations. See How to Set Up Payment Gateways »
Under Charitable » Settings » Payment Gateways, you can enable test mode. You’ll see an alert appear that test mode is active.

Now you can make a small test donation on your site to verify Charitable records new gifts correctly – amounts, donor details, and receipts.
Once confirmed, you can deactivate GiveWP from your plugins if you no longer need it.
Head to Charitable » Donations one last time. Everything should match your expectations with no gaps or errors.

Also check Charitable » Donors, and Charitable » Campaigns to make sure everything looks good.
Your migration is complete, and you’re ready to build new campaigns.
Next Steps in Charitable
Your GiveWP data is now fully migrated into Charitable – congratulations on a smooth switch. Now’s the perfect time to explore the tools that help nonprofits like yours raise more and manage donors better. These quick actions will get you up to speed fast.
Start in Charitable » Campaigns to review your imported ones and create new fundraisers tailored to your goals.
Essential Features to Set Up First
- Donor Portals: Let supporters log in to view history, update details, and manage pledges.
Let Donors Manage Their Giving: How to Set Up a Donor Portal - Recurring Donations & Receipts: Turn one-time gifts into steady income with automated emails.
Sending Thank You Emails for Donations: Best Practices (+ Templates) - Reporting: Pull insights on top donors and campaigns.
10 Fundraising Reports Every Nonprofit Needs or Guide to Donor History: Track Who Gave What and When
Fundraising Guides to Boost Results
- Maximize end-of-year giving: The Ultimate Nonprofit Playbook to Maximize Year-End Fundraising
- Grow your email list: Grow Your Non-Profit’s Email Newsletter List
- Plan smarter events: Sell Tickets to Your Fundraising Event with WordPress or 9 Virtual Fundraiser Ideas for Non-Profits
Dive into our Getting Started With Charitable guide for setup basics, then How to Create Your First Campaign to launch something new today. Pick one resource, spend 15 minutes on it, and watch your fundraising pick up.
Frequently Asked Questions – GiveWP to Charitable Migration
Got questions about switching from GiveWP to Charitable? We’ve answered the most common ones below based on what nonprofits ask us every day. If you still have questions, contact us.
What makes Charitable different from GiveWP?
Charitable is built by a team that understands the struggles and needs of non-profits like yours. We’ve specifically designed the plugin to meet the everyday needs of nonprofits, providing all essential fundraising tools in one platform—without hidden fees, confusing add-ons, or artificial limits. Here are the main differences:
- Affordable Pricing – Charitable costs significantly less than GiveWP, starting at just $69 for the entire year.
- Generous Free Plan – Everything you need to start fundraising is included fre,e and you can upgrade as you grow
- More Payment Options – Wider range of payment gateway integration,s including global and local providers
- All-Inclusive Plans – No expensive add-ons needed; features come standard
Are there limits on campaigns or forms in Charitable?
No, there are no limits on campaigns or forms. You can create unlimited donation campaigns and forms from day one on any Charitable plan, so your fundraising scales without restrictions or upgrades.
Can I handle recurring donations in Charitable?
Yes, recurring donations are fully supported on the Plus plan ($99/year). You can offer donors flexible options like weekly, monthly, bi-annually, or annual contributions, with suggested amounts or custom donor-entered totals. Charitable tracks every payment, schedule changes, and lifetime value automatically, so your recurring revenue stays organized and predictable.
What’s the pricing difference?
Charitable starts at $69/year for essential features like unlimited forms, reports, and receipts. Charitable’s Pro plan at $199/year includes everything you need (all advanced features) without additional add-ons.
GiveWP begins at $149/year, with advanced features like recurring donations costing $349/year.
Does Charitable integrate with my tools?
Yes, Charitable integrates seamlessly with popular tools like MailChimp, ActiveCampaign, Constant Contact, HubSpot, MailPoet, Zapier, and more. You can automatically sync donor data, trigger email campaigns from new donations, and connect your fundraising workflow without custom coding.
Is Charitable easy to set up?
Yes, Charitable includes a setup wizard that guides you through the process and gets you live in minutes. No coding is required, and Pro users receive fast support from our team to resolve any questions quickly.
Will I lose data during migration?
No, you will not lose data—both automatic imports and CSV tools preserve all your donors, donations, and campaigns fully and accurately. Always create a site backup first as a precaution before starting the process.
How do I get support?
Lite users can post questions in the WordPress support forums for community help. Pro users receive priority email and ticket support from our team, who have deep experience helping nonprofits succeed with Charitable.
How long does migration take?
The automatic method usually finishes in 5-30 minutes, depending on your data volume. Manual CSV imports take about the same plus review time – most nonprofits complete everything in under an hour.
Do I need to deactivate GiveWP first?
No, keep GiveWP active during automatic migration for direct access. After testing in Charitable, deactivate it safely. Manual CSV works anytime since files are exported first.
Stay Connected for More Nonprofit Resources
For more tutorials and videos tailored to nonprofits, subscribe to our YouTube channel. We regularly publish expert tips, step-by-step guides on migrations like this GiveWP to Charitable switch, fundraising strategies, and practical resources to help your organization succeed.
🗞️ Get weekly tips and exclusive guides in your inbox
Join our newsletter →
🎥 Watch step-by-step tutorials and success stories
Subscribe to our YouTube channel →
👩🏽💻 Connect with our community and get daily nonprofit insights
Follow us on LinkedIn →
🥳 Fun reels and non-profit insights
Follow us on Instagram →
👀 Insightful & fun videos to help you grow your cause
Follow us on TikTok→
🌎 Subscribe and follow for general fundraiser tips
Get Fundraiser Tips on TikTok →
That’s it! I hope you found this guide helpful!


Leave a Reply