The Donation Form Visual Builder is a powerful, easy-to-use drag-and-drop tool that lets you design custom donation forms directly within Charitable. It was created to simplify the process of building donation forms by giving you complete visual control over every field, section, and layout option – no coding required.
In this documentation, you will learn how to use all the available fields and configuration options to build donation forms that are unique to your campaign’s goals and style, helping you raise more efficiently and connect with your supporters better.
How to Use the Donation Form Visual Builder
Getting started with the Donation Form Visual Builder is simple and designed to fit into your existing Charitable workflow. Follow these steps to build and customize donation forms with ease:
Update Your Charitable Plugin
Make sure you have Charitable Pro version 1.8.8.10 or higher installed. The Donation Form Visual Builder is included out of the box in recent releases, so updating your plugin activates this new feature instantly.
Open or Create a Campaign
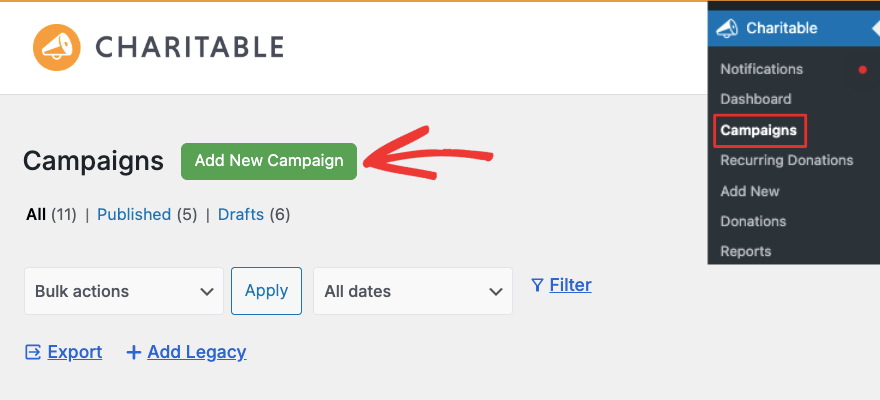
From your WordPress dashboard, navigate to Charitable » Campaigns. Open an existing campaign or create a new one to begin designing its donation form.

Access the Visual Builder
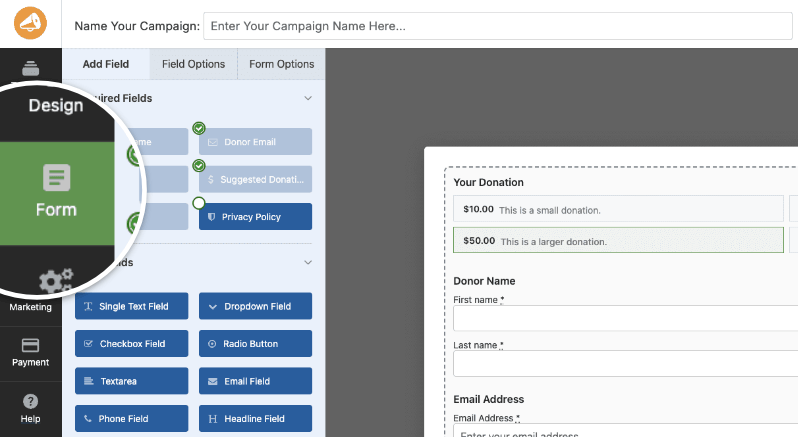
Inside the campaign editor, you’ll find the new Form tab or section. Click to launch the drag-and-drop form builder interface.

Add and Arrange Fields
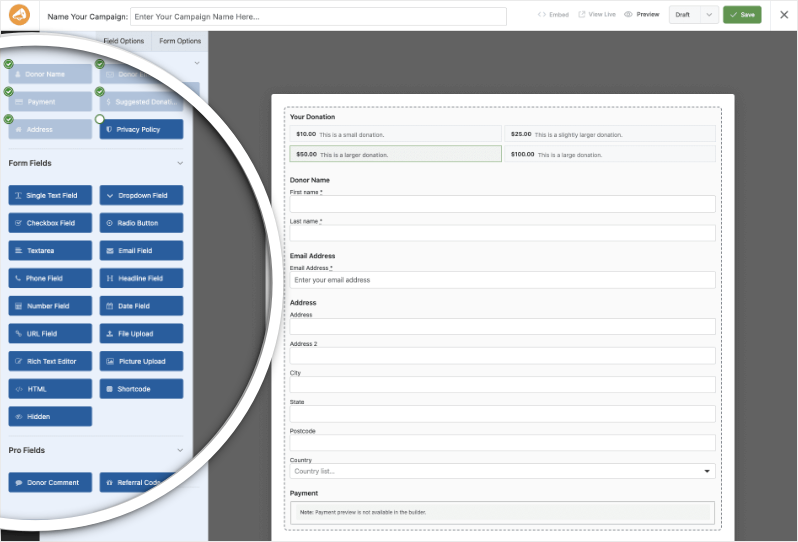
Drag required, standard, or Pro fields from the sidebar onto your form canvas. Use drag handles to rearrange fields in any order that fits your campaign goals and user experience preferences.

Configure Field Settings
Click on any field to open its settings panel. Here, you can customize the label, placeholder text, help instructions, and whether the field is required. You can also set alignment and add custom CSS classes for styling.
Preview Your Form in Real Time
See your changes immediately in the live preview area. This ensures your form looks and flows exactly as intended before saving.
Save and Publish
Once you’re happy with the form design, save your changes. Your campaign donation form will be updated instantly and ready to accept donations.
Test Your Form
Always test the form on the front end to make sure it functions correctly across devices and payment gateways you have activated.
The Donation Form Visual Builder gives you total control, whether you want a quick setup with just the essentials or a highly customized form with advanced fields and messaging.
Form Fields Available in the Campaign Visual Builder
The Visual Builder offers a wide variety of fields categorized into Required, Standard, and Pro fields to give you full control over what information you collect and how your donation form looks and functions. Each field also includes common settings like custom labels, placeholders, instructions, alignment, and custom CSS classes for styling.
Required Fields
These essential fields are included in every donation form by default and cannot be removed because they are necessary to process donations securely and correctly:
- Donor Name: Collects first and last names; mandatory. Layout toggle between stacked or side-by-side.
- Donor Email: Required field for donor contact and receipt delivery; validated email input. Only one allowed per form.
- Payment: Shows payment gateway options and payment inputs. You can select which gateways to activate and choose between classic text tabs or modern button styles.
- Suggested Donation Amounts: Displays preset donation amounts configured at the campaign level with an optional custom amount input.
- Address: Collects full postal address details, including street, city, state/province, postal code, and country.
- Privacy Policy: Displays your site’s privacy notice, contact consent, and terms & conditions, configurable globally.
Standard Form Fields
Use these to collect additional data as suits your campaign:
- Single Text Field: A basic single-line input for short text responses.
- Dropdown Field: Allows donors to choose from predefined options; supports multiple selections.
- Checkbox Field: Let donors select multiple items from a list.
- Radio Button Field: Choose exactly one from a list of options.
- Textarea: Multi-line input for longer comments or messages; configurable height and max length.
- Email Field: Additional email address input with validation (different from the required donor email).
- Phone Field: Phone number input optimized for mobile entry with validation.
- Headline Field: Display-only text headings to organize form sections visually.
- Number Field: Numeric input with configurable min, max, and step increments.
- Date Field: Native browser date picker with optional time input and configurable min/max dates.
- URL Field: Validated web address input, good for company URLs or team pages.
- File Upload Field: Allow donors to upload files with configurable types, sizes, and cropping options.
- Rich Text Editor: WYSIWYG editor to capture formatted text and media.
- Picture Upload: Image uploader with drag & drop and preview thumbnails.
- HTML Field: Insert custom HTML/CSS for static content or styling.
- Shortcode Field: Render WordPress shortcodes dynamically within the form.
- Hidden Field: Store information invisibly, useful for tracking sources or campaign data.
Pro Fields (Available With Charitable Pro)
Unlock powerful engagement and tracking capabilities with these advanced fields:
- Donor Comment: Allow donors to leave public comments shown on the campaign page.
- Referral Code: Collect and track referral or partner codes for attribution and affiliate programs.
Get More Information
Here are some of the more popular “how to” guides and help articles for you:
- Create and Edit Donations in the WordPress Dashboard
- How to Use the Donor Management System
- Connect to Google Analytics
- Issues With Donation Emails Not Sending
- Resend Donation Emails from the Dashboard
- Widgets And Shortcodes
Want more fundraising tips and nonprofit advice?
We regularly share practical guides, proven strategies, and insider tips to help you raise more funds and build stronger donor relationships. Join thousands of nonprofits who get our best content delivered straight to them:
- Join our newsletter – Get weekly tips and exclusive guides in your inbox
- Subscribe to our YouTube channel – Watch step-by-step tutorials and success stories
- Follow us on LinkedIn – Connect with our community and get daily nonprofit insights
- Follow us on TikTok – Insightful & fun videos to help you grow your cause
- Follow us on Instagram – Fun reels and non-profit tips
No fluff, just actionable advice from people who understand the challenges you face every day.
FAQs on the Visual Donation Form Builder
Do I need coding skills to use the Campaign Visual Builder?
No, the visual builder is designed for all users – whether you’re a beginner or an advanced user. You can drag, drop, and configure fields visually without writing any code. Optional custom CSS classes are available if you want to add your own styles.
Will my existing campaigns and forms work with the new builder?
Yes, all existing campaigns and donation forms will continue to work as before. You can open them in the Visual Builder to customize or enhance the form visually if you choose.
Can I use the builder to create multiple campaigns?
Absolutely. There’s no limit to how many campaigns you can create, each with its own unique form design and settings through the builder.
Are Pro fields available in the Visual Builder?
Yes. If you have Charitable Pro, you can add advanced fields like Donor Comments and Referral Codes, unlocking powerful engagement features.
How do I add the campaign form to my website pages?
After building and saving your form, use the embed wizard or shortcode provided in the campaign editor to place the form on posts, pages, or widgets seamlessly.
Can I preview the donation form before publishing?
Yes, the builder shows a live preview of your form, updating instantly as you make changes, so you always know exactly how it will look to donors.
What’s the difference between Charitable Lite and Pro?
Charitable Lite is free but includes a 3% transaction fee. Pro plans eliminate this fee and include advanced features like recurring donations, donor management, peer-to-peer fundraising, and more payment gateways.
Where can I get support if I have issues?
- Free users: Use the WordPress.org support forums
- Pro users: Contact support directly for priority assistance
- Documentation: Check the comprehensive documentation library
- Community: Join the newsletter and follow social channels for tips and updates
Are there video tutorials available?
Yes! Subscribe to the Charitable YouTube channel for step-by-step tutorials and success stories.
Are you in need of support? Have a question? If you are a lite/free user of Charitable, you can reach out to our team on the WordPress.org support forums. If you have an active license, feel free to reach out to us directly for priority support.
