One of the most overlooked parts of online fundraising is the donor experience after they give. Sure, the donation form matters — but what happens after someone supports your cause?
Today’s donors expect more than a thank-you email. They want transparency, control, and the ability to manage their giving — especially when it comes to recurring donations, receipts, and personal details.
That’s exactly why I recommend setting up a donor dashboard on your WordPress site using WPCharitable. It gives every supporter a private, secure space where they can view past donations, update payment info, manage recurring gifts, and download receipts — all without having to email or call for help.
In this post, I’ll show you how to set up your own donor dashboard step by step, so you can give your supporters the smooth, professional experience they deserve.
Why a Donor Dashboard Matters
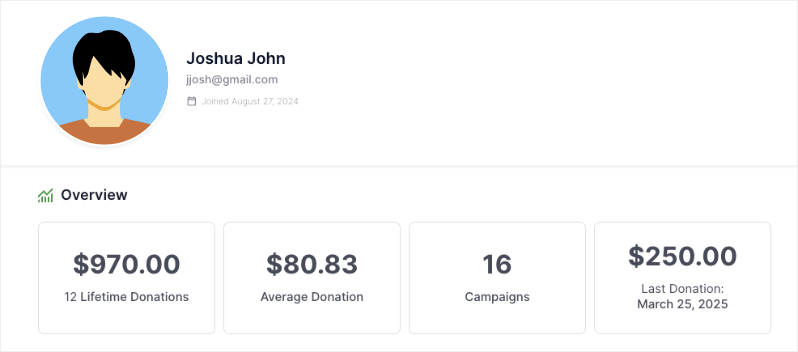
Before we dive into setup, let’s talk about why this matters. A donor dashboard isn’t just a “nice to have” — it’s a trust builder. When supporters can easily:
- View their donation history
- Manage or cancel recurring donations
- Update personal or payment information
- Download receipts for tax purposes
…it shows that your organization is transparent, organized, and donor-focused. It also reduces the number of admin requests you’ll get (no more “Can you resend my receipt?” emails).
Whether you’re a nonprofit or a solo fundraiser, adding a donor dashboard helps you build stronger relationships and keep donors coming back.
Here’s a quick tour of how the donor dashboard works:
Let’s walk through how to set it up using WPCharitable.
Step 1: Enable the Donor Dashboard
WPCharitable comes with a built-in Donor Dashboard that you can activate and tailor to fit your needs. This dashboard gives supporters a secure space to view their giving history, update personal details, download receipts, and more — all from your website.
First, you need to install Charitable on your site. If you haven’t done that already, head to this post: Install Charitable Plugin »
Once done, you’ll see Charitable appear in your WordPress admin menu on the left. Open the Charitable » Settings page and go to the Donors tab.
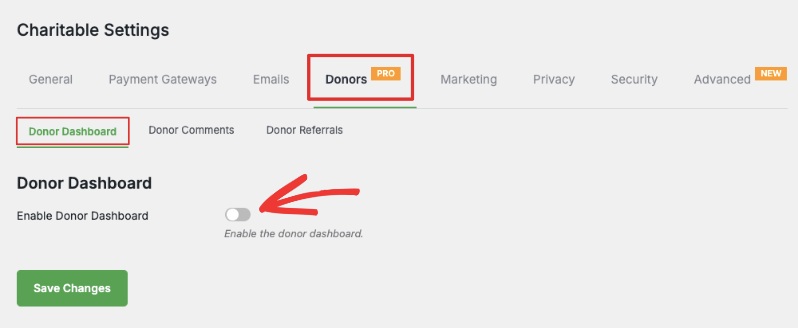
To enable donor dashboard, simply toggle the switch to Enable the dashboard.
Step 2: Customize the Donor Dashboard
Below that, you’ll see a range of customization options. Here’s what you can do:
Customize the Overview

You can choose to show/hide these fields that appear in the Overview section:
- Lifetime Donations: Shows the total amount the donor has given across all campaigns which shows their overall impact.
- Average Donation: Displays how much the donor gives on average
- Campaigns: Shows how many campaigns they’ve participated in and helped
- Last Donation: Shows most recent contribution date and amount
Customize Communication & Social Preferences
Next, you can choose to allow donors to add and manage their postal or shipping addresses as well as email addresses.
You can also allow them to add and edit their social media links.

Customize Profile Information
Remember, Charitable can show these tabs:
- Profile: Appears by default and can be customized
- Donations: Appears by default and is automatically configured, no customizations needed. It will display a list of all the donations made by the donor across all campaigns. They can manage their donation records and download PDFs here. There are no customizations needed.
- Campaigns: Can be shown or hidden. It displays a list of all campaigns the donor has created or participated in.
- Comments: Choose to display any comments made by the donor across various campaigns. They’ll be able to see the status of their comment as well.
- Settings: Appears by default and can be customized. This tab gives your donors the option to consent to being contacted by email or withdraw their consent. You can also give them to option to change their password for added security.

Hit the ‘Save Changes’ button to store all your dashboard settings.
Everything you select here controls what the donor sees and can manage on the front end. Once you’re done customizing, click Save Changes.
Next, let’s place the dashboard on a page so your donors can access it easily.
Optional: Create a Static Donor Dashboard Page
Charitable automatically creates a donor dashboard for you. If you’d like to create a static page, then head to Pages » Add New in your WordPress admin panel.
Here give your page a title such as “Donor Portal”. Then add this shortcode [charitable_donor_dashboard]
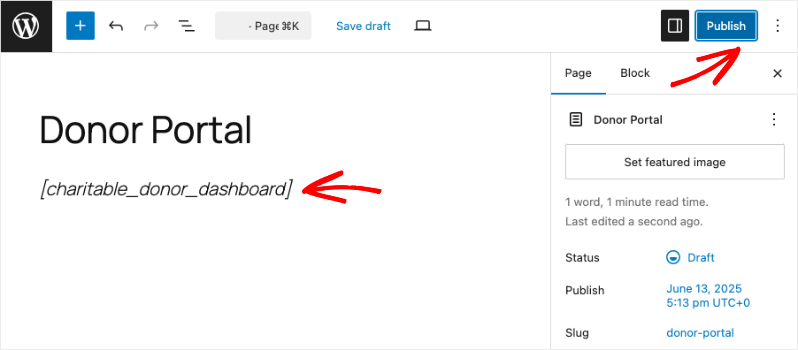
That’s it. Save and publish your page.
Next, in the Charitable » Settings » General tab, go to the Pages tab.
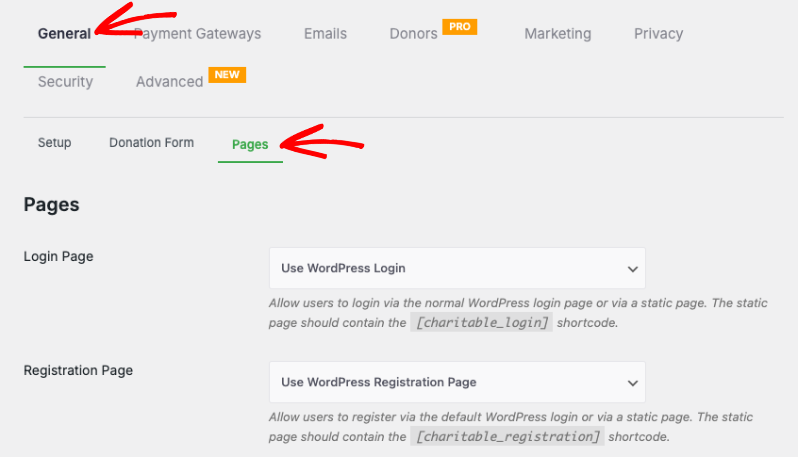
Scroll down to “Donor Dashboard Page”. Here, use the dropdown menu to choose the page you just created.
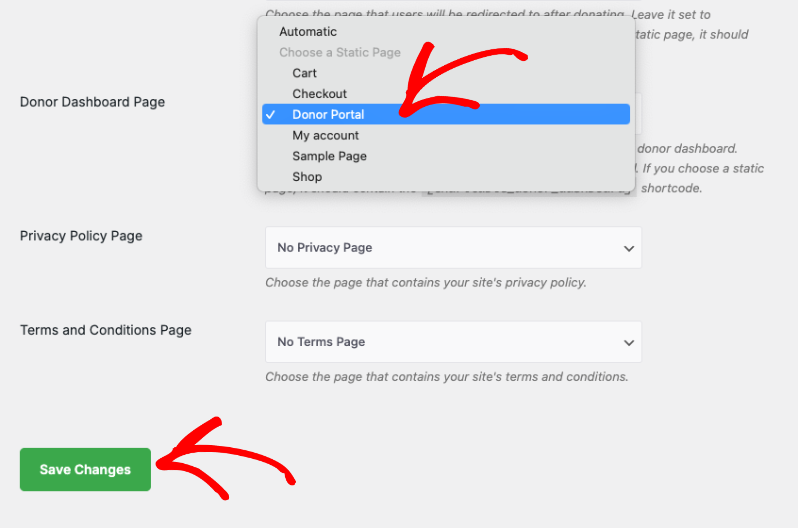
Save your changes. Now you can visit this page and you’ll see the option to log in as a donor and access the dashboard.
See the Dashboard Through Your Donor’s Eyes
Understanding what your donors will see helps you fine-tune the experience and catch anything that might cause confusion.
Here’s what the Donor Dashboard looks like from their side once they’re logged in:
🧾 Overview

Donors get a quick snapshot of their giving, including:
- Total donated (lifetime)
- Average donation amount
- Number of campaigns supported
- Details of their most recent donation
It’s a simple but powerful way to remind supporters of their impact.
👤 Profile
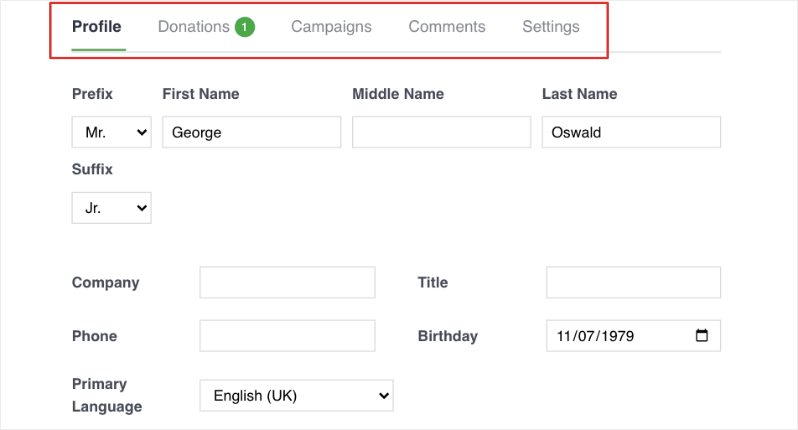
Here, donors can update personal details like:
- Name, title, and suffix
- Company name and job title
- Phone number, birthday, and preferred language
- Address and email
- Social media links and profile picture
It’s a good idea to only enable fields you actually use — less is more when it comes to keeping forms donor-friendly.
💳 Donations
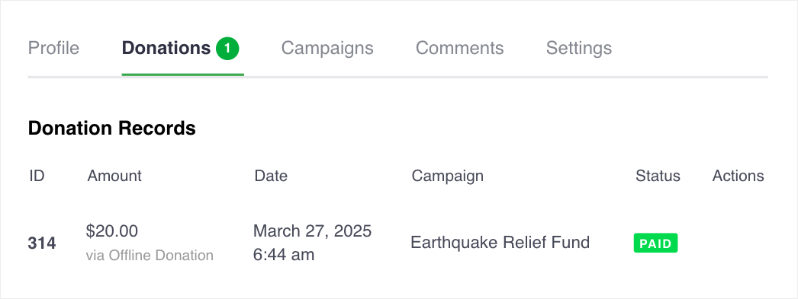
This tab lists all one-time and recurring donations the donor has made, along with:
- Amount, campaign name, and date
- Payment method and donation status
- Option to download a PDF receipt for each donation
This is often the most visited section, especially around tax season.
📢 Campaigns (Optional)
If enabled, this shows a list of campaigns they’ve donated to, along with status and amount given.
💬 Comments (Optional)
Displays any comments the donor has made on your campaigns and whether they’ve been approved.
🔐 Settings
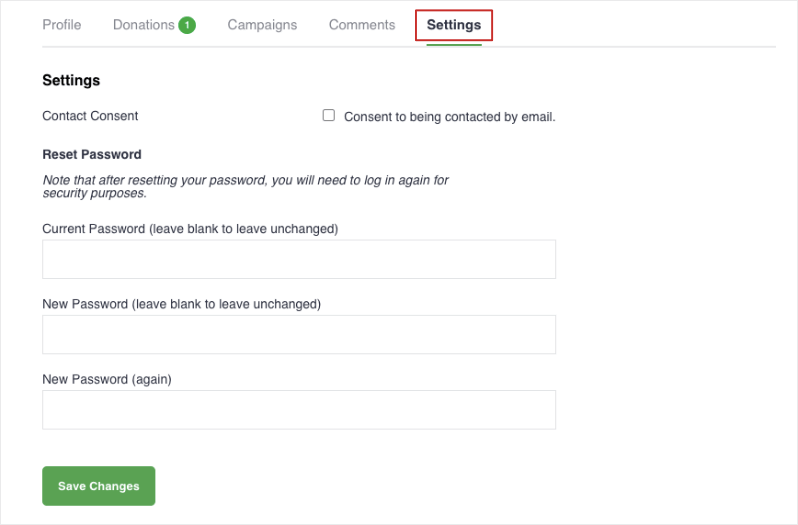
Lets donors:
- Opt in or out of email communication
- Change their password
With all these features available in one place, your donors feel more in control — and more connected to your mission.
Pro Tips for a Better Donor Dashboard Experience
- Keep it simple.
Only enable the tabs and profile fields you really need. Too many fields can feel overwhelming — fewer clicks mean happier donors. - Link to it in emails.
Include a direct link to the donor dashboard in donation receipts and follow-up emails so supporters can easily revisit and manage their info. - Use friendly page titles.
Instead of “Donor Dashboard,” try something warmer like “Your Giving Portal” or “My Giving” — it feels more personal. - Encourage account creation.
Remind donors they can create an account during or after donating to access their dashboard, view history, and download receipts. - Reinforce impact.
The “Overview” tab shows donors how much they’ve contributed. That visual reinforcement goes a long way in boosting loyalty and repeat giving. - Test it yourself.
Log in as a test donor to preview the full experience — and spot anything that might need tweaking before real donors use it.
Donor Dashboard FAQs
Is there a donor portal where supporters can manage their donations?
Yes, Charitable’s Donor Dashboard (in Pro) lets supporters log in, view past donations, manage recurring gifts, and download receipts.
Can donors manage their own information in Charitable?
The Charitable donor dashboard lets users update profiles, view donations, and download receipts.
Is there a donor portal? Do donors get an account?
Charitable offers a built-in Donor Dashboard without requiring extra extensions.
I want donors to be able to download their receipts. How do I do this?
Install Charitable on your site. With every donation, a PDF receipt is automatically generated. You can allow users to download it instantly or send it to their email.
Can recurring donors manage their subscriptions?
Yes — if using the recurring donations add-on, the dashboard shows all active contributions.
Do I have to manually email donors every time?
No. With the dashboard and automated email features, donors can view their history anytime — reducing manual work.
I want to personalize donor experiences — what’s possible?
The Charitable dashboard can be customized with profile fields, communication preferences, and a personal overview of their giving.
How do I show donors their impact?
Charitable’s dashboard’s Overview tab shows total donations, average gifts, and campaign count — simple, motivating, and automated. See The Complete Guide to Donor Impact Reports and How they Work
The Donor Dashboard isn’t just a convenience—it’s a powerful way to deepen relationships with your supporters. By giving donors an easy, secure space to manage their giving, update their details, and see their impact, you create a better experience for them and reduce admin work for your team.
If you’re using Charitable, the Donor Dashboard is already built in. Just enable it, customize it to match your needs, and start empowering your donors today.
👉 Ready to get started? Follow our step-by-step guide here.


Leave a Reply