Charitable comes with Stripe Payments built into the platform. You don’t need to use any API keys or manually configure webhooks. Simply log in to your Stripe account to complete the connection.
Note: Before we start, be sure to install Charitable on your WordPress site. Since Stripe is built into Charitable, you don’t need to install any addons or extensions for basic Stripe functionality.
Here’s a table of contents to help you navigate this easily:
- Enabling The Stripe Payment Gateway
- Connecting Your Stripe Account
- Stripe Settings Inside Your Campaign
Enabling The Stripe Payment Gateway
In your WordPress admin panel, navigate to the Charitable » Settings » Payment Gateways tab. You’ll see the Stripe tab along with an option to ‘Enable Gateway’.

Before you enable this, you’ll also see an option to turn on ‘Test Mode’ below the list of gateways. We recommend using Test Mode when enabling a new gateway to ensure you’ve set up everything correctly before going live on your site.

Make sure to hit the ‘Save Changes’ button to activate test mode.
Now you can hit the ‘Enable Gateway’ button next to Stripe and you will be automatically taken to the Stripe Settings page.
Note: When you enable a gateway, a green ‘Gateway Settings’ button will appear. You can use this to access the Settings page on your own any time you need.
Connecting Your Stripe Account
On the next page, you can add a label for this gateway. It’s prefilled with ‘Stripe’ for you but you can change that if you need.

Note: There’s a 3% fee for every transaction along with Stripe charges if you’re using Charitable Lite. To remove the additional 3% charge, you’ll need to upgrade to Charitable Pro.
Below this, you’ll see Credit Card Fields Format. This lets you decide how you want customers to enter their credit card information. There are 2 options here:
- Single Field asks for the card number, expiration date, zip code, and CVC fields in one field.
- Multiple Fields creates a separate field for each item.
Here’s what it will look like on the front end:

After you choose the Credit Card Fields format, click on the ‘Connect with Stripe’ button.
This will take you to the Stripe page where you can log into your account. If you don’t have an account, you can enter your email address and you’ll be able to sign up for a Stripe account.

Once you’re logged into your Stripe account, use the ‘Return to WP Charitable’ link on the left. This will take you back to your WordPress dashboard and you’ll see the Connection Status should either say ‘Connected in test mode’ or ‘Connected in live mode’ depending on which mode you chose earlier.

If you ever need to remove this Stripe account, you can use the ‘Disconnect this account’ link here.
Now you’re all set to start accepting donations using the Stripe payment gateway.
Stripe Settings Inside Your Campaign
When you create a fundraiser campaign with Charitable, under the Payment tab in the left menu, you’ll see that Stripe is enabled. If you need to tweak the settings, there’s an easy access button here that takes you straight to the Payment Gateway Settings page.

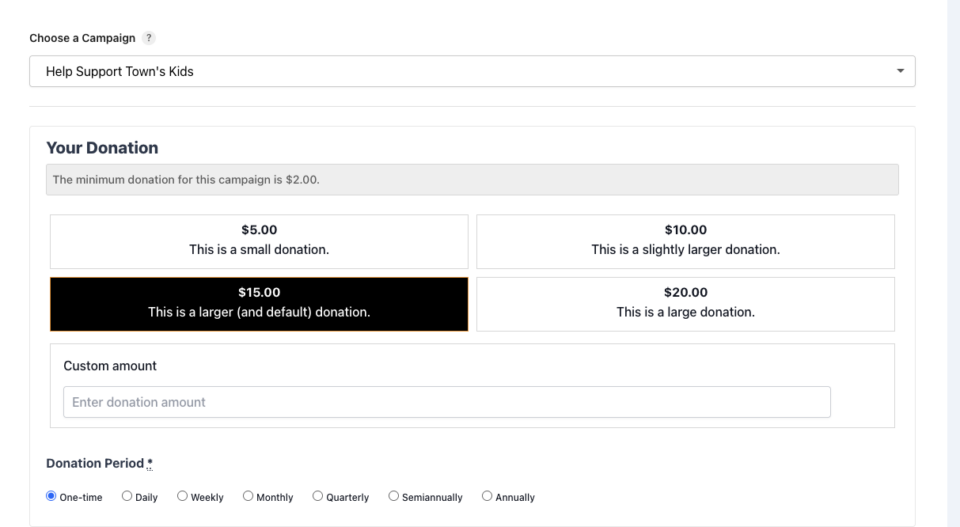
When you publish your campaign, depending on the payment options you enabled with Stripe, they will appear in your donation form like this:

That’s it. You’re ready to create your fundraiser campaigns and accept donations through Stripe. Here’s the guide on How to Create a Fundraiser Campaign.
Looking to set up other payment options? Head over to our documentation page for Setting Up Payment Gateways.
Frequently Asked Questions
Do you have a question about using Stripe in Charitable? See the list below for our most frequently asked questions. If your question is not listed here, then please contact us.
Does Charitable Store Credit Card Numbers?
No. Charitable does not store credit card numbers or similar sensitive billing information.
Can I Change How Stripe’s Credit Card Fields Look?
You can alter appearance through custom CSS. Charitable also offers for Stripe a “name/CC” (standard) and a multi-form option (four fields to enter Stripe’s CC information).
What fees are associated with using Stripe in Charitable?
Stripe has a per-transaction charge which varies by country. See Stripe’s pricing for details.
If you are using Charitable with a valid license (see our pricing page), there are no additional fees or charges beyond Stripe’s.
Besides Stripe’s pricing, Charitable charges an additional 3% fee for transactions. This fee is waved if you are using Charitable with an active license.
Does Charitable Support Recurring Donations With Stripe?
Yes, Learn more about our Recurring Donations addon.