Charitable Documentation

Learn how to make the most of Charitable with clear, step-by-step instructions.

How to Set Up ACH Debit in Charitable

Enabling ACH payments provides your donors with a convenient and secure way to donate directly from their bank accounts

This tutorial will guide you through the process of setting up ACH (Automated Clearing House) Direct Debit payments in Charitable. 

ACH Direct Debit can be enabled through the Stripe payment gateway within Charitable.

Table of Contents

Step 1: Enabling Stripe Payments

Before you can enable ACH Direct Debit, you must first ensure that Stripe is enabled within Charitable.

In your WordPress dashboard, navigate to Charitable » Settings » Payment Gateways tab.

If Stripe is not already enabled, activate it. Then follow our guide to connect your Stripe account to Charitable »

After enabling Stripe and saving your changes, click the ‘Gateway Settings’ button.

This will open the Stripe configuration page where you can manage various payment methods, including ACH Direct Debit.

Enable Stripe and test mode

We recommend turning on Test Mode and saving your changes. This will allow you to thoroughly test the payment process without processing real transactions.

Step 2: Accessing Gateway Settings

Inside the Gateway Settings page, enable ACH Direct Debit from the list of available payment methods. It’s as simple as one click.

Enable ACH Debit

On the same page, you can also configure other Stripe settings like Express Checkout and Stripe Checkout.

You can also choose the layout of your credit card fields and how they appear on your donation form.

Credit card field formats in donation form

Next, you’ll need to add your statement descriptor. This is the description that will appear on your donors’ bank statements. By default, it shows the campaign title.

Below the statement descriptor settings, you’ll find fields to add your Stripe Live Key and Live Publishable Key, as well as your Test Keys if using Test Mode.

Stripe keys

Remember to save your settings by clicking the ‘Save Changes’ button after making any modifications.

Step 3: Testing Your ACH Direct Debit Setup

Once you’ve saved your settings, it’s time to test your ACH Direct Debit integration!

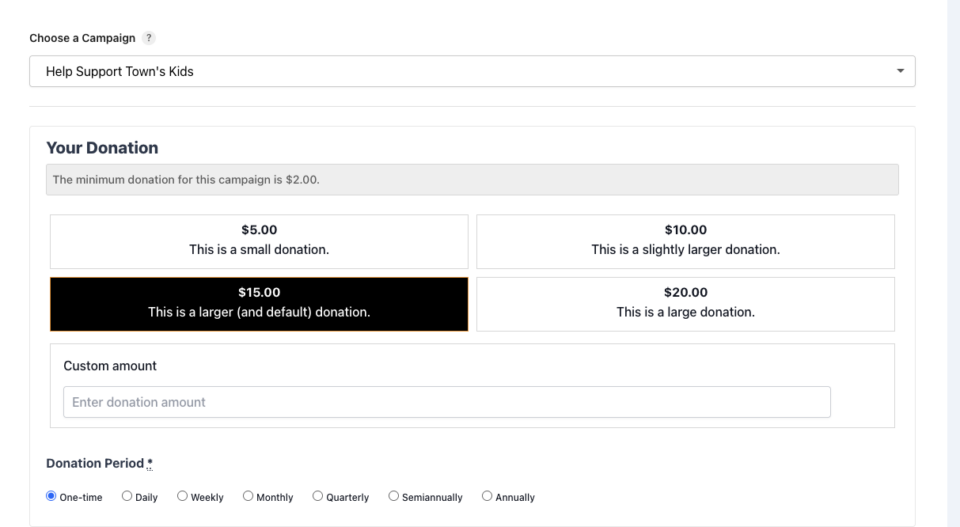
Navigate to a campaign page on your website. Initiate a donation to access the donation form.

In the Payment section, you should now see ACH Direct Debit as a payment option.

ACH Debit in payment form

If you don’t see it immediately, a dropdown menu with additional payment options will be available.

Select ACH Direct Debit and choose your bank.

Dropdown menu for more payment options

A Stripe popup will appear, prompting you to log in to your bank account. Follow the on-screen instructions to grant permission to link your account.

ACH Debit payment page

Once your bank account is linked, you’ll see it appear in the donation form.

Make sure it is selected and click the ‘Donate’ button’.

ACH bank donate now button

Upon successful payment, a receipt will be generated and displayed on the screen.

ACH direct debit receipt

Congratulations! You have successfully set up and tested your ACH Direct Debit via Charitable!

Viewing Your ACH Direct Debit Donations

Now that you’ve successfully set up ACH Direct Debit, let’s explore how to view and manage your donations.

You can find all your donation records under Charitable » Donations. Here, all donations are organized neatly for easy access.

ACH payment method used in donations tab

You’ll see key information like the donor’s name, the donation amount, the payment gateway used – in this case, ACH Direct Debit (Stripe), the campaign name, the date of the donation, and the payment status.

If you click to view or edit a specific donation record, you’ll find detailed payment method information, including the specifics of the ACH Direct Debit transaction. This allows you to easily review and track payments received via this method.

ACH Direct debit in donation record

That’s it! You now know how to set up and view your ACH Direct Debit donations within Charitable.

FAQs – ACH Direct Debit in Charitable

Here are some frequently asked questions regarding setting up and using ACH Direct Debit with Charitable:

What is ACH Direct Debit? 

ACH (Automated Clearing House) Direct Debit is a secure payment method that allows donors to make donations directly from their bank accounts.

Do I need a separate account to process ACH Direct Debit? 

No, you can process ACH payments through your existing Stripe account.

What information do I need to provide to enable ACH Direct Debit? 

You can use Stripe Connect within Charitable to connect your Stripe account. However to accept donations via ACH Direct Debit, you first need to activate this payment method within your Stripe account. Log in to your Stripe Dashboard, navigate to Settings, and then select Payment Methods. Scroll down to the “Bank debits” section, find US bank account (ACH), and click the “Turn on” button. Stripe may require you to verify your business information before activation is complete, as this is necessary for processing direct debit payments.

What is the statement descriptor? 

The statement descriptor is the description that will appear on your donors’ bank statements, helping them identify the donation.

What security measures are in place to protect donor information? 

Stripe provides a secure payment gateway to protect donor’s banking information. All data is securely encrypted.

Can I test ACH Direct Debit before going live? 

Yes, we highly recommend enabling Test Mode in Stripe to test ACH Direct Debit payments without processing real transactions.

Where can I view my donation records? 

You can view all donations under Charitable » Donations.

Interested in offering more payment options to your donors? See our list of payment integrations »

Still have questions? We’re here to help!

Last Modified:

What's New In Charitable

🔔 Subscribe to get our latest updates
📧 Subscribe to Emails

Email Subscription

Join our Newsletter

We won’t spam you. We only send an email when we think it will genuinely help you. Unsubscribe at any time!

Integration New

Add Image Galleries to Fundraising Campaigns With Envira Gallery

Showcase the impact of your mission like never before. We are excited to announce our brand-new integration with Envira Gallery, the best WordPress gallery plugin, designed to help you tell your story through powerful, high-performance visuals.

The Ultimate Storytelling Experience

A picture is worth a thousand words – and now, it’s worth even more for your fundraising. Connect your visual impact directly to your cause by creating stunning, responsive galleries that engage donors and drive contributions.

🖼️ Visual Impact: Easily create beautiful, fast-loading galleries to show your nonprofit’s work in action, from field reports to event highlights.

🔗 Seamless Connection: Link gallery images directly to your fundraising campaigns, making it effortless for inspired visitors to go from viewing a photo to making a donation.

📱 Perfectly Responsive: Whether your donors are on a phone, tablet, or desktop, your galleries will look professional and load lightning-fast, ensuring a smooth experience on every device.

Integration New

👉🏻 New Divi Integration In Charitable Pro

Bring the power of Charitable directly into your favorite page builder and maintain total creative control with our brand-new Divi integration.

The Ultimate Design Experience

No more switching back and forth or relying on complex shortcodes. Use dedicated Divi modules to build, style, and launch high-converting donation pages without ever leaving the Divi Builder.

⚡ Native Divi Modules: Effortlessly drag and drop your donation forms, progress bars, and campaign details exactly where you want them.

⚙️ Visual Customization: Tweak colors, fonts, and spacing using Divi’s familiar design settings to ensure your fundraiser matches your brand perfectly.

🚀 Live Visual Editing: See your changes in real-time. What you see in the builder is exactly what your donors will see, ensuring a seamless giving experience every time.

donation form New

👉🏻 New Campaign Selector For Donation Forms

Take your campaign management to the next level. Find the perfect fundraiser for any page and stay in your creative flow with our new Campaign Selector integration.

The Ultimate Selection Tool

No more hunting for IDs or creating one page for every donation form. Use the new Campaign Selector to allow users to switch to a campaign with no code.

⚡ Instant Search: Quickly find any campaign leaving your page or post.

⚙️ Editor Agnostic: Whether you’re using the Block Editor, Elementor, or WPBakery, selecting your campaigns is now a unified experience.

🚀 Real-Time Previews: See exactly which campaign you’ve selected instantly, ensuring your donors always see the right cause.

Integration New

WordPress Command Palette Integration

Take your fundraising workflow to the next level. Speed up your site management and stay in your creative flow with our new WordPress Command Palette integration.

Supercharge Your Workflow
Navigate your fundraising dashboard faster than ever.

The Ultimate Keyboard Shortcut Hit Cmd + K (or Ctrl + K) to launch the Command Palette and manage your campaigns instantly.

⚡ Instant Navigation: Jump directly to your Campaigns, Donations, or Settings from anywhere in the editor.

➕ Quick Create: Start a new fundraising campaign or add a manual donation with a single command.

Efficiency Redefined
The tools you need, exactly when you need them.

⚙️ Contextual Actions: See relevant Charitable commands based on whether you’re editing a page or viewing your reports.

🚀 Seamless Integration: Built directly into the WordPress core experience for a lightweight, native feel.

Improvement New Security

📣 New Security Features

We’ve introduced a suite of new security tools to give you total control over who accesses your forms, plus a new way to tidy up your database.

Advanced Security Suite

Layered protection: Cloudflare, ReCAPTCHA, IP Controls, and Rate Limiting.

We have overhauled our security settings to stop bots without blocking real donors.

  • 🤖 Flexible Protection: Choose between Google reCAPTCHA v3 or the privacy-first Cloudflare Turnstile to block bots invisible.

  • 🚦 Rate limiting: Stop spam floods by limiting how many submissions an IP address can make in a set timeframe.

  • 🛑 Total control: Use the new IP Blacklist to block bad actors instantly, or the IP Whitelist to let your team bypass checks during testing.

The Clean Donation Tool

Go from “Testing” to “Live” in seconds.

Finished setting up your site and need to get rid of all those test transactions?

  • 🧹 Sweep it clean: Bulk delete test donations and donor records with a single click.

  • 📉 Accurate reporting: Ensure your revenue stats are 100% accurate for launch day.

  • ⚙️ Reset sequences: Automatically resets sequential invoice numbering.