
Struggling to keep track of your donors and donation records?
I recently saw a query from a non-profit asking about tracking donors in Google Sheets and how to do it. I’ve done this and I’ll never do it again. It was time-consuming and so difficult to find the data you need.
I would often scramble through spreadsheets trying to remember who donated to the last campaign or spend hours manually creating donor reports for your board meeting. Managing donor information shouldn’t feel like solving a puzzle with missing pieces.
As a nonprofit administrator, you need quick answers to important questions: Who are your most loyal supporters? When did someone last give? How much have they contributed over time? Having this information at your fingertips isn’t just convenient—it’s essential for building stronger donor relationships and making informed decisions about your fundraising strategy.
The good news? You don’t need expensive software or technical expertise to track donor history effectively. With the right WordPress plugin, you can see every donation, identify giving patterns, and generate professional reports in just a few clicks.
In this guide, I’ll walk you through exactly how to set up a comprehensive donor tracking system using Charitable. You’ll learn how to:
- View complete donor profiles with full giving history
- Filter and search donations by date, amount, or campaign
- Generate donor reports for your team and board
- Export donation data for your accounting software
- Identify your top donors and track giving trends
Let’s get started.
1. Why You Need to Stop Using Spreadsheets for Donor Tracking
When you first start accepting donations, a simple spreadsheet seems like the obvious choice. It’s free, you already know how to use it, and it works… until it doesn’t.
Here’s the thing: I’ve been there. In the early days of running online fundraisers, I tracked everything in spreadsheets. And let me tell you, it was a nightmare that only got worse as we grew.
The Real Cost of Spreadsheet Tracking
Think about how much time you spend:
- Manually entering each donation (and double-checking for typos)
- Creating separate sheets for different campaigns
- Building formulas that break when someone adds a column
- Searching through rows to find one donor’s history
- Copy-pasting data to create board reports
That’s not even counting the stress of wondering if your data is accurate or if you accidentally deleted something important.
What Happens When You Grow
The bigger problem? Spreadsheets don’t scale. When you have 50 donors, maybe it’s manageable. But what about 500? Or 5,000?
Suddenly you’re dealing with:
- Multiple versions floating around (“Final_Report_v3_REALLY_FINAL.xlsx”)
- Team members who can’t access the file when they need it
- No way to quickly segment donors or spot trends
- Zero automation for receipts or thank-you emails
The Security Risk Nobody Talks About
Here’s something most people don’t consider: donor data is sensitive. Names, emails, addresses, donation amounts – this is information that needs to be protected.
Spreadsheets stored on someone’s computer or in a basic cloud folder? That’s a data breach waiting to happen.
There’s a Better Way
The solution isn’t more complex spreadsheets or expensive enterprise software. It’s using a tool designed specifically for nonprofits that integrates right into your WordPress website.
That’s where a proper donor management system comes in. And the best part? You can set it up today and start saving hours every week.
Or let me show you exactly how to do it.
Solving Your Donor Tracking Problems with Charitable
Before we dive into the how-to, let me quickly explain what Charitable is and why it’s the perfect solution for your donor tracking needs.

Charitable is a WordPress donation plugin that transforms your website into a complete fundraising platform with a built-in donor management system. All under one roof, you can accept donations, manage donors, and track every contribution without the spreadsheet headaches.
What makes Charitable different is that it automatically creates a comprehensive donor database right inside your WordPress dashboard. Every time someone donates through your website, their information is instantly captured and organized – no manual entry required.

You get detailed donor profiles, complete donation histories, and powerful reporting tools that would take hours to create in a spreadsheet. You can see reports for every campaign, who are your top donors, who donated last year but didn’t this year, and so much more.

Plus, it handles all the technical stuff like secure payment processing, automated tax receipts, and donor email notifications.
The best part? You don’t need any technical expertise to use it. If you can use WordPress, you can use Charitable.
It works with all major payment gateways, integrates with your favorite email marketing tools, and grows with your organization whether you have 50 donors or 50,000. And unlike expensive donor management software that costs hundreds per month, Charitable is affordable for nonprofits of any size.
See how Charitable elevates your fundraising efforts »
Now that you know what Charitable can do for you, let me show you exactly how to access and use your new donor tracking system. Trust me, once you see how easy this is, you’ll wonder why you didn’t make the switch sooner.
How to Access Your Complete Donor Database in WordPress
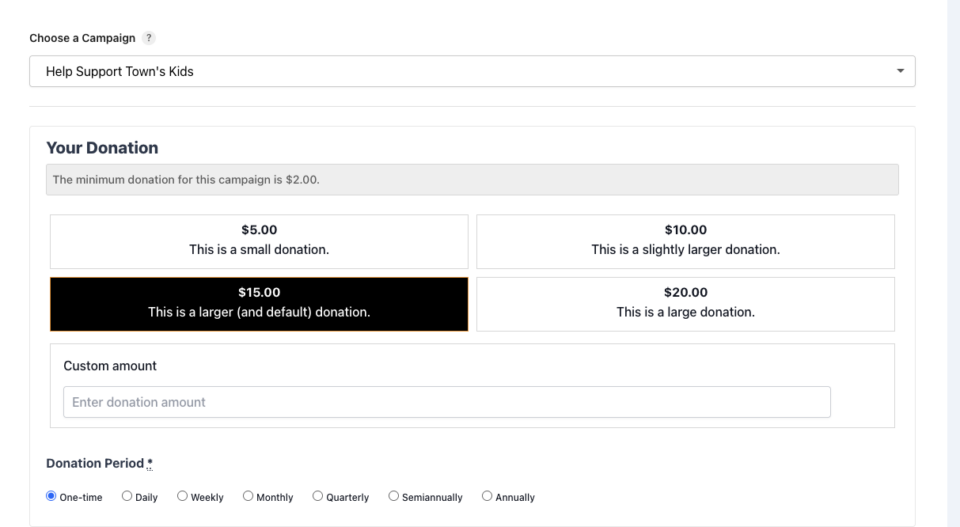
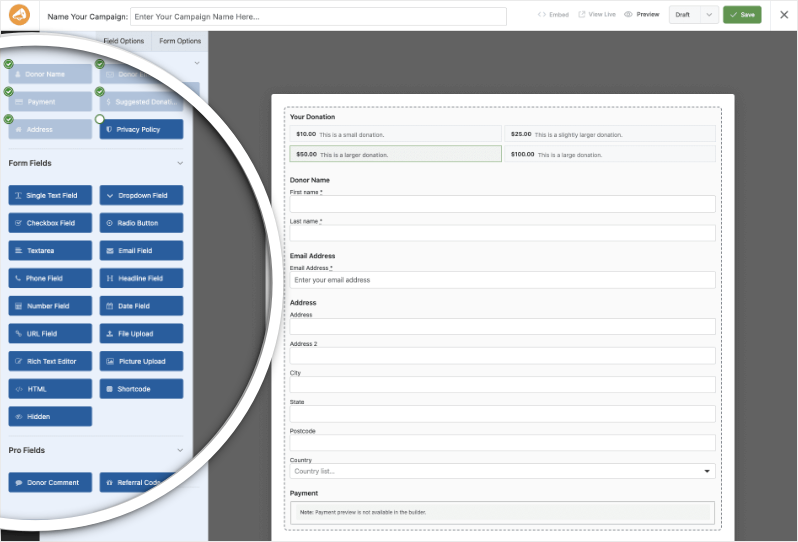
Once you have Charitable installed, you can quickly launch donation campaigns using premade templates and a drag and drop builder.
As donations pour in, every transaction is tracked and a record is created. Along with that, if the donor is new, a donor profile is also automatically created. If the donor already exists, then their profile gets updated with the new data.
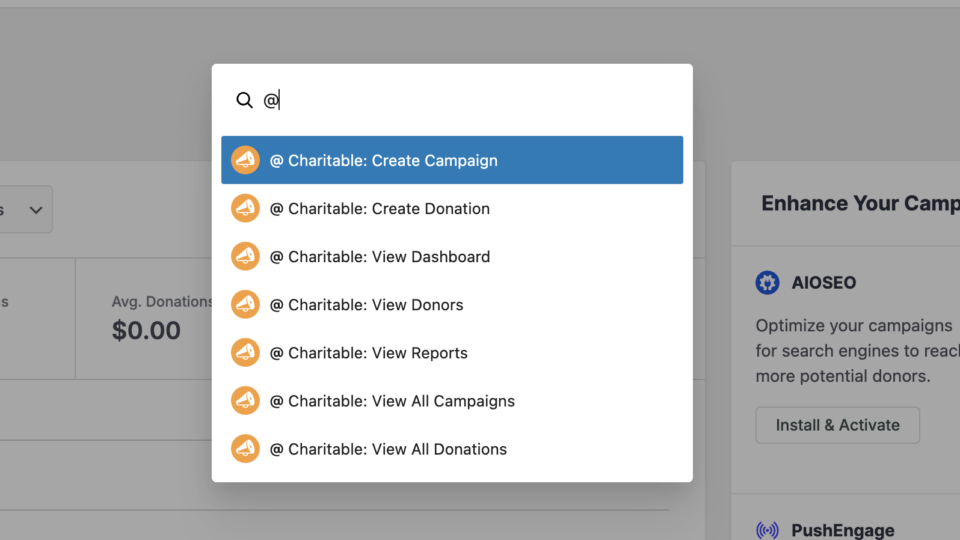
Now accessing your donor database takes literally two seconds. Just log into your WordPress dashboard and click on Charitable » Donors in the admin menu. That’s it – you’re now looking at every single donor in your database, all organized and ready to use.

The first thing you’ll notice is how clean everything looks. No more squinting at tiny spreadsheet cells or scrolling endlessly to find information. Each donor entry shows you their name, email address, total lifetime donations, how many times they’ve given, and when they joined. It’s all right there in an easy-to-scan format that actually makes sense.
Here’s where it gets really good – everything updates automatically. When someone donates through your website, they’re instantly added to this database with all their information captured perfectly.
No typos, no manual entry, no forgetting to add someone. It just happens in the background while you focus on more important things.
Notice those little icons next to each donor’s name? The pencil lets you edit their profile, the envelope sends them an email, and the trash bin lets you remove outdated records. Everything you need is one click away, no switching between programs or opening multiple windows.
Want to find a specific donor? Just use the search box at the top. Looking for everyone who gave last month? Hit the filter button. Need to export everything for your accountant? There’s a button for that too.
The real power here is having everything centralized. You can also manually add donation records and donor profiles.
So when your board chair calls asking about donor trends, you have answers in seconds. When you need to check if someone already gave this year, it’s right there. This isn’t just a list – it’s your complete donor command center.
Learn more about the Donor Database »
How to View and Manage Individual Donation Records
Sometimes you need to see every single donation that comes in, not just donor summaries. Maybe you’re reconciling accounts, checking on a specific payment, or updating records for your monthly report. Here’s how to access and manage individual donations with just a few clicks.
Head over to Charitable » Donations in your WordPress dashboard. This is where every single donation lives – think of it as your transaction history but way more powerful.
You’ll see a complete list showing the donor’s name, email, amount donated, which campaign they gave to, the date, and payment status. Everything is color-coded so you can instantly spot completed payments, pending transactions, or refunds.
Let’s say you need to update a donation record. Maybe a check came in and you need to mark it as paid, or you need to add a note about a special request. Just hover over any donation and click “Edit” or the pencil icon.
Inside, you can update the payment status, trigger email notifications, send receipt copies, or download PDF receipts. Every change you make is tracked in the donation log with timestamps, so you always have a clear audit trail.

Here’s a feature that will save you hours: the “Add Donation” button. When someone gives cash at an event, sends a check, or donates through another platform, you can manually add that donation to keep everything in one place.

Just click the button, select existing donor or add a new one, choose the campaign, enter the amount, and save. Now that offline donation is part of your complete records and included in all your reports.
The best part about having all donations in one place is the instant insights you get. You can quickly filter by date range, specific campaigns, or payment status.
No more piecing together information from different sources or maintaining separate spreadsheets for different types of donations.
Learn how to use donation records »
How to Create Detailed Donor Profiles That Actually Help
Every donor in your database gets their own profile page, and this is where the magic happens. Click on any donor’s name from your main donors page, and you’ll see why this beats spreadsheets every single time.
At the top, you get an instant snapshot – their photo, full name, email, join date, lifetime donations, and this year’s contributions. No calculations needed, it’s all done for you. This data is pulled from the information the donor has provided in the donation form as well as their public gravatar associated with their email.

The profile starts with basic information you’d expect – name, email, phone, address. But here’s where Charitable gets smart. You can add custom fields for anything specific to your organization. Need to track volunteer hours? Add a field.

Want to note their interests or connection to your cause? Board member’s spouse? Simply add your own custom fields. You can even add tags like “major donor” or “monthly giver” to quickly segment your database later.
Scroll down and you’ll find tabs that tell the complete donor story.

- The Donations tab shows every single contribution they’ve made – dates, amounts, campaigns, and payment status. You can download receipts, edit records, or export their entire giving history.
- The Campaigns tab shows which fundraisers they’ve supported, helping you understand what motivates their giving.
- If they’ve left comments on campaign pages, you’ll see those too, giving you insights into their passion for your cause.
Want to get really advanced?
Add their social media profiles to keep track of supporters who share your content.

Use the Notes section to record important details like “Prefers phone calls” or “Daughter benefited from our program.”
The Activity Log shows you every change made to their profile, perfect for accountability when multiple staff members access donor records.
The beauty of these profiles is that they grow with your relationship. Start with basic contact info, then add details as you learn more about each donor.
Before long, you’ll have rich profiles that help you connect with donors on a personal level. When it’s time to reach out, you’ll know their giving history, interests, and preferences – everything you need to make stewardship meaningful.
On a side note, if you use the Charitable Pro plugin, then you can enable a donor portal for your donors. They can then log in and manage/update their profiles, download receipts, adjust recurring donations, and more. Check out how the donor dashboard works »
How to Find Any Donor or Donation in Seconds
Remember the last time you spent 20 minutes searching through spreadsheets trying to find that one donor who gave $500 last December? Or when you needed a list of your monthly recurring donors and you had to manually count them? Those days are over. Let me show you how to find anything in your donor database in literally seconds.
The search function in Charitable is ridiculously simple but incredibly powerful. At the top of your donor database, there’s a search box.

Type in a name, email, or even part of an email address, and boom – instant results. No more CTRL+F through multiple spreadsheets or wondering if you spelled someone’s name wrong. The search is smart enough to find partial matches, so even if you only remember that someone’s email had “smith” in it, you’ll find them.
But here’s where it gets really good – the filter options. Click the Filter button and you can slice and dice your data any way you need.

Want to see everyone who donated last month? Select the date range and done. Need a list of donors who gave to your holiday campaign? Choose that campaign from the dropdown. Filter by search terms and favorites too!
If you head over to the Donations tab, you can search and filter here too.

The view-only tabs at the top let you instantly see just paid, pending, failed, or refunded transactions – no more scrolling through everything to find what you need.
My favorite time-saver? You can save filtered views by bookmarking them in your browser. Set up filters for your most common searches – like “this month’s donations” or “major donors” – and bookmark those pages. Next time you need that information, it’s one click away.
How to Generate Professional Donor Reports (Without the Headache)
Let’s be honest – creating donor reports used to be the worst part of my month. Hours of copying data, making charts, double-checking numbers, and formatting everything to look professional. If you’re still doing this manually, I’m about to save you a ton of time and frustration.
In Charitable, fundraising and donation reports generate themselves. Just navigate to your dashboard and you’ll see visual reports with interactive graphs that actually make sense.

Total donations, refunds, top donors, payment methods used – it’s all there in a format you can understand at a glance. No more trying to remember Excel formulas or figuring out how to make a pie chart. The system tracks everything automatically and presents it in a way that’s ready to share with your board or team.
Need to dig deeper? The reports show you exactly which campaigns are crushing it and which ones need work. You can see donation trends over time, spot your peak giving periods, and identify which payment methods your donors prefer.

For instance, you can see Lybunt and Sybunt reports.
- LYBUNT (Last Year But Unfortunately Not This Year) shows donors who gave a donation last year but haven’t donated yet in the current year.
- SYBUNT (Some Year But Unfortunately Not This) shows donors who have given at some point in the past but haven’t donated in the current year.
See these reports in action:
This isn’t just data for data’s sake – it’s actionable information that helps you make better fundraising decisions. When you notice that 70% of your donations come through PayPal, you know to make sure that option is prominent. When you see donations spike every December, you can plan accordingly.
Here are all the reports you get access to and exactly how to use them:
• Fundraising Overview – See total donations, refunds, and net revenue at a glance. Perfect for board meetings and monthly updates.
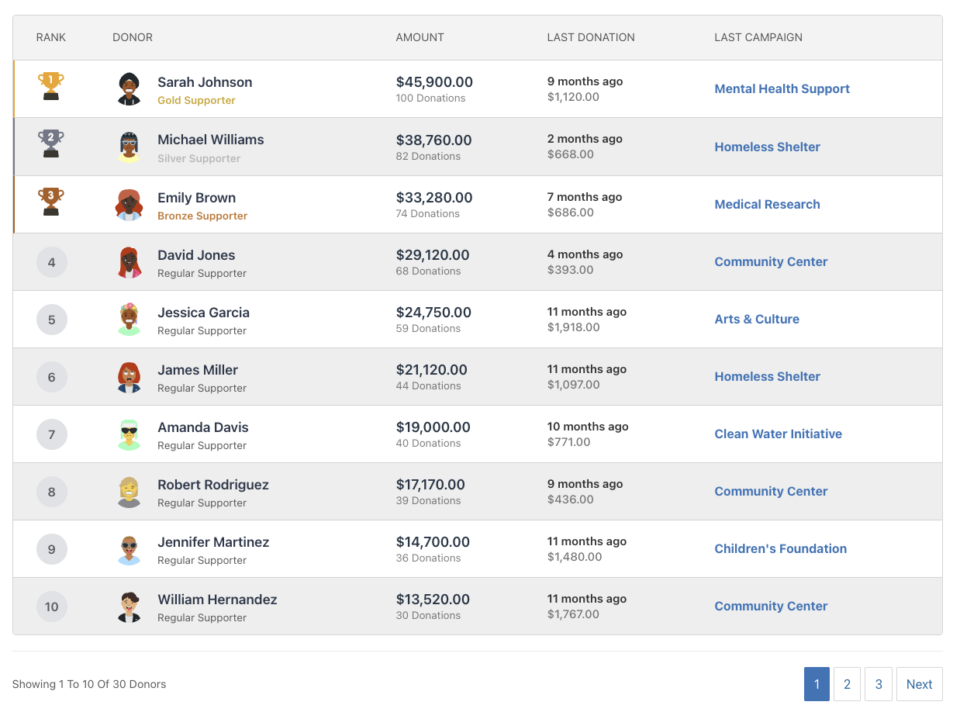
• Top Donors Report – Instantly identify your VIP supporters sorted by lifetime giving. Use this for major donor outreach and recognition programs.
• Recurring vs One-Time Donors – Know exactly who gives monthly and who gave once. Target one-time donors for recurring gift campaigns.
• Payment Methods Report – See which payment options bring in the most donations. If 70% use PayPal, make sure it’s prominent.
• Campaign Performance – Track which fundraisers hit goals and which need help. Double down on what works, fix what doesn’t.
• Day-by-Day Activity – Spot donation patterns and peak giving times. Schedule appeals when donors are most likely to give.
• Donor Insights – View average donation sizes, frequency, and retention rates. Use for realistic goal setting and forecasting.
• Activity Timeline – Monitor failed transactions, new donors, and refunds in real-time. Catch and fix issues before they become problems.
• Year-on-Year Comparison – Identify lapsed donors and growth trends. Perfect for re-engagement campaigns and strategic planning.
The export function is what really saves time. Every single report can be exported as a CSV file with one click. Board meeting tomorrow? Export your donor summary. Accountant needs quarterly numbers? Export donations filtered by date. Want to send a special thank you to everyone who gave over $500 this year? Export that specific donor segment.
You can filter by date ranges, campaigns, donation amounts, or donor types before exporting, so you get exactly the data you need without any cleanup work.

Tax time? Export all donations for the year. What used to take hours now takes seconds, and you know the numbers are accurate because they’re pulled directly from your live database.
If you’ve been adding manual donations all along in the Charitable database, these reports include everything – online gifts, checks, cash donations, all in one place. No more combining multiple spreadsheets or wondering if you’re missing data. One system, complete reports, actual insights you can use to raise more money. Let’s talk about that more.
How to Add Manual Donations and Keep Everything Centralized
Here’s a question I get all the time: “What about donations that don’t come through the website?” You know what I’m talking about – checks that arrive in the mail, cash from fundraising events, wire transfers from major donors, or donations made through Facebook fundraisers. If you can’t track these in your system, you’re still stuck with spreadsheets. Good news: Charitable solved this problem brilliantly.
Adding manual donations is dead simple. Go to Charitable » Donations and click the green “Add Donation” button.
A new donation form opens where you can enter all the details. Select an existing donor from your database or create a new one right there.

Choose which campaign it’s for (or general fund), enter the amount, add the date it was received, and mark the payment status as complete. Hit save and that offline donation is now part of your complete records.
This feature alone has saved me hours of work. When five checks arrive after your direct mail campaign, add them all in about two minutes. Cash from the silent auction? That donor who prefers to wire money directly? Add it.
Every donation lives in one place, which means your reports are actually accurate. No more maintaining separate spreadsheets for online and offline gifts, no more manual calculations to get total campaign results.
The smart part is that these manual donations work exactly like online ones. They appear in donor profiles, count toward lifetime giving totals, and show up in all your reports. You can even add notes to remind yourself of important details, like “Check #1234” or “Cash from table sponsors at gala.”
If you need to issue a receipt later, you can do that too – the system generates the same professional PDF receipts for manual donations.
Ready to switch to a better donation management process?
Here’s my pro tip: make it a habit to add manual donations the day they arrive. Don’t let them pile up. It takes 30 seconds per donation, and your future self will thank you when it’s report time. Plus, having real-time accurate totals means you can make better decisions about your campaigns.
When you can see that your direct mail piece brought in $5,000 in checks alongside the $3,000 in online donations, you know the true ROI of that campaign.
With that in mind, I want to cover mistakes you want to avoid when your managing your donor database.
Mistakes to Avoid When Managing Your Donor Database
After years of managing donor data (and making pretty much every mistake possible I can think of), I’ve learned what not to do. These mistakes seem small, but they can create massive headaches down the road. Here’s how to avoid the pitfalls that trip up most nonprofits.
The biggest mistake I see? Not adding manual donations regularly.
It’s tempting to think “I’ll add those checks later” or “I’ll update the cash donations after the event.” Don’t do this. When you let manual donations pile up, you lose track of what’s been entered and what hasn’t. Your reports become useless because they don’t reflect reality.
Make it a rule: every donation gets added within 24 hours. Set a daily reminder if you need to. Those five minutes each day save you hours of cleanup later.
Another costly mistake is ignoring duplicate donor profiles. When John Smith donates with “[email protected]” and later with “[email protected],” Charitable creates two profiles. If you don’t merge these, you’ll undercount donor loyalty and lifetime value.
Check for duplicates monthly – look for similar names or addresses. When you spot them, keep the profile with the most donations and update it with any missing information from the duplicate before deleting it.
Here’s one that burned me early on: not using tags and custom fields from the start. Six months in, I realized I needed to track which donors were board members’ contacts, who preferred phone calls, and who attended which events. Going back to add this information to hundreds of profiles was a nightmare.

Start with a tagging system from day one. Common tags like “board contact,” “monthly donor,” “event attendee,” and “major donor” will make your life so much easier when you need to segment your database.
The worst mistake? Not backing up your data regularly. Yes, Charitable stores everything securely, but you should still backup your entire website including your donor database. You can use a backup plugin for this. I recommend saving a copy either to your computer and cloud storage.
If you ever need to switch systems, analyze data offline, or provide records for an audit, you’ll have everything ready. Plus, having that backup gives you peace of mind.
One final mistake that seems harmless but isn’t: being inconsistent with data entry. Decide now whether you’ll use “St.” or “Street,” whether you’ll include middle names, how you’ll format phone numbers. Write down these rules and stick to them. Consistent data is searchable data.
When your board president asks for all donors from “Main Street,” you don’t want to miss half of them because some are listed as “Main St.”
You made it this far, which tells me you’re serious about fixing your donor tracking situation. Good. Because every day you wait is another day of scattered spreadsheets, missing information, and wasted time that could be spent on your actual mission.
Here’s the truth: switching from spreadsheets to a real donor management system isn’t just about saving time (though you’ll save tons of it). It’s about respecting your donors enough to keep accurate records of their generosity.
It’s about having the confidence to answer any question about your fundraising instantly. It’s about making decisions based on real data, not best guesses.
The path forward is simple. First, get Charitable installed on your WordPress site if you haven’t already. It takes minutes, not hours.
Charitable offers both a free (lite) version as well as a premium plugin. See the difference between Charitable lite and pro here »
Launch beautiful fundraiser campaigns on your site. Need help? Get started here »
Third, gradually add your historical donation data when you have a few spare minutes. You don’t need to do it all at once.
Within a month, you’ll wonder how you ever managed without it. Those board reports that used to take hours? They’ll take minutes. Finding that donor who called with a question? Seconds. Knowing exactly how much you’ve raised this quarter? It’s right there on your dashboard.
The best part is that this isn’t some complicated enterprise software that requires training and a manual. If you can use WordPress, you can use Charitable. And unlike those expensive donor management platforms, you won’t break your budget to get professional-level tools.
So here’s my challenge to you: stop reading about it and start doing it. Your future self (and your donors) will thank you.
Set up your donor tracking system today, and next month when you’re pulling reports with a single click instead of copying and pasting from spreadsheets, remember this moment when you decided to work smarter, not harder.
Ready to transform your donor tracking? Get started with Charitable today and join thousands of nonprofits who’ve already made the switch.


Leave a Reply