Would you like Charitable to receive real-time updates when a payment is completed or refunded through Square? With Square webhooks enabled, your forms can stay in sync with Square so payment statuses are always up to date.
This guide will show you how to easily connect Square webhooks with Charitable, ensuring your website stays in sync with your Square activities.
Before you get started, be sure to install Charitable on your WordPress site. After that, connect your site to your Square account.
Understanding Webhooks
Webhooks are a way for Square to notify Charitable when an event happens in your account, like a payment being updated or refunded. Once enabled, Charitable listens for these events so your site can reflect changes in payment status automatically.
With Square webhooks set up, you don’t need to manually check or update your form entries after a transaction is processed. Whether a payment goes through, is refunded, or partially returned, your Charitable dashboard will stay up to date based on the latest information from Square.
Enabling Webhooks in Charitable
Here are the steps we’ll follow in this guide:
Step 1: Enabling Square Payments
To get started, open your WordPress admin area and go to Charitable » Settings » Gateway Payments tab.
Here, you’ll see a list of available payment gateways that you can enable/disable with just a click. In case Square payments has not yet been enabled, click on the ‘Enable Gateway’ button here.
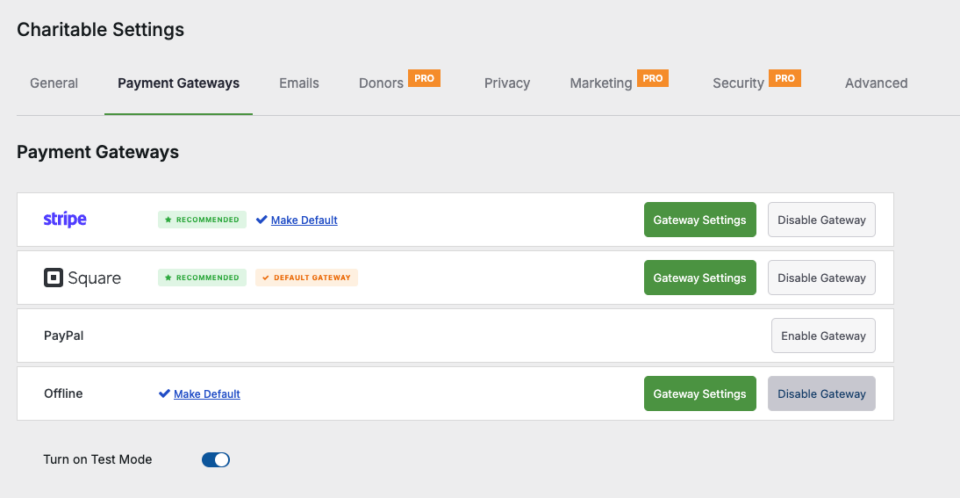
Once enabled, a green ‘Gateway Settings’ button will appear. Click on it to go to the next step.
Step 2: Connecting to Square
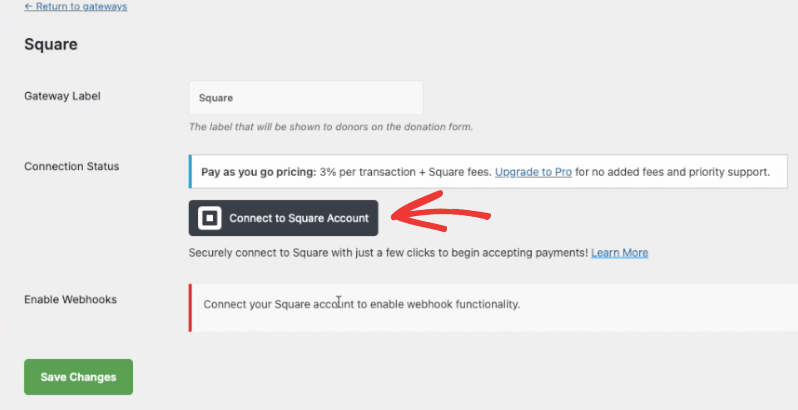
On the Square Gateway Settings page, you’ll see a Connection Status section with a button that reads “Connect to Square Account”. Select it and it will open up the Square login page.
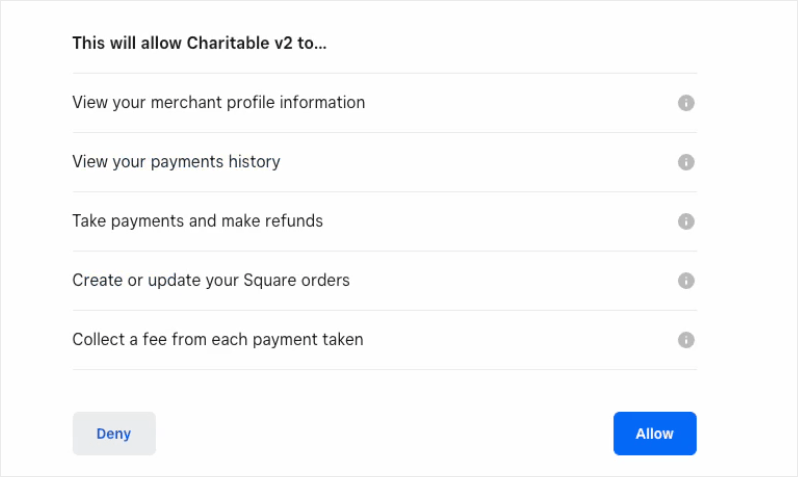
Enter your credentials and log in to your Square account. You’ll see a page that asks you to grant permission to Charitable.
Select “Allow” and Charitable will sync with Square.
When connected, you’ll be directed back to the Square Gateway Settings page in Charitable.
Charitable will automatically fetch your business locations, and you can select them from a dropdown menu here. This gives you the ability to switch locations as and when you need.

Step 3: Enabling Webhooks in Square
We’ve made it as easy as possible to enable webhooks with Square. It’s just a copy and paste. Simply follow the steps below.
First, in the same Square Gateway Settings page, you’ll see an Enable Webhooks section.
Here, there is a webhook URL available. You’ll need to add this inside your Square dashboard. Click on the clipboard icon to quickly copy it.
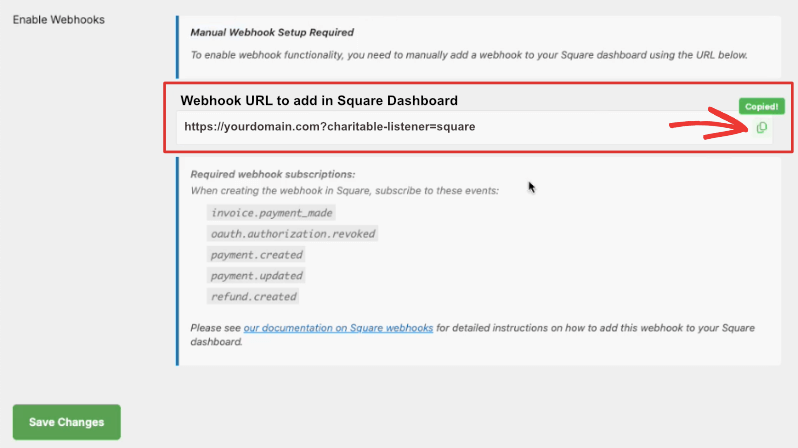
Go to your Square dashboard, and open the Webhooks » Subscriptions tab.
Here, you’ll see all the webhooks you’ve set up.
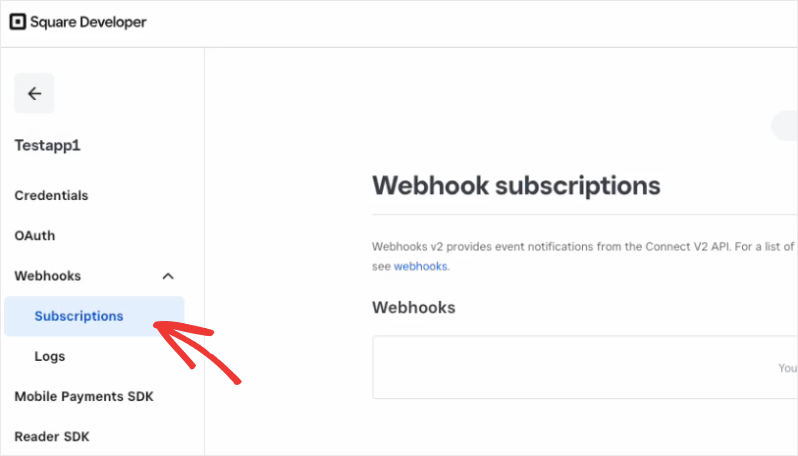
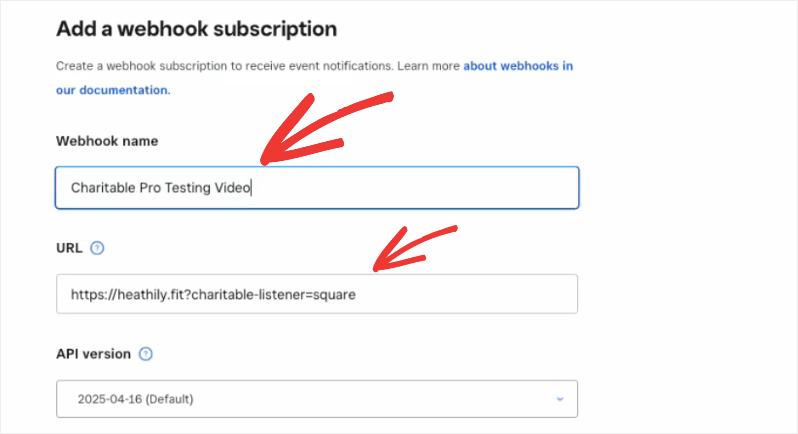
Choose the ‘Add subscription’ button to create a new webhook.

Now, you can add a name for your webhook so you can easily recognize it in the future.
Below that, paste the URL you copied.
Now there’s one more step here. You’ll see a list of Events below this.
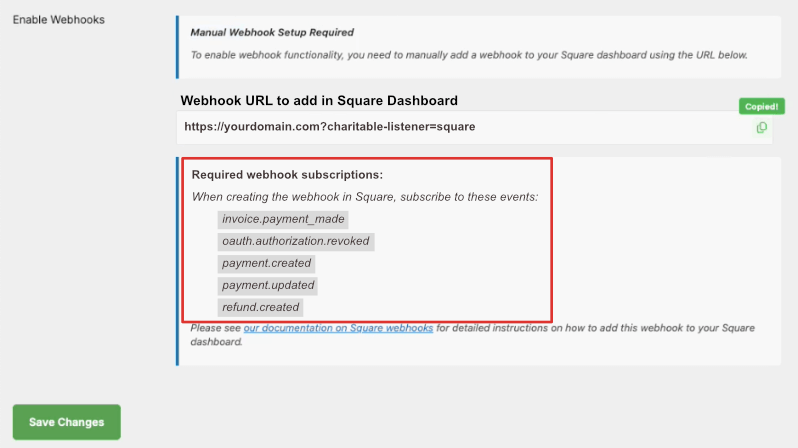
You’ll need to select 5 specific events here:
- invoice.payment_made
- oauth.authorization.revoked
- payment.created
- payment.updated
- refund.created

You can find the events required inside your Charitable dashboard. Below the webhook URL you copied, you’ll see the list of required webhook subscriptions.
Once you’ve chosen these events in your Square dashboard, hit the ‘Save’ button at the top to save your new webhook.

That’s it! You’ve connected your Charitable account to Square webhooks.
Now you can go to the Webhooks » Subscriptions tab., and you’ll see the webhook you’ve just set up.

Make sure you ‘Save Changes’ inside the Square Gateway Settings page in your WordPress admin panel as well.
We recommend making one or two test donations to make sure your connection is working fine.
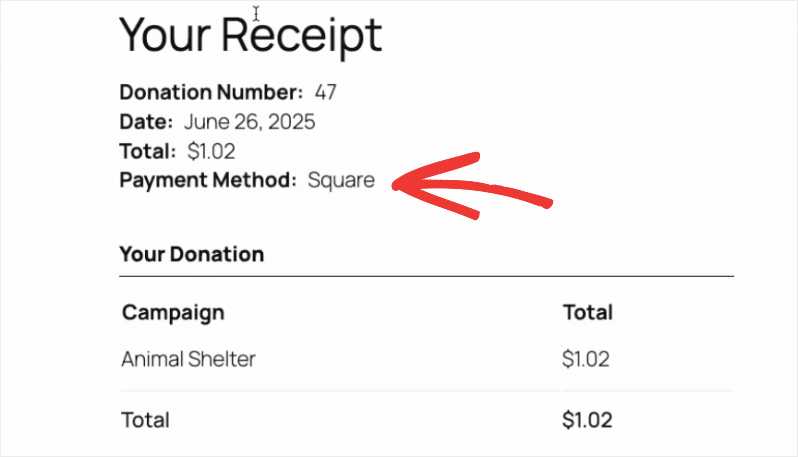
Now, when a donor makes a contribution using Square payments, it will appear in the donation receipt like so:
Viewing Square Donations inside Charitable
When a donation is made, the transaction details will be recorded by Charitable.
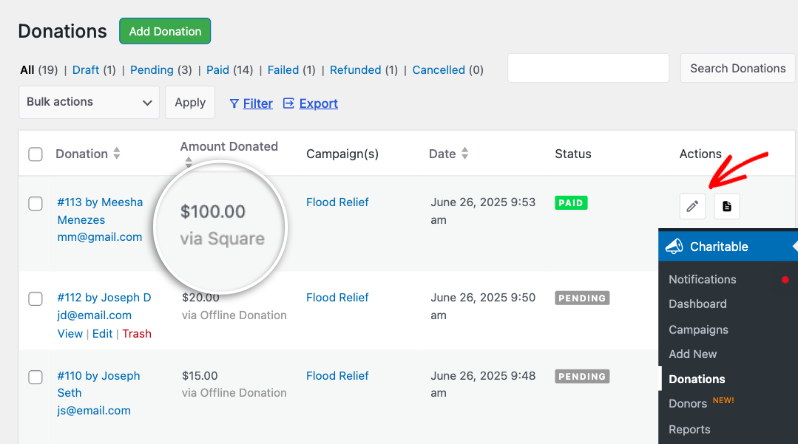
You can access this under Charitable » Donations.
Here you can see all donations made through all payment gateways you’ve enabled on your site.
Charitable displays the donation details such as the name, email address, amount donated, payment gateway, campaign, and status.
This gives you a bird’s eye view of all donations received.
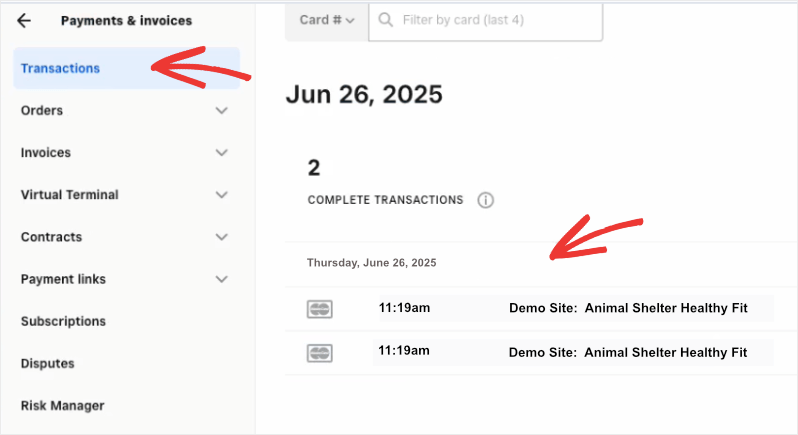
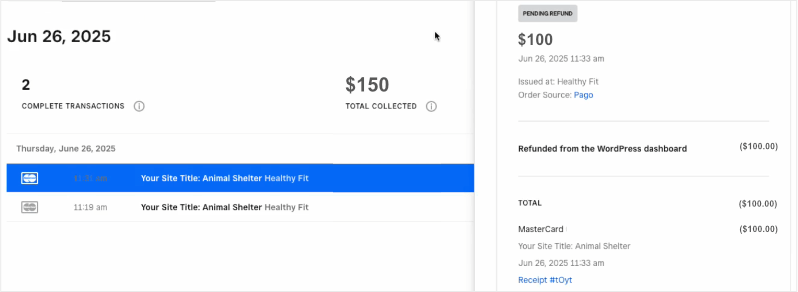
Any transactions made through the Square payment gateway will also appear in your Square dashboard under the Payments & invoices » Transactions tab, like this:
Next, we’ll show you how to issue Square refunds.
Refunding Donations Made With Square
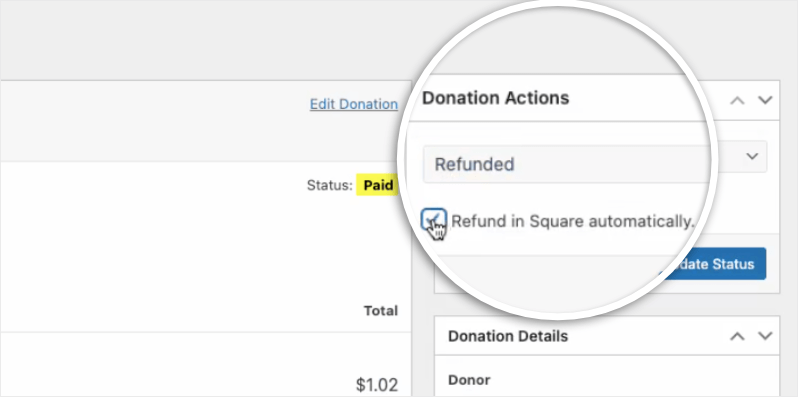
Charitable makes it easy for you to issue refunds on any donation made through Square. Go to Charitable » Donations and edit the donation record you need to refund.
On the right taskbar, under the Donations Actions section, choose the ‘Refunded’ status from the drop down menu.
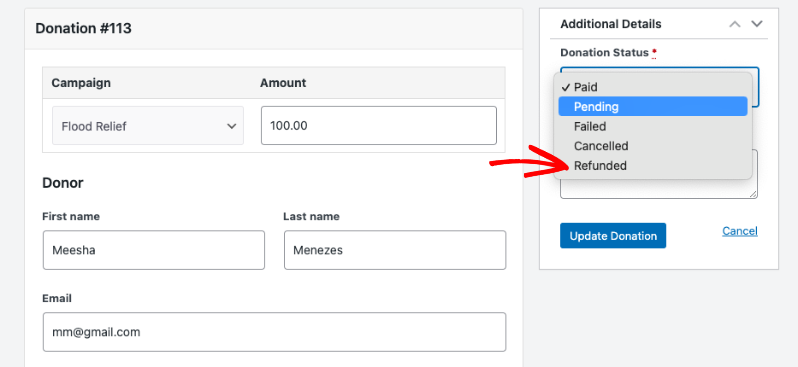
You’ll see a checkbox appear to ‘Refund in Square automatically’. Check this box and click on the ‘Update Status’ button.
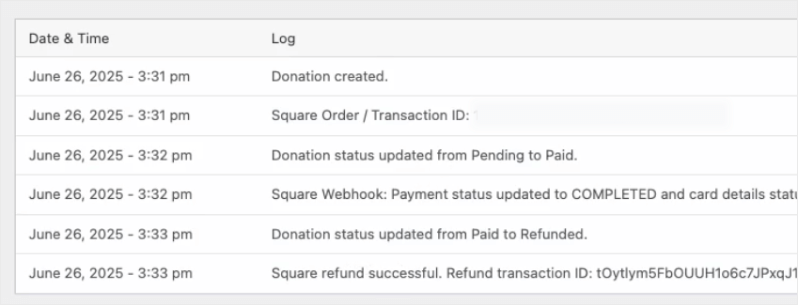
That’s it. You’ll see the refund activity appear in the activity log on the same page.
The refund will be issued by Square. You can visit your Square dashboard and see that the refund payment has been made.
Now you know how to set up Square webhooks with Charitable.
Frequently Asked Questions
These are answers to some of the top questions we see about setting up Square webhooks in Charitable.
How do I enable Square payments in Charitable?
In your Charitable dashboard, go to Settings » Payment Gateways and enable the Square payment gateway. Then follow our Square Setup guide to complete the connection.
Do I need to set up webhooks for both Test Mode and Live Mode?
Yes, Square provides separate credentials for Sandbox (Test) and Production (Live) environments. Be sure to use the correct access token based on whether Test Mode is enabled in your Charitable settings.
Can I enable multiple payment gateways along with Square?
Yes, Charitable makes it possible enable multiple payment gateways. You can also enable specific gateways for different campaigns.
Next, would you like to learn more about creating campaigns in Charitable? Check out our tutorial on creating your first campaign with Charitable.
