
¿Y si pudieras llegar a tus donantes sin una dirección de correo electrónico o un número de teléfono? ¿Y si pudieras activar un mensaje para que les llegue en el momento justo, al segundo de recibir una donación, a la hora de cerrar una campaña, y que aparezca directamente en su pantalla? Todo lo que necesitas son unos minutos para configurarlo.
Las notificaciones push también son económicas, y eso no es una nota al pie, es el punto principal. No hay una tarifa por mensaje que merme tu presupuesto como ocurre con los SMS. Eso es importante porque nuestro objetivo en Charitable es asegurarnos de que todas las buenas causas, grandes o pequeñas, puedan recaudar los fondos que necesitan sin importar dónde operen en el mundo.
En esta guía, te explicaré exactamente cómo configurar esto. Sin código. Sin desarrollador. Solo unos pocos clics dentro de WordPress.
Y como el canal es casi gratuito, no estás obligado a enviar solicitudes de donación una y otra vez como podrías hacer en una plataforma de pago donde cada mensaje cuesta algo. Puedes enviar actualizaciones, agradecimientos, historias de impacto y más, sin ver cómo tu presupuesto se reduce cada vez que envías un mensaje. Menos solicitudes forzadas significan menos fatiga del donante, y he incluido un conjunto completo de mensajes de ejemplo más adelante en esta guía para que no empieces desde cero.
Primero, cubriremos brevemente qué son las notificaciones push, cómo funcionan y cómo puedes utilizarlas. Luego te guiaré a través de la configuración, paso a paso.
En esta guía
- ¿Qué son las notificaciones push y por qué tu organización sin fines de lucro debería usarlas?
- Lo que necesitarás antes de empezar
- Cómo configurar PushEngage con Charitable (paso a paso)
- 10 notificaciones de ejemplo que puedes enviar esta semana
- Preguntas frecuentes
¿Qué son las notificaciones push y por qué tu organización sin fines de lucro debería usarlas?
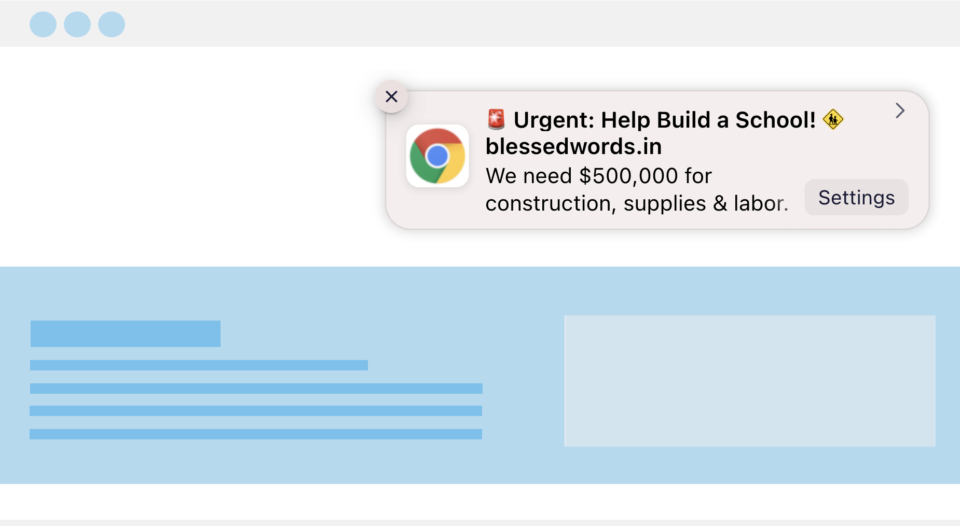
Una notificación push web es una pequeña alerta emergente que aparece en el escritorio o teléfono de un visitante después de que ha hecho clic en "Permitir" en tu sitio, incluso si no está en tu sitio web en ese momento. Piénsalo como un mensaje de texto, pero gratis, y sin necesidad de un número de teléfono.
Para una organización sin fines de lucro, eso la convierte en uno de los canales más fáciles de añadir a lo que ya estás haciendo:
- Es gratis. No hay una tarifa por mensaje como con los SMS, ni gasto en publicidad para llegar a las personas que ya han optado por participar. Hay opciones gratuitas de software de notificaciones push, pero si quieres funciones avanzadas, ¡las aplicaciones premium siguen siendo asequibles!
- No compite con una bandeja de entrada abarrotada. Tu notificación aparece directamente en la pantalla, no enterrada bajo otros veinte correos electrónicos.
- No se requieren datos personales. Los donantes optan por participar con un solo clic. Sin dirección de correo electrónico, sin número de teléfono, sin nada que escribir.
- Llega a las personas incluso cuando no están en tu sitio. Una vez que alguien opta por participar, puedes llegar a ellos días o semanas después.
La herramienta que hace esto posible es PushEngage. Es la que maneja la solicitud de "¿Permitir notificaciones?" en tu sitio y hace un seguimiento de todos los que dicen que sí. Una vez que tienes eso en marcha, la siguiente pregunta es qué necesitas realmente antes de activarlo.
Más información sobre la función de PushEngage en Charitable »
Lo que necesitarás antes de empezar
Esta configuración utiliza dos elementos que trabajan juntos:
- Plugin PushEngage : gestiona el aviso de suscripción en tu sitio y almacena tu lista de suscriptores. Esta parte es gratuita, sin importar nada.

- Charitable: gestiona el lado de la campaña: cuándo enviar una notificación, qué dice y a qué campaña está vinculada. Si usas Charitable Lite, aún puedes instalar PushEngage y crear una lista de suscriptores. Para recibir notificaciones que se activen automáticamente con la actividad real de los donantes, como un agradecimiento en el momento en que alguien dona, necesitarás Charitable Pro.
Si aún no tienes Charitable Pro, puedes empezar con un plan y estar operativo en pocos minutos, con una garantía de devolución de dinero de 14 días si no es lo adecuado.
Este tutorial asume que tienes Charitable instalado en tu sitio. Si aún no lo has instalado, sigue esta guía: Cómo instalar Charitable »
Ahora vamos a instalar PushEngage.
Cómo configurar PushEngage con Charitable (paso a paso)
Nada de esto requiere código. Trabajarás completamente dentro de tu panel de WordPress y el Creador de Campañas de Charitable.
Paso 1: Instalar el plugin gratuito PushEngage
Ve a Plugins » Añadir nuevo en tu panel de WordPress, busca “PushEngage” y haz clic en Instalar, luego en Activar.
Esto lleva menos de un minuto y no requiere nada más allá de un inicio de sesión en WordPress.
Si te registraste para obtener una cuenta de PushEngage, recibirás un archivo de plugin para descargar. Debes subirlo en Plugins » Añadir nuevo » Subir plugin.
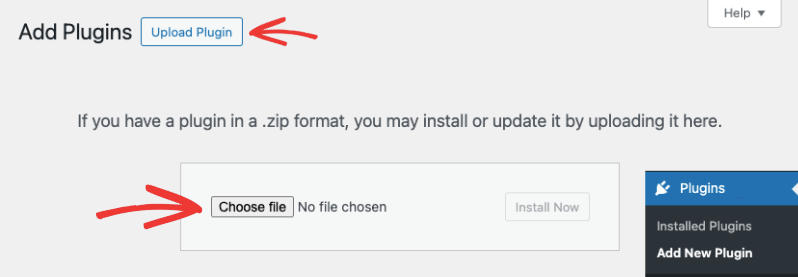
Eso es todo. Asegúrate de que el plugin esté activado en tu sitio.
Paso 3: Configurar PushEngage en Charitable
Dentro del Creador de Campañas de Charitable, en la barra lateral izquierda, haz clic en Marketing y luego elige PushEngage de la lista de integraciones.
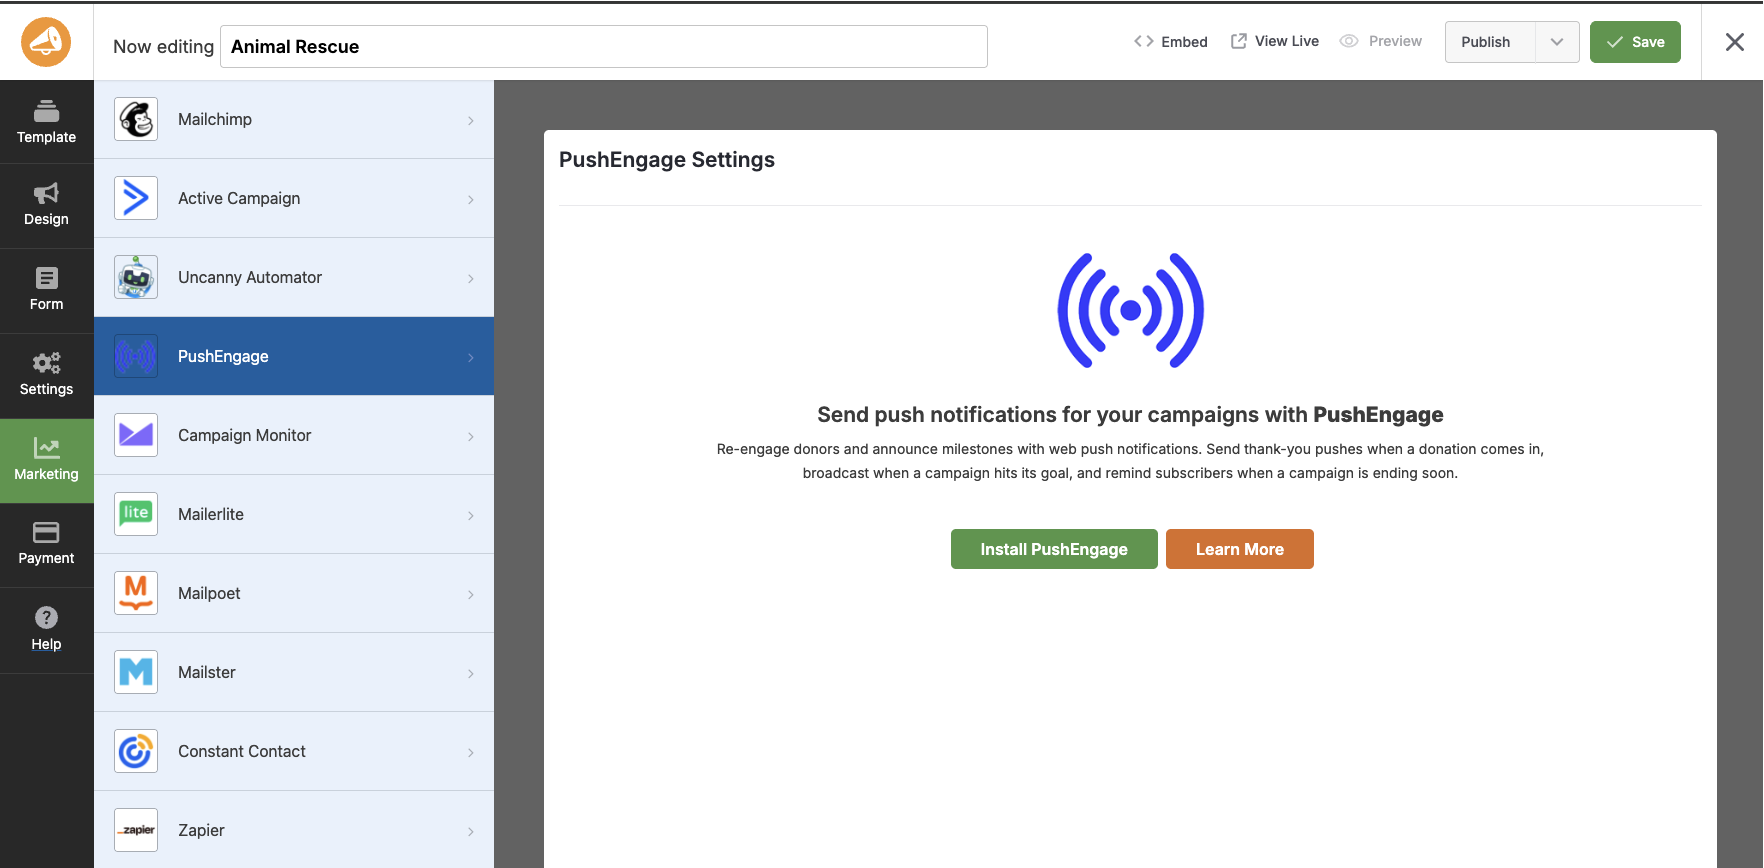
Si aún no has conectado tu cuenta, verás un botón de Instalar PushEngage justo aquí.
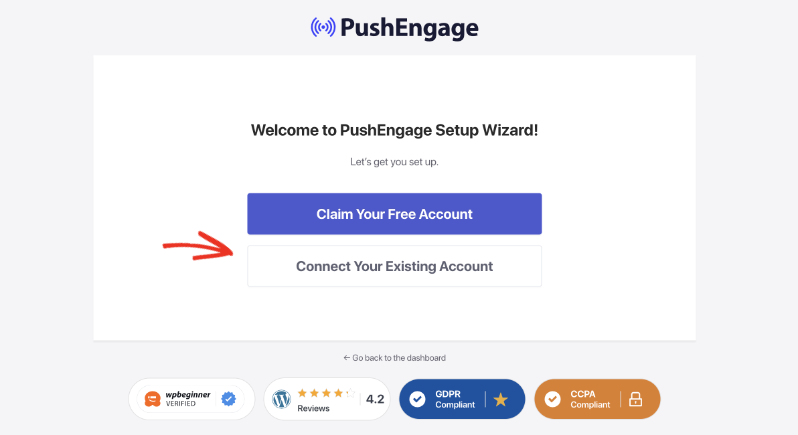
Haz clic en él y sigue las instrucciones en pantalla, y podrás conectar tu cuenta usando el asistente de PushEngage.
Esto te guiará a través de la creación de una cuenta gratuita (o el inicio de sesión si ya tienes una) y su conexión a tu sitio.
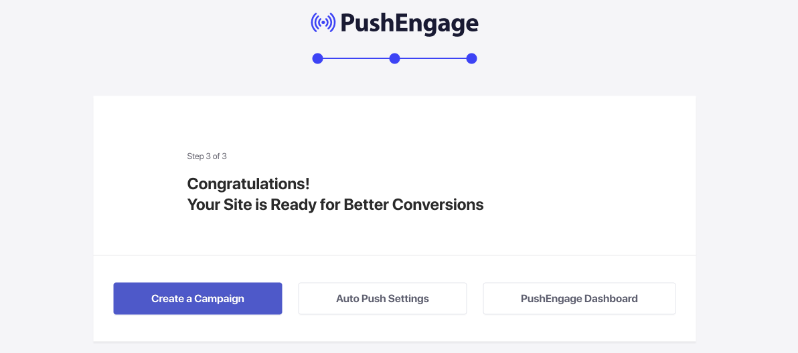
Una vez que inicies sesión en tu cuenta, verás esta pantalla de Felicitaciones.
Paso 4: Activar tus desencadenadores
Ahora, en tu administrador de WordPress, ve a Charitable » Campañas y abre cualquier campaña.
Verás cuatro desencadenadores que puedes activar para esta campaña.
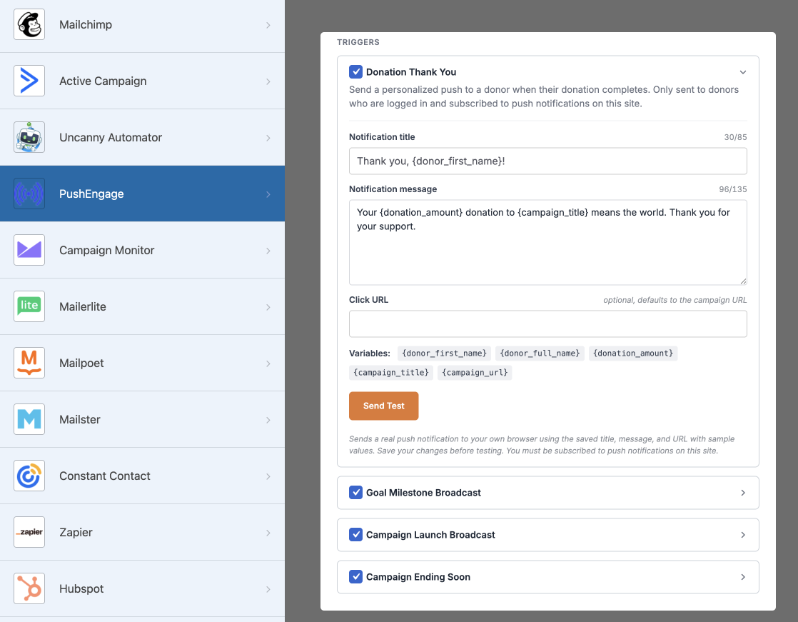
Activa los que se ajusten:
- Agradecimiento por donación: se envía automáticamente a un donante en el momento en que se completa su donación.
- Hito de objetivo: se transmite a tu lista de suscriptores cuando la campaña alcanza el 50%, 75% y 100% de su objetivo.
- Lanzamiento de campaña: anuncia esta campaña a todos los que se han suscrito en tu sitio.
- Próxima finalización: recuerda a tu lista que la campaña está a punto de cerrar.
No necesitas activar las cuatro de inmediato. Si es tu primera vez, Agradecimiento por donación y Hito de objetivo son los lugares más fáciles para empezar, ya que son a los que los donantes responden más.
Paso 5: Escribe tu mensaje
Cada disparador tiene su propio título y campo de mensaje editables.
Puedes insertar marcadores de posición para el nombre del donante, el título de la campaña, la cantidad recaudada y el progreso hacia el objetivo, de modo que un mensaje como
“¡Gracias, {donor_name}! Acabas de ayudarnos a alcanzar {amount_raised} para {campaign_title}”
El código dentro de {} se completa automáticamente para cada donante, sin que tengas que escribirlo a mano cada vez.
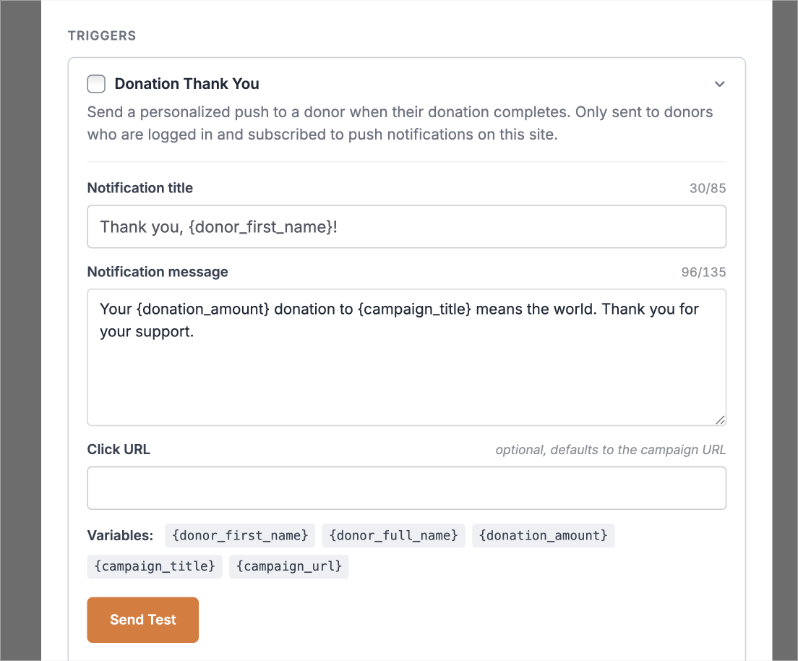
Añade un enlace para que la gente aterrice en un lugar útil, como la página de la campaña o una publicación de agradecimiento.
Paso 6: Previsualiza y envía una prueba
En la parte inferior de la página, verás una vista previa de tu notificación.
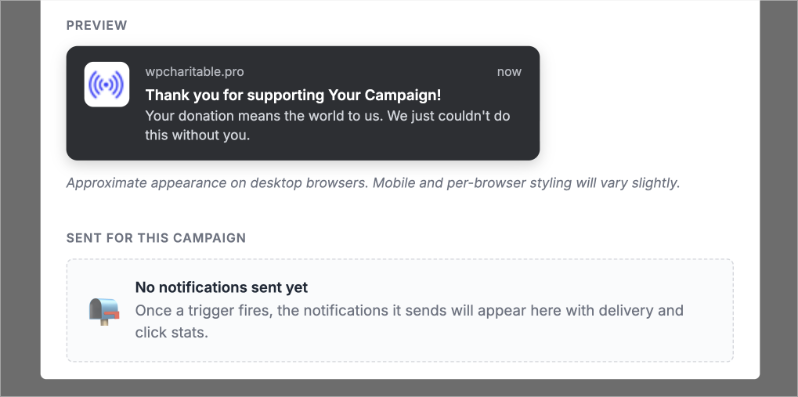
Antes de publicar, haz clic en Enviar prueba. Esto te muestra exactamente cómo se verá la notificación en un navegador, para que puedas detectar errores tipográficos o un enlace roto antes de que llegue a un solo suscriptor.
Paso 7: Guarda y publica
Asegúrate de guardar tus cambios dentro del constructor de Charitable.
Eso es todo. Tus disparadores están activos y, a partir de aquí, Charitable y PushEngage se encargan del envío por ti. No necesitas recordar enviar nada manualmente.
Desde aquí, también puedes continuar creando y enviando notificaciones push dentro de PushEngage.
Lo único que queda es decidir qué decir realmente. Esa parte confunde más a la gente que la configuración, así que aquí tienes 10 que puedes adaptar ahora mismo.
10 notificaciones de ejemplo que puedes enviar esta semana
Una regla rápida antes de la lista: no hagas que cada notificación sea una petición. Mezcla agradecimientos y actualizaciones con tus solicitudes de donación, o los donantes empezarán a ignorarte. Aquí tienes una mezcla sencilla para empezar.
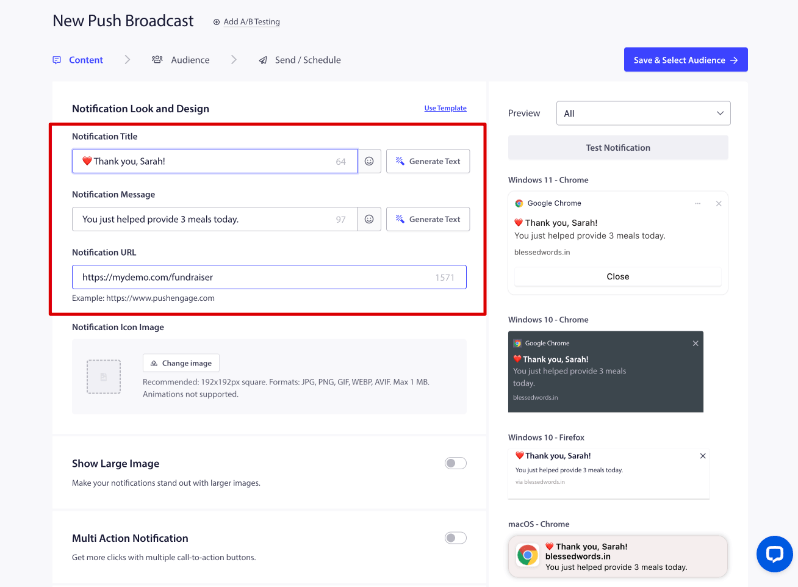
Mensajes de agradecimiento
- “¡Gracias, Sarah! Tu donación acaba de ayudar a proporcionar 3 comidas hoy.” (CTA: Ver tu impacto)
- “¡Hemos recibido tu donación! Esto es lo que ya está haciendo para ayudar.”
Actualizaciones de campañas
- “¡Estamos al 75% de nuestro objetivo! Solo quedan 2.500 € por recaudar.”
- “32 donantes se unieron hoy. Gracias por ser parte de esto.”
- “Esta campaña cierra en 48 horas.”
Peticiones de donación
- “Estamos a 1.000 € de terminar este proyecto. ¿Puedes ayudar a cerrar la brecha?”
- “Tu donación se igualará hoy, dólar por dólar.”
Impacto e historia
- “Gracias a donantes como tú, ahora hemos proporcionado 8.400 comidas.”
- “Conoce a Ravi, uno de los niños a los que ayuda tu última donación.”
Observa el patrón: dos agradecimientos, tres actualizaciones, dos peticiones y dos historias de impacto. Esa es una mezcla más saludable que cinco peticiones seguidas, y es la forma más fácil de mantener a tu lista comprometida en lugar de que te ignoren.
Preguntas frecuentes
¿Necesito un desarrollador para configurar esto?
No. Todo lo anterior ocurre dentro de tu panel de WordPress y el Constructor de Campañas de Charitable. No se involucra ningún código.
¿Es PushEngage realmente gratis?
Sí, el plugin PushEngage en sí es gratuito para instalar y usar para tu aviso de suscripción y lista de suscriptores. Los disparadores automáticos dentro de Charitable que conectan las notificaciones a la actividad real del donante, como Agradecimiento por Donación y Hito de Meta, son parte de Charitable Pro.
¿Funcionará si aún no tengo una lista de correo electrónico?
Sí. Ese es precisamente el objetivo. Los suscriptores de notificaciones push se suscriben con un solo clic, sin necesidad de dirección de correo electrónico ni número de teléfono, por lo que esto funciona incluso si no tienes ninguna lista de correo electrónico en absoluto.
¿Cuántas notificaciones debo enviar?
No hay un número fijo, pero intenta equilibrar las peticiones con actualizaciones y agradecimientos en lugar de enviar una petición cada vez. Una mezcla aproximada de una petición por cada dos o tres mensajes que no son peticiones mantiene tu lista comprometida sin agotarla.
¿Puedo usar esto para algo más que campañas de donación?
Los cuatro disparadores integrados de Charitable se centran en las campañas, pero el propio panel de PushEngage te permite enviar notificaciones puntuales adicionales a tu lista completa, por lo que también puedes cubrir cosas como inscripciones de voluntarios o recordatorios de eventos una vez que te sientas cómodo con lo básico.
Una vez que tu primer disparador esté activo, la mayor victoria es simplemente dejarlo funcionar durante unas semanas y observar a qué responden los donantes. Sabrás rápidamente qué mensajes obtienen clics y cuáles no, y podrás ajustar a partir de ahí.
¡Charitable tiene más de 1 millón de descargas!
Confiado por millones para impulsar campañas de recaudación de fondos exitosas. Prueba Charitable sin riesgos hoy mismo.
✅ Garantía de devolución de dinero en 14 días
✅ Precios transparentes
✅ Configuración sin código
Recibe consejos y recursos gratuitos directamente en tu bandeja de entrada, junto con más de 60.000 personas. Suscríbete al boletín de Charitable →
Mantente conectado para más recursos para organizaciones sin fines de lucro
Para más tutoriales y vídeos adaptados a organizaciones sin fines de lucro, suscríbete a nuestro canal de YouTube. Publicamos regularmente consejos de expertos, guías paso a paso sobre donaciones en línea, estrategias de recaudación de fondos y recursos prácticos para ayudar a tu organización a tener éxito.
🗞️ Recibe consejos semanales y guías exclusivas en tu bandeja de entrada
Únete a nuestro boletín →
🎥 Mira tutoriales paso a paso e historias de éxito
Suscríbete a nuestro canal de YouTube →
👩🏽💻 Conecta con nuestra comunidad y obtén información diaria sobre organizaciones sin fines de lucro
Síguenos en LinkedIn →
🥳 Reels divertidos e información sobre organizaciones sin fines de lucro
Síguenos en Instagram →
👀 Vídeos interesantes y divertidos para ayudarte a hacer crecer tu causa
Síguenos en TikTok→
🌎 Suscríbete y sigue para recibir consejos generales de recaudación de fondos
Obtén consejos de recaudación de fondos en TikTok →
Potentes recursos de recaudación de fondos
🤖 Usa Charitable con tu asistente de IA
⬇️ Descarga estrategias probadas, ideas de campañas y herramientas de expertos
Obtén el Kit de Recaudación de Fondos →
💸 Obtén recursos gratuitos de recaudación de fondos
Ve al Centro de Recaudación de Fondos de Charitable →
¿Tienes preguntas sobre Charitable?
Preguntas frecuentes de Charitable →
🏎️ Prueba Charitable
Crea tu demostración de Charitable →
Comprende la terminología y la jerga de las organizaciones sin fines de lucro
Glosario de organizaciones sin fines de lucro→
% ¿Buscas ofertas y descuentos para organizaciones sin fines de lucro?
Las mejores ofertas y descuentos para organizaciones sin fines de lucro →





Deja una respuesta