¿Quieres permitir que los donantes paguen con Apple Pay o Google Pay a través de Mollie? Charitable Mollie 1.1.0 añade un panel de estado que muestra exactamente qué carteras están activas en tu cuenta, y esta guía te muestra cómo activarlas.
Antes de empezar
Apple Pay y Google Pay para Mollie se basan en la configuración estándar de Charitable Mollie. Antes de continuar, asegúrate de tener:
- Charitable Mollie 1.1.0 o posterior instalado y activado.
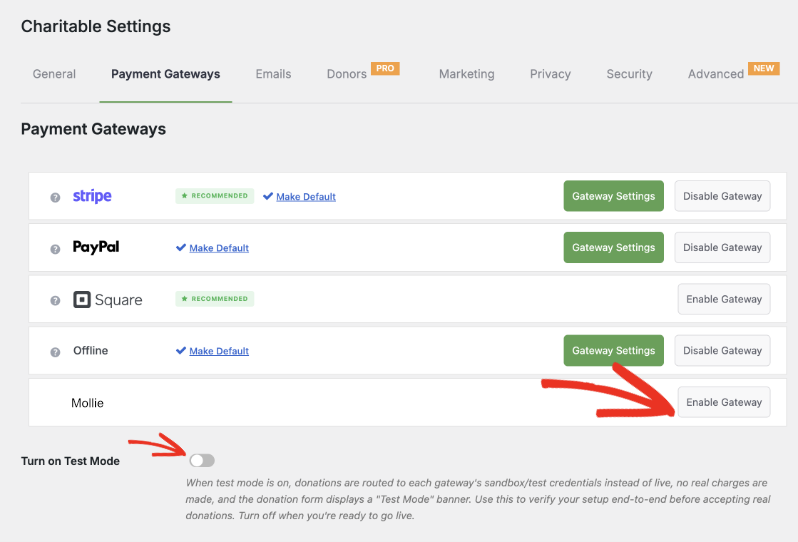
- La pasarela de Mollie habilitada en Charitable » Ajustes » Pasarelas de pago.
- Tus claves API de Mollie en vivo y de prueba introducidas y guardadas en los Ajustes de pasarela de Mollie.
Nota: ¿Aún no has instalado Mollie o necesitas ayuda para encontrar tus claves API? Sigue primero la guía de configuración completa de Charitable Mollie y luego vuelve aquí.
Nota importante: Apple Pay y Google Pay también están disponibles a través de las pasarelas Stripe y Square. Esta guía cubre su activación específicamente para Mollie.
Activación de Apple Pay y Google Pay en tu panel de control de Mollie
Apple Pay y Google Pay se activan en Mollie, no en Charitable. Mollie se encarga de mostrar los botones de cartera y verificar al donante al pagar; el papel de Charitable es enviar la donación una vez que el donante la confirma. Aquí te explicamos cómo activarlos:
- Inicia sesión en tu Panel de control de Mollie.
- En el menú, ve a Métodos de pago.
- Busca Apple Pay y Google Pay en la lista y activa cada uno.
- Guarda tus cambios en el Panel de control de Mollie.
No necesitas añadir nada a tu formulario de donación para que esto funcione. Una vez que una cartera se activa en Mollie, aparece automáticamente al pagar para los visitantes adecuados: Apple Pay en Safari e iOS, Google Pay en Chrome y Android.
Confirmación del estado en Charitable
Charitable Mollie 1.1.0 añade un panel de Apple Pay y Google Pay a los ajustes de tu pasarela Mollie para que puedas comprobar qué está activo sin salir de tu panel de WordPress.
Ve a Charitable » Ajustes » Pasarelas de pago » Mollie.
Asegúrate de que la pasarela está activada aquí. Activa el modo de prueba si quieres probar los pagos antes de que salgan en vivo,
Dentro de los Ajustes de pasarela, introduce tus claves API y conéctate a Mollie (si aún no lo has hecho).
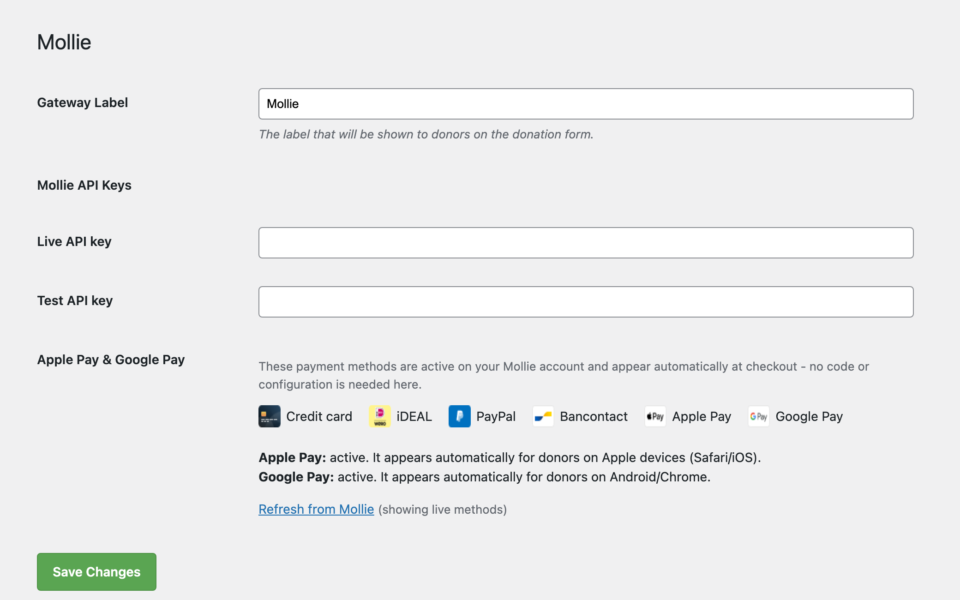
Busca el panel Apple Pay y Google Pay. Cada cartera se marca como activa o inactiva según tu cuenta de Mollie conectada.
Si una cartera aparece como inactiva, haz clic en el enlace proporcionado para ir directamente a ese ajuste en tu Panel de control de Mollie.
¿Has hecho un cambio en Mollie? Haz clic en Actualizar desde Mollie para volver a comprobar el estado de tu cuenta sin recargar la página.
Pruebas antes de salir en vivo
Como con cualquier cambio de pago, pruébalo antes de aceptar donaciones reales.
- En Charitable » Ajustes » Pasarelas de pago, marca el ajuste “Activar modo de prueba” y guarda tus cambios.
- Visita un formulario de donación en tu sitio desde un dispositivo compatible con Apple Pay o Google Pay, y comienza una donación de prueba.
- Confirma que el botón de la billetera aparece y que el pago de prueba se completa.
- Ve a Charitable » Donations y confirma que la donación de prueba está marcada como Pagada.
- Desactiva el Modo de Prueba cuando estés listo para aceptar donaciones en vivo.
Consejo profesional: Prueba en un dispositivo móvil real siempre que sea posible. Los botones de la billetera dependen de que el navegador y el dispositivo reconozcan una tarjeta guardada, y eso es más fácil de confirmar en el dispositivo real que en un navegador de escritorio que simula un móvil.
Lo que ven los donantes al pagar
Una vez que ambas billeteras estén activas, los donantes llegan al checkout alojado de Mollie como de costumbre después de enviar tu formulario de donación. Si su navegador y dispositivo lo admiten, verán un botón de Apple Pay o Google Pay junto a tus otras opciones de pago. Tocarlo les permite confirmar la donación con Face ID, Touch ID, una huella digital o el código de acceso de su dispositivo, en lugar de escribir los detalles de la tarjeta.
Si el navegador o dispositivo de un donante no admite ninguna de las billeteras, simplemente verá tus otros métodos de pago disponibles. Nada cambia para ellos y nada se rompe en tu formulario.
Cancelaciones y el filtro charitable_mollie_cancel_url
Si un donante inicia un pago a través de Mollie y lo cancela a mitad de camino, se le devuelve a la página de cancelación de donaciones de tu sitio. Esto se aplica a Apple Pay, Google Pay y cualquier otro método de pago de Mollie.
Si necesitas enviar a los donantes cancelados a un lugar específico en su lugar, como una página personalizada de "aún nos encantaría tu apoyo", usa el filtro charitable_mollie_cancel_url. Recibe el objeto de donación, por lo que puedes construir una URL basada en la campaña, el donante o cualquier otro detalle de la donación.
Nota: Este filtro es una opción para desarrolladores y requiere agregar un pequeño fragmento de código a tu sitio, típicamente en un plugin personalizado o en el archivo functions.php de tu tema.
Preguntas frecuentes sobre Mollie Apple Pay y Google Pay
¿Necesito agregar algo a mi formulario de donación? No. Una vez que Apple Pay y Google Pay estén habilitados en tu Panel de Mollie, aparecerán automáticamente en el checkout. No hay nada que configurar en el constructor de formularios de Charitable.
El panel de Apple Pay y Google Pay muestra una billetera como inactiva. ¿Qué hago? Haz clic en el enlace junto a esa billetera para ir directamente a la configuración en tu Panel de Mollie, habilítala allí, y luego haz clic en Actualizar desde Mollie de nuevo en Charitable para actualizar el estado.
¿Por qué no me aparece el botón de la billetera cuando lo pruebo? Los botones de la billetera solo aparecen en navegadores y dispositivos compatibles: Apple Pay en Safari e iOS, Google Pay en Chrome y Android. Si estás probando en un navegador no compatible, no verás el botón, y eso es lo esperado.
¿Se requiere algún trabajo adicional de cumplimiento PCI de mi parte? No. Apple Pay y Google Pay se ejecutan a través del checkout alojado de Mollie, por lo que los datos de la tarjeta nunca tocan tu servidor y no se requiere ninguna configuración adicional de cumplimiento o dominio.
¿Puedo usar Apple Pay y Google Pay con otras pasarelas también? Sí. Apple Pay y Google Pay también son compatibles a través de las pasarelas de Stripe y Square. Esta guía solo cubre cómo habilitarlos para Mollie.
¡Eso es todo! Ha aprendido a configurar Apple Pay y Google Pay con Mollie.
A continuación, también puede que desee leer la guía completa de configuración de Charitable Mollie o obtener más información sobre cómo configurar otras pasarelas de pago.
¿Todavía no tienes Charitable Pro? Puedes obtener hasta un 50% de descuento al registrarte o actualizar a Charitable Pro. Queremos asegurarnos de que puedas probar las funciones avanzadas de recaudación de fondos como Donaciones Recurrentes, Recuperación de Donaciones y más a un costo significativamente reducido.
Únete a más de un millón de usuarios satisfechos de Charitable Pro hoy mismo. Cada compra viene con una garantía de devolución de dinero de 14 días, asegurando que estés respaldado en cada paso del camino.
Si tienes alguna pregunta o necesitas ayuda, nuestro equipo de soporte está listo para ayudarte a sacar el máximo provecho de estas nuevas funciones.
Enlaces Útiles
🤝 Obtenga ayuda cuando la necesite
Conéctese con el Soporte al Cliente →
📑 Encuentre la guía que necesita
Explore el Centro de Documentación →
⬇️ Descarga estrategias probadas, ideas de campañas y herramientas expertas
Consigue el Kit de Recaudación de Fondos →
🔗 Deja que tu Asistente de IA haga el trabajo de recaudación de fondos por ti.
Conecta Charitable a tu asistente de IA →
💸 Obtén recursos gratuitos de recaudación de fondos
Ve al Centro de Recaudación de Fondos de Charitable →
¿Tienes preguntas sobre Charitable?
Preguntas frecuentes de Charitable →
¿Necesita ayuda para entender la terminología y la jerga de las organizaciones sin ánimo de lucro?
Consulte nuestro Glosario de organizaciones sin ánimo de lucro→