Installing Charitable Authorize.Net is the same as installing any other Charitable extension. If you’re not sure how to do that, we recommend first reading our guide to installing Charitable extensions.
Getting Started
After the extension is installed, you will need to add your license keys. We assume that you already have an Authorize.Net account activated.
- Go to Charitable > Settings.
- Click on the Payment Gateways tab.
- You will see Authorize.Net listed as one of the gateway options. Click Enable Gateway to activate it.
- After the page reloads, you will see a new button called Gateway Settings. Click this.
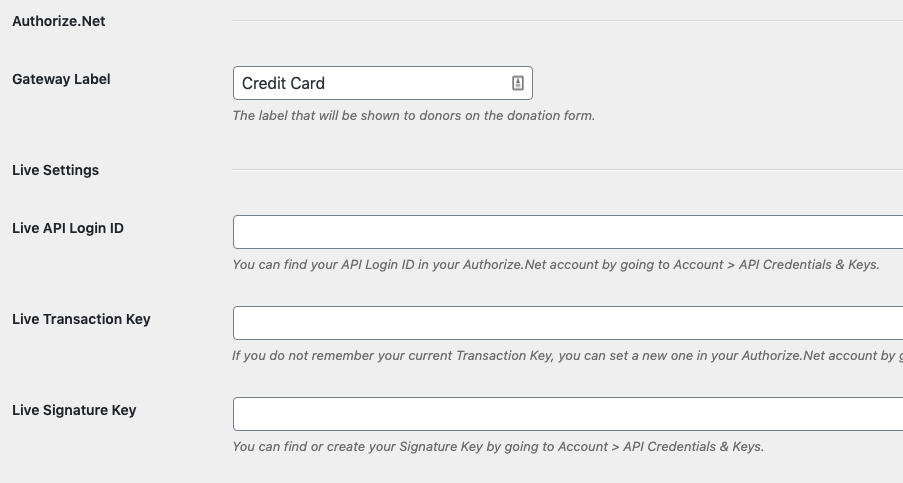
- On the following page, you can add your license keys, as well as setting the gateway label (this is what donors will see when choosing their payment method). If you are not sure where to find your Authorize.Net keys, see the section below.
- When you have finished adding your settings, click Save Changes.

Finding Your Authorize.Net Keys
If you want to test out Authorize.Net in test mode, you will need to create a sandbox account on Authorize.Net and add the login ID, transaction key and signature key for the sandbox account in the Charitable settings.
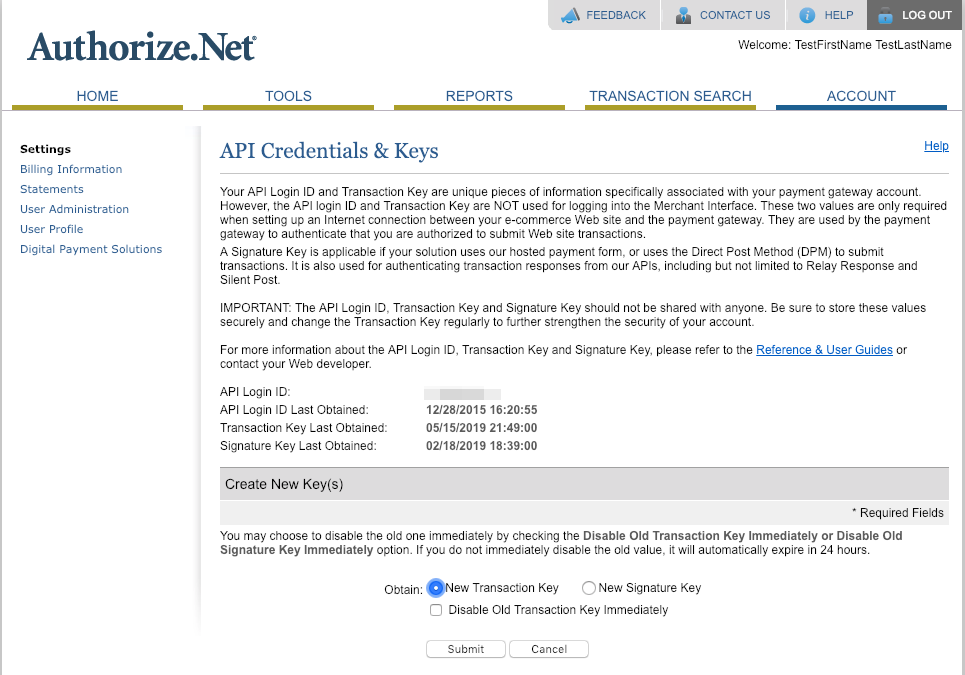
To access your API Login ID, Transaction Key and Signature Key, login to your Authorize.Net account at https://account.authorize.net/ and click Account > API Login ID and Transaction Key in the Merchant Interface.

- API Login ID: You will see your API Login ID printed in the top section.
- Transaction Key: Under “Create New Key(s)”, select “New Transaction Key” and click on Submit. Your Transaction Key will be displayed on the next screen.
- Signature Key: Under “Create New Key(s)”, select “New Signature Key” and click on Submit. Your Signature Key will be displayed on the next screen.
Enable E-check Payments
To get started with E-check payments, you will need to add support for it in your Authorize.Net account:
- Log into your Authorize.Net dashboard.
- Under “Products & Services”, click on eCheck.Net.
- On the next page, fill out the application form for eCheck.Net and submit the application. The application will then go through an approval process.
Once you have E-check enabled in your Authorize.Net account, you can turn it on for your Charitable donation forms from the Charitable Authorize.Net settings page.

Sync Required Fields
In your Authorize.Net account you can configure which fields are required in your donation form. You may choose to make different fields required for internal purposes or to reduce fraudulent donations. This can be set in your Authorize.Net account by going to Account > Payment Form > Form Fields.
After setting your required fields, use the Sync Required Fields button in your Charitable Authorize.Net settings to sync this across to your Charitable donation forms. This will ensure that any fields which you have marked as required in your Authorize.Net account will also be required in your Charitable donation form.
