Möchten Sie Spendern ermöglichen, über Mollie mit Apple Pay oder Google Pay auszuchecken? Charitable Mollie 1.1.0 fügt ein Statusfeld hinzu, das genau anzeigt, welche Wallets in Ihrem Konto aktiv sind, und diese Anleitung führt Sie durch die Aktivierung.
Bevor Sie beginnen
Apple Pay und Google Pay für Mollie bauen auf der Standard-Charitable-Mollie-Einrichtung auf. Stellen Sie sicher, dass Sie Folgendes haben, bevor Sie fortfahren:
- Charitable Mollie 1.1.0 oder neuer installiert und aktiviert.
- Das Mollie-Gateway ist aktiviert unter Charitable » Einstellungen » Zahlungs-Gateways.
- Ihre Mollie Live- und Test-API-Schlüssel sind in den Gateway-Einstellungen von Mollie eingegeben und gespeichert.
Hinweis: Mollie noch nicht installiert oder Hilfe beim Finden Ihrer API-Schlüssel benötigt? Folgen Sie zuerst dem vollständigen Einrichtungsleitfaden für Charitable Mollie und kehren Sie dann hierher zurück.
Wichtiger Hinweis: Apple Pay und Google Pay sind auch über die Stripe- und Square-Gateways verfügbar. Diese Anleitung behandelt die Aktivierung speziell für Mollie.
Aktivieren von Apple Pay & Google Pay in Ihrem Mollie Dashboard
Apple Pay und Google Pay werden in Mollie aktiviert, nicht in Charitable. Mollie kümmert sich um die Anzeige der Wallet-Buttons und die Verifizierung des Spenders beim Checkout; die Rolle von Charitable ist es, die Spende zu übermitteln, sobald der Spender sie bestätigt. Hier erfahren Sie, wie Sie sie aktivieren:
- Melden Sie sich in Ihrem Mollie Dashboard an.
- Gehen Sie im Menü zu Zahlungsmethoden.
- Suchen Sie Apple Pay und Google Pay in der Liste und aktivieren Sie jeden einzelnen.
- Speichern Sie Ihre Änderungen im Mollie Dashboard.
Sie müssen Ihrem Spendenformular nichts hinzufügen, damit dies funktioniert. Sobald eine Wallet in Mollie aktiviert ist, erscheint sie automatisch beim Checkout für die richtigen Besucher: Apple Pay auf Safari und iOS, Google Pay auf Chrome und Android.
Status in Charitable bestätigen
Charitable Mollie 1.1.0 fügt Ihrer Mollie-Gateway-Einstellung ein Apple Pay & Google Pay-Panel hinzu, damit Sie überprüfen können, was live ist, ohne Ihr WordPress-Dashboard zu verlassen.
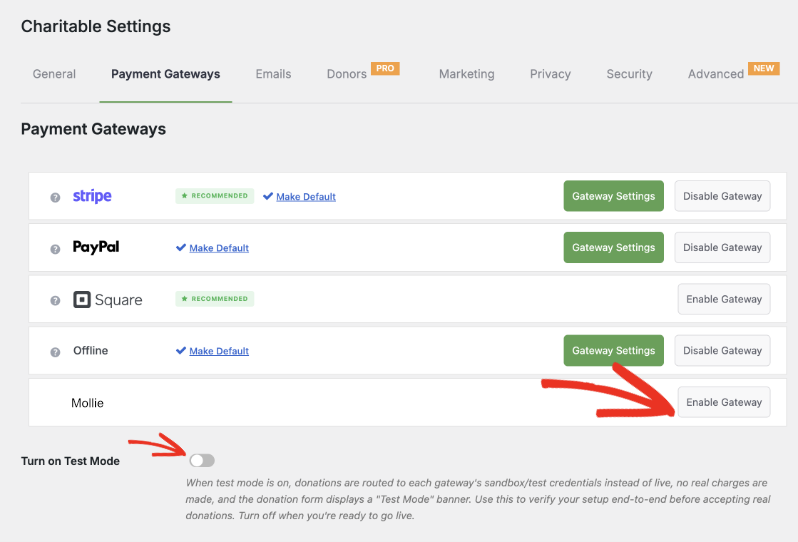
Gehen Sie zu Charitable » Einstellungen » Zahlungs-Gateways » Mollie.
Stellen Sie sicher, dass das Gateway hier aktiviert ist. Aktivieren Sie den Testmodus, wenn Sie Zahlungen testen möchten, bevor Sie sie live schalten,
Geben Sie in den Gateway-Einstellungen Ihre API-Schlüssel ein und verbinden Sie sich mit Mollie (falls Sie das noch nicht getan haben).
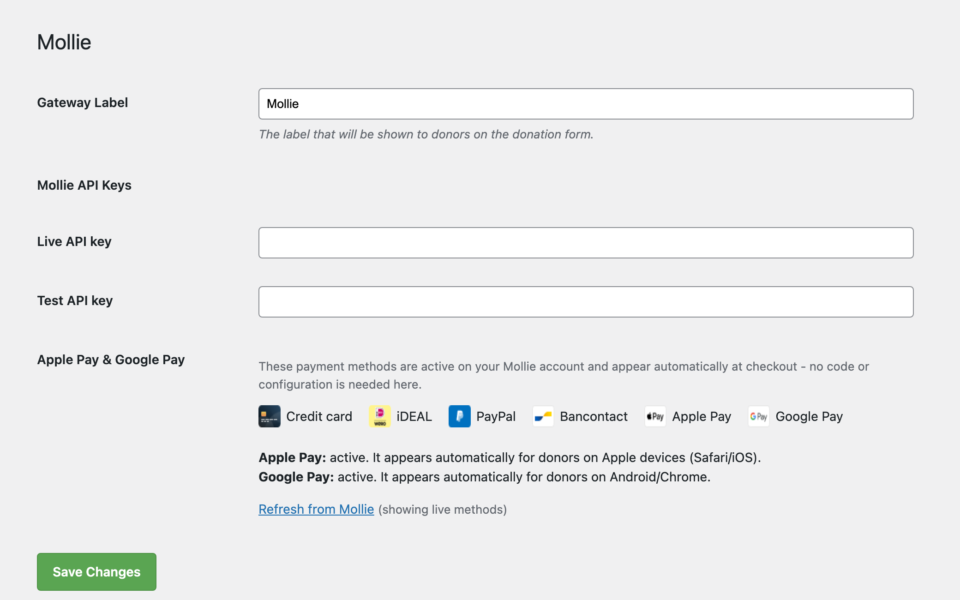
Suchen Sie nach dem Apple Pay & Google Pay-Panel. Jede Wallet ist als aktiv oder inaktiv markiert, basierend auf Ihrem verbundenen Mollie-Konto.
Wenn eine Wallet als inaktiv angezeigt wird, klicken Sie auf den angegebenen Link, um direkt zu dieser Einstellung in Ihrem Mollie Dashboard zu gelangen.
Eine Änderung in Mollie vorgenommen? Klicken Sie auf Von Mollie aktualisieren, um den Status Ihres Kontos zu überprüfen, ohne die Seite neu zu laden.
Testen vor der Veröffentlichung
Wie bei jeder Zahlungsänderung testen Sie sie, bevor Sie echte Spenden annehmen.
- Überprüfen Sie unter Charitable » Einstellungen » Zahlungs-Gateways die Einstellung „Testmodus aktivieren“ und speichern Sie Ihre Änderungen.
- Besuchen Sie ein Spendenformular auf Ihrer Website von einem Gerät aus, das Apple Pay oder Google Pay unterstützt, und starten Sie eine Testspende.
- Bestätigen Sie, dass der Wallet-Button angezeigt wird und die Testzahlung abgeschlossen wird.
- Gehen Sie zu Charitable » Spenden und bestätigen Sie, dass die Testspende als bezahlt markiert ist.
- Schalten Sie den Testmodus wieder aus, wenn Sie bereit sind, Live-Spenden anzunehmen.
Profi-Tipp: Testen Sie nach Möglichkeit auf einem tatsächlichen Mobilgerät. Wallet-Buttons hängen davon ab, ob der Browser und das Gerät eine gespeicherte Karte erkennen, und das lässt sich auf dem echten Gerät am besten bestätigen als in einem Desktop-Browser, der ein Mobilgerät simuliert.
Was Spender beim Checkout sehen
Sobald beide Wallets aktiv sind, erreichen Spender wie gewohnt die gehostete Kasse von Mollie, nachdem sie Ihr Spendenformular eingereicht haben. Wenn ihr Browser und Gerät dies unterstützen, sehen sie neben Ihren anderen Zahlungsoptionen einen Apple Pay- oder Google Pay-Button. Durch Tippen darauf können sie die Spende mit Face ID, Touch ID, einem Fingerabdruck oder der Geräte-Passwortabfrage bestätigen, anstatt Kartendaten einzugeben.
Wenn der Browser oder das Gerät eines Spenders keines der Wallets unterstützt, sieht er einfach Ihre anderen verfügbaren Zahlungsmethoden. Für ihn ändert sich nichts, und an Ihrem Formular bricht nichts zusammen.
Stornierungen und der charitable_mollie_cancel_url Filter
Wenn ein Spender eine Zahlung über Mollie startet und diese mittendrin abbricht, wird er auf die Spendenausfallseite Ihrer Website zurückgeleitet. Dies gilt für Apple Pay, Google Pay und jede andere Mollie-Zahlungsmethode.
Wenn Sie abgebrochene Spender stattdessen an einen bestimmten Ort weiterleiten müssen, z. B. auf eine benutzerdefinierte Seite „Wir würden uns immer noch über Ihre Unterstützung freuen“, verwenden Sie den Filter charitable_mollie_cancel_url. Er empfängt das Spendenobjekt, sodass Sie eine URL basierend auf der Kampagne, dem Spender oder anderen Spendeninformationen erstellen können.
Hinweis: Dieser Filter ist eine Option für Entwickler und erfordert das Hinzufügen eines kleinen Code-Snippets zu Ihrer Website, typischerweise in einem benutzerdefinierten Plugin oder der functions.php-Datei Ihres Themes.
FAQs zu Mollie Apple Pay und Google Pay
Muss ich meinem Spendenformular etwas hinzufügen? Nein. Sobald Apple Pay und Google Pay in Ihrem Mollie Dashboard aktiviert sind, werden sie automatisch an der Kasse angezeigt. Im Charitable Form Builder gibt es nichts zu konfigurieren.
Das Apple Pay & Google Pay-Panel zeigt ein Wallet als inaktiv an. Was soll ich tun? Klicken Sie auf den Link neben diesem Wallet, um direkt zu den Einstellungen in Ihrem Mollie Dashboard zu gelangen, aktivieren Sie es dort und klicken Sie dann in Charitable auf „Aktualisieren von Mollie“, um den Status zu aktualisieren.
Warum wird mir der Wallet-Button bei Tests nicht angezeigt? Wallet-Buttons werden nur in unterstützten Browsern und Geräten angezeigt: Apple Pay in Safari und iOS, Google Pay in Chrome und Android. Wenn Sie auf einem nicht unterstützten Browser testen, wird der Button nicht angezeigt, und das ist zu erwarten.
Ist auf meiner Seite zusätzliche PCI-Compliance-Arbeit erforderlich? Nein. Apple Pay und Google Pay laufen über die gehostete Kasse von Mollie, sodass Kartendaten niemals Ihren Server berühren und keine zusätzliche Compliance oder Domain-Einrichtung erforderlich ist.
Können Apple Pay und Google Pay auch mit anderen Gateways verwendet werden? Ja. Apple Pay und Google Pay werden auch über die Stripe- und Square-Gateways unterstützt. Diese Anleitung behandelt nur die Aktivierung für Mollie.
Das war's! Sie haben gelernt, wie Sie Apple Pay und Google Pay mit Mollie einrichten.
Als Nächstes möchten Sie vielleicht die vollständige Anleitung zur Einrichtung von Mollie für Charitable lesen oder mehr über die Einrichtung anderer Zahlungs-Gateways erfahren.
Noch nicht auf Charitable Pro? Sie können bis zu 50 % Rabatt erhalten, wenn Sie sich für Charitable Pro anmelden oder ein Upgrade durchführen. Wir möchten sicherstellen, dass Sie die erweiterten Fundraising-Funktionen wie wiederkehrende Spenden, Spendenwiederherstellung und mehr zu deutlich reduzierten Kosten ausprobieren können.
Schließen Sie sich noch heute über einer Million zufriedenen Charitable Pro-Nutzern an. Jeder Kauf beinhaltet eine 14-tägige Geld-zurück-Garantie, die sicherstellt, dass Sie auf jedem Schritt unterstützt werden.
Wenn Sie Fragen haben oder Hilfe benötigen, steht Ihnen unser Support-Team zur Verfügung, um Ihnen zu helfen, das Beste aus diesen neuen Funktionen herauszuholen.
Hilfreiche Links
🤝 Holen Sie sich Hilfe, wenn Sie sie brauchen
📑 Finden Sie die Anleitung, die Sie benötigen
Durchsuchen Sie den Dokumentations-Hub →
⬇️ Laden Sie bewährte Strategien, Kampagnenideen und Experten-Tools herunter
Holen Sie sich das Fundraising-Kit →
🔗 Lassen Sie Ihren KI-Assistenten die Fundraising-Arbeit für Sie erledigen.
Verbinden Sie Charitable mit Ihrem KI-Assistenten →
💸 Holen Sie sich kostenlose Fundraising-Ressourcen
Besuchen Sie den Charitable Fundraising Hub →
🤔 Haben Sie Fragen zu Charitable?
Charitable FAQs →
Benötigen Sie Hilfe beim Verständnis von Begriffen und Fachjargon für gemeinnützige Organisationen?
Siehe unser Glossar für gemeinnützige Organisationen→