In this guide, we’re going to walk you through the process of adding a donation button to your WordPress website, letting you bring in a new stream of consistent donations from generous visitors.
The WordPress plugin ecosystem has been fantastic in eliminating technical challenges and coding from the website customisation process.
In today’s world, all that’s required is a simple click of a button to install the WordPress plugin of your choice. Once the plugin has been installed, your website gains instant access to the functionality provided by the plugin.
WordPress Charitable is a donation plugin that’s incredibly simple to set up, configure, and use on your website, allowing you to add a beautiful WordPress donation button in minutes!
In the next few sections, you’re going to learn how to add a donation button step by step and where you should place your button for maximum effectiveness.
Let’s get started!
Why Add a Donation Button to Your WordPress Website?
Any business that depends on donations, particularly non-profit organisations, tend to benefit most from a prominent donation button visitors can’t miss.
If you can leverage your WordPress website to get donations, hold online fundraising campaigns to reach a wider donor base, and complement your email marketing efforts with a “Call to Action” (CTA) to donate, your organisation will begin to see an increased number of donations from visitors.
Leverage your WordPress website to bring in donations
Since your organisation already has an active WordPress site, adding a donation button is a tremendous opportunity for a “quick-win”.
Most non-profits already have existing donation channels offline, in-person, or through physical mail, and the simple act of adding an online donation button captures an entirely new segment of visitors and instantly expands your reach.
Your website can be so much more than a simple educational resource with information about your non-profit.
By allowing your existing visitors to quickly, easily, and securely donate through a well-placed WordPress donation button, your organisation can quickly begin to reap the rewards.
Hold online fundraising campaigns
In today’s modern era of rapidly advancing technology, organisations that haven’t begun to make the shift online could quickly see themselves falling behind the competition.
If your organisation hasn’t yet attempted an online fundraising campaign, it may prove to be more effective than you’d imagine.
Instead of only capturing donations from local and regional supporters, online fundraising campaigns have the potential to reach a global audience through the internet. Starting an online fundraiser can work incredibly well and allow your organisation to reach a significantly greater segment of the population, likely resulting in greater numbers of donations.
Complement your email marketing efforts
Many nonprofits are beginning to use email marketing to communicate with their customers, clients, or past donors.
Since email is a quick and efficient way to reach a large number of individuals simultaneously, it allows you to reach thousands of people at a tiny fraction of the cost when compared to physical mail.
By adding a WordPress donation button to your website, you can include a link in your emails pointing to a donation page on your website.
Once someone reads your email and clicks the donation link, they’ll be taken to a page where they can securely donate to your organisation in a matter of minutes.
What Should You Use to Add a Donation Button to Your WordPress Website?
There are a number of ways you can add a donation button to your WordPress website, ranging from technically complex to incredibly simple.
Depending on your budget and resources, your organisation may choose to create a completely custom-coded donation button that seamlessly integrates with your website. As you can imagine, this can get expensive relatively quickly.
On the other hand, you can take advantage of WordPress plugins such as WP Charitable to quickly add a functional donation button without any extra hassle or headaches.
Custom-Coded Donation Buttons
A custom-coded “bespoke” solution is the best way to create something that matches your vision 100%. Unfortunately, it’s also very expensive and cost-prohibitive to most organisations and non-profits.
If you wanted to create a custom donation button plugin from scratch, you’d have to go through the tedious process of vetting developers, hiring ones that most closely match your budget and demand for technical skill, and ensuring they complete the project on time and to your specifications.
Unless you’re running a development company part-time, this process is too time consuming and unrealistic for most non-profit organisations.
This is where a much more manageable and inexpensive solution comes in – using an existing reputable WordPress plugin to handle donations on your site.
Use the Charitable WordPress Plugin
Instead of dedicating your precious time to managing a full-blown development team, using a WordPress donation button plugin built specifically for non-profit organisations will save you a tremendous amount of money and time.
Meet Charitable – the top-rated WordPress donation plugin used by over 10,000+ non-profits to grow their online fundraising efforts and expand their reach.
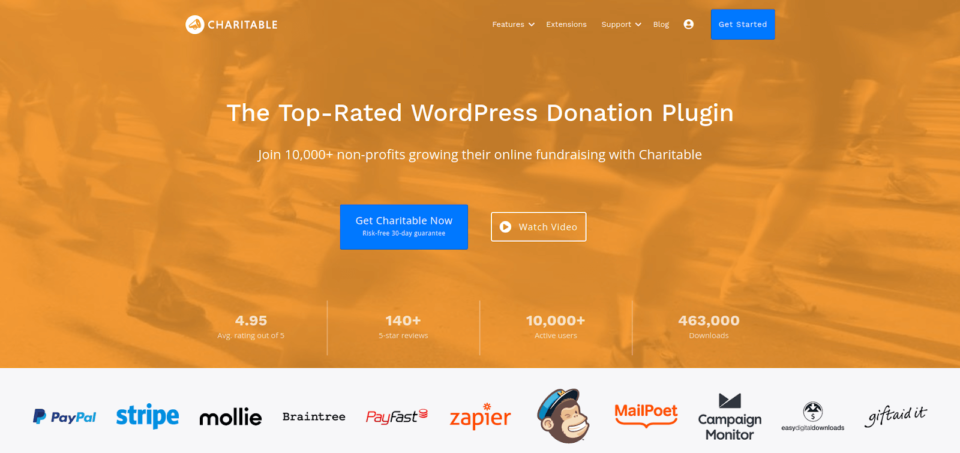
The Charitable WordPress plugin is built with flexibility and ease-of-use in mind, allowing you to quickly learn the ropes and start accepting donations in minutes. It also provides a number of add-ons that can greatly enhance functionality.
Compatible with WordPress Themes
The Charitable plugin is compatible with nearly all WordPress themes and comes with a number of custom non-profit & fundraising themes specifically created for use with the plugin.
Adding a WordPress donation button with Charitable is a simple way to ensure it fits seamlessly with your current theme.
Secure Donation Transactions
Charitable integrates with a number of secure and industry-leading payment processors such as PayPal, Stripe, Authorize.Net, and Braintree, to name a few.
Since Charitable never accepts or stores payment information on its own, you can rest assured that all of your donor’s transactions are only processed through the payment providers of your choice, utilising the full security systems of those platforms.
Create Unlimited Campaigns
The Charitable WordPress plugin will never limit the number of campaigns you can create. This is great for non-profit organisations that have multiple websites or agencies that work with hundreds of nonprofits at once.
Customisable to Fit Your Brand
Fully customise your donation button to fit your brand, allowing it to seamlessly blend into your website and provide visitors with a uniform experience.
You’ll be able to add custom donation fields, change the button’s text, modify button styles including colours, and select which features you want to use to extend your custom button’s functionality.
Tutorial: How to Add a Donation Button to Your WordPress Website
In this section, we’re going to walk you through the process of adding a WordPress donation button to your website with a step-by-step guide. Configuring the Charitable plugin is a fairly simple process, and you should be able to get up and running in a matter of minutes.
Step 1: Install the Charitable WordPress Plugin
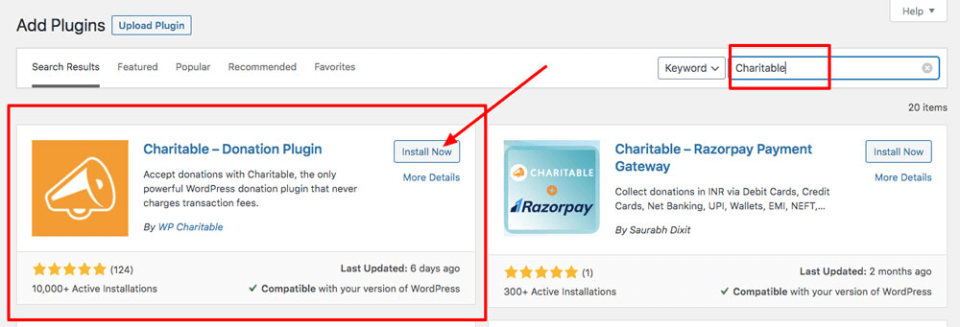
The first step is to install the Charitable plugin with WordPress. This can be done by logging into your WordPress dashboard, clicking on Plugins > Add New, and typing “Charitable” in the search bar.
Click the Install Now button and then immediately click the Activate Now link to enable the plugin on your website.
Step 2: Configure Charitable Settings
Now that the Charitable plugin is installed and activated on your website, you’ll want to configure your plugin’s core settings.
On your WordPress dashboard, find Charitable on the left menu and click Charitable > Settings to bring up the settings page.
You’ll want to configure the following core settings:
- Base Country – Select your country from the drop-down menu
- Currency – Select the currency you would like to accept donations with
- Optional Settings – Configure your “Currency Format”, “Thousands Separator”, “Decimal Separator”, and “Number of Decimals” options
Once those core settings have been configured, navigate to General Settings > Donation Form Display Options.
Here you can choose to have your donation form show:
- On a separate page – Choose the specific page you would like your donation form to show on
- On the same page – Show your donation form on the same page as the campaign
- Reveal in a modal – Show a “pop-up” modal dialogue with your donation form after the visitor clicks on a button or link
Step 3: Configure Payment Gateways
Out of the gate, Charitable allows you to accept payments through Paypal and Offline Donations. If you’d like to activate additional payment gateways, you may do so through Charitable Plugin Extensions.
To activate a payment gateway, navigate to Charitable > Settings > Payment Gateways.
To enable a gateway, all you have to do is click on the “Enable Gateway” button. You may also click “Disable Gateway” to turn off any payment gateways you no longer wish to use.
Setting Up Offline Donations
To begin accepting offline donations, click the “Gateway Settings” button under the “Offline” payment gateway.
You’ll be able to set the label shown on the donation form as well as add specific instructions for your donors. For example, if you wanted to accept offline donations via. bank transfer, you can include your organisation’s bank transfer details here.
Detailed Paypal Setup Instructions
Millions of individuals all over the world trust PayPal for online payments and donations. Accepting PayPal for your fundraising or donation campaign can boost trust and push more of your visitors to donate.
To see detailed instructions on how to set up PayPal with Charitable, visit our Guide to Setting Up PayPal.
Step 4: Set Up Emails
To enable emails, navigate to Charitable > Settings > Emails.
Note that emails are disabled by default, and you’ll have to click the “Enable Email” button to get started.
If you’ve disabled the “Offline” payment gateway, you can also turn off the “Donor: Offline Donation Receipt” and “Admin: New Offline Donation Notification” emails.
Customising the content of your emails is as simple as clicking the “Email Settings” button next to the email you wish to edit. You’ll see a list of shortcodes you can add to your email below the “Email Body”, and you can use HTML to format content as you desire.
To preview an email, click the “Preview Email” button at the bottom of the page.
When you’re done, simply click “Save Changes” to update your emails. It’s as easy as that!
Step 5: Create Your Campaign
Since Charitable is a plugin built on the concept of “fundraising campaigns”, you’ll need to create a campaign before you can begin accepting donations on behalf of your organisations.
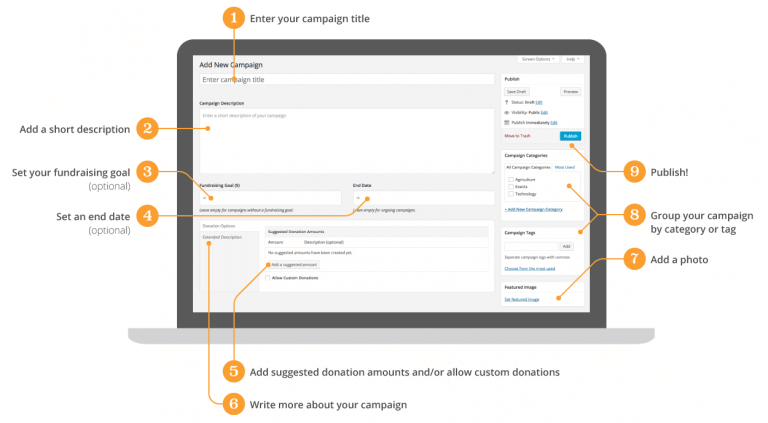
To begin creating your campaign, navigate to Charitable > Add Campaign on your WordPress dashboard.
From there, you can enter your campaign title, add a description, set your fundraising goal campaign end date (if desired), and configure some additional settings to fully customise your campaign.
For detailed campaign setup instructions, visit our detailed Campaign Setup Guide to learn more.
Step 6: Display Your Campaign or Donation Form
At this point, you have a campaign created and ready to go – all that’s left is to show your campaign to visitors on the front-end of your website.
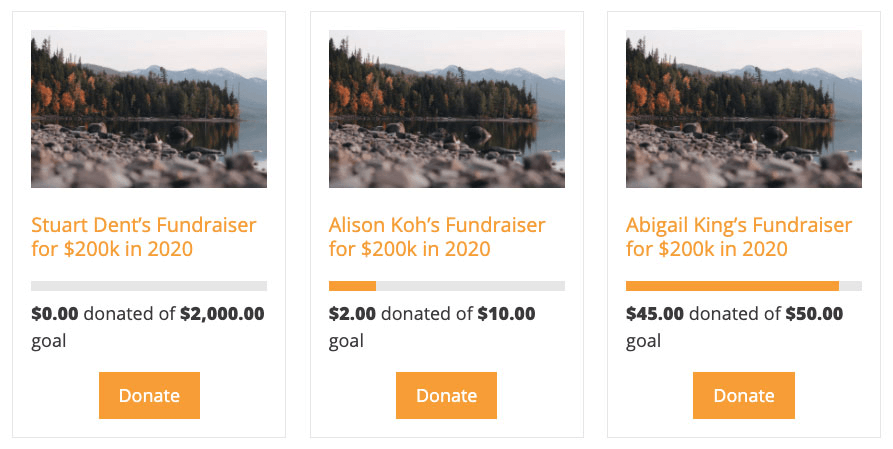
Display Multiple Campaigns as a Collection
If you choose to create multiple campaigns, you can display them as a collection within your posts or pages by using the [campaigns] shortcode. Take a look at our detailed Campaigns Shortcode Guide for specifics.
Display a Simple Donation Form
If you only want to display a simple donation form on specific pages, you can simply leave the “Goal” and “End Date” fields blank when creating your campaign. By excluding these fields, you’ll have an ongoing campaign.
The final step towards creating an independent donation form is to create a specific “Donate Page” your visitors will go to instead of a “Campaign Page”. For specific details on creating a separate “Donate Page”, read our guide on Adding a Donation Form to a Page.
Step 7: Add a “Donate” Link to Your Menu
If you’d like to add a custom donation link to one of your website’s menus, you can do so through three separate methods:
- Link to a separate donation page
- Open the donation form in a pop-up modal
- Add it to your menu
Since each step is more involved, you can get specific details about adding your donation link to a WordPress menu by reading our Guide to Creating a Donate Menu Link.
Step 8: Test Your Donation Form
You’ve officially done it! You’ve successfully integrated Charitable into your website and created a WordPress donation button your visitors can use to quickly and easily donate to your organisation.
As a final step, you’ll want to preview your website and ensure your donation links are working as intended. If there are any customisations you wish to make, simply navigate back to the Charitable plugin’s settings through the WordPress dashboard.
Where on Your Website Should You Add Your WordPress Donation Button?
If you want your website visitors to donate to your organisation, you have to make it as easy as possible by ensuring your donation button is accessible and visible.
This can be accomplished by placing your donation button within high-visibility areas of your website, such as the hero section of your homepage, the top right of your header menu, or at the end of each blog post.
Hero Section of Your Homepage
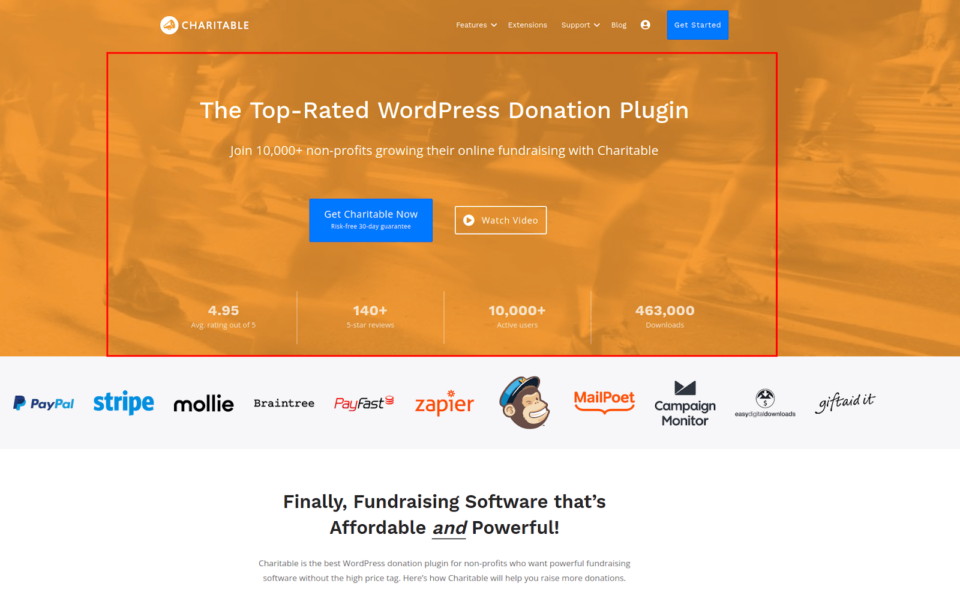
The hero section of your homepage is the topmost section that visitors see above the fold immediately upon opening your website.
On the Charitable website, for example, the topmost orange section before the homepage’s content is considered the “Hero Section” and can be an excellent place to place your donation button for maximum visibility.
Top Right of Your Header Menu
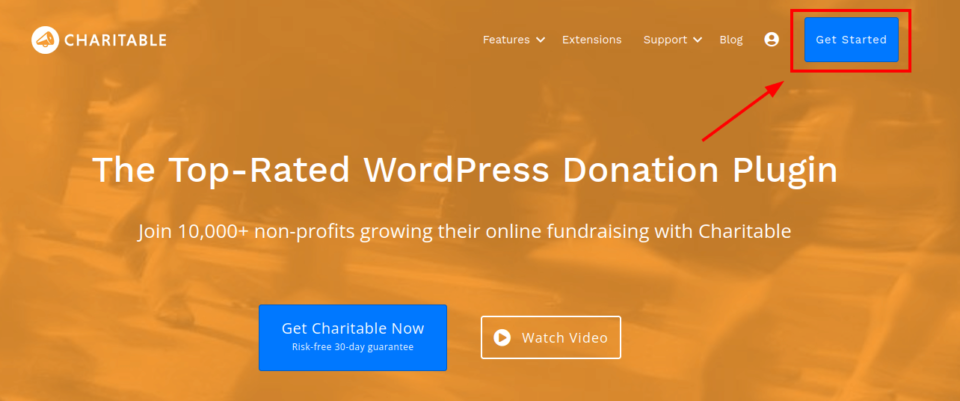
Placing your donation button on the top right of your header menu allows your button to be seen across every page of your website.
End of Every Blog Post
If your website has a blog, placing your donation button at the bottom of every blog post allows it to be seen by your most engaged visitors who are actively reading the content you’ve published.
Once they reach the end of a post, give them an opportunity to donate! By including a call to action at the end of posts, you can inspire your readers to donate to the wonderful causes your organisation supports.
Install the Charitable Plugin on Your WordPress Website Today and Start Accepting Donations
At this point, you should know why adding a WordPress donation button can be a game-changer for your organisation, what your options are for adding donation buttons, and the exact steps you can take to quickly create a donation button with the Charitable donation plugin.
Adding a donation button can boost the number of donations, and donation amounts your non-profit organisation receives.
Charitable makes the process simple and easy, allowing you to add a beautiful button that seamlessly integrates with your WordPress website and represents your brand.
How Non-Profit Organizations Can Get Started
The most popular Charitable plans for non-profit organisations include our “Essentials” and “Growth” plans.

For any nonprofits that need powerful yet easy-to-use donation features without breaking the bank or hiring a custom development team, these popular plans are a perfect starting point.
By purchasing a “Growth” or “Essentials” Charitable Plan, you’ll receive:
- Payment gateway and newsletter integrations
- Recurring donation options
- Anonymous donation options
- Geolocation
- Donor comment functionality
- Campaign videos
- One year’s worth of customer support and updates
- Fee relief
- Renewal discounts
To start accepting donations through the Charitable WordPress plugin today, visit Charitable and choose a plan to get your organisation started!



Leave a Reply