This guide will help you set up Google Pay, Apple Pay, and Cash App for your donation forms when using the Square payment gateway with the Charitable plugin. Our plugin handles the complex coding, but a few setup steps are required on your end to ensure these modern, convenient payment methods are available to your donors.
Step 1: Activate Digital Wallets in Charitable
Before Google Pay, Apple Pay, or Cash App will appear on your donation forms, you must first activate them within your WordPress dashboard.
- Navigate to Charitable > Settings > Payment Gateways.
- Make sure Square is enabled gateway and click into it’s detail page.
- Ensure Square is connected. On this page you can check the boxes for Apple Pay, Google Pay, and/or Cash App.
- Click Save Changes.
Once activated, follow the specific instructions for each payment method below.
Google Pay
The great news about Google Pay is that it requires no extra setup beyond activating it in the Charitable settings. As long as your Square account is connected, it will work automatically.
Availability
- Supported Merchant Locations: You can accept Google Pay in all countries where Square is supported, including the United States, Canada, Australia, Japan, the United Kingdom, Ireland, France, and Spain.
- Supported Currency: Transactions are processed in the currency of the country where your Square account is active (e.g., USD for US-based accounts).
What Your Donors Need
- A Supported Browser: Google Pay works on most modern browsers, including Chrome, Firefox, Safari, and Edge.
- A Saved Payment Method: Donors must be logged into their Google Account and have a payment method saved. This allows them to complete their donation in seconds without manually typing their card details.
Apple Pay
To securely accept donations via Apple Pay, Apple requires you to verify ownership of your website’s domain. This security step is managed through the Square Developer Dashboard.
Availability
- Supported Merchant Locations: You can accept Apple Pay in all countries where Square is supported, including the United States, Canada, Australia, Japan, the United Kingdom, Ireland, France, and Spain.
- Supported Currency: Transactions are processed in the local currency associated with your Square account (e.g., CAD for Canadian accounts).
- Supported Browsers: Apple Pay only appears on Safari browsers.
How to Verify Your Domain for Apple Pay
1. Understand the Square Developer Dashboard
The Square Developer Dashboard (also called the Developer Console) is a separate portal from your main Square Dashboard. It’s used to manage the technical settings for apps and services—like the Charitable plugin—that connect to your Square account. You will use your same Square login credentials to access it.

2. Download the Verification File
- Open your web browser and navigate to the Square Developer Dashboard at
https://developer.squareup.com/apps. Log in with your standard Square account information. - In the top right corner of the dashboard, ensure the toggle is set to Production (or Sandbox if you are testing).
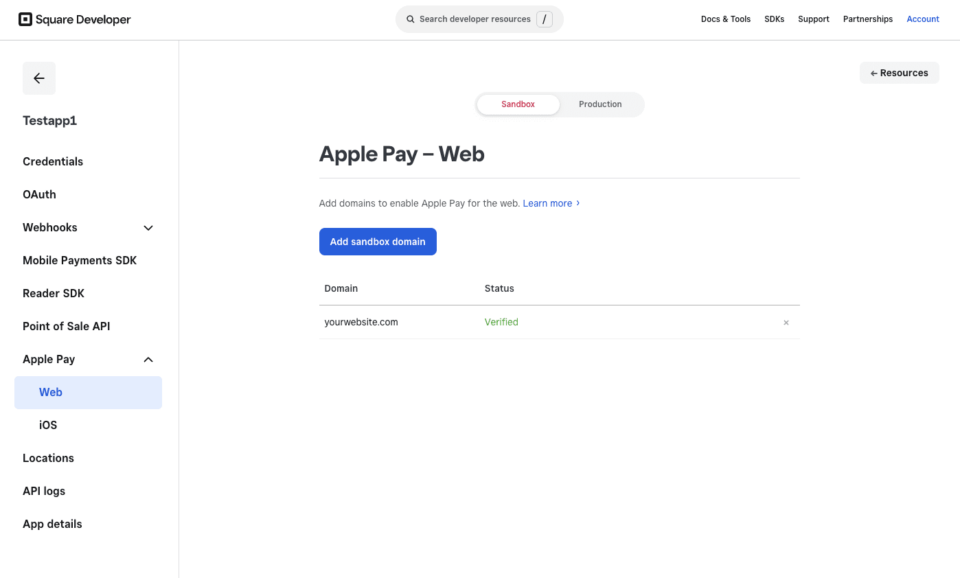
- On the main page, you will see a list of your “applications.” An application was likely created automatically when you connected Charitable to Square, or was created manually by your or your developer. Click on the application you use for your website.
- In the left-hand menu, click on Apple Pay.
- Click the Add Domain button.
- Enter your website’s full domain name (e.g.,
yourwebsite.com) and follow the on-screen instructions. - At the final step, click Download verification file. This will save a file named
apple-developer-merchantid-domain-associationto your computer.
3. Upload the Verification File to Your Website
- Connect to your website’s server using an FTP client (like FileZilla) or your web host’s built-in File Manager.
- Navigate to your website’s root directory (often called
public_html,www, or your domain name). - Inside the root directory, create a new folder named
.well-known(the leading dot is important). - Upload the
apple-developer-merchantid-domain-associationfile you downloaded into this new.well-knownfolder. - Return to the Apple Pay page in your Square Developer Dashboard and click the Verify button. Square will now check for the file and, once found, activate Apple Pay for your domain.
To test the Apple Pay integration, you will need a live credit or debit card saved in your Apple Wallet.
To test ensure Charitable is in Test Mode (Charitable > Settings > General > Test Mode). Then, submit a test donation through your form. When the Apple Pay payment sheet appears, you can authorize the test donation with your device. It will look like a real transaction is taking place, but rest assured, no actual funds will be charged as long as Charitable is in Test Mode.
Cash App Pay
Cash App Pay provides a fast and familiar checkout for the millions of Cash App users. After you activate it in Charitable’s settings, it’s ready to go.
Availability
- Supported Merchant Locations: United States only.
- Supported Currency: USD only.
- Supported Donor Locations: Your donors must also be located in the United States to use this payment method.
How the Donor Experience Works
- On a Desktop Computer: The donor selects “Cash App Pay” on the donation form. A unique QR code will be displayed. The donor scans this QR code with the Cash App on their phone to approve the payment.
- On a Mobile Device: If a donor selects “Cash App Pay” on their phone, they will be automatically redirected to their Cash App to authorize the donation. Once they approve it, they are sent back to your website.
For the Latest Information
Please note that supported regions, currencies, and features can change. The information in this guide is current as of July 6, 2025. For the most up-to-date details, we always recommend consulting the official Square documentation.
You can find more information on Square’s digital wallet payment methods on their support site: Square Help Center: Accept Digital Wallets
