
If you run many campaigns, you may need to add campaign-specific text to your donation receipt emails. Charitable does not support this out of the box, but thanks to the flexibility of the underlying code, it’s possible to enable this.
The Solution
To solve this problem, we are going to add a new field to the Campaign editor in the WordPress dashboard. This field will allow you to add content.
In addition, we’ll add a new email tag that can be added to any donation email, including the Donation Receipt.
Best of all, we can achieve all of this with just two PHP functions! Let’s see how.
Step 1: Add our function
First of all, we’re going to add a PHP function which will be run when the init hook is called within WordPress. init is a hook that happens early on while WordPress is loading, before the page has started rendering.
add_action( 'init', function() {
    // Our code will go in here.
} );
Note that in this example we are creating what is known as an anonymous function; essentially, this is an unnamed function. This is fine as long as you are on a version of PHP greater than 5.2.
Not sure how to add code to your site? Here’s our rundown of three different ways you can add custom code to your site.
Step 2: Add the field to the Campaign editor
Since version 1.6, Charitable has included an API called the Campaign Fields API which provides an easy way to add new fields to the Campaign editor. This followed on from the Donation Fields API that we added in version 1.5.
Our next step is to use the Campaign Fields API to add our custom field to the Campaign editor:
add_action( 'init', function() {

    /**
     * Create a new field as an instance of `Charitable_Campaign_Field`.
     *
     * See all available arguments at:
     *
     * @https://github.com/Charitable/Charitable/blob/ef9a468fbdd6fa83307abe6ac0c38896f625cf45/includes/fields/class-charitable-campaign-field.php
    */
    $campaign_field = new Charitable_Campaign_Field( 'campaign_email_content', array(
       'label' => 'Donation Email Content',
       'data_type' => 'meta',
       'admin_form' => array(
          'type' => 'textarea',
          'required' => false,
       ),
   ) );

    /**
     * Now, we register our new field.
     */
    charitable()->campaign_fields()->register_field( $campaign_field );

} );
In this code, we first of all create a new field by creating a Charitable_Campaign_Field object. We pass two parameters when creating this object:
– A key – campaign_email_content
– An array of arguments
We’re only using a sub-set of all the arguments that are possible when registering a campaign field. To see other arguments that are available, read the exhaustive inline documentation on Github.
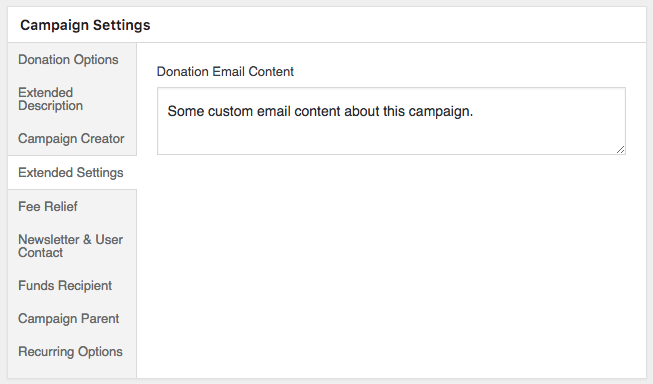
If we go to add a new campaign or edit an existing one, we will now see an “Extended Settings” panel, and inside that is a “Donation Email Content” field.
Step 3: Add a donation email tag
Now that we have our campaign field in place, the next step is to create a new email tag for donations. There are a few ways we could do this. One option is to use the Donation Fields API to register a new Donation field and automatically add an email tag for it. This would be appropriate if we want to use the field in multiple places, like the Donations export or within the donation meta.
In our case, we just want an email tag, so we are going to register just that. The first step is to create a new function that will be called on the charitable_email_donation_fields filter hook:
/**
 * We create a new function that will be called on the `charitable_email_donation_fields` filter.
 *
 * This function accepts two parameters:
 *
 * @param array $fields All registered donation email fields.
 * @param Charitable_Donation|null $donation When an email is being sent, this will be an instance of `Charitable_Donation`. Otherwise it's null.
 */
add_filter( 'charitable_email_donation_fields', function( $fields, $donation ) {
    Add our field here.
}, 10, 2 );
As with our function above, this is an anonymous function. But this one accepts a couple parameters. Since we want to use two parameters, we need to specify that in the final line of code, where we pass a priority of 10 and the number of parameters, 2.
Next, we will create a variable in our function called $field which will define the field.
/**
 * Define our field as an array.
 */
$field = array(
    'description' => 'Campaign-specific content',
    'preview' => 'This is some campaign-specific content.',
);
So far, this just sets a description and a preview-only value for the field. The preview value is what you see in place of the email shortcode when you click on the “Preview email” button in the email.
Our next step is to get the value to display when an email is sent:
/**
 * When this filter is called with a Donation object, we need to set
 * the `value` of the field to the campaign content. The rest of the
 * time, we don't need a `value` parameter.
 */
if ( ! is_null( $donation ) ) {
    /**
     * Get the campaign that received the donation.
     */
    $campaign_id = current( $donation->get_campaign_donations() )->campaign_id;
    $campaign = charitable_get_campaign( $campaign_id );

    /**
     * Set the `value` of our field to the campaign's email content.
     */
    $field['value'] = $campaign->get( 'campaign_email_content' );
}
In this code, we first check whether the $donation paramater is null. We have to check this because this filter (charitable_email_donation_fields) is not only called when a donation email is sent; it is also called at other times. For example, when you view the email settings page for the Donation Receipt email, this filter is called to get a full list of the donation email fields.
When we know that $donation is not null, we can get the campaign ID by using the $donation->get_campaign_donations() method, which gives us a set of rows that have all the campaign donations associated with a particular donation. Unless you are programatically creating donations or using our Easy Digital Downloads Connect integration, there will only be one row, so we get the first row by using current() and then get the campaign_id property from it.
$campaign_id = current( $donation->get_campaign_donations() )->campaign_id;
With $campaign_id in hand, we can call charitable_get_campaign( $campaign_id ) to get the Charitable_Campaign object.
$campaign = charitable_get_campaign( $campaign_id );
In turn, we set our field’s value property to the value of the campaign’s campaign_email_content field — the one we registered back in Step 2 above.
$field['value'] = $campaign->get( 'campaign_email_content' );
Finally, we add our field to the $fields array and return $fields, with our custom field included.
$fields['campaign_content'] = $field;

return $fields;
Step 4: Add the shortcode to the email content
If you have been following along, you should now have all the following code:
/**
 * We are creating a function which will be called on the `init` hook.
 */
add_action( 'init', function() {

	/**
	 * Create a new field as an instance of `Charitable_Campaign_Field`.
	 *
	 * See all available arguments at:
	 *
	 * @https://github.com/Charitable/Charitable/blob/ef9a468fbdd6fa83307abe6ac0c38896f625cf45/includes/fields/class-charitable-campaign-field.php
	 */
	$campaign_field = new Charitable_Campaign_Field( 'campaign_email_content', array(
		'label'      => 'Donation Email Content',
		'data_type'  => 'meta',
		'admin_form' => array(
			'type'     => 'textarea',
			'required' => false,
		),
	) );

	/**
	 * Now, we register our new field.
	 */
	charitable()->campaign_fields()->register_field( $campaign_field );

} );

/**
 * We create a new function that will be called on the `charitable_email_donation_fields` filter.
 *
 * This function accepts two parameters and must return an array.
 *
 * @param array                    $fields   All registered donation email fields.
 * @param Charitable_Donation|null $donation When an email is being sent, this will be an instance of `Charitable_Donation`. Otherwise it's null.
 */
add_filter( 'charitable_email_donation_fields', function( $fields, $donation ) {
	/**
	 * Define our field as an array.
	 */
	$field = array(
		'description' => 'Campaign-specific content',
		'preview'     => 'This is some campaign-specific content.',
	);

	/**
	 * When this filter is called with a Donation object, we need to set
	 * the `value` of the field to the campaign content. The rest of the
	 * time, we don't need a `value` parameter.
	 */
	if ( ! is_null( $donation ) ) {
		/**
		 * Get the campaign that received the donation.
		 */
		$campaign_id = current( $donation->get_campaign_donations() )->campaign_id;
		$campaign    = charitable_get_campaign( $campaign_id );

		/**
		 * Set the `value` of our field to the campaign's email content.
		 */
		$field['value'] = $campaign->get( 'campaign_email_content' );
	}

	/**
	 * Finally, we add our new field to the `$fields` array.
	 *
	 * The key used here (`campaign_content`) will become the email tag
	 * key, so the email tag would be shown like this:
	 *
	 * [charitable_email show=campaign_content]
	 */
	$fields['campaign_content'] = $field;

	return $fields;

}, 10, 2 );
There are just two functions included here, but together they do everything we need them to do.
The final step is to add the email shortcode to the email body, which can be done in the Email Settings area:
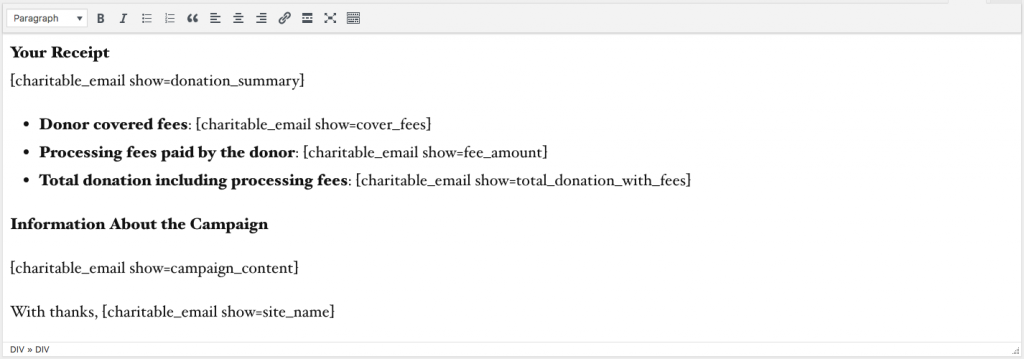
Once you have done this, test everything out by editing one of your campaigns, setting some campaign content and finally adding a test donation to the campaign. The email should contain your custom campaign-specific content.
Bonus tip: Add Easy Digital Downloads email tag
If you’re using our Easy Digital Downloads Connect extension and you would like to display your campaign-specific content in EDD’s purchase emails, you can drop in the code from this gist:
View the original gist on GitHub →
Enjoyed this?
I plan to write more tutorials like this to illustrate different ways in which you can customize and fine-tune Charitable to match your needs. This tutorial in particular was written in response to one user’s request, so if you have an idea for a topic you would love to see me cover in the future, send us an email via our Support page or leave a comment below.






Leave a Reply